Tech News Back Issues Issue: 090904
Report Class BasicsBy David Swain I suppose it's about time to broach the topic of reports. We have published a few articles in Omnis Tech News about certain report components or features, but have never explained the basics of Report Classes or of the Reporting Process. Before we can discuss more advanced reporting topics, it is important to get everyone up to speed on the fundamentals. So let's begin at the beginning with an overview and then explore more detail in subsequent articles... The term "report" is a rather broad one when applied to database work. Uses and forms of reports vary greatly, but the most general definition of a report might be "a collection of record images gathered from a database and organized for presentation, distribution and/or analysis". Immediately exceptions come to mind, such as a report based on a single record or a simple "dump" of the contents of a table, but this general definition covers the vast majority of reports. Of course, much of this definition could also apply to a list or to a select table - and these are actually "reports" in the broadest sense as well. They just need a little cleaning up and enhancement for certain forms of presentation. In fact, a select table or a list built from one is generally the basis or source material for a report. But a report is usually more than just a listing of record contents. Presentation is an important aspect of a report. This includes the order of the record images in the report (see "Sort Fields in Reports" in the March 3, 2004 Omnis Tech News) as well as their layout on the page. The point of the presentation of a report is both to make the contents easy to read and to help the reader understand the meaning behind or see a pattern within the contents of the report. Analysis features can also be included in a report. We can include counts of records (so the user doesn't have to manually perform this task), totals, subtotals and averages of numeric data (which can also be used on date and boolean values, with discretion) and minimum and maximum values for a data element (in case the sorting of the report was done on some other column). We can also include these aggregate values in additional calculations at subtotal and total breaks in our reports (see "Aggregate Values in Omnis Studio Reports" in the January 29, 2004 Omnis Tech News). We can even include simple charts in a report using the Graph component if a pictorial representation of the data is more meaningful. All of these features help the user to glean more information at a glance from a report than is offered by the raw data alone. Portability is another important feature of a report. A paper report can be copied and physically distributed to many people, but we have many electronic avenues for doing this with Omnis Studio reports as well. We can save "flat" collections of record images in a text file, but this has limited appeal these days. Instead, we can save reports in postscript, html, rtf and/or pdf formats, or even in Omnis Studio's own "disk" format, for quick and easy electronic distriution. We can even store fully formatted reports directly into a binary column in a database for archival purposes. Such reports can be exported into an Omnis Data Transfer file and distributed in that way, if need be. Different formats and techniques offer different advantages. Reports in Omnis Studio are not interactive. We cannot "drill down" into them by clicking on control elements of a finished report to view underlying data or to seek out records for modification or for a more detailed view. Reports printed to the screen are as non-responsive to user actions as are reports printed to paper, although the user can select part of the text of a screen report by drawing a selection rectangle around it (with the mouse), copy the enclosed text (tab-delimited) to the clipboard and then paste it elsewhere (into a spreadsheet, for example). There are no control fields for Omnis Studio reports like the pushbuttons, checkboxes and radio buttons we can place on windows. If we want to simulate the appearance of such items for display purposes, we can always use their icons, as mentioned in the article "Checkboxes, Radio Buttons and Other Icons in Reports" in the February 28, 2003 Omnis Tech News. Exceptions to this are reports printed in html format that contain specialized external fields designed to include hyperlinks in the finished report when viewed in a browser. Once created, a report instance (even one printed to the screen) is completely independent of the database from which its content was derived. A report is an immutable snapshot of a set of data taken at a specific time. Subsequent changes to that data (even while the screen report remains open) are not reflected in a report instance. A report is only "updatable" by printing a new one, but the previous one remains untouched (suggesting the importance of dating and timestamping important reports). Think "ink"... So far we've described an Omnis Studio report as a finished product and indicated a number of features a report can contain, but what tools do we use to create one? The Report ClassJust as we have separate class types for presenting and manipulating data on screen (Window and Remote Form Classes), for accessing data manipulation and application navigation commands (Menu and Toolbar Classes) and for defining data structures (File, Schema and Query Classes), we have a Report Class type for defining reports. Depending on our needs and on our preferred reporting techniques, a Report Class may be used for just the layout of a report or it can also contain analytical elements, record selection criteria and methods for a variety of purposes. While there are a number of similarities between a Report Class and a Window Class in the way we build and manipulate them in design mode, there are a number of important and necessary differences. (For most reports, the layout of a related window would not be appropriate or workable - which does not eliminate the occasional request "Why can't we just print the window, like in FileMaker" from new users. <sigh>) On the surface, for example, the layout of a Report Class is similar to that of a Window Class. Each class type offers a two-dimensional grid that we can use to place field and background objects into meaningful positions. But that is where the similarity ends. The objects placed on a Window Class are the same as those that appear on the Window Instances spawned from it (unless we dynamically move, remove or add to them using Notation at runtime). But the objects we place on a Report Class generally appear many times on a Report Instance - some more than others depending on which part of the Report Class contains them. A Report Class in the Report Class Editor may look like this:
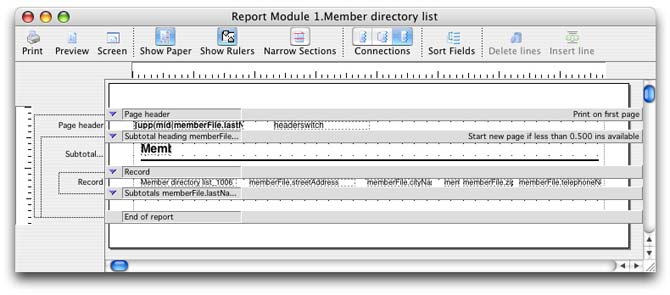
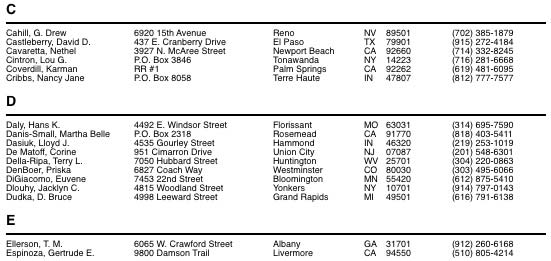
while a portion of a Report Instance spawned from it may look like this:
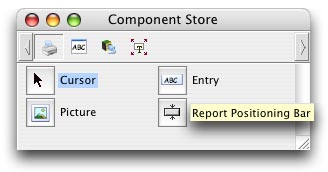
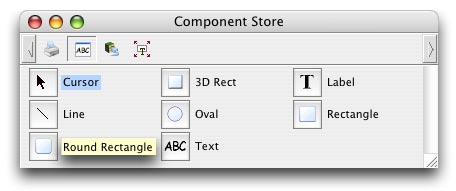
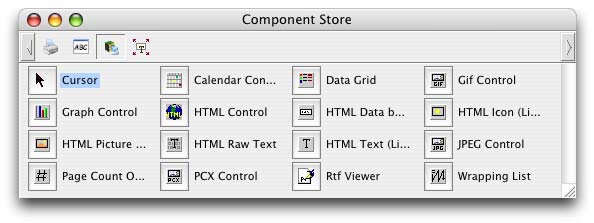
Notice that the bulk of this report is generated from the single line below the bar labeled "Record" in the Report Class. Other parts of the Report Class provide the heading (with a letter of the alphabet) or even just the space between record groupings in the finished report. So there are different parts to a Report Class that perform different functions during the reporting process (see "Report Sections" later in this article). On the other hand, reports are strictly two-dimensional while windows can contain controls (page and tab panes, for example) that essentially offer an interactive "third dimension" for data display. Report Component ObjectsBoth Window and Report Classes can contain component objects. In fact, they must contain such objects to fulfill their purpose in a meaningful way. But the choices of available component objects differ greatly between the two class types. Windows have a wealth of component types from which to choose. Most of these are interactive controls, but even entry fields are split between basic, masked and multiline varieties. Report Classes, by contrast, have only three built-in foreground component objects from which to choose: "entry" fields (which, for whatever reason, can contain format masks and can wrap their contents onto multiple lines if necessary), picture fields and the Report Positioning Bar (formerly known as the Positioning Section). Here is what the Component Store looks like for report field objects. (The tooltip for the positioning bar was exposed only to display the full name of that item.)
Reports and Windows have the same background object options, though. Here they are:
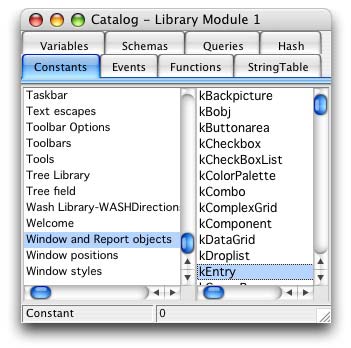
Built-in Report and Window foreground and background object types are so closely related that the constants used to specify them appear in the same group in the Catalog: the "Window and Report objects" group.
There are also a number of external components available for use with Report Classes. Some of these are related to Window Class external components. such as the Calendar and Graph Controls, and are installed when the libraries they share with their Window Class cousins are loaded. Others, the HTML Device group for example, are completely unique to Report Classes and have no Window Class counterparts.
There is only one background external component available for reports - the String Label component from the String Table library. It works in the same way as the one for Window Classes (and it now supports fieldstyles in Studio 4). This listing of foreground and background components brings up another interesting different between Window and Report Class component objects. While the Component Store separates foreground and background components for cataloging purposes, the Omnis Notation for Report Classes does not. For Window Classes and Instances we have completely separate $objs and $bobjs notational groups, but Report Classes and Instances have only an $objs group. This will have interesting and useful implications as we explore reports more deeply in coming articles. The Report Layout GridAs with Window Classes, we place Report Class component objects on a layout with an optional alignment grid. If the grid is switched on and configured in a certain way, objects placed on that grid can be both sized and positioned automatically to conform to the grid. The difference between report and window grids is that only the horizontal part of the report layout grid is optional. The vertical part of the grid is permanent and cannot be switched off because that is how the layout of a Report Class is organized - by line. Window Classes are intended for display on a computer monitor and placing objects just anywhere in the layout space is appropriate for the target device. But even though most of us have moved beyond dot matrix, daisy wheel and line printers for printed output, a line-based layout is still the most suitable one for the bulk of reports the majority of us will ever need to design. But beyond the fact that most reports print out line after line of content, the internal organization of a Report Class is line-based. A Report Class is both a template for arranging record images on the printed page and a filing system for determining the evaluation and execution order of its component elements. Window Class components have an order property for the latter purpose, but no such property exists for Report Class objects. The order in which individual elements are processed during the execution of a report is determined, in part, by the line on which they lie. We do have the option to make an object a floating object, thereby uncoupling that object from the vertical grid and allowing it to be positioned at a slight offset from other object on that line - and many objects, notably picture fields and the "shape" background objects, can only be floating objects. But floating objects still belong to the line on which their topmost pixels lie and this determines the order in which they are handled as the report progresses. We will see this in action in later articles. We also use different units of measure for placing objects on a Report Class layout. Window Classes are again designed for display on a computer monitor, so using pixels as the unit of measure is most appropriate. But reports (even those to be displayed on a computer screen) are ultimately intended for the printed page where physical units of measure are more appropriate. We are given two unit of measure choices for our convenience: centimeters and inches. A root property of Omnis Studio named usecms determines which of these is in force. If its value is kTrue, positioning and size property values are in centimeters. Changing the value of usecms automatically converts existing stored property values (not those in calculations, however) to the new unit. Omnis Studio maintains these measurements in 10,000ths of a centimeter internally and simply translates to either inches or centimeters as we have chosen. This may be only a curious fact for now, but it will be important information when we explore more advanced techniques in a later article... Report SectionsUnlike Window Classes, Report Classes have no field level "container" objects. That is, a Report Class component cannot be put "inside of" another Report Class component of any kind (at least, not so far...). But there are functional divisions of a Report Class named sections that are both containers of field and background objects and that have specific purposes and roles to play in the reporting process. Unlike container components on Window Classes, sections cannot be dragged to different positions within a Report Class. There is a rigid order in which the various sections must be maintained. If we reposition a section in a Report Instance, however (using a technique we will explore in a later article), we will see that all the objects within that section move with it. So a section acts like a container, but that is not its primary purpose. The greater purpose of sections in a report is to perform the function of that type of section. Sorry if that sounds a bit redundant! Each type of section has a specific job to do within the overall report. For example, the Record section processes record images and dispatches values from some fields to aggregation buffers. A Subtotal section lies in wait until a specific sort field value changes in a specific way, at which time it gathers values from a set of aggregation buffers, adds itself to the Virtual Page and then clears those aggregation buffers in preparation for the next grouping of records at that subtotal level. We will examine this process in detail in the next article on the Report process. While the way we add and remove sections to a Report Class using the Property Manager may make it appear that sections are properties of a report, this is not the case. Sections are objects within a Report Class. There is no property we can use to switch on the Page Heading section, for example. That is, a report does not have a pageheader property even though it appears to exist when we open the Property Manager to work with the Report Class Editor. If we open the Property Manager while examing a Report Class using the Notation Inspector, we see that there is no "Sections" property group in the report. (The Interface Manager also confirms this.) If we open the $objs group for the report in the Notation Inspector, we will see the sections listed there along with the foreground and background objects. In the special case of using the Property Manager with the Report Class Editor, the Property Manager appears to contain special methods for managing (adding and removing) sections and keeping them in the proper top-to-bottom order. This knowledge is only important if we want to dynamically add or remove sections in a Report Class or Instance using Notation, which we will do in a later article. (If you want to work ahead, try the $add and $remove methods of the $objs group instead of the non-existent "properties" mentioned here.) Custom Methods and Variables in ReportsIn Omnis Studio we can also build methods within a Report Class, just like in a Window Class. There is even a $construct method we can use to perform last-minute modifications to a Report Instance before the report process begins. As with any other method, the $construct method can contain parameter variables, so we can pass parameters to a report when we invoke it to give it information about what records it should include, how it should configure itself or whatever other information it needs to operate. Objects within Omnis Studio reports can also contain methods. This allows us to build much more "intelligence" into our reports than we could in previous generations of Omnis. We will explore the possibilities of this feature in the coming months as well. Along with methods, Report Classes can contain class and instance variables. While there are still jobs that only hash variables can do during the report process, we will generally use instance variables for such purposes as calculated subtotal fields and the like. There will be many examples of their use as we delve deeper into reports. New Report Features in Studio 4The creators of Omnis Studio are always expanding the possibilities for us! Every new generation of Omnis Studio offers new features of reports just ripe for exploitation. While there is not time in this introductory article to go into any of these in detail, it is worth at least listing some of the new options we have been given in this latest generation. Report and Section BordersWe can now place a border around a report, and separate borders around any section, using any of the properties that apply to a 3D rectangle. This includes fill color and pattern, border effect, border color and line style (if a "plain" border is selected). Background PictureWe can now assign a picture as a background skin for a report. We can use this for forms, watermarks, logos or any number of other purposes. We can only have one such graphic per page, but we can change the picture from one page to the next with a little programming effort. And we can still use older techniques for applying (multiple) background pictures in addition to this one. The background picture also has a number of positioning options as well as horizontal and vertical offsets. Resolution Control for PicturesWe can now take advantage of the full content of picture data by specifying the resolution at which we want that picture to print. Higher resolution settings mean sharper picture but smaller size. Separate horzdpi and vertdpi properties. Automatic Page Setup LoadingWe can now set a report to automatically load its own page setup using the new loadpagesetup property. This is set to kTrue by default for all new reports and to kFalse for all existing reports (so as not to break anything). A simple
will set all existing reports to load their page setups automatically (if you are sure this is otherwise safe...). Height Control for SectionsWe can now specify the exact print height of a section using the printheight property. If we leave its value at 0.000, the print height remains on "automatic" (best for sections with variable height content). But if we are printing items such as labels where a fixed height is desired, this is much more straightforward than other techniques we have used in the past. An additional advantage of this property is that we can extend the height of the section in the Report Class Editor beyond the print height and place additional fields in the grey area that appears. These fields will not print, but any calculations they contain will be carried out. Fit On Page Control for SectionsThe pagemode property of a section now has a new kFitonpage option that applies to sections with variable as well as fixed length content. This is in addition to the kTestspace option that continues to work fine for fixed height sections. Print If Calculation for SectionsThe new printif property for a section allows us to specify an expression that controls whether the section will print under current conditions. If the property is left empty, there is no effect. But if an expression is entered, it must evaluate to kTrue (non-zero result) for the section to print. This applies to positioning sections as well as "normal" sections. For positioning sections, we can also set this property value to zero and then print that section at any time using the $printsection(sectionRef) method. This is henceforth known as a "custom" section. Separate Margins for SectionsEach section can have its own margins inside of the margins of the report. If these properties are left at a value of zero, the sections simply follow the margins of the overall report. But a non-zero value indents the section within the report boundaries. Vertextend PropertyWe no longer have a kExtendingJst option for the align property of a report object. Instead, we have a new property called vertextend. This allows us to specify that a field (or other object) should extend vertically to fulfill its content, but allows the align property to be either kLeftJst, kRightJst or kCenterJst. Userinfo PropertyAll classes and foreground objects have this property as of Studio 4. It is tremendously versatile as it allows us to store whatever information we need within an object. Since it is binary, we can store a string, a number, a list or whatever we want, for whatever purpose we can think of, in an object. We will have some fun with this one... In the Next IssueThat's all for now. Next time we will examine the Reporting Process. If we understand what Omnis Studio does for us automatically, we can learn how to override certain parts of the process to better control our ultimate report. |
|
| © 2004
Copyright of the text and images herein remains with the respective
author. No part of this newsletter may be reproduced, transmitted,
stored in a retrieval system or translated into any language in any
form by any means without the written permission of the author or
Omnis Software. Omnis® and Omnis Studio® are registered trademarks, and Omnis 7™ is a trademark of Omnis Software UK Ltd. Other products mentioned are trademarks or registered trademarks of their corporations. All rights reserved. |


 Please logon or create a free account to download this file.
