Building and Customizing Standalone Apps
In addition to using the new JavaScript Client in the browser on any computer, tablet or mobile device, you can create standalone apps for iOS, Android and BlackBerry 10 devices that have your JavaScript remote form embedded. These can even operate completely offline (if you have a Serverless Client serial).
To do this, there are three custom app, or "wrapper", projects for the JavaScript Client: one for iOS, one for BlackBerry 10, and another for Android. These projects allow you to build custom apps, which create a thin layer around a simple Web Viewer which can load your JavaScript remote form. They also allow your form access to much of the device's native functionality, such as contacts, GPS, and camera.
This document describes the steps required in order to create and deploy your own customized wrapper app for each of these platforms. It should provide you with all of the information you need to create your own, self-contained, branded mobile app, and deploy it to users manually or through the device's app store.
Please note: This document is no longer maintained for wrapper versions as of v1.2.0. Docs for the latest iOS and Android wrappers can be found here.
Select Platform:
App
Building Requirements
Setting Up the Building Environment
App Customization
Building the App
App Deployment
Android App Building Requirements
In order to build and deploy Android apps to devices, you will need the following:
- Windows, OS X or Linux
- Eclipse & ADT Plugin
- Android SDK
- $0 - $25
Below are the device OS requirements for the different areas of functionality within the app:
- Online Mode: Android 2.2+ (API 8)
- Offline Mode: Android 2.3+ (API 9)
- Local Database: Android 2.2+ (API 8)
Setting Up The Android Build Environment
1) Install The Android Build Environment
The Android build environment comprises Eclipse, the ADT Plugin for Eclipse, and the Android SDK.
Google now provide an ADT Bundle, which contains Eclipse, the ADT plugin & Android SDK, all set up and ready to go.
- Download the ADT bundle from here.
- This will be a zip file, which you simply need to extract to a location of your choosing.
- You can then launch the build environment by running the Eclipse executable in the eclipse folder of your extracted ADT bundle.
2) Import The Project
-
First, download the latest Android wrapper project from our website.
In order to import the Omnis Wrapper project you should open Eclipse, then:
- Select Import from the File menu.
- In the wizard that opens, select General > Existing Projects Into Workspace.
- In the next window, choose select archive file, then browse to the zip file you downloaded which contains the wrapper project, and Finish.
3) Set Build Target
When the wrapper projects are created, we will always try to give them a build target which matches the latest Android SDK. However, these are often updated, and if you do not have this particular SDK version installed, the project will not build.
-
Right-click the root of your project in Eclipse, and select Properties.
- Under the Android section of the properties, ensure that the Project Build Target is set. If you have multiple SDKs installed, select the latest one.
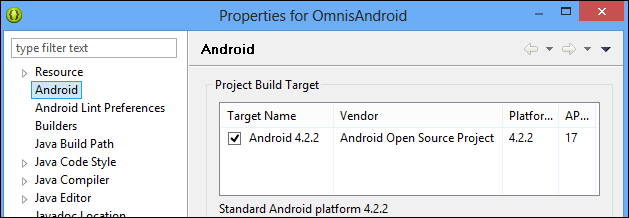
If you do not have a recent SDK installed,
you would be advised to install one, then set the Build Target to that.
The latest Android wrapper requires a minimum build target of API 18,
but we suggest you use the latest SDK available.
To install other SDK versions, you just need to use the Android SDK
Manager  , accessible via the Eclipse toolbar.
Android App Customization
Once you have imported the wrapper project into Eclipse, you should customize it for your particular application. This process comprises the following steps:
- Rename The Project
- Edit Config.xml
- Change The Package Name
- Change The App Name
- Add Custom Launcher Icons
- Add A Custom Splash ScreenNew
- Remove Unnecessary Permissions
- Localize App
- Bundle SCAFs (offline apps only)
- Bundle Local DatabaseNew
- Edit The About ScreenNew
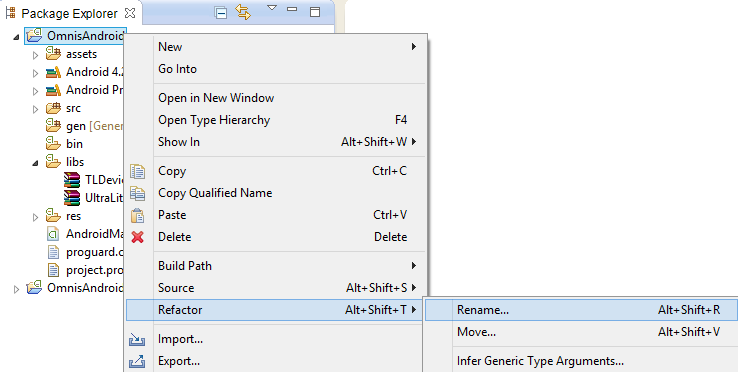
Rename The Project
Once you have imported the wrapper project into Eclipse, you will probably want to give it a name which reflects your particular application.
Note that naming the project has no effect on the resulting app, but just better allows you to keep track of your projects, especially if you are creating multiple different apps. You should use a separate project for each app you create.
- Right-click on your project in Eclipse and select Refactor > Rename.
- In the dialog window which opens, enter a value for the new project name, make sure Update references is checked, then push OK.
Edit config.xml
The config.xml file provides the connection settings your app will use to connect to your Omnis server, as well as several settings which define aspects of the app's behavior.
Locate the config.xml file in your project's assets folder, and edit the values as necessary for your application as described below.
- AppTitle - Whether or not the app includes a title bar (Android < 3.0), or an Action Bar (Android 3.0 +). 1 for true, 0 for false.
- AppStandardMenu - Whether or not the app includes a runtime menu. 1 for true, 0 for false.
- AppTimeout - If the app is sent to the background, this is
the number of milliseconds it will wait before killing the app and freeing
the connection to the server. If you set this to a negative number,
it will never timeout (although the system may kill the app if it requires
the resources).
It's worth noting that if you are making use of some of the device functionality (e.g. Camera, SMS etc), the app will be sent to the background while you are using the Camera/SMS apps etc. So you should be careful not to set this value too low, so that your app is not killed while the user is taking a photo, for example.
- MenuIncludeSettings - Whether or not your app's runtime menu includes a "Settings" button, to allow the user to change the connection settings. 1 for true, 0 for false.
- MenuIncludeOffline - Whether or not your app's runtime menu allows the user to switch between online and offline modes. 1 for true, 0 for false.
- MenuIncludeAbout - Whether or not your app's runtime menu includes an "About" button, to allow the user to open the about screen. 1 for true, 0 for false.
- SettingsFloatControls - Whether or not the form should resize/reposition
controls according to their $edgefloat property, relative to the difference
between the device's screen size and the designed layout's $screensize.
1 for true, 0 for false.
Only takes effect if SettingsScaleForm is 0. - SettingsScaleForm - If true (1), the form will be scaled up or down to fit the screen size of the client device. 1 for true, 0 for false.
- SettingsAllowHScroll and SettingsAllowVScroll - If true, allows horizontal or vertical scrolling of the form. 1 for true, 0 for false.
- SettingsMaintainAspectRatio - If SettingsScaleForm is set to 1, this controls whether the scaling maintains the design form's aspect ratio. 1 for true, 0 for false.
- SettingsOnlineMode - Controls whether the app opens in online mode (1) or offline mode (0).
- TestModeEnabled - Controls whether test mode (Ctrl-M on form from Studio to test on device) is enabled for your app. 1 for true, 0 for false.
- TestModeServerAndPort - The <ipaddress>:<port> of the Omnis Studio Dev version you wish to use test mode with.
- ServerOmnisWebUrl - URL to the Omnis or Web Server. If using
the Omnis Server it should be http://
: . If using a web server it should be a URL to the root of your Web server: http://myserver.com. - ServerOnlineFormName - Route to the form's .htm file from ServerOmnisWebUrl. So if you're using the built in Omnis server, it will be of the form /jschtml/myform. If you are using a web server, it will be the remainder of the URL to get to the form, e.g. /omnisapps/myform. (Do not add the .htm extension!)
Only ServerOmnisWebUrl & ServerOnlineFormName are needed for Online forms. The other Server... properties are only needed if your app supports Offline mode.
- ServerOmnisPlugin - If you are using a web server plugin to talk to Omnis, the route to this from ServerOmnisWebUrl. E.g. /cgi-bin/omnisapi.dll
- ServerOmnisServer - The Omnis Server <ipaddress>:<port>.
Only necessary if you are using a web server with the Omnis Web Server
Plugin. If the Omnis App Server is running on the same machine as the
web server, you can just supply a port here.
E.g. 194.168.1.49:5912 - ServerOfflineFormName - Name of the offline form. (Do not
add .htm extension!)
E.g. rfOffline - ServerAppScafName - Name of the App Scaf. This will be the
same as your library name.
E.g. myLibrary
Note: this is case-sensitive and must match the App Scaf (by default this is generally all lower-case).
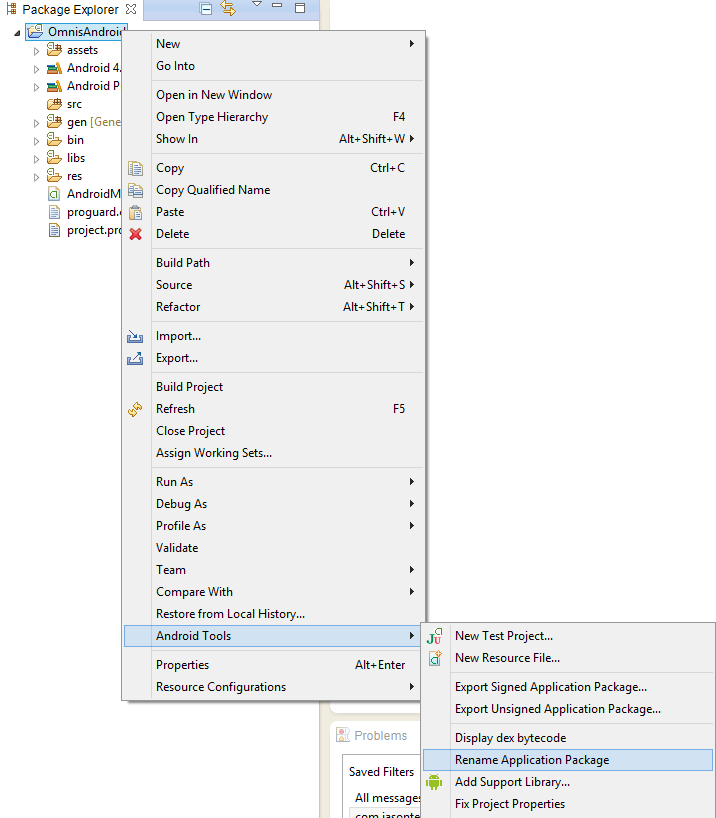
Change The Package Name
The Package Name identifies your app, and must be unique amongst
all apps on the device. Two apps with the same package name will be seen
by the device as the same app, so this is an important step.
As such, it is recommended to use a reverse domain name syntax. E.g com.mycompany.omnis.myfirstapp.
- Right-click on the top level of your project in Eclipse, and select Android Tools > Rename Application Package.
- Change the Package Name to your own value.
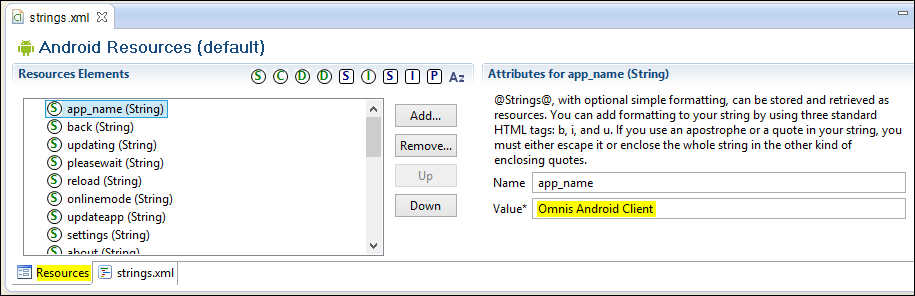
Change The App Name
To change the display name of your app:
- Open the project's res/values/strings.xml file, and select the app_name string.
- Set your required app name in the Value field.
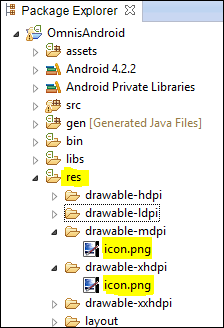
Add Custom Launcher Icons
As Android devices are so wide-ranging in their displays, it is necessary to create several different resolutions of icons. The OS will then use the appropriate icon for the user's device.
- Open the res folder of your project, and note the drawable-...dpi folders.
- Each of these folders contains an icon.png file, sized correctly for devices classed as part of that dpi group.
- Edit or replace these files, making sure to keep the image sizes and file name the same.
Add A Custom Splash Screen
The Android wrapper displays a splash screen while it is loading (or
reloading) the form.
This needs to be an image named splashscreen in the res/drawable-...dpi
folders. The file extension be just a standard .png file, or it could
be a 9-Patch (.9.png).
A 9-patch image is a png with special markers which control how the image is scaled. This allows you to avoid any horrible stretching as the image is scaled. This is our recommended format for splash screens on Android. Info on 9-Patches can be found here.
You may notice that the default project only contains splash screen images in two of the dpi folders. This is OK (especially if using 9-patch images) - the device should pick the closest available image to its dpi. We did this to keep the size of the app/project down.
Remove Unnecessary Permissions
Each Android App must request permissions to access various areas of
the device - e.g. Contacts, Camera, Location etc.
It is bad practice to include unnecessary permissions for your app - especially
if you are distributing through Google Play.
When downloading/installing your app, the user can see which permissions
your app has requested access to. Unnecessary permissions may give the
user the impression that your app is malicious.
- Open the project's AndroidManifest.xml file, and select the Permissions tab.
- This page allows you to add or remove permissions for your app.
- By default, all permissions which an Omnis app may use are present.
- Remove those permissions not needed by your app, by selecting the permission in the list, and using the Remove button.
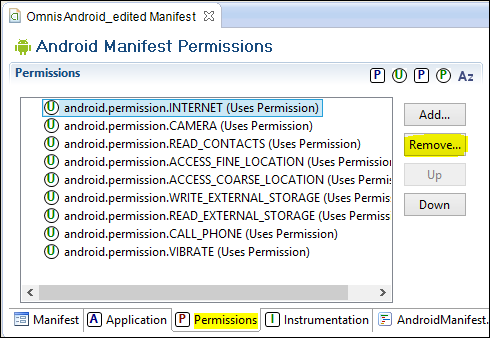 MANDATORY PERMISSIONS:
- INTERNET
All other permissions may be removed if your particular app does not make use of their functionality.
The optional permissions you may require, depending on the functionality you use in your app, are:
- CAMERA - necessary to use barcode reader (kJSDeviceActionGetBarcode).
- READ_CONTACTS - necessary if you use the kJSDeviceActionGetContacts device action to access the device's contacts.
- ACCESS_FINE_LOCATION - provides fine grain (provided by GPS sensors) location data to the kJSDeviceActionGetGps device action.
- ACCESS_COARSE_LOCATION - provides coarse location (provided by network) data to the kJSDeviceActionGetGps device action.
- WRITE_EXTERNAL_STORAGE - necessary if you are obtaining images from the camera (kJSDeviceActionTakePhoto).
- READ_EXTERNAL_STORAGE - necessary if you are obtaining images
from the camera or the device's saved images (kJSDeviceActionTakePhoto
or kJSDeviceActionGetImage).
Only enforced after Android 4.3
- CALL_PHONE - necessary in order to make phone calls from the app (kJSDeviceActionMakeCall).
- VIBRATE - necessary in order to make the device vibrate (kJSDeviceActionVibrate).
Localize App
If you wish to translate text used by the wrapper app, you can do so as described here. If the user's device is set to one of the supported languages, it will use any alternative translated text strings which have been specified.
- Locate the project's res/values folder. This contains a strings.xml file, which contains all of the default text strings used by the app.
- You can create language/region specific versions of this folder (and strings.xml file), which will be used instead when run on devices which match that language/region. In order to do this, you need to create new values folders, with language/region qualifiers.
- Create a new folder in the res directory, named values-<Language
Code> (or values-<Language Code>-r<Region Code >
if you wish to include a region). These qualifiers are not case sensitive.
E.g: values-en or values-en-rGB.
- Copy the strings.xml file from the default values folder into your new folder.
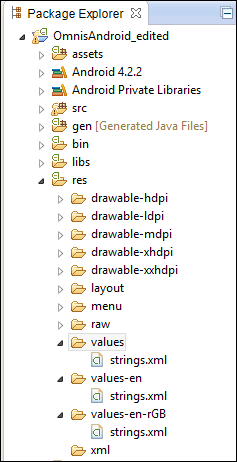
- Edit the strings.xml file in your new folder, changing the
values of the individual strings to your translated values.
If you do not wish to translate any strings for a particular language, delete them from that language's strings.xml file. If any string is not present in a translated strings.xml, it will fall back to the default value in values/strings.xml
Bundle SCAFs (offline apps only)
If your app includes offline support, you need to decide whether or not to include the SCAFs inside your app. If you do so, the app will be larger, but it will run in offline mode immediately, with no need to first update from the server.
If you wish to include the SCAFs in your app, you should do the following:
- Browse to the html/sc folder of your Omnis Studio installation.
- On Windows, this will be in the AppData area. e.g: C:\Users\
\AppData\Local\TigerLogic\OS6.X\
- On Windows, this will be in the AppData area. e.g: C:\Users\
- Locate your App SCAF (This will be a .db file in the root of the sc folder and will be named as your library).
- Also locate your Omnis SCAF (This will be the omnis.db file in sc/omnis/).
- Import both of these SCAF files into your Android project's
assets directory.
- The easiest way to do this is to drag them from your file browser into the project in Eclipse. Make sure to select the Copy Files option.

Bundle Local Database
It's possible to add a pre-populated SQLite database to use with your app. This will be used as the database which the form's $sqlobject connects to.
- Drag your SQLite .db file from your file system, into the assets folder of your project within Eclipse. Make sure to select the Copy Files option.
- Edit your project's config.xml file, and set the <ServerLocalDatabaseName> to the name of your local database (including the .db extension).
Bear in mind that you are creating a mobile application, and so should
not be storing huge databases locally on the device.
To keep your data secure, the database is compiled into the apk. At the
time of writing, Android .apk files submitted to the Play Store must be
under 50MB, so this is another reason to keep the size of your local database
down.
If you need to access data from a large database, it may make sense for
you to hold the whole database on your Omnis server, and use the Sync
Server functionality to synchronize a subset of this data with your device.
Details on the Sync Server can be found here.
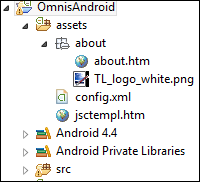
Edit The About Screen
If enabled in the config.xml, an About option is displayed in your app's menu. This will open a new screen which displays a html page which you can configure as you wish.
- To enable(/disable) the About menu option, edit your project's config.xml file, setting the value of <MenuIncludeAbout> to 1 (or 0 to disable it).
- Open your project's assets/about folder. This needs to contain a file named about.htm, which is the html page which will be loaded when opening the About screen. You can customize this however you wish, and add any resources it might need to this about folder.
Building The Android App
Once you have customised the project for your application, creating a release build is very simple.
- Open your project's AndroidManifest.xml, select the Manifest tab, and click the Use the Export Wizard link.
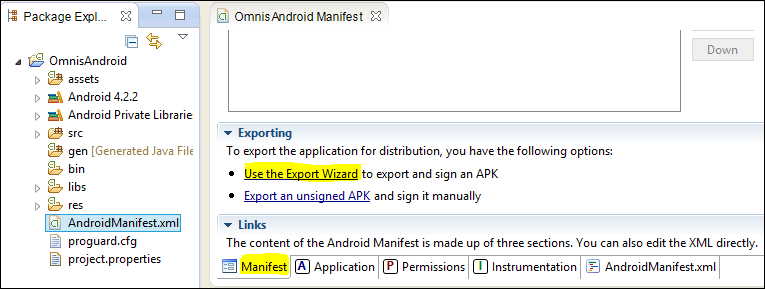
- You should follow through the wizard, in order to build a signed Android app from your project.
- The first time you do this, you should select the option to create
a new keystore and key. For later builds you can select your
existing keystore.
This is what identifies you as a developer, so it's important that you back this up after you create it. Any updates to your app must be signed with the same key. You can use the same key for multiple apps, if you wish. - If you are intending to deploy your app through Google Play,
when creating your key you should ensure that you set its Validity
to a value which will take it past 22nd October 2033.
Guidance from Google on Signing Strategies can be found here.
Once you finish this wizard, it will export an .apk file. This is your signed, release build of your app, ready to deploy to your users.
Android App Deployment
Once you have built your app, you are ready to deploy it to devices. This tech note covers two options as to how to do this:
Manual Deployment simply requires you to distribute the .apk file to your users manually. They then sideload the app to their device.
Google Play is Android's app store. Getting your app onto
this platform is a bit more involved, but the benefits are very worthwhile.
There is no manual verification of your app by Google, so this process
is much quicker than deploying to iOS or BlackBerry app stores.
This does require a one-off registration fee of $25.
Manual Deployment
The first step is to distribute your .apk file to your users. It is up to you as to how you go about this. You could, for example, email the .apk file to their devices, or make it available as a download from a website.
Once your users have the .apk file on their device:
- Open the device's Settings, select Security, and enable
Unknown Sources.
On older Android devices, Unknown Sources may instead be under Applications in the device Settings.
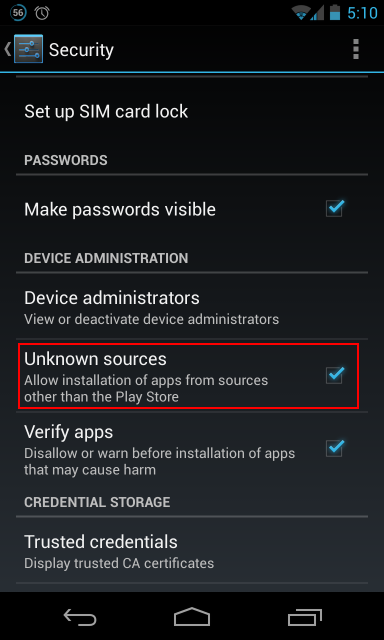
- Locate the .apk file on the device, and click it - you should then be prompted to install the app.
Google Play Deployment
DISCLAIMER: Before embarking down this route, you should read
Google's requirements and guidelines on app submission.
Omnis Software Ltd. takes no responsibility for any content of your app.
In order to deploy apps to Google Play you must register as a Google
Play Developer.
You can register here.
(You will have to sign in with a Google account).
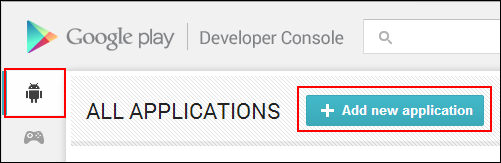
Once you have registered as a Google Play Developer:
- Sign in to your Developer Console.
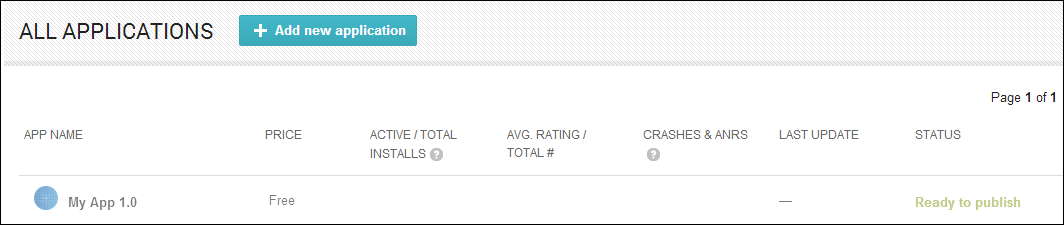
- On the All Applications page, push the Add new application button.
- This will begin a wizard to take you through the process of uploading
your APK and preparing your store listing. It is up to you which of
these you do first, but you need to do both.
- The wizard will take you through everything required to get your app and store page ready. It gives descriptions of each of the fields you need to populate, and the size of images you need to upload.
- You can save your details at any point, so there is no pressure to have everything ready before starting this process.
- Make sure that you complete each of the sections shown in the sidebar when editing your app:
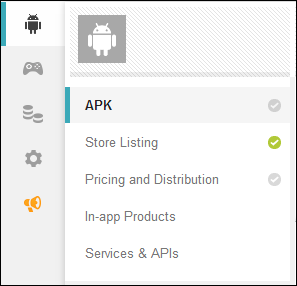
- Once you have uploaded your APK, and provided all of the necessary images/information which Google requires, your application will be marked as Ready to publish.
- If you are ready to publish your app; select your application, open the Ready to publish droplist, and select Publish this app.
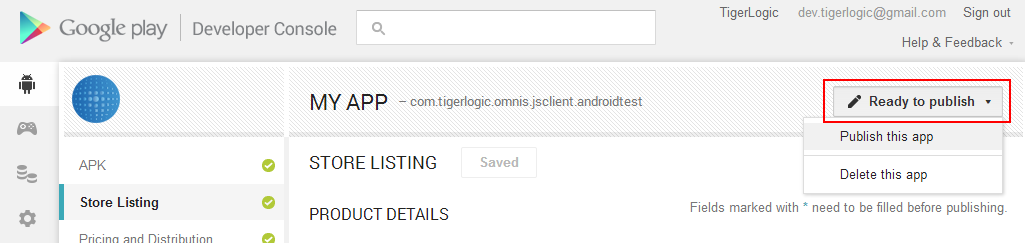
- Your app will then be published to Google Play (it may take "several hours" until it becomes live on Google Play), whereupon it can be found by millions of potential users.
Setting Up the Building Environment
App Customization
Building the App
App Deployment
iOS App Building Requirements
In order to build and deploy iOS apps to devices, you will need the following:
- Mac OS X 10.7 or later
- xCode 4.5 or later
- $99 - $299 per year
Setting Up The iOS Build Environment
1) Install xCode
In order to build iOS apps, you will need to install xCode. You can download this (on OS X 10.7 or later) through the Mac App Store. You should start by installing this.
2) Set Up Code Signing Requirements
In order to build an app which will run on an iOS device, you need to code sign your app at build time. The first step in this process is to sign up for one of Apple's iOS Developer Programs.
Apple gives you 3 options when signing up for their iOS Developer Program:
- Free - This will allow you to download the iOS SDK, and test your applications on the simulator, but you cannot distribute your app to a real device.
- Standard ($99 per year) - This allows you to submit your app to the AppStore, and also allows you to create and distribute Ad-Hoc apps to run on up to 100 specified devices.
- Enterprise ($299 per year) - This option is for larger corporations only. Your company must have a Dun & Broadstreet Number (DUNS). This does not allow the distribution of Apps through the AppStore, but allows distribution to a greater number of (unspecified) in-house devices.
We expect the great majority of Omnis developers to sign up for the Standard program, and this is used for the basis of the tech note.
You are also given the choice of signing up as a Company, or as an Individual. Signing up as a Company gives you the ability to add team members, whereas signing up as an Individual does not.
Once you have signed up as an iOS developer, you should sign in to the iOS Dev Center, then follow through the steps below:
Certificates
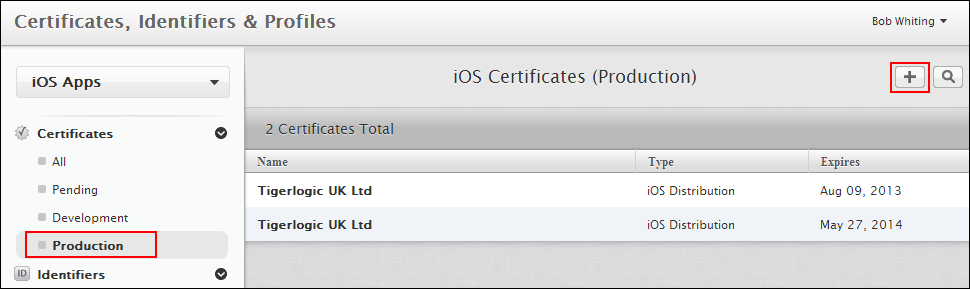
- Open the Certificates section of your iOS Dev Center account, and select Production certificates.
- Push the + button to open a wizard to take you through the creation of a new certificate.
- When prompted to select the type of certificate, you should choose
an App Store and Ad Hoc Production certificate.
- You should also use the link provided on this page to download and install the Intermediate Certificates (Worldwide Developer Relations Certificate Authority), if you do not already have it installed.
- The wizard will then guide you through the rest of the process to create your certificate.
- Once you have created your certificate (and its associated private
key), it is important that you BACK THIS UP.
- Open Keychain Access from your Mac's Applications/Utilities/.
- Select the Certificates Category from the sidebar, and locate your certificate you just created.
- Right click the certificate and select Export.
- Keep this somewhere safe - if you change machines, or for any reason lose the certificate from your keychain, you can import the certificate from this backup. If you want to build an update to any of your apps, it must be signed with the same certificate, so this is important.

Indentifiers
An App ID determines which app Identifiers you will be able to sign with the profile you are creating.
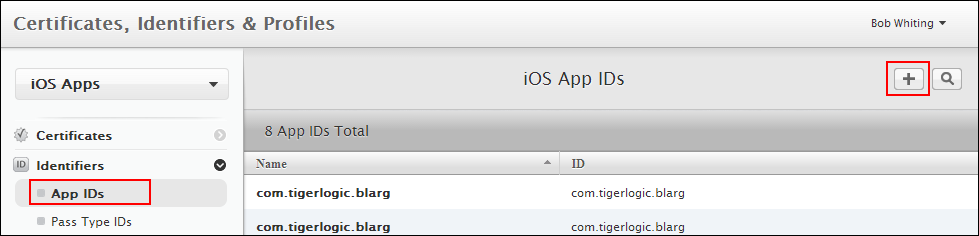
- Open the Identifiers section of your iOS Dev Center account, and select App IDs.
- Push the + button to open a wizard to take you through the creation of a new App ID.
- You can choose to create an Explicit App ID (can only be used to
sign a single app identifier), or a Wildcard App ID (can be used to
sign any app whose Identifier matches the pattern specified).
The convention for app Identifiers is to use a reverse domain name. E.g. com.mycompany.myapp. So you could set this as an explicit App ID, or if you are using a wildcard App ID you could use anything from "*" to "com.mycompany.*".
Whichever you choose, make a note of this, as it will be needed later when you assign an Identifier to your app.
- Omnis wrapper apps do not require any App Services.
Devices
If you are going to deploy via the Ad-Hoc method (not through the App Store), you need to explicitly define each individual device which your app will run on.
- Open the Devices section of your iOS Dev Center account.
- Push the + button to open a page to allow you to add a new device.
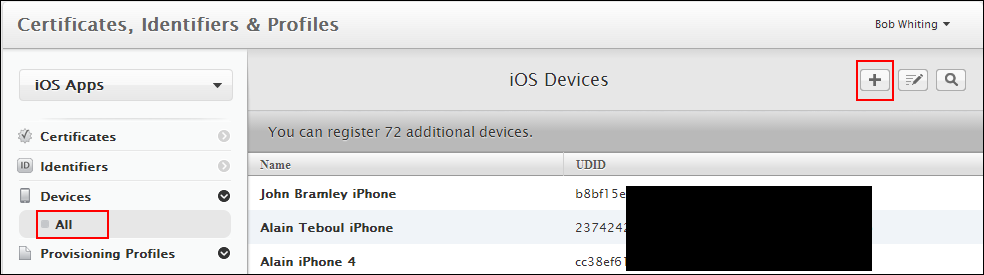
- Devices are added by their UDID (Unique Device Identifier). You can find your device's UDID by connecting it to iTunes, and clicking on its serial.
Provisioning Profile
A Provisioning Profile ties together a Certificate and an App ID (and a group of Devices for Ad Hoc Provisioning Profiles). It is with this that you then sign your app (in association with the matched certificate/private key pair stored in your keychain).
- Open the Provisioning Profiles section of your iOS Dev Center account, and select Distribution.
- Push the + button to open a wizard to take you through the creation of a new Provisioning Pofile.
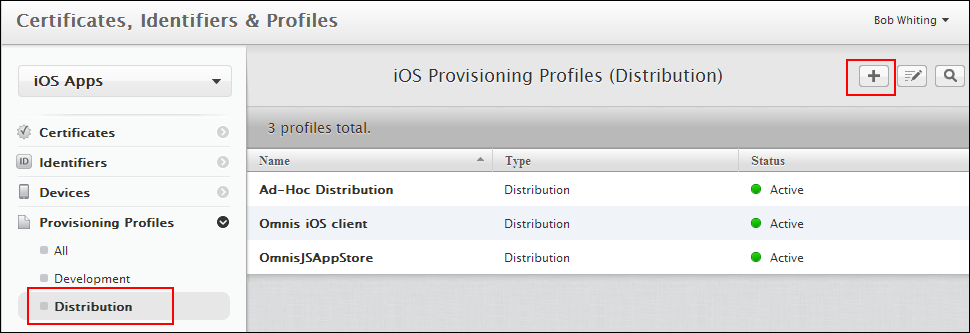
- You will be offered the choice of creating an Ad Hoc or App
store Distribution Provisioning Profile. You should select that
which matches the distribution model you are going to use. Make sure
you select a Distribution profile - not Development.
It is possible to create multiple Provisioning Profiles, so you can create one (or more) of each type, should you wish.
- Follow through the wizard, and once complete, you will be able to download the provisioning profile. Do so, then double-click the downloaded file in the Finder, and it will be imported into xCode.
3) Open The Project
-
First, download the latest iOS wrapper project from our website.
- Extract the contents of the wrapper zip file to a folder on your Mac. Make sure that there are no spaces in the path to the extracted folder.
- Double-click the OmnisJSWrapper.xcodeproj file, to open the project in xCode.
iOS App Customization
Once you have imported the wrapper project into xCode, you should customize it for your particular application. This process comprises the following steps:
- Rename The Project
- Edit Config.xml
- Change The Identifier
- Change The App Name
- Add Custom Icons & Splash Screens
- Requesting GPSNew
- Localize AppNew
- Remove Settings
- Bundle SCAFs (offline apps only)
- Bundle Local Database
Rename The Project
Once you have opened the wrapper project in xCode, you will probably want to give it a name which reflects your particular application.
Note that naming the project has no effect on the resulting app, but just better allows you to keep track of your projects, especially if you are creating multiple different apps. You should use a separate project for each app you create.
- Show the Project Navigator view in the project's sidebar (click the folder icon in the sidebar's toolbar).
- Select the project name at the top level of this view, then push Enter to allow you to rename the project.
- Change the name, then push Enter again. You will be prompted as to whether you'd also like to rename various other instances - select to rename all of these.
- The current version of xCode (at the time of writing) seems to miss
renaming the Prefix Header of other targets. So you need to manually
change this:
- Select the root level of your project in the Project Navigator - this will bring up your project settings in the main pane.
- Select one of the Targets, and view its Build Settings.
- Locate the Prefix Header setting (you may like to make use of the search box), and ensure that the .pch file name is set to <NewProjectName>-Prefix.pch.
- Repeat this for each of the 3 Targets.

Edit config.xml
The config.xml file provides the connection settings your app will use to connect to your Omnis server, as well as several settings which define aspects of the app's behavior.
Locate the config.xml file in the root of your project, and edit the values as necessary for your application as described below.
- AppTitle - Whether or not the iOS status bar is displayed. 1 for true, 0 for false.
- SettingsFloatControls - Whether or not the form should resize/reposition
controls according to their $edgefloat property, relative to the difference
between the device's screen size and the designed layout's $screensize.
1 for true, 0 for false.
Only takes effect if SettingsScaleForm is 0. - SettingsScaleForm - If true (1), the form will be scaled up or down to fit the screen size of the client device. 1 for true, 0 for false.
- SettingsAllowHScroll and SettingsAllowVScroll - If true, allows horizontal or vertical scrolling of the form. 1 for true, 0 for false.
- SettingsMaintainAspectRatio - If SettingsScaleForm is set to 1, this controls whether the scaling maintains the design form's aspect ratio. 1 for true, 0 for false.
- SettingsOnlineMode - Controls whether the app opens in online mode (1) or offline mode (0).
- TestModeEnabled - Controls whether test mode (Ctrl-M on form from Studio to test on device) is enabled for your app. 1 for true, 0 for false.
- TestModeServerAndPort - The <ipaddress>:<port> of the Omnis Studio Dev version you wish to use test mode with.
- ServerOmnisWebUrl - URL to the Omnis or Web Server. If using the Omnis Server it should be http://<ipaddress>:<omnis port>. If using a web server it should be a URL to the root of your Web server: http://myserver.com.
- ServerOnlineFormName - Route to the form's .htm file from ServerOmnisWebUrl. So if you're using the built in Omnis server, it will be of the form /jschtml/myform. If you are using a web server, it will be the remainder of the URL to get to the form, e.g. /omnisapps/myform. (Do not add the .htm extension!)
Only ServerOmnisWebUrl & ServerOnlineFormName are needed for Online forms. The other Server... properties are only needed if your app supports Offline mode.
- ServerOmnisPlugin - If you are using a web server plugin to talk to Omnis, the route to this from ServerOmnisWebUrl. E.g. /cgi-bin/omnisapi.dll
- ServerOmnisServer - The Omnis Server <ipaddress>:<port>.
Only necessary if you are using a web server with the Omnis Web Server
Plugin. If the Omnis App Server is running on the same machine as the
web server, you can just supply a port here.
E.g. 194.168.1.49:5912 - ServerOfflineFormName - Name of the offline form. (Do not
add .htm extension!)
E.g. rfOffline - ServerAppScafName - Name of the App Scaf. This will be the
same as your library name.
E.g. mylibrary
Note: this is case-sensitive and must match the App Scaf (by default this is generally all lower-case).
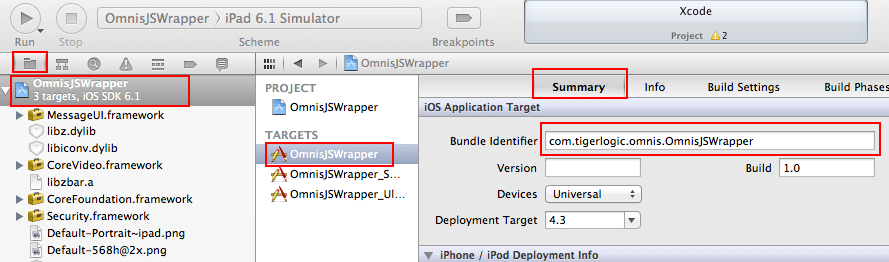
Change The Identifier
The Identifier identifies your app, and must be unique amongst
all apps on the device. Two apps with the same Identifier will be seen
by the device as the same app, so this is an important step.
As such, it is recommended to use a reverse domain name syntax. E.g com.mycompany.omnis.myfirstapp.
- Select the root of your project in the Project Navigator.
- Select any of the Targets, and open its Summary tab.
- Change the Bundle Identifier to your own value.
Change The App Name
To change the display name of your app:
- Select the root of your project in the Project Navigator.
- Select one of the Targets, and open its Build Settings tab.
- Locate the Product Name in the list of settings, and change it to your own value.
- Repeat this for each of the targets.
Add Custom Icons & Splash Screens
The images used for the Icons and splash screens are stored in the project's OmnisJSWrapper/Resources folder. You should replace these (keeping the naming the same) with your own versions.
The sizings and uses of the images are as follows:
App Icons:
- Icon.png (57x57) - Non-retina iPhone/iPod touch devices.
- Icon@2x.png (114x114) - Retina iPhone/iPod touch devices.
- Icon-72.png (72x72) - Non-retina iPad devices.
- Icon-72@2x.png (144x144) - Retina iPad devices.
Search & Settings Icons:
- Icon-Small.png (29x29) - Non-retina iPhone/iPod touch devices.
- Icon-Small@2x.png (58x58) - Retina iPhone/iPod touch devices.
- Icon-Small-50.png (50x50) - Non-retina iPad devices.
- Icon-Small-50@2x.png (100x100) - Retina iPad devices.
Splash Screens:
- Default.png (320x480) - Non-retina iPhone/iPod touch devices.
- Default@2x.png (640x960) - Retina iPhone/iPod touch devices.
- Default-568h@2x.png (640x1136) - iPhone 5 devices.
- Default-Portrait.png (768x1004) - Non-retina iPad devices (Portrait orientation).
- Default-Portrait@2x.png (1536x2008) - Retina iPad devices (Portrait orientation).
- Default-Landscape.png (1024x748) - Non-retina iPad devices (Landscape orientation).
- Default-Landscape@2x.png (2048x1496) - Retina iPad devices (Landscape orientation).
App Store/iTunes Images:
- iTunesArtwork (512x512) - Non-retina devices.
- iTunesArtwork@2x (1024x1024) - Retina devices.
Further information on these images can be found in Apple's documentation.
Requesting GPS
When GPS is required in your app, via the Device control, the end user receives a prompt to agree to the use of GPS. Apple changed the APIs for this in iOS8 and included a new requirement for all apps through the app store. You need to make sure one of two strings exists in your iOS project, either using the default string, or adding your own. This string is shown on the prompt on the end user's device when requesting access to GPS.
The default string NSLocationAlwaysUsageDescription which allows the app to access GPS in the background and foreground. You can change the text of this to something more appropriate for your app. You can remove this string and add another string NSLocationWhenInUseUsageDescription (also with a description). This will limit the app to GPS data ONLY when running and active with no background support. Only one string should be included in the app.
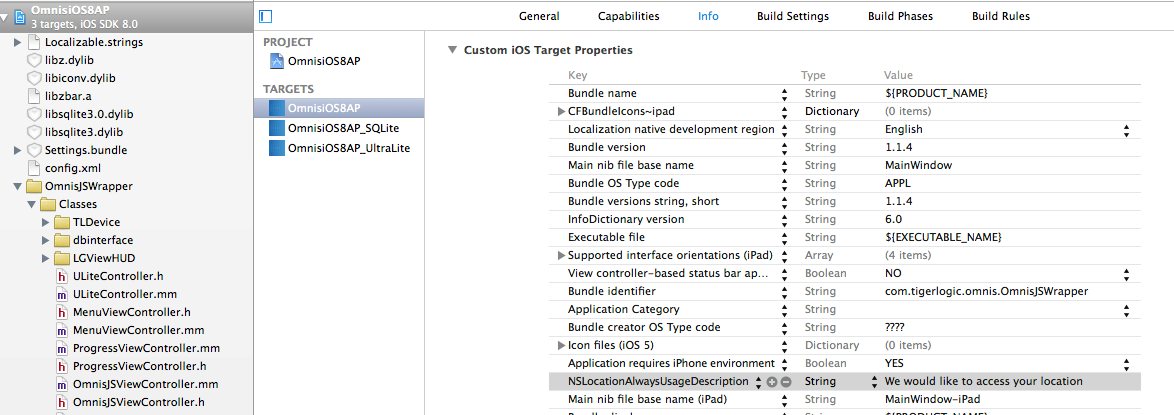
Detail of project properties.

Localize App
Localization support requires iOS wrapper version 1.1.3 or later.
If you wish to translate text used by the wrapper app, you can do so as described here. If the user's device is set to one of the supported languages, it will use the specified translated strings.
- Select the top level of the project in the Project Navigator, and select the project's Info pane.
- Locate the Localizations section, and add a new language.
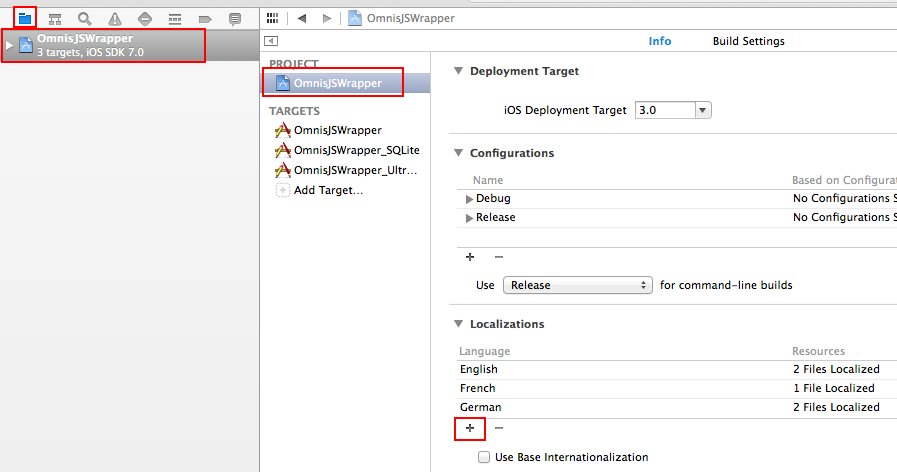
- In the window which appears, make sure you select both the Localizable.strings and InfoPlist.strings files to be localized.
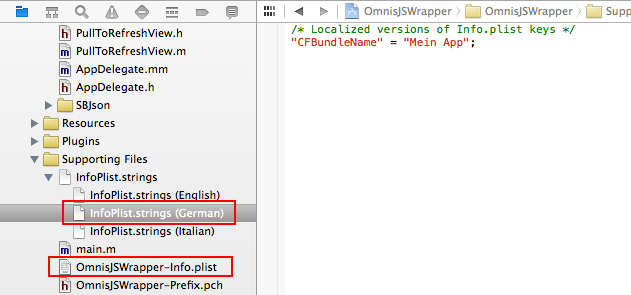
- Now if you locate Localizable.strings in the Project Navigator, you will see that it can be expanded. If you do so, you will see that a copy of the file has been created for your new language.
- This file contains a group of key-value pairs. The keys (to the left of the equals signs) must be left as they are. The values (to the right of the equals signs) should be translated to your new language.
- Make sure to always end each line with a semi-colon.
Similarly, if you wish to change some of the attributes of your application package (e.g. The App name, icon etc), you can do so by:
- Locate the InfoPlist.strings file in your project, under Supporting Files, expand this and select the file which corresponds to the appropriate language.
- This file can be built up using key-value pairs, in the same way that the Localizable.strings files are. i.e: "Key Name" = "Key Value";
- The key names in this case must match a key defined in your <Project Name>-Info.plist file. These keys aren't displayed with the default Property List viewer, so right click the file and Open As > Source Code to see these.
- Remember to end each line with a semi-colon.
Remove Settings
When you are deploying your app to your end-users, you will probably
not want to give them the ability to change the connection settings.
To achieve this, you need to remove the Settings.bundle from your
project target.
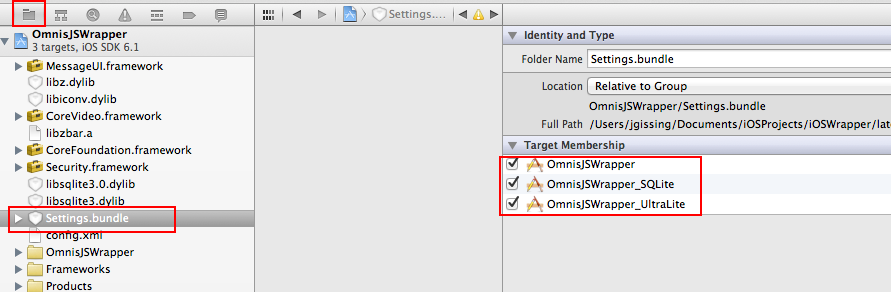
- Open the Project Navigator view of your xCode project, and select the Settings.bundle.
- Un-check the target(s) you are building from the Target Membership for this file.
Bundle SCAFs (offline apps only)
If your app includes offline support, you need to decide whether or not to include the SCAFs inside your app. If you do so, the app will be larger, but it will run in offline mode immediately, with no need to first update from the server.
If you wish to include the SCAFs in your app, you should do the following:
- Browse to the html/sc folder of your Omnis Studio installation.
- On Windows, this will be in the AppData area. e.g: C:\Users\<username>\AppData\Local\TigerLogic\OS6.X\
- Locate your App SCAF (This will be a .db file in the root of the sc folder and will be named as your library).
- Also locate your Omnis SCAF (This will be the omnis.db file in sc/omnis/).
- Import both of these SCAF files into your xCode project's OmnisJSWrapper/Resources
directory.
- The easiest way to do this is to drag them from the Finder into the project in xCode. Make sure to select the Copy Files option, and check the boxes to add to all of the targets.
Bundle Local Database
It's possible to add a pre-populated SQLite database to use with your app (if you build the SQLite target). This will be used as the database which the form's $sqlobject connects to.
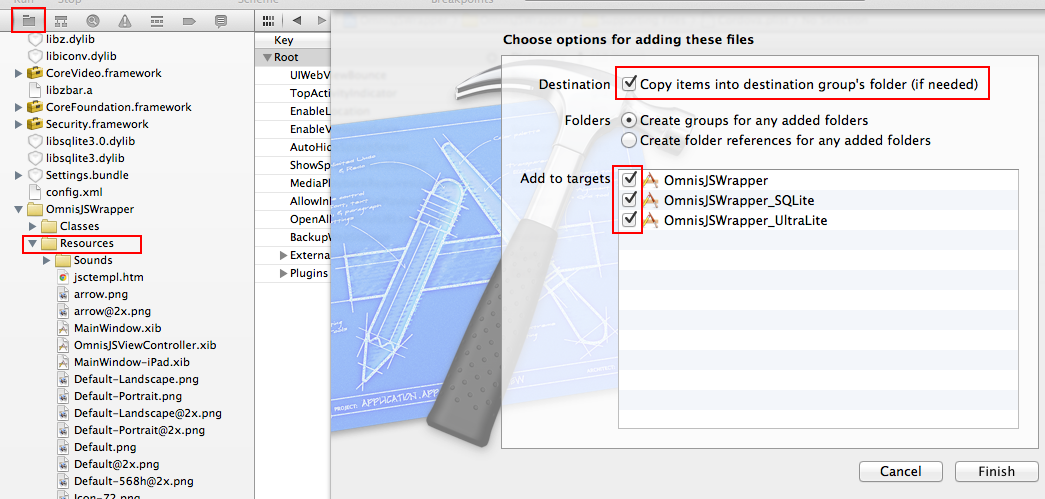
- Drag your SQLite .db file from your file system, into the Resources
folder of your project within xCode.
- Make sure to select the Copy items into destination group's folder option.
- Also make sure that you check the box to add it to the SQLite target.
- Edit your project's config.xml file, and set the <ServerLocalDatabaseName> to the name of your local database (including the .db extension).
Bear in mind that you are creating a mobile application,
and so should not be storing huge databases locally on the device. If
you need to access data from a large database, it may make sense for
you to hold the whole database on your Omnis server, and use the Sync
Server functionality to synchronize a subset of this data with your
device.
Details on the Sync Server can be found here.
Building The iOS App
Once you have customised the project for your application, creating a release build is very simple.
- Select the appropriate Target (based on which local database you wish to support, if any) in the Scheme droplist at the top of the xCode window. Also select iOS Device as the target architecture.

- Select Archive from xCode's Product menu.
- This will create an archive of your project as it currently stands. You can then build this archive out to an Ad-Hoc or App Store App. This is described in the Deploy App section, as the process differs depending on your deployment model.
iOS App Deployment
Once you have built your app, you are ready to deploy it to devices. This tech note covers three options as to how to do this:
Manual Deployment simply requires you to distribute your Ad-Hoc app file to your users manually. They then install to their device through iTunes.
Over The Air Deployment allows you to host your Ad-Hoc app on a web server, and your users can install the app to their device by following a web link.
App Store Deployment. Getting your app onto Apple's App Store is a bit more involved, but the benefits are very worthwhile. This process requires your app to be manually verified by Apple, which may take anything up to a couple of weeks, and there is no guarantee your app will be accepted.
Manual Deployment
This process requires an Ad-Hoc provisioning profile. If you do not have one, please refer to the Set Up Environment section of this document for details on how to obtain one.
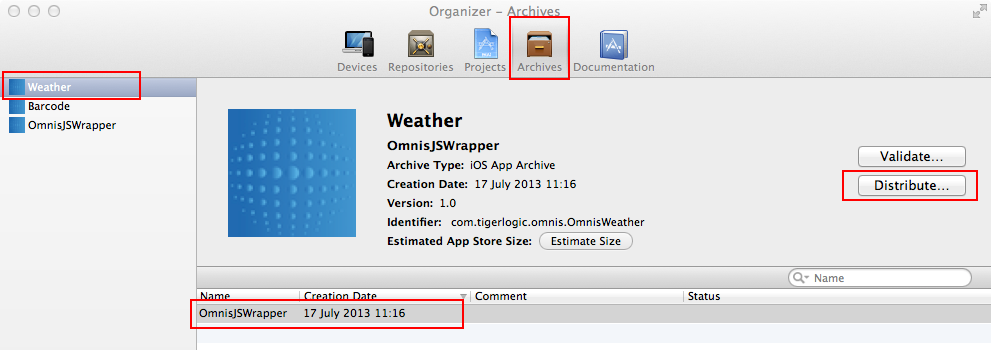
- Open xCode's Organizer (Cmd-Shift-2), and select the Archives section.
- Select the Archive which you created in the Build App section of this document, then push the Distribute button.
- In the window which opens, select to Save for Enterprise or Ad-Hoc Deployment, then push Next.
- Select the Distribution Provisioning Profile you wish to sign with, then push Next.
- Select the output destination in the Save As dialog, then push Save.
This will create an .ipa file in the location you selected in the Save dialog.
This is your signed iOS app, which is ready to be installed onto your users' devices. Distribute this file to your users, who can then install to their device by importing the .ipa file into iTunes and syncing their device.
OTA Deployment
With a little more work than the standard Manual deployment process, you can give your users a professional, automated install process via your website.
This process requires an Ad-Hoc provisioning profile. If you do not have one, please refer to the Set Up Environment section of this document for details on how to obtain one.
- Open xCode's Organizer (Cmd-Shift-2), and select the Archives section.
- Select the Archive which you created in the Build App section of this document, then push the Distribute button.
- In the window which opens, select to Save for Enterprise or Ad-Hoc Deployment, then push Next.
- Select the Distribution Provisioning Profile you wish to sign with, then push Next.
- In the Save As dialog, check the box to Save for Enterprise Distribution.
This will extend the dialog with several new fields. You should fill in these fields as follows:
- Application URL - This is the URL to where the app will be located on your server. It will be an .ipa file, so will be of the form: http://www.myserver.com/iOS_Apps/myApp.ipa
- Title - This is the name which will be used for the app while it is downloading and installing to the device. Once installed, it will revert to the name defined in your XCode project.
- Small Image URL - This is the URL to a 57x57 PNG image on
your server, which will display as the icon background while the app
is being downloaded and installed to the device. Once installed, the
app will display the icon which you defined in the XCode project.
The Icon2.png file from your project is usually suitable for this.
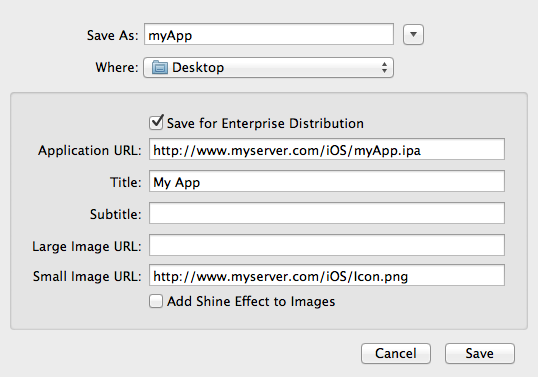
- Make a note of the location you specified for your .ipa and image, then push Save.
- This will create an .ipa file and a .plist file at
the location you specified in the save dialog. Copy these to the location
on your web server which you specified as the Application URL.
If you've forgotten this, you can open the .plist, where you will be able to see how this was set.
- Also copy your Small Image file to the location you specified as the Small Image URL.
- On your web page, create a link of the following format:
itms-services://?action=download-manifest&url=<URL to your .plist file>
- You may need to configure your web server to transmit these file types properly. This is done by setting your server's MIME Types for .ipa files to application/octet-stream, and .plist files to text/xml.
Now, if an iOS device follows this link (and that device is included in your provisioning profile), your app will be downloaded and installed to the device wirelessly.
App Store Deployment
DISCLAIMER: Before embarking down this route, you should read
Apple's requirements and guidelines on app submission.
Omnis Software Ltd. takes no responsibility for any content of your app.
This process requires an App Store provisioning profile. If you do not have one, please refer to the Set Up Environment section of this document for details on how to obtain one.
The first step is to create a repository for your app in iTunes Connect.
- Log in to iTunes Connect, and select Manage Your Apps.
- Push the button to Add New App, and follow through the wizard to create your iOS app repository. This will include setting store descriptions, images etc. The wizard provides instruction on each of these.
- Once you complete this, you will have an app repository with a status of Prepare For Upload.
- If you are happy with your app's descriptions/images etc; push View Details on your new app repository, then push Ready to Upload Binary, and follow through the short wizard which opens.
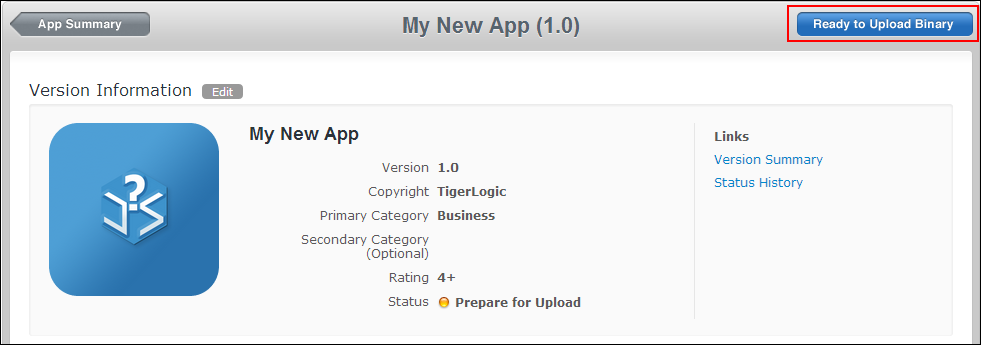
- Your app repository will now have a status of Waiting For Upload. Once a repository is in this state, it is possible to upload your app binary through xCode.
- Open xCode's Organizer (Cmd-Shift-2), and select the Archives section.
- Select the Archive which you created in the Build App section
of this document, then push the Validate button.
- Follow through the wizard, selecting your app repository and App Store Provisioning Profile when prompted.
- This will perform a series of checks on your app to look for any common issues which would cause your app to be rejected.
- If this finds any issues, make sure to correct these (then create a new Archive and re-validate) before going any further.
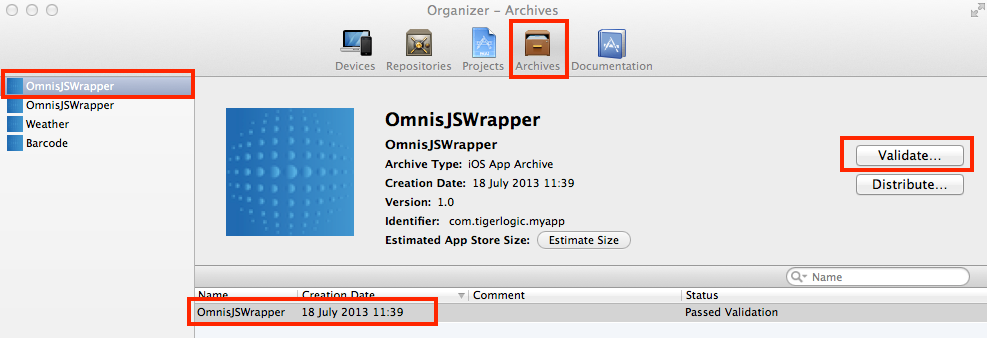
- Open the Organizer and select your Archive again, but this time push the Distribute button.
- As before, follow through the wizard, selecting your App repository and App Store Provisioning Profile when prompted.
- At the end of this process, your app will have been uploaded and
submitted for review.
You can check the progress of this review in iTunes Connect. It is worth checking this shortly after uploading your app, as the binary may have requirements you've not fulfilled with your store page (e.g. device screenshots).
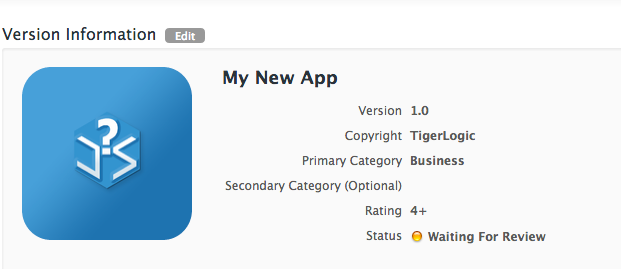
If the review of your app is successful (this may take up to several weeks, but is usually much faster), it will become live on the App Store, and open to millions of potential customers.
Setting Up the Building Environment
App Customization
Building the App
App Deployment
BlackBerry App Building Requirements
In order to build and deploy BlackBerry apps to devices, you will need the following:
- Windows, OS X or Linux
- BlackBerry 10 Native SDK
- $0
Setting Up The BlackBerry Build Environment
1) Install The BlackBerry 10 Native SDK
To begin with, you should download and install the BlackBerry
10 Native SDK.
2) Set Up Code Signing Requirements
In order to create a release build of your app, you must first register with BlackBerry, and obtain code signing keys. Using these keys you can register your SDK with the code signing authority and create a certificate, which you can then use to sign your app.
- Visit http://www.blackberry.com/go/codesigning
and fill in the form to request code signing keys for BlackBerry 10.
Make a note of the PIN which you create.
You now need to wait up to 2 hours for these files to be emailed to you.
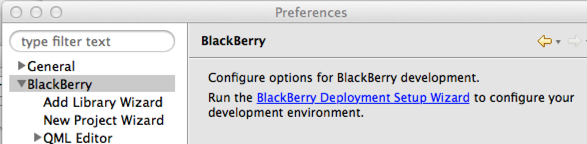
- Open the SDK's BlackBerry Deployment Wizard, accessed
under BlackBerry in the SDK's Preferences.
If you are on a Mac, Preferences is found under the Momentics menu. If you are on Windows or Linux it is under the Window menu.
-
You only need concern yourself with the Signing Registration step.
- At this point, select the option Complete the registration process using the 2 CSJ files...
- On the next page, fill in the fields by selecting your CSJ files, creating a password and entering the pin you created when registering for your CSJ files.
- Once you do this, it will create a certificate using your keys and register with the code signing authority.
- Once you complete this it will prompt you to Back Up your keys & certificate. Please make sure to do so, as this is what identifies you as a developer.
3) Import The Project
-
First, download the latest BlackBerry wrapper project from our website.
In order to import the Omnis Wrapper project you should open the BlackBerry SDK, then:
- Select Import from the File menu.
- In the wizard that opens, select General > Existing Projects Into Workspace.
- In the next window, choose select archive file, then browse to the zip file you downloaded which contains the wrapper project, and Finish.
BlackBerry App Customization
Once you have imported the wrapper project into the BlackBerry SDK, you should customize it for your particular application. This process comprises the following steps:
- Rename The Project
- Edit Config.xml
- Change The Package Name
- Change The App Name
- Add Custom Icons & Splash Screens
- Remove Unnecessary Permissions
- Localize App
- Bundle SCAFs (offline apps only)
Rename The Project
Once you have imported the wrapper project into the SDK, you will probably want to give it a name which reflects your particular application.
Note that naming the project has no effect on the resulting app, but just better allows you to keep track of your projects, especially if you are creating multiple different apps. You should use a separate project for each app you create.
- Right-click on your project in the SDK and select Rename.
- In the dialog window which opens, enter a value for the new project name, then push OK.
Edit config.xml
The config.xml file provides the connection settings your app will use to connect to your Omnis server, as well as several settings which define aspects of the app's behavior.
Locate the config.xml file in your project's assets folder, and edit the values as necessary for your application as described below.
- MenuIncludeSettings - Whether or not your app's runtime menu includes a "Settings" button, to allow the user to change the connection settings. 1 for true, 0 for false.
- MenuIncludeOffline - Whether or not your app's runtime menu allows the user to switch between online and offline modes. 1 for true, 0 for false.
- MenuIncludeAbout - Whether or not your app's runtime menu includes an "About" button, to allow the user to open the about screen. 1 for true, 0 for false.
- SettingsFloatControls - Whether or not the form should resize/reposition
controls according to their $edgefloat property, relative to the difference
between the device's screen size and the designed layout's $screensize.
1 for true, 0 for false.
Only takes effect if SettingsScaleForm is 0. - SettingsScaleForm - If true (1), the form will be scaled up or down to fit the screen size of the client device. 1 for true, 0 for false.
- SettingsAllowHScroll and SettingsAllowVScroll - If true, allows horizontal or vertical scrolling of the form. 1 for true, 0 for false.
- SettingsMaintainAspectRatio - If SettingsScaleForm is set to 1, this controls whether the scaling maintains the design form's aspect ratio. 1 for true, 0 for false.
- SettingsOnlineMode - Controls whether the app opens in online mode (1) or offline mode (0).
- TestModeEnabled - Controls whether test mode (Ctrl-M on form from Studio to test on device) is enabled for your app. 1 for true, 0 for false.
- TestModeServerAndPort - The <ipaddress>:<port> of the Omnis Studio Dev version you wish to use test mode with.
- ServerOmnisWebUrl - URL to the Omnis or Web Server. If using the Omnis Server it should be http://<ipaddress>:<omnis port>. If using a web server it should be a URL to the root of your Web server: http://myserver.com.
- ServerOnlineFormName - Route to the form's .htm file from ServerOmnisWebUrl. So if you're using the built in Omnis server, it will be of the form /jschtml/myform. If you are using a web server, it will be the remainder of the URL to get to the form, e.g. /omnisapps/myform. (Do not add the .htm extension!)
Only ServerOmnisWebUrl & ServerOnlineFormName are needed for Online forms. The other Server... properties are only needed if your app supports Offline mode.
- ServerOmnisPlugin - If you are using a web server plugin to talk to Omnis, the route to this from ServerOmnisWebUrl. E.g. /cgi-bin/omnisapi.dll
- ServerOmnisServer - The Omnis Server <ipaddress>:<port>.
Only necessary if you are using a web server with the Omnis Web Server
Plugin. If the Omnis App Server is running on the same machine as the
web server, you can just supply a port here.
E.g. 194.168.1.49:5912 - ServerOfflineFormName - Name of the offline form. (Do not
add .htm extension!)
E.g. rfOffline - ServerAppScafName - Name of the App Scaf. This will be the
same as your library name.
E.g. myLibrary
Note: this is case-sensitive and must match the App Scaf (by default this is generally all lower-case).
Change The Package Name
The Package Name identifies your app, and must be unique amongst
all apps on the device. Two apps with the same package name will be seen
by the device as the same app, so this is an important step.
As such, it is recommended to use a reverse domain name syntax. E.g com.mycompany.omnis.myfirstapp.
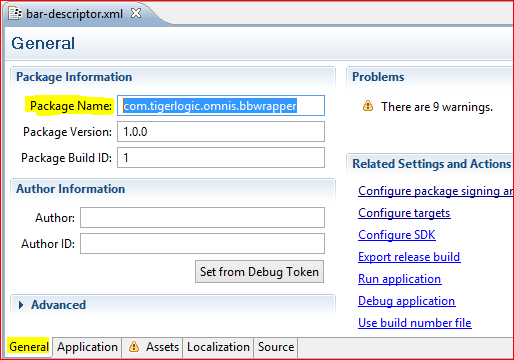
- Open the project's bar-descriptor.xml file, and select the General tab.
- The Package Name is set at the top of this window - change this to your own value.
Change The App Name
To change the display name of your app:
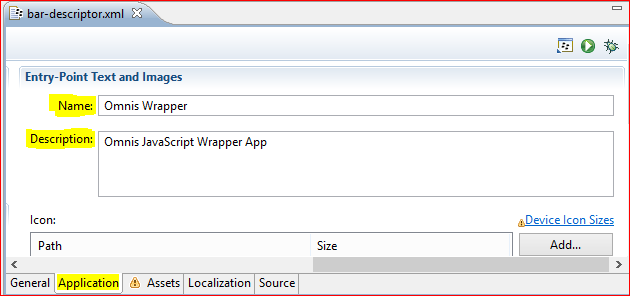
- Open the project's bar-descriptor.xml file, and select the Application tab.
- Set your required app name in the Name field.
- You can also assign a Description text here.
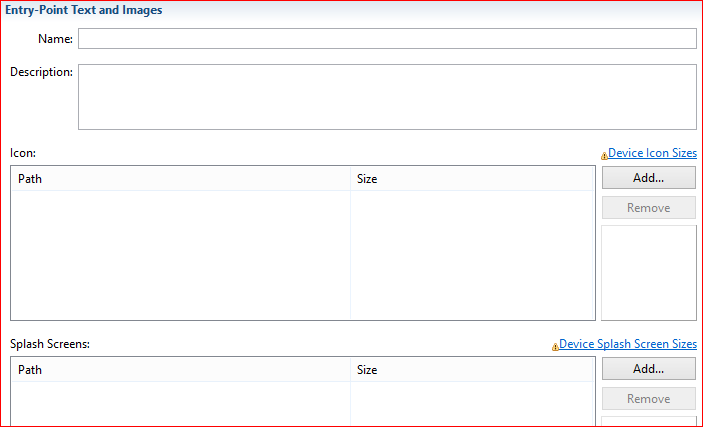
Add Custom Icons & Splash Screens
Requirements for images are as follows:
- App Icon:
- 114x114 PNG
- Splash Screens:
- 768x1280 PNG (Portrait All Touch device - e.g. Z10)
- 1280x768 PNG (Landscape All Touch device)
- 720x720 PNG (Keyboard device - e.g. Q10)
Once you have created your image files:
- Import each of your image files into your project's assets/images
folder.
- You can do this by simply dragging the files from your Operating System into the folder in the SDK (make sure to select Copy Files at the prompt).
- Open the project's bar-descriptor.xml file, and select the Application tab.
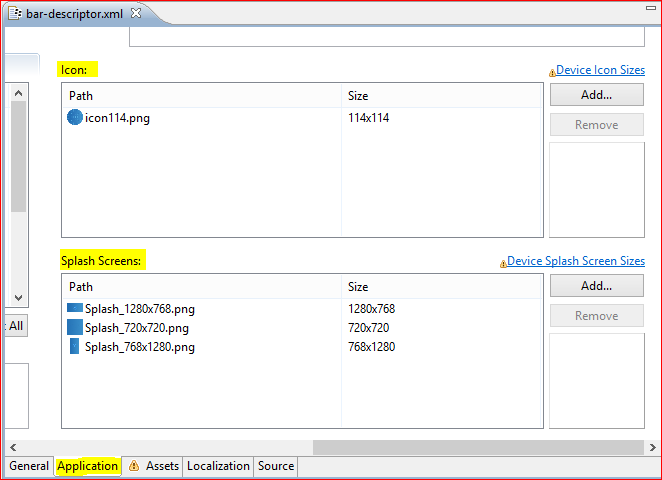
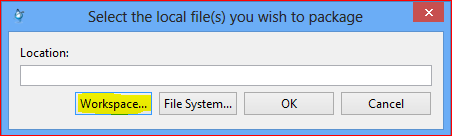
- In the Icon section, push the Add button.
- In the dialog which opens, push the Workspace button, and browse to your icon file in your project.
- Once selected, push OK to reference this icon.
- In the Icon list, select the default icon, and push the Remove button.
- Delete the default icon from the assets/images folder. You no longer need this as you are now using your own.
- Now repeat this process for the images in the Splash Screens section below.
Remove Unnecessary Permissions
Each BlackBerry App must request permissions to access various areas
of the device - e.g. Contacts, Camera, Location etc.
It is bad practice to include unnecessary permissions for your app - especially
if you are distributing through BlackBerry World.
When downloading/installing your app, the user can see which permissions
your app has requested access to. Unnecessary permissions may give the
user the impression that your app is malicious.
- Open the project's bar-descriptor.xml file, and select the Application tab.
- The Permissions section on this page allows you to select which permissions the app requires using check boxes.
- By default, all permissions which an Omnis app may use are checked.
- Check only those permissions your particular app requires. Uncheck all others.
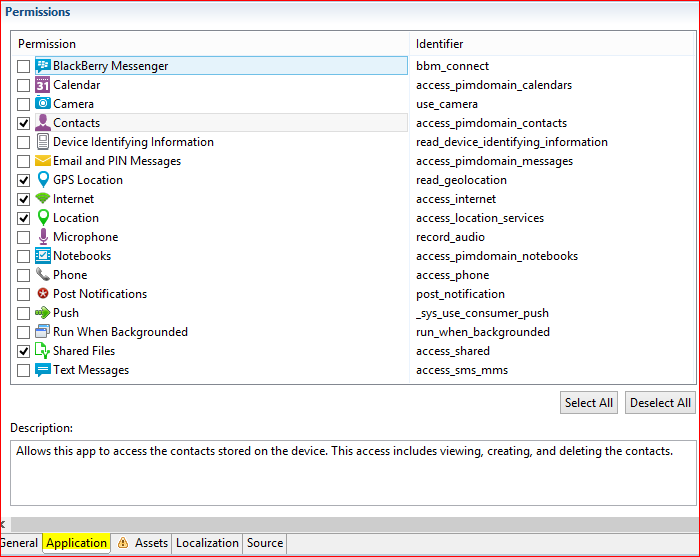 MANDATORY PERMISSIONS:
- Internet
All other permissions may be removed if your particular app does not make use of their functionality. The names and descriptions for these permissions should be self-explanatory as to whether your app requires them.
The optional permissions you may require, depending on the functionality you use in your app, are:
- Camera - necessary to use barcode reader (kJSDeviceActionGetBarcode).
- Contacts - necessary if you use the kJSDeviceActionGetContacts device action to access the device's contacts.
- GPS Location - provides fine grain (provided by GPS sensors) location data to the kJSDeviceActionGetGps device action.
- Location - provides coarse location (provided by network) data to the kJSDeviceActionGetGps device action.
- Shared Files - necessary if you are obtaining images from the device or from the camera (kJSDeviceActionGetImage or kJSDeviceActionTakePhoto).
Localize App
If you wish to translate text used by the wrapper app, or you wish to use alternate splash screens/icons for different languages, you can do so as described here. If the user's device is set to one of the supported languages, it will use any alternative translated text/icons which have been specified.
Add Supported Languages
- Open the project's bar-descriptor.xml file, and select the Localization tab.
- This contains a list of the languages you wish to provide translations for.
- You can Add/Remove languages using the Add/Remove buttons.
- Modify this list to populate it with those languages you wish to support translations for.
- If the language you wish to support is not included in the list of languages, you can add a custom language code in the Other field below.
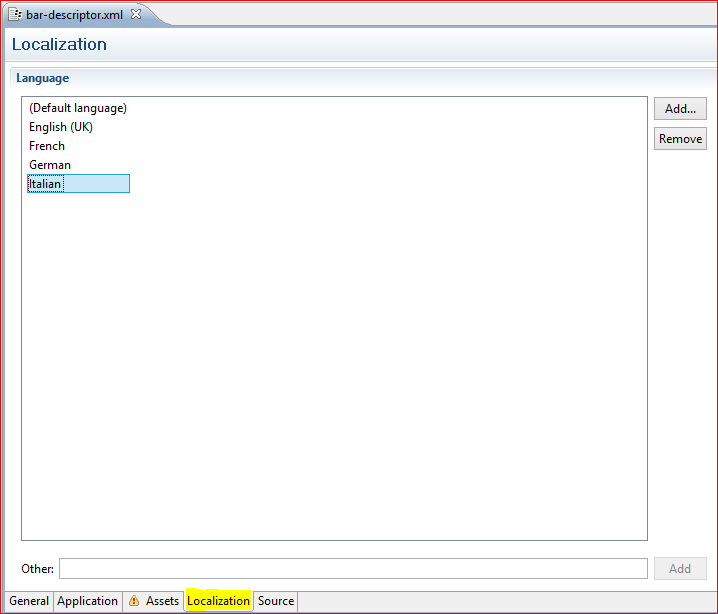
Alternate Icons/App Name
- Select a language in the Language list.
- To the right of this is an Entry-Point Text and Images section.
- You can populate this section with text and images for the selected language.
- Any values entered here will override the defaults if the user's device is set to the language in question. Any you leave empty will be inherited from the defaults.
Translate Text Strings
The wrapper app uses various text strings throughout. For example in the in-app menu. You can also translate these.
- Once you have added your languages, Build and then Clean
the project.
- Right-click the project and select Build Project, then right click again and Clean Project.
- This should generate some ..._XX.ts files in your project's translations directory.
- Locate and edit the .ts file for the language you are translating to.
- You will see that this is an XML file made up of multiple <message> tags - each containing a <source> and <translation> tag.
- For new languages, each <translation> tag will include a type="unfinished" attribute. While this attribute is present, the translation will not be used.
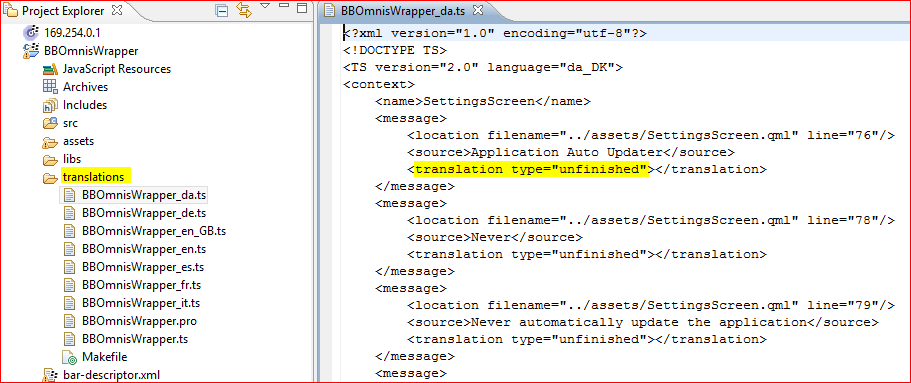
- The <source> tag contains the default string, and the <translate> tag should be edited to contain the translated string for this language.
- E.g: <source>Application Auto Updater</source>
<translation>Mise à jour automatique</translation> - If the <translation> tag contains the attribute type="unfinished", delete this. Otherwise the translation will not be used.
Bundle SCAFs (offline apps only)
If your app includes offline support, you need to decide whether or not to include the SCAFs inside your app. If you do so, the app will be larger, but it will run in offline mode immediately, with no need to first update from the server.
If you wish to include the SCAFs in your app, you should do the following:
- Browse to the html/sc folder of your Omnis Studio installation.
- On Windows, this will be in the AppData area. e.g: C:\Users\
\AppData\Local\TigerLogic\OS6.X\
- On Windows, this will be in the AppData area. e.g: C:\Users\
- Locate your App SCAF (This will be a .db file in the root of the sc folder and will be named as your library).
- Also locate your Omnis SCAF (This will be the omnis.db file in sc/omnis/).
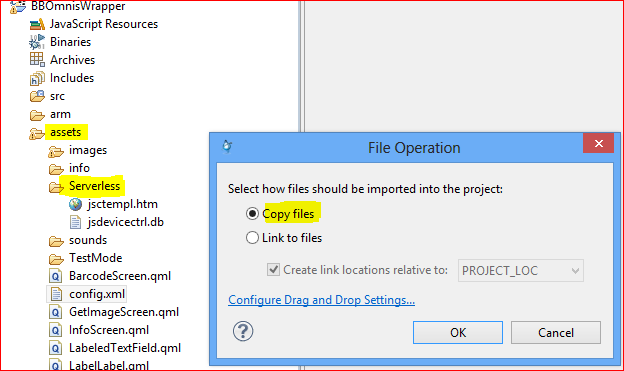
- Import both of these SCAF files into your BlackBerry project's
assets/Serverless directory.
- The easiest way to do this is to drag them from your file browser into the project in the SDK. Make sure to select the Copy Files option.
Building The BlackBerry App
Once you have customised the project for your application, creating a release build is very simple.
- Open your project's bar-descriptor.xml, select the General tab, and push the Export release build link.
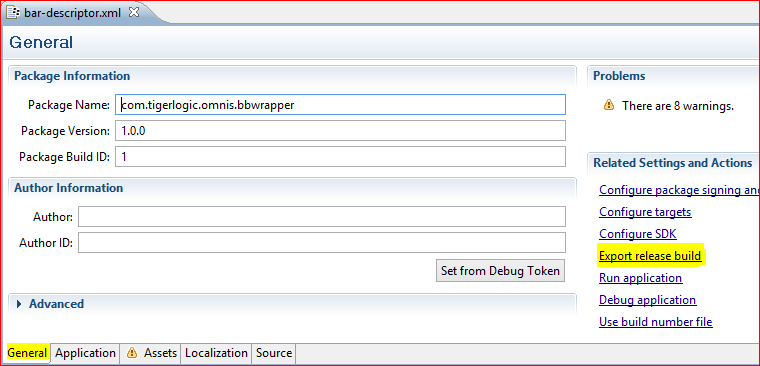
- Just push Finish in the wizard, and it should export a signed release build into your workspace (to the folder specified in the dialog's Export to folder: field).
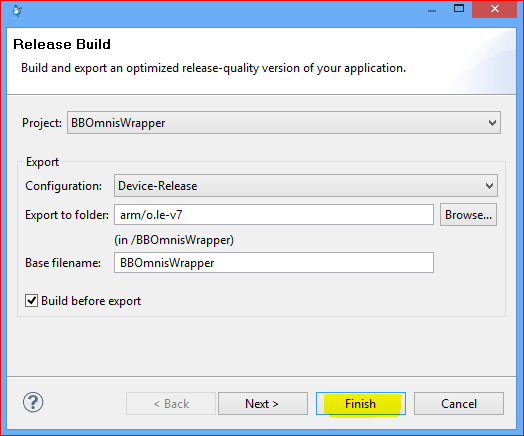
Your finished app will be a .bar file. You now just need a way to deploy this to devices...
BlackBerry App Deployment
Once you have built your app, you are ready to deploy it to devices. This tech note describes the following methods of deployment:
Manual Deployment simply requires you to distribute the .bar file to your users manually. They then sideload the app to their device.
BlackBerry World is BlackBerry's app store. Getting your app onto this platform is a bit more involved, but the benefits are very worthwhile.
Manual Deployment
The first step is to distribute your .bar file to your users.
It is up to you as to how you go about this. You could, for example, email
the .bar file, or make it available as a download from a website.
Note however, that they need the .bar file on a computer - not on their
device at this stage.
Once your users have a copy of your .bar file, they need to install it onto their device. This process of manually installing an app outside of BlackBerry World is often referred to as sideloading.
There is no real official way to do this, but there are several third-party
solutions which enable you to do so.
Our preferred solution is a (desktop) Chrome extension called Playbook
App Manager. This provides a simple drag & drop GUI interface,
and, because it is a Chrome extension, is cross-platform.
You can install the Playbook App Manager extension by visiting
this
link in Chrome.
The following instructions assume you are using Playbook App Manager.
- If you don't already have BlackBerry Link installed on your
computer, install this first.
- If you plug your BlackBerry device into the machine, it should
prompt you to install BlackBerry link.
Note that you only need to install the software - you do not need to go through the process of syncing your device with it.
- If you plug your BlackBerry device into the machine, it should
prompt you to install BlackBerry link.
- On your BlackBerry device, open Settings > Security and Privacy
> Development Mode, and turn on Use Development Mode.
- On this same screen, make a note of the Development IP address.
- Plug your device into the computer, and open the Playbook App Manager in Chrome.
- Enter your device's Development IP address into the App Manager's Device Hostnames/IPs: field, then click Save.
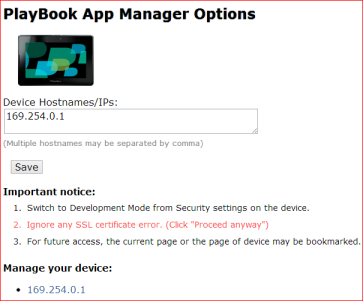
- Click on your device's address under Manage your device
on the page, and accept any unverified certificates.
- You will be prompted to enter your device's password to connect - do so.
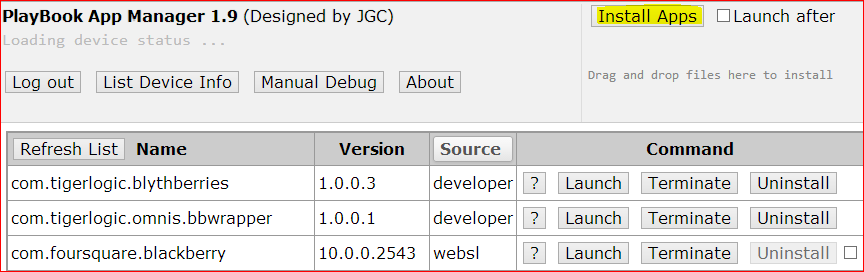
- Use the Install Apps button, or drag & drop your .bar file, and the app will be uploaded and installed.
BlackBerry World Deployment
DISCLAIMER: Before embarking down this route, you should read
BlackBerry's requirements and guidelines on app submission.
Your app will be manually tested by BlackBerry before it is made live,
and if they find it not suitable they may decline your app.
Omnis Software Ltd. makes no guarantees that your app will be accepted, and takes
no responsibility for any content of your app.
In order to deploy apps to BlackBerry World you must register as a Vendor.
It is free to do so, but does require sending BlackBerry some official
identifying information. As such, you should allow 2 or more days for
the registration process to complete.
You can register here
(you will have to sign in with your BlackBerry ID).
Once you have been approved, you can log in to your Vendor Portal and Add apps.
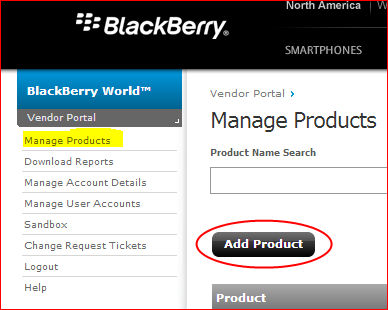
- Log in to your vendor portal.
- Under Manage Products use the Add Product button to create a new "Product". This will, in effect, be a repository to which you can then upload your app.
- Follow through the Add Product wizard which opens, adding descriptions & images etc for your store page. All of the fields are documented. Once you complete this, you will have a new "Product" repository, into which you can upload your app.
- Push the + button under your Product's Releases, and follow through the wizard which opens in order to upload your .bar file to the Product.

- When you reach Step 4 (Add Release Version), push the button
to Add filebundle.
- Set your filebundle's Platform to QNX, and its Min. OS to 10.0.0.
- Edit its Device Support to specify which devices you wish to make your app available to.
- Edit its Files and upload your .bar file.

- Once you have completed this wizard, and if you are happy with your
app and all of the descriptions/images etc you have setup for your store
page, you are ready to submit your app to BlackBerry for approval. Push
the Send for review link to submit your app for approval.
- Your app will then go through BlackBerry's manual approval process. This may take several days, or even weeks.
- If your app is approved, it will then become live on BlackBerry world, where it will be exposed to millions of potential customers.


 Please logon or create a free account to download this file.
