Omnis Technical Note TNWS0007 November 2020
Integrating Omnis Studio with Mailjet using REST
For Omnis Studio 10.2 or above
by Richard Miller, Omnis Engineering
Introduction
This tech note shows you how to integrate Omnis Studio with Mailjet using the Mailjet Web Services API and REST. It also discusses how to use Postman to test the API calls to show you what response you should expect in your Omnis Studio Mailjet calls. You can download the example library: Mailjet.zip (requires Studio 10.2 or above)
Mailjet is a cloud-based email delivery service which can also provide tracking information to interrogate the effectiveness of your emails: if you don’t have a Mailjet account, you can sign-up for a free account that allows you to send emails and access the APIs. Mailjet provides the ability to send plain text or html emails as well as being able to generate templates that can be called from your Omnis Studio code (this tech note assumes you are sending ‘transactional emails’ and that you are able to create a template using the Mailjet email template editor). Another benefit of using Mailjet is you do not have to worry about managing emails from Omnis Studio as it automatically tracks and records when the email was delivered, opened, clicked or if it was blocked. The published API is extensive and can be used to set up contact properties to personalise your emails and mailing lists to send emails to specific groups.
Postman allows you to send REST requests to public APIs and inspect the response. It is particularly useful to test you are defining your REST request correctly and verify the responses. Postman provides a number of public APIs, including a set for Mailjet. You can find this at explore.postman.com. Go to the collection and click the ‘Run in Postman’ button to import the collection into your Postman environment.
Mailjet Keys
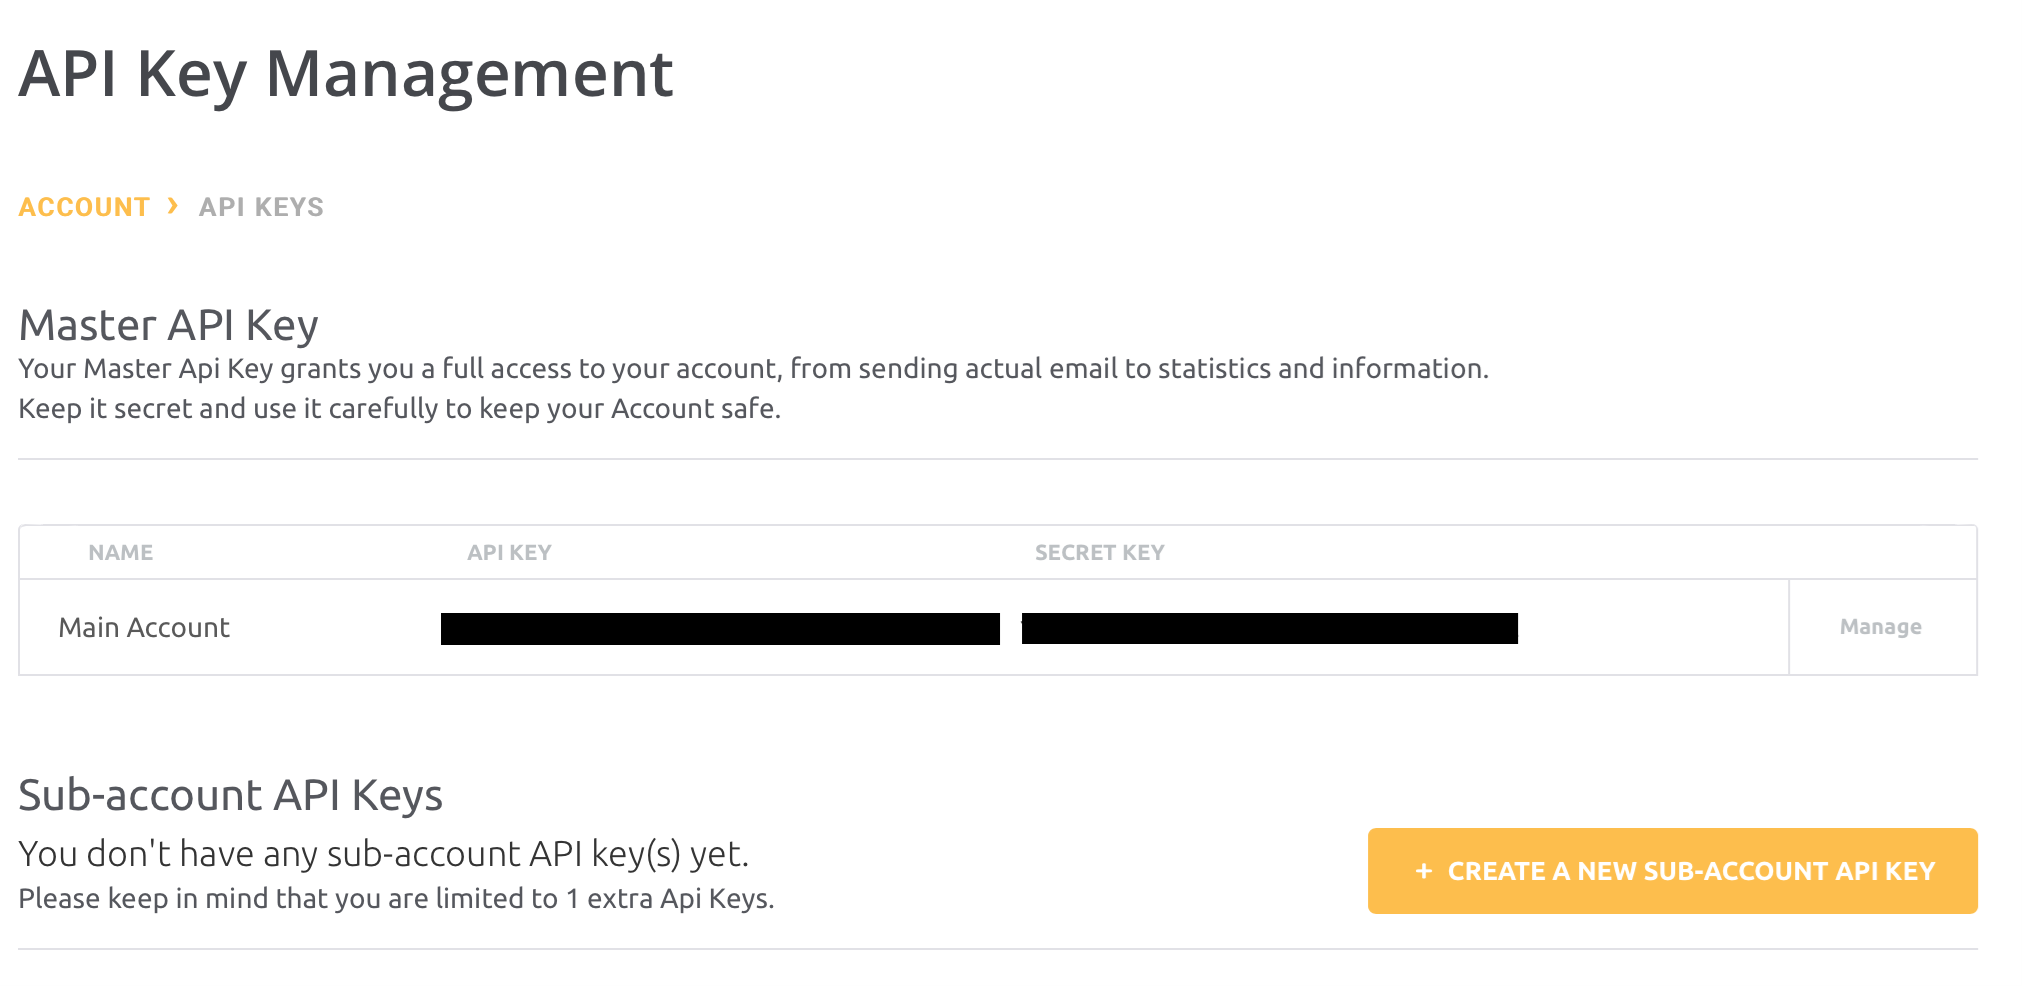
Before you can do anything with the Mailjet APIs, you need to find your API key and Private Key. To do this, login to your Mailjet account and go to Account Settings. Click on your account name in the top right corner and select ‘Account Settings’. Now click ‘Master API Key...' in the REST API section.
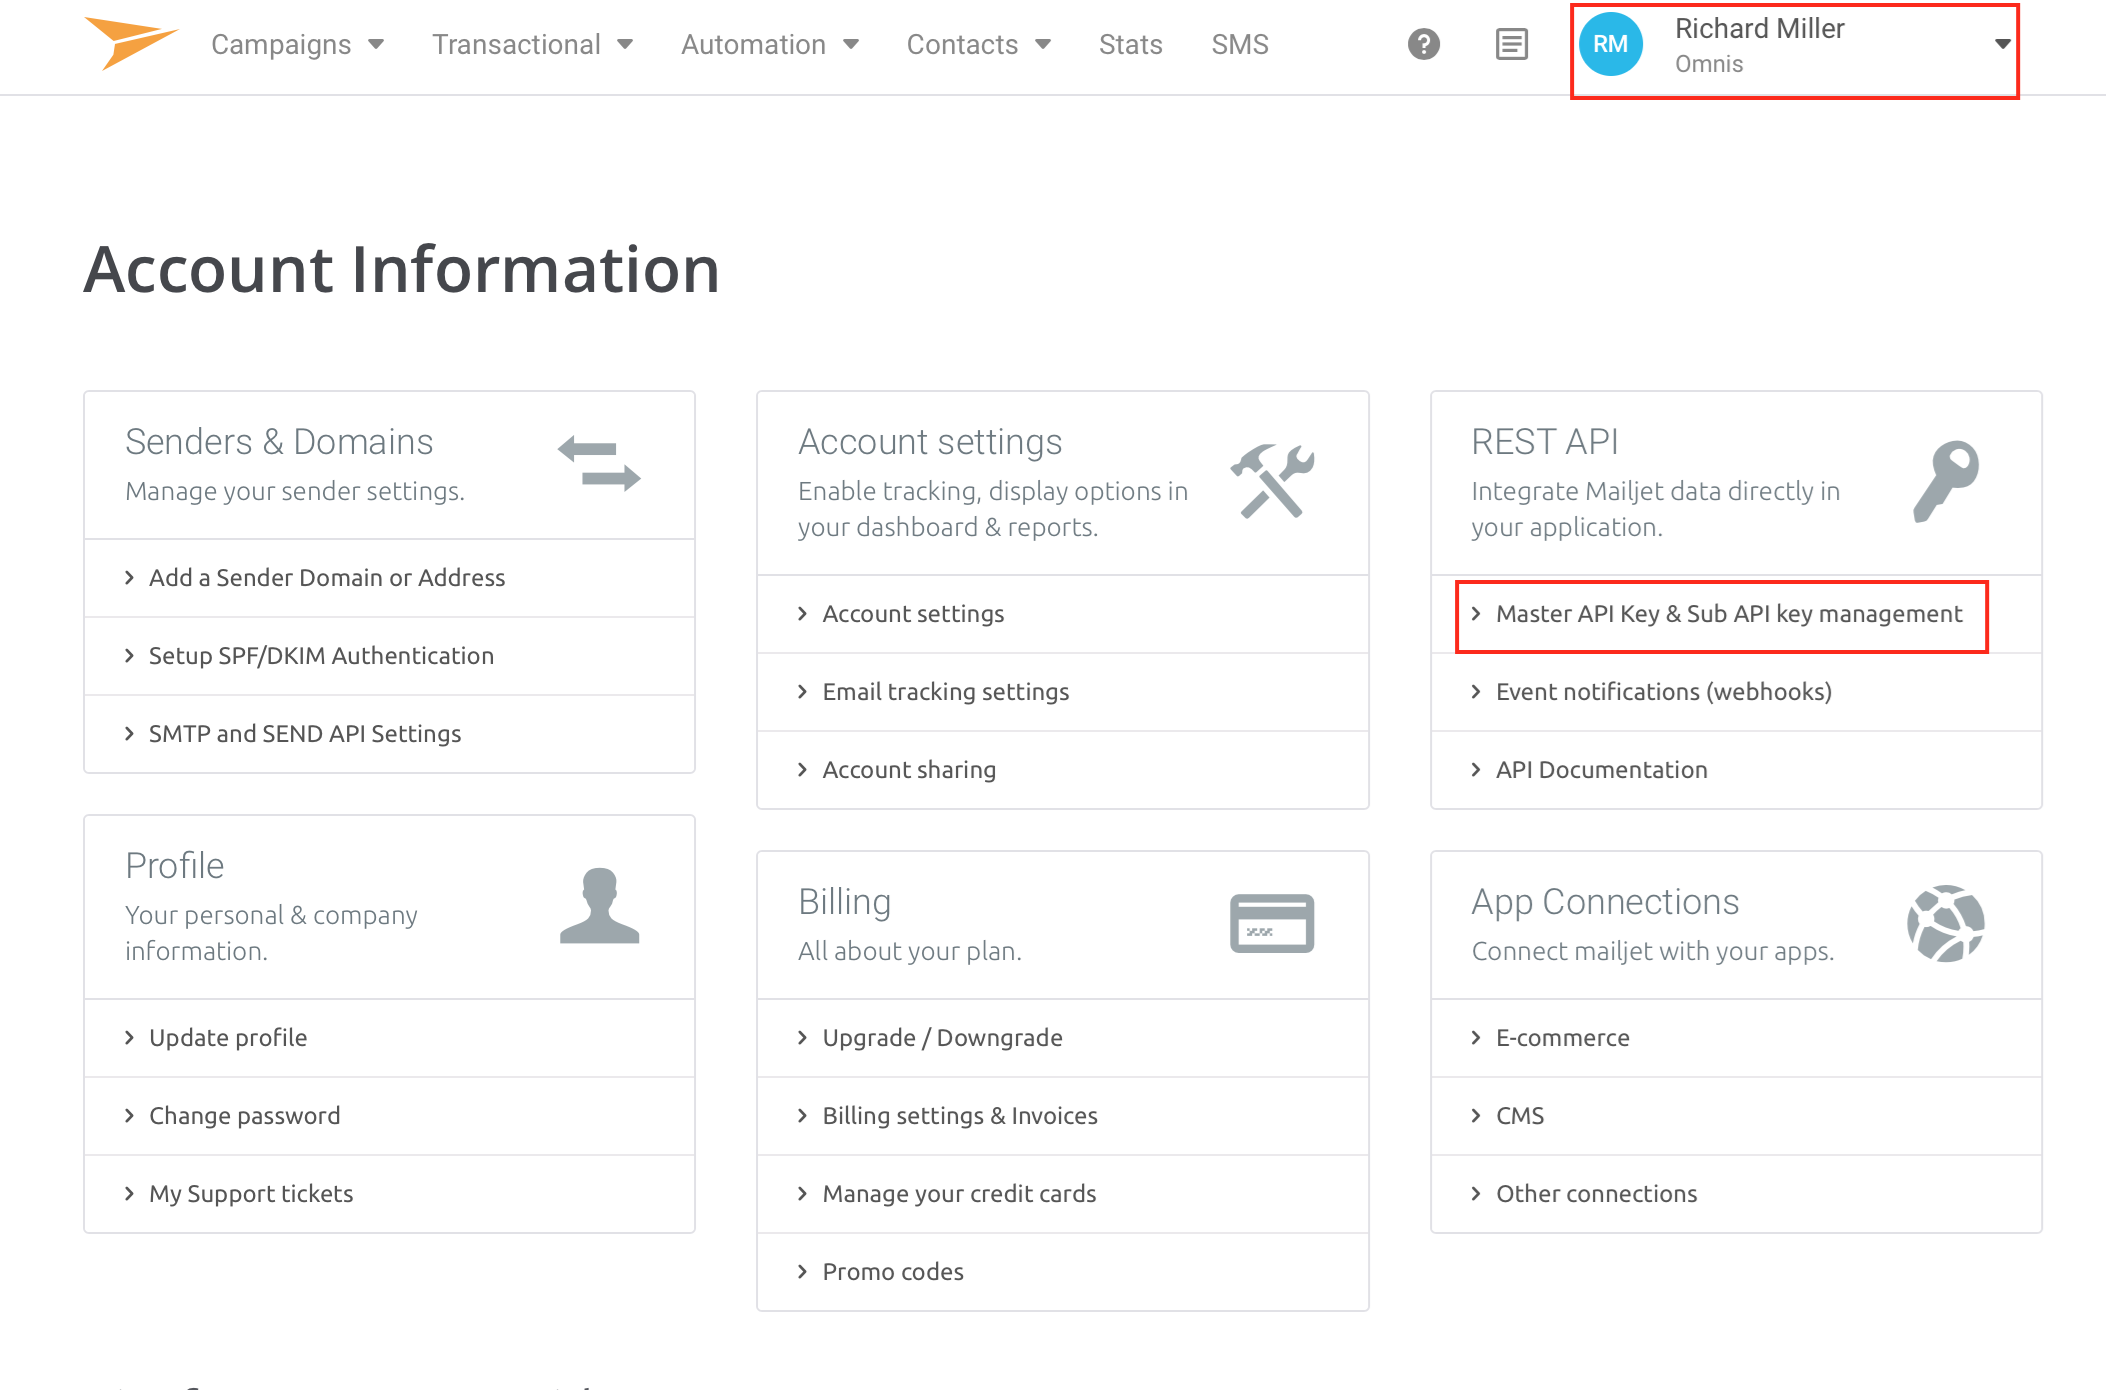
(Alternatively, you may need to navigate to Transactional > Overview on the main menu to see the API keys page.)
Make a note of the API Key and Secret Key. You will need these to communicate with the Mailjet servers.
Mailjet API Documentation
The documentation is published at dev.mailjet.com/email/guides and is an essential reference point when developing your Omnis Studio code.
Using Omnis Studio to interface to Mailjet
In this example we are going to use an object class to encapsulate our code, so it can be used either in a Window or Remote Form. To talk to Mailjet we need to use the Omnis Studio HTTPClientWorker.
Create an object class called oMailjet and add a variable iMailjetOW3 of type Object Reference. Set the subtype to point to OW3 Worker Objects\HTTPClientWorker.
Sending your first email
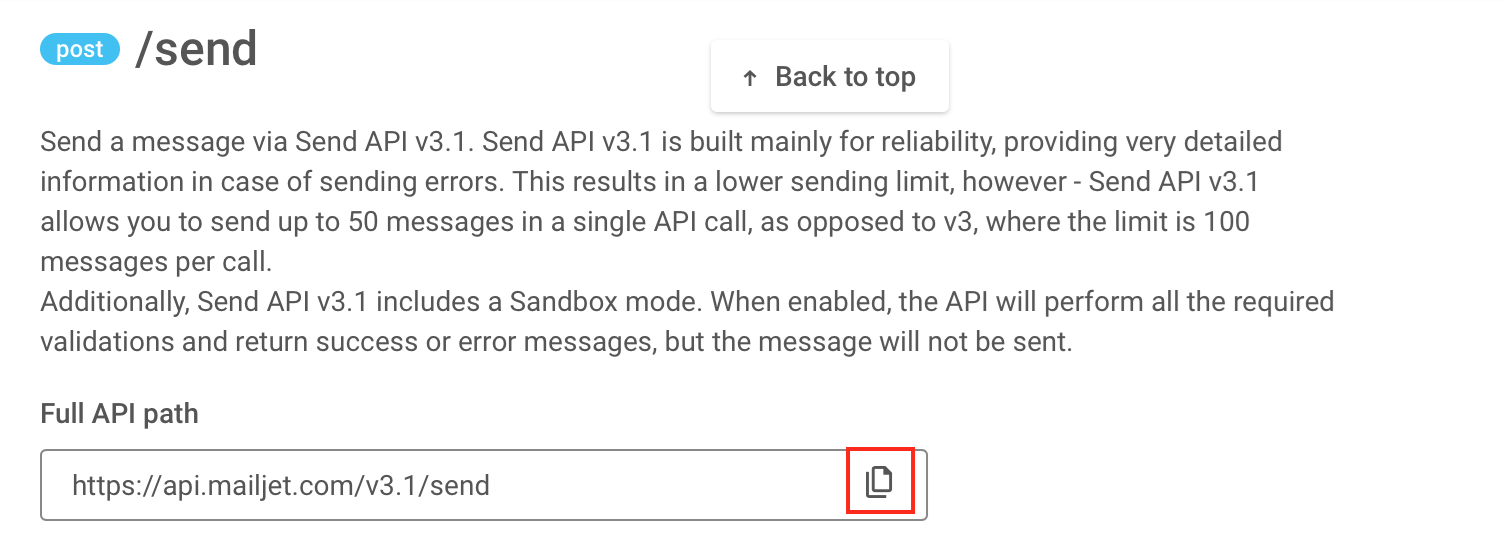
Mailjet currently provides two separate API calls you can use to send transactional emails. In this example we are using v3.1. From the Mailjet documentation, you can see the API call that you need and can copy it by clicking on the icon next to it.
Create a method in the object called $sendEmail and give it the following parameters, pAPIKey, pSecretKey, pCallingRef, pSendFromName, pSendFromEmail, pSendToName and pSendToEmail. All of these should be character variables except for pCallingRef which is an item reference and contains a reference to the class that has called this method.
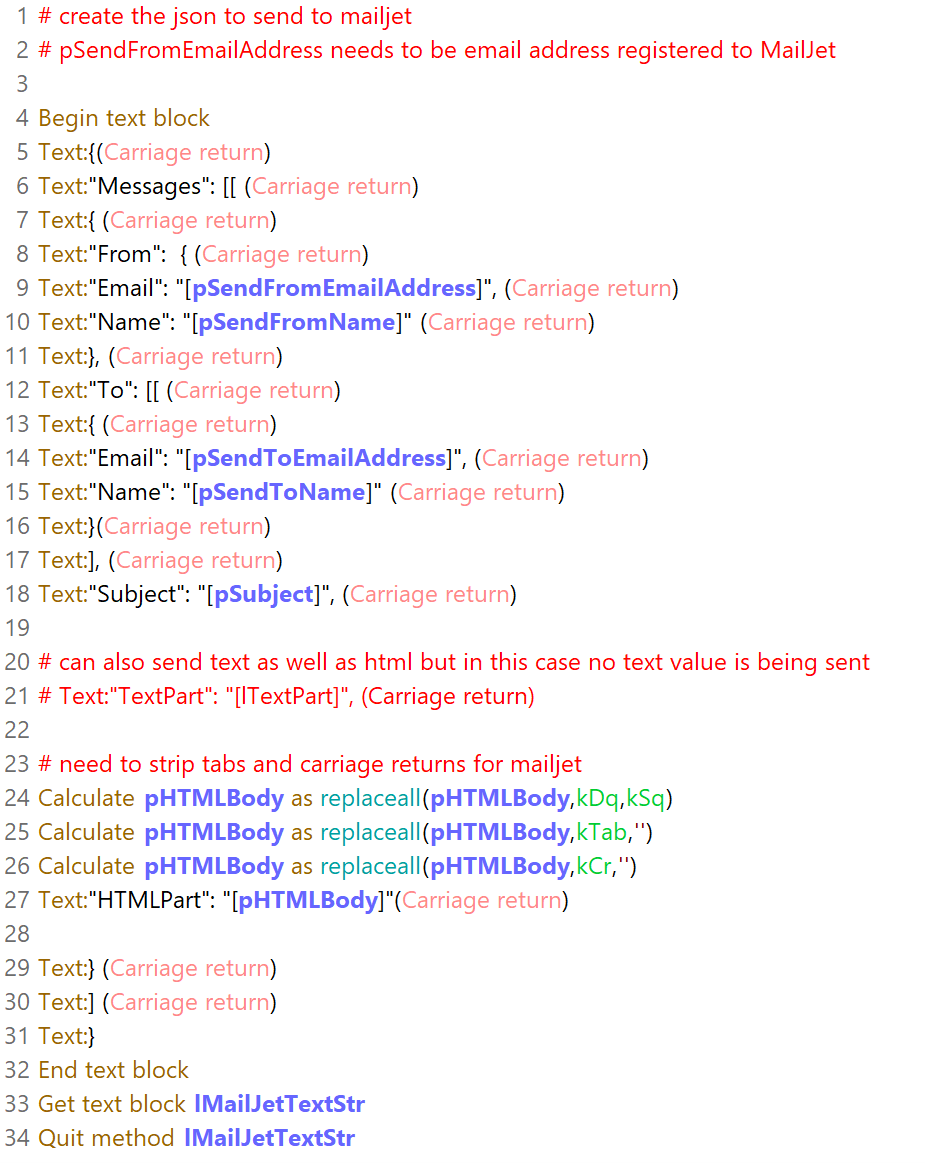
Since our first email is a simple HTML email, generate some text with basic HTML styles. We can use the API call we copied as the first parameter to the worker object. The documentation has told us it is a POST request, so we use kOW3httpMethodPost as the second parameter. The JSON string needs to be converted to binary. Authentication to the Mailjet system is provided by adding the API Key and Secret Key.
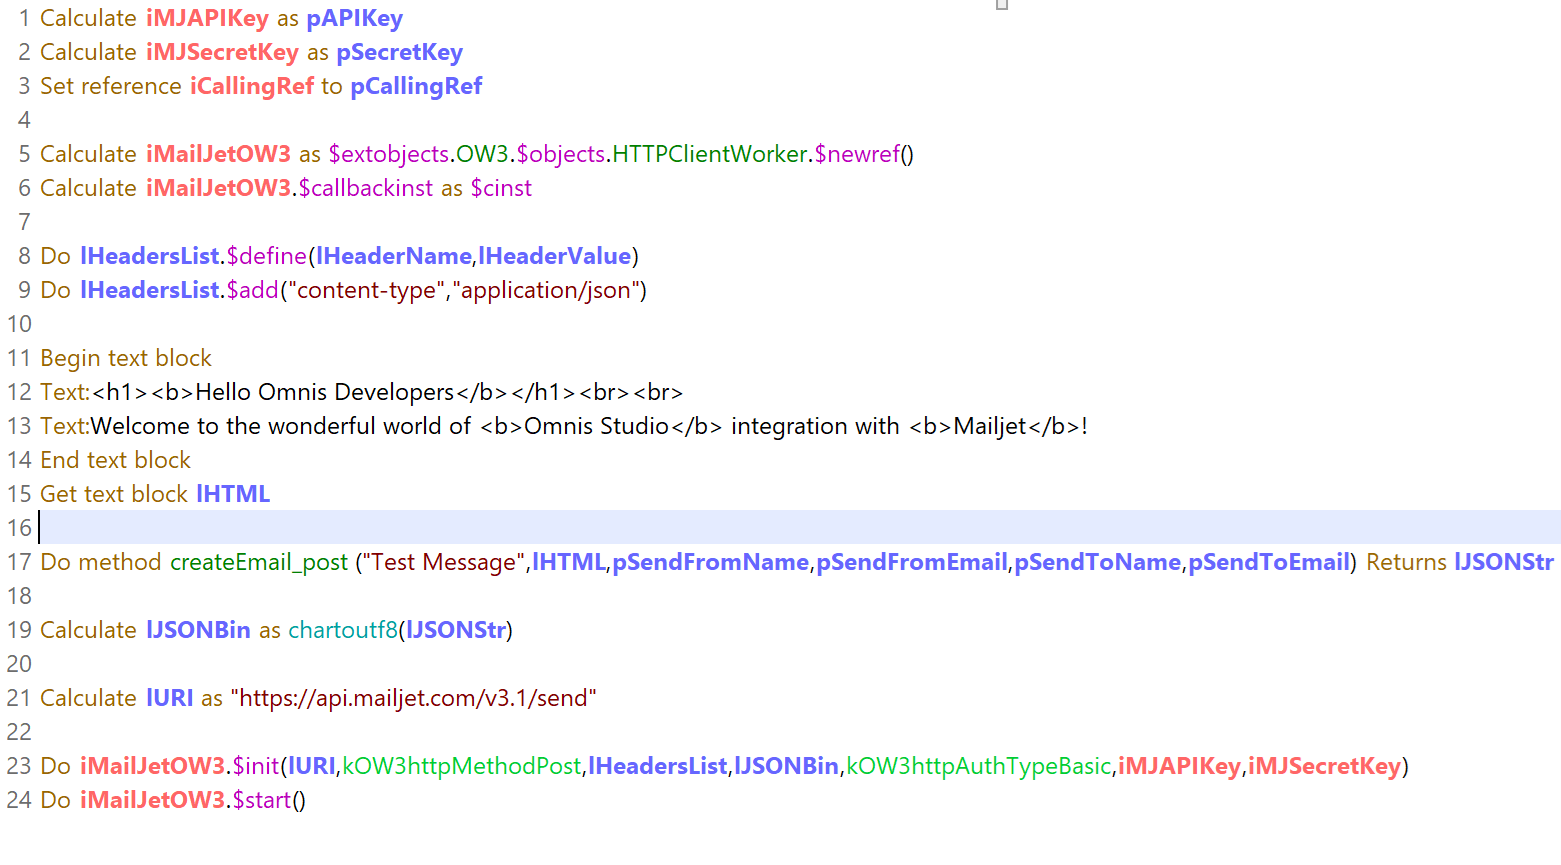
The method createEmail_post generates the JSON that is sent with the request. It is important to note that the sending email address (and domain) should be registered with your Mailjet account otherwise the email will not be sent and your registered email account will instead receive an email informing you that there is an email queued from an unregistered address.
Now add a $completed method with a parameter row variable. This will be called automatically when the worker returns with the row containing the results of the call. This code will pass it back to the calling class.

Create a window class like this (or see the first tab in the example library):
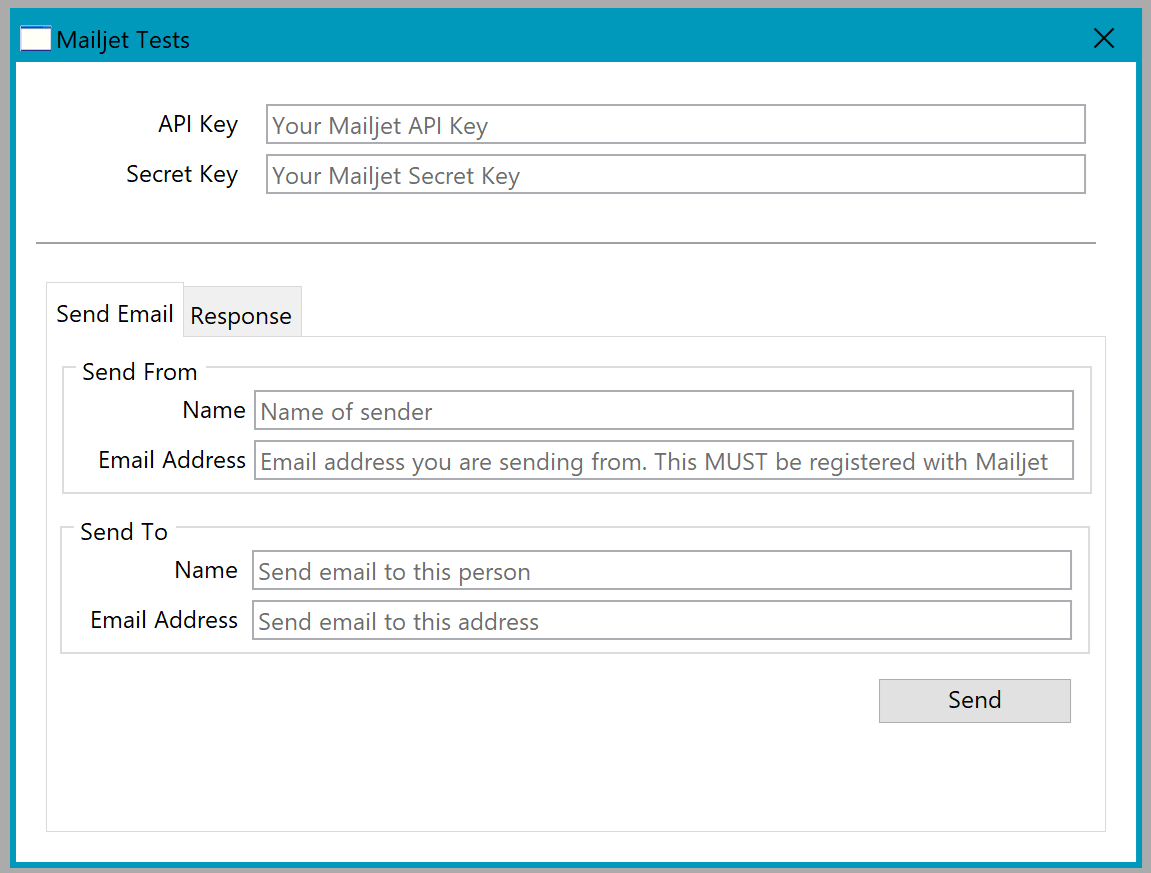
Use this code behind the Send button:

If all the fields on the window are filled out, after pressing the Send button, the request should be issued to Mailjet and the Response tab will list the results.
Using Templates
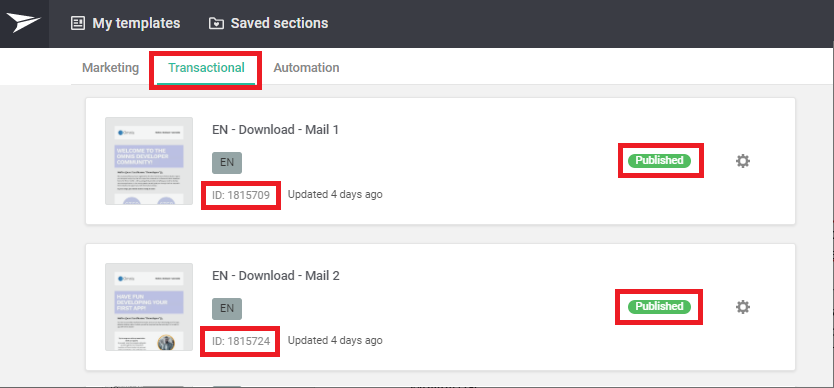
Our example email was very basic but, Mailjet allows you to create templates which you can personalise by adding variables and then call from Omnis Studio. The templates need to be created as ‘Transactional emails’ if you want to call them via Omnis: the templates are created under the Transactional tab in Mailjet, the ID is shown in the list view or when editing the template, and the templates need to be ‘published’ to be available via the API.
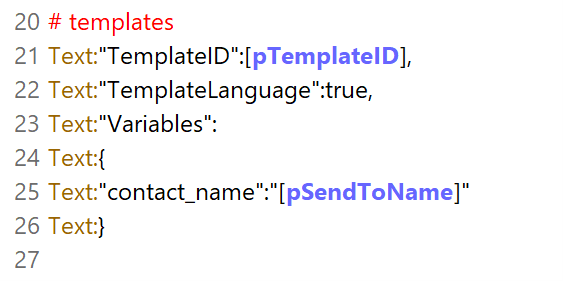
Once you have created the template, note the ID that Mailjet has automatically assigned to it. We can then pass this as a further parameter to our $sendEmail method.
When we generate the JSON content to send a template-based email, we can replace the HTML code with the following code. This will assign the template ID we want to send and also personalise the email if we have created a variable ‘contact_name’.
Example Library & Window
The window in the example library provided with this tech note includes three more tabs to demonstrate some further Mailjet actions. The List Contacts & Properties tab has three buttons. The first will list all the contacts. The second button will list all the contact properties: the contact properties allow you to associate a set of values for each contact, such as first_name, country, website etc. The third button will return the property values for the contact.
The Create Contact tab will create a contact and the Create Property tab will create a contact property and optionally assign a value to it for a specific contact.
Contact Lists
By default, any contact you create either directly or indirectly by sending them an email, creates an entry in your global contact list within Mailjet. You may find that you wish to separate these into different lists depending perhaps on location or product version and then send email campaigns to these groups. This is one of many further areas you could explore to enhance your Omnis Studio application.
Using Postman to test APIs
When developing your Omnis application, it can be useful to test the APIs outside of Omnis. This is where Postman becomes very useful.
Open up Postman and navigate to the Mailjet API collection. Click the arrow to expand and you will see that the APIs are grouped into useful sections. For example, to create a contact property, navigate to the Contacts section and find Create a Contact Property Object.
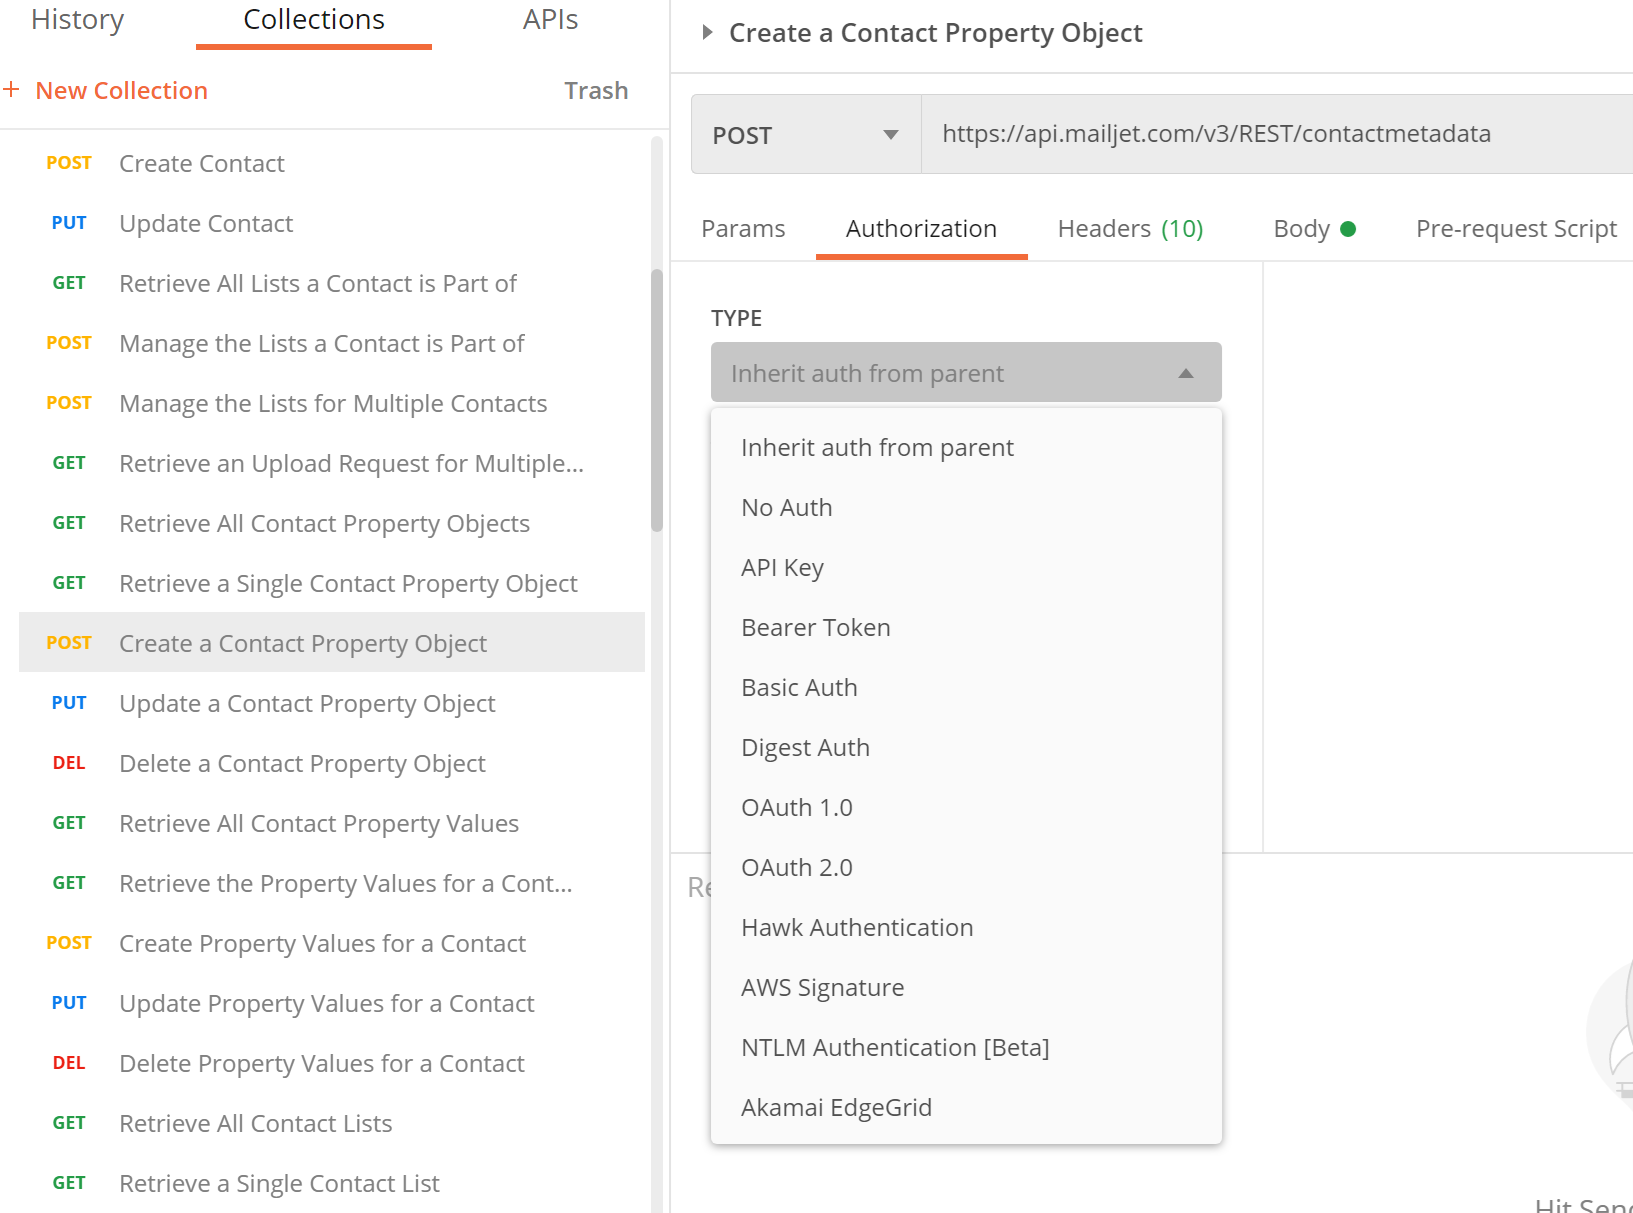
Before we can create the contact property, we need to tell Postman the Mailjet security details. Go to the Authorization tab and select Basic Auth. You can then enter the API key and security key that Mailjet has generated for you. The body tab allows you to enter the datatype and name for the contact property.
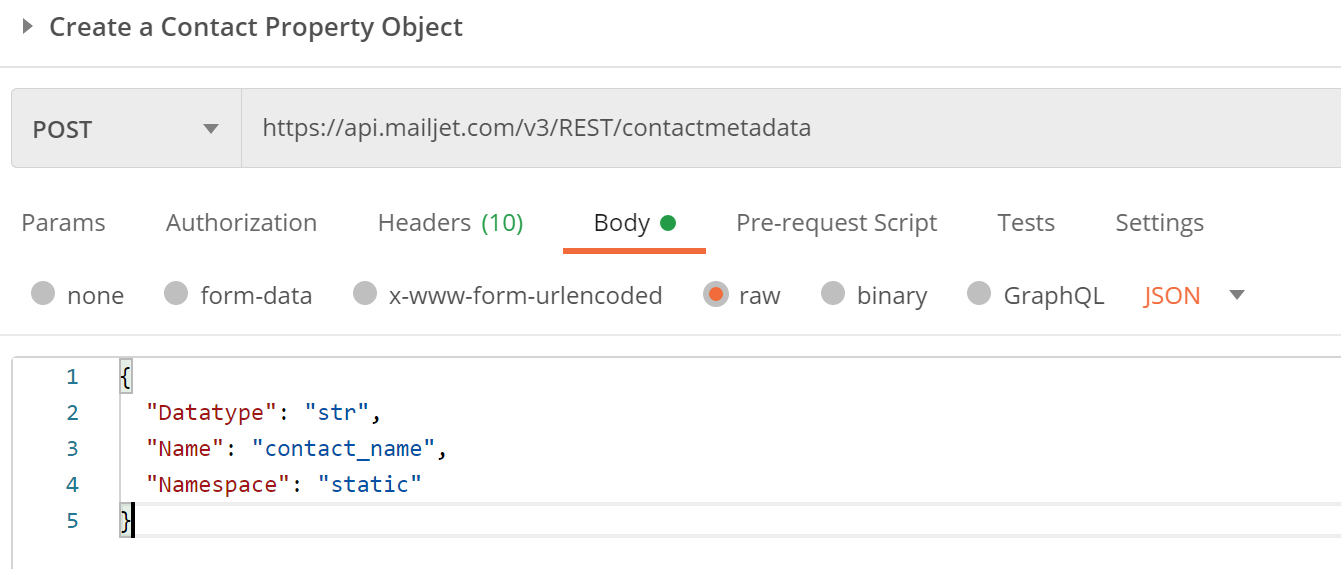
Press Send and the request is sent to Mailjet.


 Please logon or create a free account to download this file.
