Omnis Technical Note TNWI0002 July 2011 (updated 2024)
Running the Omnis Application Server as a Windows Service
for Omnis Studio 5.x, 6.x*
By Jason Gissing
*The Omnis Server for Windows 64-bit installer for Omnis Studio 8.x and 10.x allows you to run the Omnis Server as a Service, so you are advised to use this option for these versions of Omnis Studio. The information in this tech therefore only applies for older versions of Omnis Studio including version 5.x or 6.x.
Running the Omnis Application Server as a Windows Service gives you more control over the running of your Omnis web application, including the ability to run your application automatically when the Server starts, and to stop and start the Omnis Server if necessary. It is reasonably straightforward to setup the Omnis Server to run as a Windows Service, but the UAC system introduced into Windows 2008 introduces some extra complexity into setting up this system.
Installing Omnis as a Service (manually)
In order to manually install the Omnis service, you need to open a command prompt (as Administrator), then browse (using the "cd" command) to your Omnis Server's install directory. The file you are looking for is ntserv.exe, which should be at the root of your Installation.
cd "C:\Program Files\OmnisSoftware\OS8.1.1SVR"
You then install the service by simply executing:
ntserv.exe -install
The ntserv.ini file specifies the settings for ntserv.exe (found in the same folder as ntserv.exe). The default settings in ntserv.ini are:
[Service]
Name=OMNISServer
DisplayName=OMNIS Server
Description=Omnis Web App Server
Program=OMNIS.EXE
StartType=2
From Omnis Studio 11 revision 36652, you can specify StartName and StartPassword in the ntserv.ini, as follows:
StartName=.\Username
StartPassword=xxxxxx
Removing the Omnis Service
To remove the Omnis service you simply need to re-open your command prompt (as Administrator), browse back to the ntserv.exe and execute:
ntserv.exe -remove
If for any reason you are unable to locate your ntserv.exe, you can remove the service by instead executing:
sc delete OMNISServer
(Note, if you changed the name of your service, you should substitute your service's name for "OMNISServer")
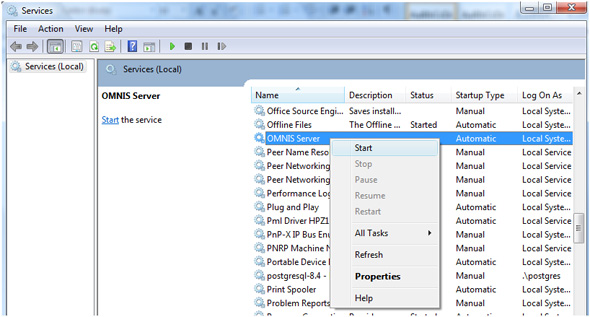
Running the Omnis Service
Once you have installed the service, you can run it by opening your list of services (Control Panel -> Administrative Tools -> Services), then start the service from its context menu.
It’s important to note that if the Omnis server is not serialised, the service will start and Omnis will not load properly. When you stop the service in this case, the omnis.exe process will not be killed.
So it’s important to make sure that the Omnis Server executable is serialised before running your service. To do this you should run the server normally and enter a serial number when prompted (the Omnis Server serial number is available from your local Omnis sales office or distributor). After serialization, you should set the $serverport property and any other properties you need to set for your Omnis Server. Then close Omnis.
The service will be registered to run as SYSTEM. We recommend you do not change the service’s “Run as” property, as there are currently known issues with this. This doesn’t affect running the service on pre-2008 versions of Windows, but running the service as SYSTEM causes a lot of the confusion many people run into when running the service on the newer versions of Windows.
Running under Windows 2008 or later
If you are running under Windows 2008 or later, UAC disables write access to Program Files. On these Operating Systems Omnis puts those parts of its installation that require write access into your user-specific AppData folder.
As the service is running as SYSTEM, instead of username, it uses the system profile's AppData area for these files, which for 32-bit versions of Windows is located at (or equivalent if you changed the install path):
C:\Windows\SysWow64\config\systemprofile\AppData\Local\OmnisSoftware\OS8.1.1SVR
or for 64-bit Windows at:
C:\Windows\System32\config\systemprofile\AppData\Local\OmnisSoftware\OS8.1.1SVR
It is very important to understand that by default, the SYSTEM user will not inherit your preferences (such as server port) or serial number, as it is using this completely separate set of files. As such, you should run the Omnis Server visually, as a user, and enter a serial number and set the server port etc. Then close Omnis and take a copy of your omnis.cfg file from the Studio folder inside your user's AppData part of the Omnis installation. For Studio 6.1 or above, you also need to take a copy of your config.json file from the Studio folder.
You should then paste the omnis.cfg file (and config.json if appropriate) into the equivalent location for the SYSTEM user (i.e. at the path mentioned at the start of this section). If you don't copy a pre-serialized omnis.cfg across, when running as a service Omnis will not start up fully, but will be stuck (invisibly) at the Serialization screen.
You will also need to make sure that any custom or altered files that reside in your AppData section are copied across to the SYSTEM's AppData area before running as a service. This will include things like startup libraries, icon datafiles, localization files etc. In fact, you may find it easiest to just copy everything from your user's AppData area into the SYSTEM’s equivalent.


 Please logon or create a free account to download this file.
