Tech News Back Issues Issue: 102203
|
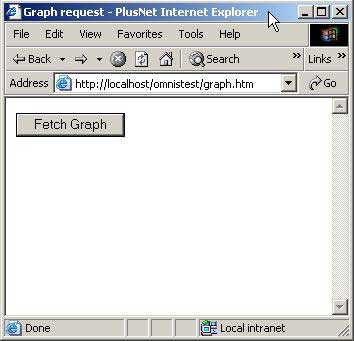
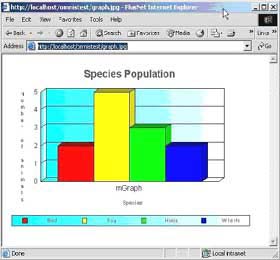
Introduction to the Omnis Web Client: Part 21, Spot The Ball - Image coordinate sensitivity in the html interface By Dr Caroline Wilkins In part 19 of this series of articles on web client, we built an example application that involved a user clicking on a button on an html page, a remote task building a graph object in response and then saving a snapshot of that graph to a jpg file which was then returned to the user as a web resource.
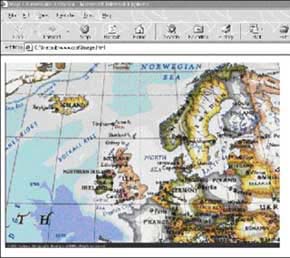
In this article, we will look at a method to send data about where a user has clicked on an image to the remote task. This will then be used to decide how to respond to a user. We will extend this concept in a later newsletter to achieve drill down through html interface graphs. There are times when it is useful to know where on a web page image a user has clicked. One example might be selection of a geographic location. If you were to put a geographic map in an html form, you could extract the co-ordinates that the user has clicked on that map. This might then be translated, server-side, to a country or region.
This type of data capture is typically achieved on web sites by using an Imagemap either within the html of the page containing the image, or on the server. Omnis gives us another option. When the user clicks on the image in an html form, the co-ordinate within the image that was clicked gets sent as a parameter to the remote task. An example where this approach might be useful is a "Spot the ball" competition. These competitions were very popular in the past and typically consisted of a photograph of a football match which had had the ball edited out. Participants in the competition would try and work out, from the position of players and lines of sight, where the ball was when the photo was taken. They would mark an x on a print of the photo and send it to the competition who would then work out which entrant was closest. A web version of this sort of competition would be very easy to achieve using the technique outlined in this article. Rather than selecting a region, we would want the user to be able to specify a co-ordinate within the image so we could work out how close they were to the invisible target. 1. The html page I am always reluctant to use images that I don't own the copyright to, so you will have to forgive the fact I am using one of my dog photos to illustrate the "Spot the ball" concept. (Greyhound fans amongst you will know there is very little point throwing a ball for most greys unless you want to fetch it yourself!) Please feel free to select and use your own sports images, if you prefer. You will have to edit out the ball and use the corresponding co-ordinates in the remote task code. 1.1 Create an html file containing the following code and save as c:\Inetpub\wwwroot\omnistest\spottheball.htm <HTML> <B>Spot The Ball!</b> <form method="GET" action="http://localhost/scripts/Omnisapi.dll"> </BODY> 1.2 Save the spottheball.jpg (or your chosen sports pic) to c:\Inetpub\wwwroot\omnistest\images\spottheball.jpg If you now open the html page as a localhost resource at http://localhost/omnistest/spottheball.htm, you should see an html page containing the dog or sports picture.
2. The remote task 2.1 Create a new library called spottheball.lbs. (Save to whatever directory
you find convenient.) If you have been doing the tutorials in this series already, you will already have succesfully set up your development machine. If not, or if you have any difficulties, ensure that the following steps have been followed: • Check that you have the Omnis serverport (Tools - Options)
set to 5912 or whatever port you are using in the html source for the
Omnis Server form parameter. Now test that you can click on the image in the page http://localhost/omnistest/spottheball.htm
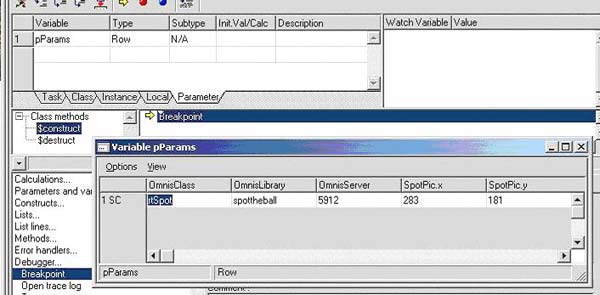
and that you hit the breakpoint in the $construct method of rtSpot.
You will probably have different values of SpotPic.x and SpotPic.y. These are the x and y coordinates that you selected when you clicked on the image and is the main concept behind this technique. Extracting those values of x and y for use in the code that follows is not entirely obvious. If you attempt to use code such as this, it will fail: Calculate iXcoord as pParams.SpotPix.x Instead, we specify the column number of the row pParams to extract the value of x that we require. e.g. Calculate iXcoord as pParams.c4 3. The rtSpot.$construct method Enter the following code so that your rtSpot.$construct method looks like: Breakpoint ; Game code - determines message back to user ; Read template HTML from file ; Customise html template to include message to
user. ; Stream web page direct to user - no temp files
required on server 4. The html template The $construct method refers to a template file which it reads, replaces a search string, @[Message], with a message to the user that is determined by the co-ordinate they have clicked and the game code in the method. The template file can be very similar to the initial html page. Note that the image file is given a full path. This is because the image location will be relative to the Omnisapi.dll script. A full path saves on confusion! Create an html file containing the following code and save as C:\Inetpub\wwwroot\omnistest\spottemplate.htm <HTML> <B>Spot The Ball!</b> <FORM method="GET" action="http://localhost/scripts/Omnisapi.dll"> </BODY> If you now test the interface again (http://localhost/omnistest/spottheball.htm), you should be able to step through the code and see that a page is returned to the user with a message that is dependant on how close they clicked to the target coordinates. The page that is served back to the user has another clickable image in it, so will carry on looping back to the server for as long as the user wants to play with it. In the next newsletter, we will add this technique to the graph generation technique in previous newsletters to create a drill down effect on html interface graphs. N.B. You can extend this demo to include the drawing of an X on the picture you return to the user by using html layers and a gif or tga containing an x with a transparent background. This would be a nice touch, but would make this newsletter far too long if we were to cover it here!
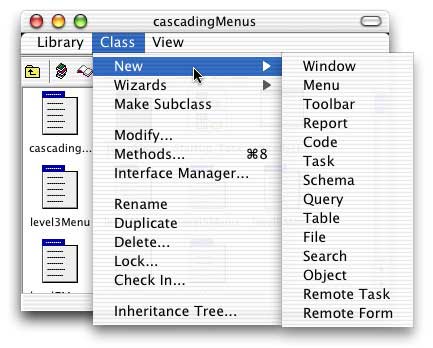
Cascading MenusBy David Swain Just like with windows and remote forms, we can enclose one or more menu instances inside of another menu instance. Such nested menus are variously called "hierarchical" or "sub-" menus, but because of their appearance when in use we call them cascading menus. This is a common technique for organizing complex sets of menus on all platforms. Why use such a technique? It allows us to better organize menu options when there are a number of them that are logically related. For example, the Class menu in the Omnis Studio Class Browser offers us many commands for dealing with Classes - including creating new ones using Class Defaults or Wizards. Rather than opening a selection list window to allow us to choose from among class types, a New sub-menu is presented with that list in menu form. The result is a faster interface for the user than the selection list window would have been while keeping the main Class menu simpler and less cluttered.
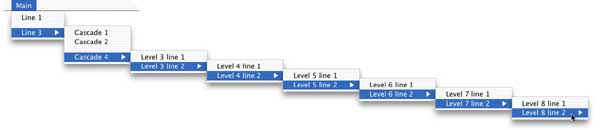
Of course, as with any good technique, this can be taken to extremes. The classic MacOS limits us to five levels of cascading menus (including the original main menu), but Windows and Unix-based platforms (including Mac OS X) allow us to deploy up to eight! Taking this to the limit could tax both the concentration and the dexterity of the typical user. In practice, I try to limit myself to two menu levels as shown above (three in rare cases). If I feel I need more than that, I consider whether separate cascading lines or even an additional primary menu wouldn't be a better idea.
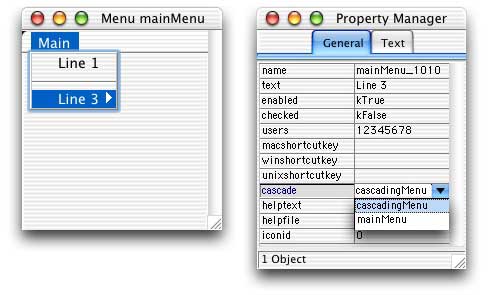
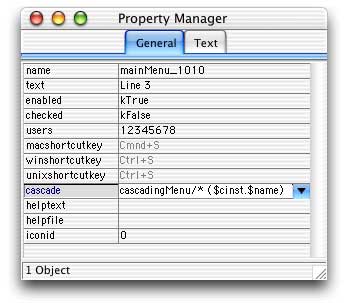
The cascade Property There is no method command for instantiating a cascading menu. Instead we use a property of a menu line to turn that line into a launch point or container for a cascading menu. The cascade property of a menu line serves this purpose. We simply assign the name of a Menu Class to this property (which we can retrieve from a handy dropdown list in the Property Manager) and the basic job is done. I say the "basic" job because there are a few options we can also take advantage of here, but these require manual keyboard intervention...all of which will be explained later in this article. Setting up a basic cascading menu is quite simple. We only need a Menu Class from which the cascading menu instance is to be spawned and another Menu Class (the "main" menu) with a line to serve as the instance container. For example, if we want to have line 3 of mainMenu present a hierarchical sub-menu based on the class cascadingMenu, all we have to do is select "cascadingMenu" from the dropdown list presented by the cascade property of that menu line.
In operation, the title property value of the cascading menu is ignored. The menu line presenting the cascading menu instance is labeled by its text property value just like any other menu line. The only visual evidence that a menu line contains a cascading menu instance is a triangle icon (which varies from one platform to another) on the right end of the line. This triangle appears whenever the cascade property value of the menu line is non-empty - whether or not that value is valid. When the user attempts to "execute" that menu line, the cascading menu drops down to one side:
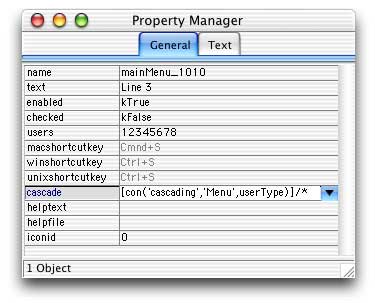
Naming a Cascading Menu Instance The sub-menu instance created when the parent menu is instantiated will, by default, have the same name as the class from which it is spawned. But as with most other instances, we can set a specific name for the instance or allow Omnis Studio to pick a unique one for us to avoid "conflicts" among sub-menu instances with the same name. We do this in the same way as with the Install menu method command, but we do it in the cascade property value. That is, we follow the name of the Menu Class with a slash ("/") character and either a specific name (no quotes required) or an asterisk ("*"). If we use the asterisk, Omnis Studio appends a number to then class name to form a unique instance name. This also implies that the cascade property supports square bracket notation since it expects to see a string value rather than an expression. This gives us additional flexibility in determining which Menu Class will be represented (perhaps we have variations for different user types) or in how the menu instance is to be named (allowing us to control the name rather than letting Omnis Studio choose a random number).
But this is not the only option the cascade property allows... Construction Parameters We can also include parameters to be sent to the $construct method of the cascading menu instance. We simply follow the naming string with a set of parameter expressions enclosed in parentheses, just as we would in the Install menu method command.
If we wish to send values obtained from the container menu instance, we have to consider which values will actually be available when these parameters are evaluated. This has to do with the... Order of Instantiation As with other "sub" instances, sub-menu instances are constructed before the menu instances that contain them. That is to say, their $construct methods are executed first. The container comes into existence first, but the contained instance must be constructed as part of the container's construction process. Only values not created or modified by the $construct methods of the container line or container menu can be relied upon here. The name and other basic properties are safe for use as parameter values, but values of variables from the container instance may not have been generated at the point where the cascading menu's $construct method is invoked. The $menuinst Property We can notationally access a cascading menu through the $menuinst property of the menu line that contains it. This is a runtime property, so it does not appear in the Property Manager unless we have chosen to display runtime properties there. But even if we display this property at design time, we can't set a value for it. The value is generated by Omnis Studio at runtime. To use this property effectively, we must "resolve" it. In other words, if we want to affect some property or execute some method of the cascading menu instance, we must follow the $menuinst reference with a set of parentheses before including further notation. This switches the notational reference to the cascading menu instance instead of to the $menuinst property itself. For example, to disable line2 of the menu instance cascaded from line3 of mainMenu, we would execute:
If we had not inserted the parentheses, the notation string would be invalid as the $menuinst property does not contain a $objs group. Who's Your Daddy II While we can get a reference to a cascading menu instance from its container using the $menuinst property, there is no property of the cascading menu instance that points in the reverse direction to the menu line or menu instance that contains it. If we need such a value for use within the cascading menu instance, we could send it as a parameter during construction. Since the containing menu instance does exist and has been assigned its name at this point, we can pass $cinst.$name as a parameter in the cascade property value. $cinst in this case refers to the container menu instance (the one that contains the menu line whose cascade property we are using). If we need to access this value from more than just the $construct method, we should create an instance variable for it in the cascading menu and populate that instance variable from the parameter variable in $construct. Depending on what we send to it, this parameter could be either a Character or an Item reference variable. Cascading in Installed and Embedded Menus A cascading menu contained in a line of an installed (main Omnis Studio menu bar) menu or of an embedded (window menu bar) menu comes into existence when the menu that contains it is installed. The menu instance then continues to exist until the menu that contains it is removed or otherwise destroyed (by its containing window being closed or by Omnis Studio being exited). We can also remove a cascading menu by dynamically setting the cascade property value of the menu line that contains it to an empty string. That line then becomes a "normal" menu line whose $event method can be executed (see below). I recently made a statement on the Omnis Underground list that cascading menus are not part of the $imenus notational group. Developers Kevin Gale and Bob Preston both corrected me in pointing out that while neither the Notation Inspector nor a $makelist() listing of the members of $imenus shows such menu instances, a valid reference to such an instance can still be produced by following $imenus with the name of the menu instance. For example, $imenus.cascadingMenu. I conceded that this is true, but that if our purpose in examining $imenus is to learn the randomly generated name of a cascading menu instance, then this trick (which requires foreknowledge of the menu instance name) is of little value. I feel that we are still better off notationally accessing the cascading menu instance through its hierarchical, object-oriented path using the $menuinst property of the menu line that contains it than by using its global membership in the group of menu instances (which has been deliberately hidden from us anyway). Cascading in Popup Menus The same basic rules apply here as they do to installed and embedded menus: the cascading menu instance is constructed before the menu that contains it. Once constructed, it continues to exist until its container is destroyed or until it is dismissed by the cascade property value of its container is emptied. As with popup menus, shortcuts to menus cascaded from them are only recognized if the menu instance is exposed - which usually makes such shortcuts pointless. Cascading in Context Menus Since a context menu is not instantiated until it is used, a submenu instance cascading from a context menu instance is also an "instantaneous" menu. It does not exist until the context click is detected and then the context menu instance, and all its sub-menus, are constructed from the inside outward. The biggest problem we encounter when cascading a menu from a context menu is that there is no $contextobj property value generated for the cascading menu. To know the notational path to the original context object from within the sub-menu (which is the object most likely to be acted upon by a sub-menu of a context menu), we must pass it as a parameter to the $construct method of the sub-menu from the "main" context menu. We do this within the cascade property value of the menu line that contains the sub-menu. Sometimes we may need to use accessor methods to acquire information from other objects that was not available during the construction process of a cascading menu instance. I demonstrated such a technique in an earlier Omnis Tech News article on dynamically creating an organizational chart. For time and space considerations, I must refer you to that earlier article. Shortcut Keys Cascading menus from installed and embedded menus can contain shortcut keys that allow their lines to be executed when the menus are not exposed. After all, that is the point of shortcut keys. This applies to all levels of cascading menu instances. The only odd thing is the way shortcut key "conflicts" are handled. By "conflict", I refer to the case where more than one cascade level in the same menu is assigned the same shortcut key. In this case, the first line encountered in the cascade (the one closest to the main installed menu) with that shortcut is executed. At first this may seem a bit counter-intuitive when compared to the fact that conflicts among installed menus are resolved by executing the right-most instance of the shortcut. But while Omnis Studio (and other programs as well) seeks shortcuts from the right-most installed menu, it also seeks them from the top down rather than from the bottom up in a menu cascade. The first one discovered is executed. Multiple Use of a Cascading Menu Instance If we don't assign unique instance names to cascading menu instances, we can create another form of "conflict". If we cascade the same menu from various places in our application and use the default (class) name for each of them, only one instance of that menu is actually created. That instance is simply shared among the various locations we have called for it. The advantage of this is that the menu instance must only be constructed once. The tremendous disadvantage is that any dynamic change made to that instance is also shared among the various locations. So if we remove or disable a line, all cascading menus sharing that instance show the line as removed or disabled. If our cascading menus are completely static and unchanging, the default name is fine. If we intend to do more interesting things with them, we should name each instance individually. Disabling or Removing a Cascading Menu Line We can dynamically alter any aspect of a cascading menu instance as we can any "normal" menu instance. We can also modify the properties of the menu line that contains a cascading menu. If we disable that line, the line will appear greyed out and the sub-menu will not drop when we attempt to select that line. If we remove the line completely, it will not appear. Re-enabling such a line is simple. Re-establishing such a line takes a bit more work. In my own work, most of the time this would be a "permanent" change for the menu instance based on user type. Rarely would I toggle the existence of a line, although I might more often toggle the $enabled property value. The $event Method of a Cascading Menu Line The $event method of a menu line with a populated cascade property is ignored. That line is simply a container for a sub-menu and only sub-menu lines can be executed through it. However, if we dynamically remove the cascade property value, the $event method becomes available to us. We can make double use of such a line, presenting a sub-menu for certain circumstances and executing a method directly for others. The possibilities are endless... Conclusion I hope this article has helped clarify the use of cascading menus for you. We will finish up this series on menus with the next issue of Omnis Tech News and then move on to something more interesting...
|
||||
| © 2002-2003 Copyright
of the text and images herein remains with the respective author. No part
of this newsletter may be reproduced, transmitted, stored in a retrieval
system or translated into any language in any form by any means without
the written permission of the author or Omnis Software. Omnis® and Omnis Studio® are registered trademarks, and Omnis 7™ is a trademark of Omnis Software Ltd. Other products mentioned are trademarks or registered trademarks of their corporations. All rights reserved. |
||||


 Please logon or create a free account to download this file.
