Tech News Back Issues Issue: 112802
|
Introduction to the Omnis Web Client: Part 5, Uploading, previewing and saving image files on the server using web client By Dr Caroline Wilkins In the previous two newsletters, we created an Omnis library, an Omnis database, programmed a startup task that will open a session to that database and created a schema in the library to represent a table in the database. We built a web client application that consists of a Sidebar controlling the pagenumber of a Paged Pane component that enables a user to enter records into a table from a remote form. If you want to skip the stages in the previous newsletter, you can download the zip file RPSidebar.zip containing RescuePet.lbs and RescuePet.df1. The numbering in the this issue follows on directly from the last issue. In this newsletter, we will add a JPEG field to the remote form and extend the interface to include a facility to upload and preview image files from the client machine, using the remote form. 19. Tidying up 19.1 Earlier in the tutorial, we put numbered label
components on each page of the remote form so we could check that the
Sidebar was controlling the pages of the Paged Pane. Now we are going
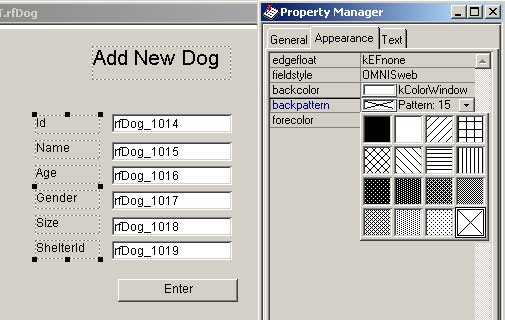
to tidy up a bit. Change the text of the label component on page 2 from
'2' to 'Add New Dog'. If you change the fieldstyle property (Appearance
tab) to '
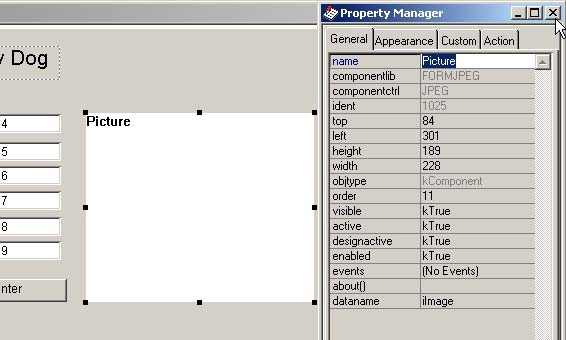
20. JPG field 20.1 Drag a JPG component from the Component Store onto
the remote form (page 2 of the Paged Pane). Resize to taste.
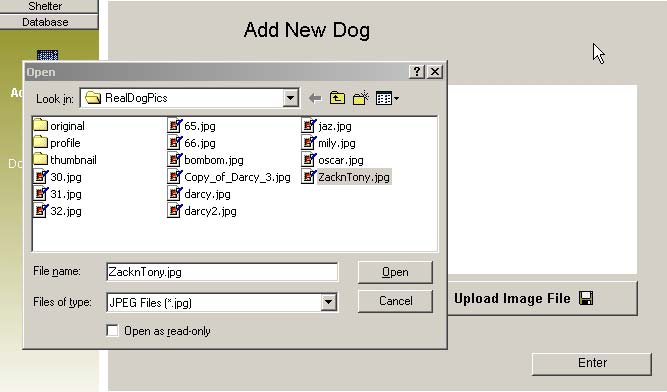
21. Form file component Now we are going to add the component that enables users to upload files from their client machine, the form file component. The form file component can be used to write to the client machine or read from it. In this example, we will just be reading files. 21.1 Drag a form file component from the Component Store
and position under the JPEG field created previously.
22. Displaying the image data 22.1 Confirm that the action property for the form file
component is set to kFFRead. On evFileRead ;; a file has been
read 22.4 Place a breakpoint in the method then test the
remote form in your browser and try and upload a jpg file using the form
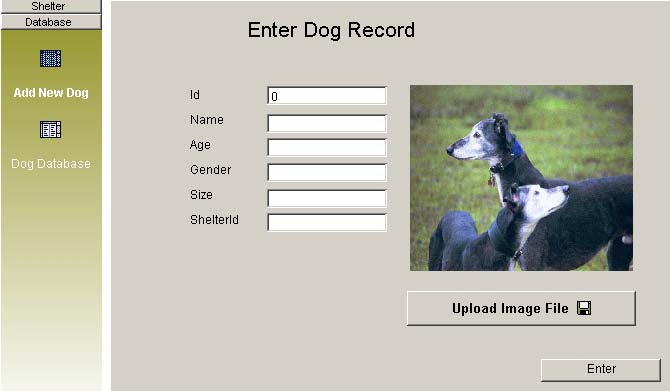
file button you have built. You should find that iImage holds the picture
data and the picture is displayed in the JPEG component on the form. At
this stage, the data is all on the client. Next we will write it to the
server.
23. Writing file to server 23.1 This bit is too easy. Just add the following couple of extra lines to the field method code behind the 'Enter' button: Calculate lTempPath as con('C:\InetPub\wwwroot\rescuepet\images\',iDogRow.Id,'.jpg') The entire method behind the 'Enter' button should now look like: On evClick Obviously, you should choose your own location to store
the image files. In this example, we store them to a path on the webserver
where they can be shared with other web resources. This means we can upload
images via web client and immediately display them on an html web page
if needed. If all has gone to plan, your library should look something like the one you can download here: RPJPEG.zip. (Libraries & datafiles may need to be converted in Omnis.)
Mouse Event ExamplesBy David Swain Last time we examined how tracking of mouse events and "right" mouse events can be enabled, what the event messages are in each of these families and some additional functions that help us further identify exactly what is happening with the mouse when one of these events occurs. Now it's time to have a little fun with this information! evMouseEnter and evMouseLeaveLet's begin with the simplest subgroup: the mouse movement messages. These are triggered when the mouse crosses a boundary of a field with its mouseevents property set to kTrue (or this property could be turned on at the library level). There is one use I make of this facility in nearly every application — and since I use this so universally, I even turn on the mouseevents property at the library level. In Omnis 7 I became very fond of the Help message command, which was used to put descriptive text in the status bar of a window as the mouse passed over a field. This facility was not put into Omnis Studio. Instead, we were given tooltips for window objects (known as "windowtips"). Now this is a personal thing, but I have this love/hate relationship with windowtips. On the one hand, I like being able to give the user information about the object the mouse is pointing at, but I can't change the font, font size or color of the things (they're yellow), and worst of all I can't control their position. It seems like they always pop up and cover some other important item on the window. So years ago I developed a way to convert window tooltips into help messages that appear in the status bar of the window instead of as tooltips. evMouseEnter and evMouseLeave are key players in this technique. Since I want to use this throughout my application, I chose to centralize the processing involved by creating a "helper" Object class named "Status object", which I instantiate as a Task variable of object type named "status". There are two methods in this Object class used for the help message chore. The first is named "$genmsg" (for "general message"). It has a single parameter named "msgString" ("message string") of Character type. It has only one line of code:
This takes the string sent as a parameter and assigns it as the text of the first pane in the status bar of whatever window is currently on top of the window stack. Since only the top window receives "mouse enter" and "mouse leave" events, this is appropriate. The other method in my object is named "$clear". It has no parameters and contains this one line of code:
This method simply removes any text from the first pane of the status bar of the top window. Now we have to determine how and when to invoke these methods. Obviously, we want to invoke "$genmsg" when the mouse enters a field and "$clear" when the mouse leaves that field. It only takes a couple of lines of method commands to do this, but this is a lot of code to create if we decide to put it into the "$event" method of each field! So let's put it into the "$control" method of each window instead and save ourselves some work. As long as we don't trap these events at the field level, they will find their way up to the window's "$control" method even if a field is buried many levels deep in containers. Here is the code for the window's "$control method:
Remember that "$cobj" refers to the object the directly received the event that is currently being processed for all levels of event handling. So "$cobj.$tooltip" contains the tooltip string for the object that the mouse just entered. Now turn off the showwindowtips property in the Omnis preferences (not the preferences at the library level) and see the difference! If you created this code but it doesn't seem to work, there are three things to check:
If all of these are so, you should have no problems. evMouseDown and evMouseUpThis may or may not have practical use for you, but it illustrates a use of these two events. let's suppose that we want our users to be able to draw lines on a window instance. They would move the mouse to the beginning position for a line, press the (left) mouse button down, move the mouse to the end position for the line and then release the mouse button. If we can capture the position information for the "mouse down" and " mouse up" events, we should be able to add a line background object to the window using the "$add" method for the group of background objects for the current window ("$cinst.$bobjs"). The syntax for this method is: $add(type,top,left,height,width,invisible,disabled) or $add(object) adds a new field or object to the window and returns an item reference to it The type for a line is "kLine". The invisible and disabled parameters default to "kFalse", so we can ignore them in our experiment. That leaves us with the problem of determining values for top, left, height and width. With line objects in Omnis Studio, we can actually think of these "beginning y position", "beginning x position", "distance to ending y position" and "distance to ending x position" since a line object can have negative values for height and width. To begin our project, let's create a new Window class and name it "sketchpad". Open the Method Editor for this Window class and create four instance variables of Long integer type named "x1", "x2", "y1" and "y2". Now we just need to work out how to populate these variables and how to cast the parameters for the "$add" method. In the last article, we learned about the mouseover() function. We can determine the current "x" or "y" coordinate of the mouse by supplying the "kMHorz" or "kMVert" constants as the parameter for this function. These return the absolute position of the mouse within the current window instance. That is, containers are ignored. Also remember that the origin of our window coordinate system is the upper left corner, that "x" increases to the right and that "y" increases downward. If we capture values for "x1" and "y1" for the "evMouseDown" event and "x2" and "y2" for the "evMouseUp" event, we will have our beginning and ending position coordinates. The height is simply the difference between the beginning and ending "y" values ("ending" minus "beginning" if you remember from geometry class) and the width is the difference between the beginning and ending "x" values. Since we have already turned on mouse events for our library, we only have to put the following code in the $event method of our window class and the test the result:
We do this in the $event method so that only "mouse down" and "mouse up" events that happen directly to the window (and not to field objects on the window) are involved. Notice that these events can occur to the window directly. If we wanted to "cover our bets" and insure that this would all work even if there are field objects in the way, we could put this exact code in the windows $control method as well. If we wanted to be really clean in our coding, we could also include four method lines after the method line that creates the line object that resets the values of our four instance variables to zero. But since we only use these values in the "evMouseUp" portion of this method and we can't have an "evMouseUp" without first having an "evMouseDown", the code above will work just fine. The user can draw a line from any point on the window instance in any direction and a line will appear when they lift the (left) mouse button. So far, so good. But what if we wanted to draw rectangles instead of lines? Rectangles can't have negative values for height or width like lines can, so we have to make some modifications to that last method line. For rectangles (and all other drawn objects except lines) we need to specify the upper left coordinates and teh absolute height and width. This means we have to use the minimum "x" and "y" coordinates for left and top and the absolute value of the distance between the beginning and ending coordinate along each axis. The result for a rectangle would then be:
If we wanted to then perform other operations on our new object (like giving it something other than the default color), we should create another instance variable named "newObjRef" of Item reference type and set that as the Return parameter of the Do command. This gives us a notational reference to the new object and we can then apply any other property values we need. evRMouseDown and evRMouseUpThe "right" mouse button is used in Omnis Studio and many other programs as the "context" button, but we can occasionally use it for other special purposes as well. Let's suppose we need to allow users of a specific window to resize the fields on that window. We could use the "right" mouse events to let them toggle the $selected runtime property of the fields they wish to resize. (Didn't know we could do that? Just watch!) First, we need to enable "right" mouse events for the proper scope. We have a number of choices. We could turn it on for the entire library, but maybe we don't need it quite so broadly available. We could use notation to turn it on for the library reversibly (in a Reversible block) in the $construct method of our window, but maybe we only want this to apply to Entry fields. We could turn it on for each Entry field as we create the Window class at design time, but that seems like a lot of work. Why not turn it on for all Entry fields on the window instance as it constructs? We can do this with the following command line in the windows $construct method:
To manage this for all affected fields in one place within the window, we can use the windows $control method for detecting and reacting to this event type. The event would only be passed up to $control from fields that can recognize the event, so we don't have to worry about the user changing the size of other field types. We will also need another instance variable (actually, this could be a local variable if this were the only thing we used it for) of Item reference type that we will name "objRef". We can then use the mouseover() function, but this time with the "kMItemref" constant as its parameter value, to determine which object received the "right" mouse event and to populate "objRef". Once we have this information, we can easily toggle the value of the $selected property of the field that received the event. Here is the code we would put in the windows $control method:
Give it a try! For my last example, let's consider how we might modify the use of a context menu by pointing it to an object other than the one that receives the context-click. Perhaps we have a number of radio buttons in a group box and want some action of the context menu to apply to the container even if one of the items inside the container is context-clicked. We will need a few items to accomplish this. We need an instance variable in the window of Item reference type to point to the intended object. We need an accessor method for the window class so the context menu can query the window to determine to which object is should direct its action. The menu needs to be programmed to perform its actions on that object rather than on the object that received the context-click. And finally, we need a means of setting the value of the Item reference instance variable — and that's where the "right" mouse events come into play. Create a new Window class named "contextTest" and place on it a group box with four radio buttons within the group box. Create an instance variable for the window named "objRef" and give it the Item reference data type. Create a Class method named "$getObjRef" and put the following line of code in it:
Since this is a public method (name begins with "$"), it can be addressed from our context menu. In the "$event" method of the group box, put the following two command lines:
This puts a reference to the group box into "objRef" at the beginning of a context-click on the group box itself. In the "$event" methods of each of the radio buttons, put the following lines of code:
This also puts a reference to the group box into "objRef" at the beginning of a context-click on any of the radio buttons Now create a new Menu class named "contextMenu" (or something equally clever!). Create four lines labeled "Plain", "Chiseled", "Inset" and "Embossed". Give the Menu class an instance variable named "winObjRef" of Item reference type. In the "$construct" method of the class, put the following command line:
In each of the menu lines, put the following command line, but use the proper 3D effect constant (kFlat, kChisel, kInset or kEmbossed) to match the line title:
Now go back to the window and set "contextMenu" as the contextmenu property value for each of the fields (including the group box). Open a test instance of the window and check it out! ConclusionNext time we will examine keystroke events. We'll have at least this much fun with those! |
|
| © 2002-2003 Copyright
of the text and images herein remains with the respective author. No part
of this newsletter may be reproduced, transmitted, stored in a retrieval
system or translated into any language in any form by any means without
the written permission of the author or Omnis Software. Omnis® and Omnis Studio® are registered trademarks, and Omnis 7™ is a trademark of Omnis Software Ltd. Other products mentioned are trademarks or registered trademarks of their corporations. All rights reserved. |


 Please logon or create a free account to download this file.
