Tech News Back Issues Issue: 111302
|
Introduction to the Omnis Web Client: Part 4, Creating a web client application using Sidebar and Paged Pane components By Dr Caroline Wilkins In the previous newsletter, we created an Omnis library,
an Omnis database, programmed a startup task that will open a session
to that database and created a schema in the library to represent a table
in the database. We are now ready to build a user interface. In this newsletter,
we will use the library and database we have built here and go on to create
a web client interface to the database. 8. Creating a Remote Form and Remote Task 8.1 Drag a remote form from the Component Store into
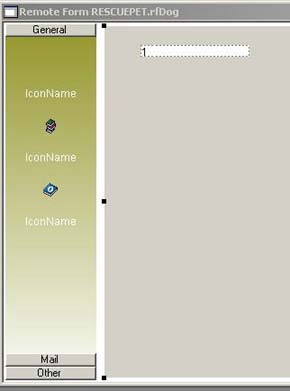
your library. Name it rfDog. 9. Adding a Sidebar and PagedPane 9.1 Go back to Studio and enlarge the remote form so
you can fit some components on it.
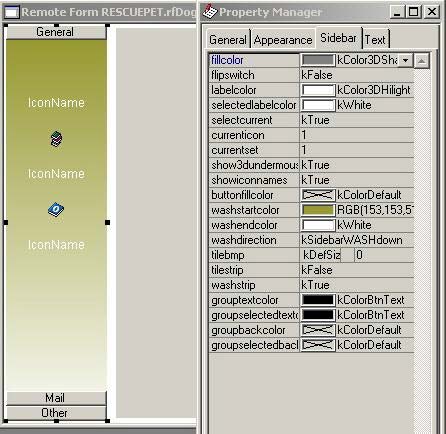
Note: Periodically, close the remote form in design mode. This will save any changes you have made to the library. Re-open to continue working. Alternatively, remember to press Ctrl/Cmnd-S now and again. 10. The Sidebar 10.1 The Sidebar structure is determined by a List variable.
We will build this List in the construct method of the remote form. Right
click on remote form and select "Class methods". Remote Form Class RESCUEPET.rfDog
$construct Method 11. Using the Sidebar to control the PagedPane 11.1 Firstly, you must enable the evIconPicked
event for the Sidebar. (Properties: events). Remote Form Class RESCUEPET.rfDog
Field Sidebar Method At this stage, you should have a remote form with a Sidebar component controlling a PagedPane component. If it is not working, check that you have named the PagedPane correctly (set name property to 'PagedPane') and check that you have enabled evIconPicked events for the Sidebar.
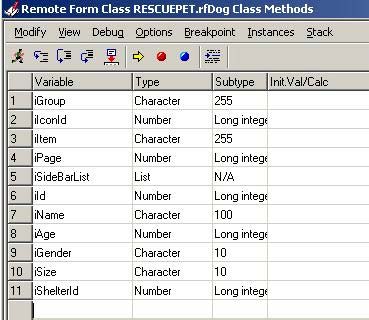
12. Instance Variables for the Remote Form 12.1 Remote Forms work with instance variables.
For each field that you are entering or displaying data with, there
must be an associated instance variable. For our example, open up
the method editor for the remote form and create the following instance
variables:
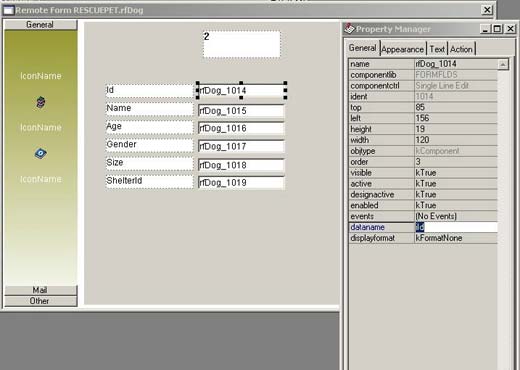
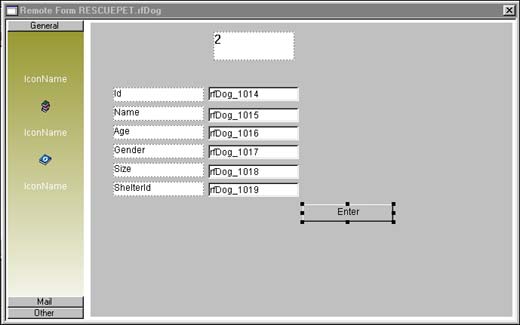
13. Setting dataname for single-line edit fields 13.1 Drag 6 single line edit fields from the component
store onto page 2 of the PagedPane component on your remote form.
Note: We could have got this far with the remote form using the remote form wizard. We have done it stage by stage in order to gain an understanding of what is involved. Next time, you may like to let the wizard do the work for you! 14. Adding a Pushbutton We need to add a button to the form for users to press
when they have entered data and want to submit it to the database.
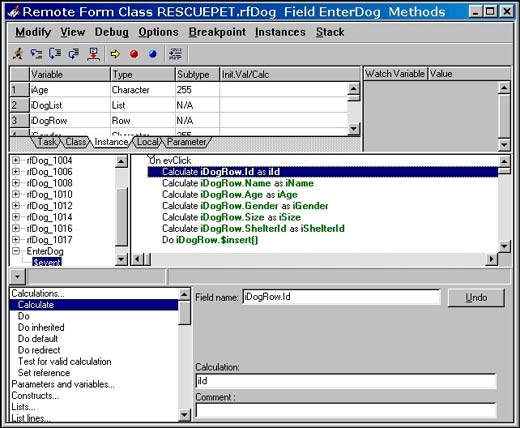
15. Inserting data from the Pushbutton 15.1 Double click on the 'Enter' button on the form.
Remote Form Class RESCUEPET.rfDog
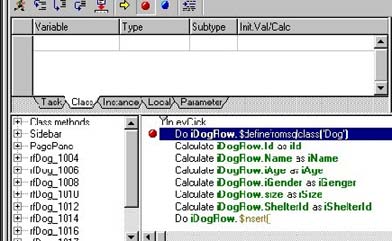
Field EnterDog 16. Testing the data insert 16.1 Place a breakpoint on one of the method lines
by clicking on that line to select it and then clicking the red
dot icon at the top of the method editor.
17. Stepping through the method 17.1 Enter some data and click the 'Enter' button. This
will cause the method behind the Enter button to execute within Omnis
and pause at the breakpoint you set. You can then step through the method
using the 'Step Over' icon, pausing to observe the values of variables
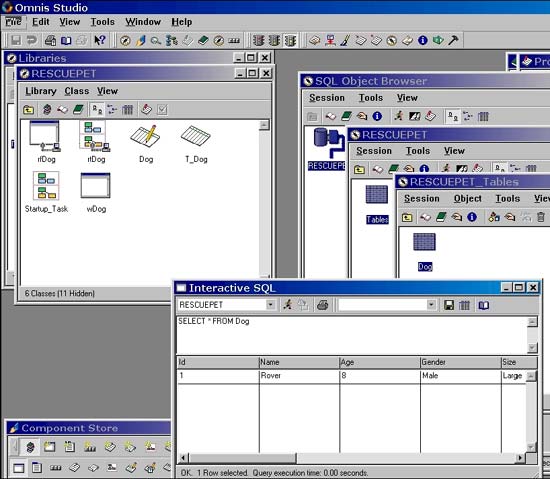
by hovering over them in the method or the variable panes. 18. Checking the data using the Interactive SQL browser 18.1 To check that the data you have just entered in
the remote form has been successfully entered into the database, go to
the SQL Browser and navigate to the Dog table.
If all has gone to plan, you should now have a web client application that consists of a Sidebar controlling the pagenumber of a PagedPane component. You should be able to enter records into a table from a remote form and check the data using the Interactive SQL browser. In the next newsletter, we will add a picture field to the remote form and extend the interface to include a facility to upload and preview image files from the client machine, using the remote form.
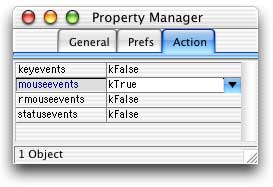
Mouse EventsBy David Swain Last time we learned how to examine complex event cycles and how to determine the order in which these events occur. We saw that many user actions actually set off a series of events and we learned that we can interrupt this series of events at any point to programmatically examine the state of our application and potentially divert the flow of events if the situation dictates. Whether or not we trap these events, Omnis Studio must spend a certain amount of "energy" (expressed in processing cycles) following their progress. There are a great many kinds of events that happen as a computer is being used. The system is analogous to the world around us - with a seemingly infinite amount of activity going on at various levels of scale within the range of our senses. Just like a human must filter out most of this activity to focus on what's important at the moment (because our system couldn't handle the load of consciously registering everything that occurs around us, to us and within us!), programmers of tools like Omnis Studio need to decide what events are important to track for the kinds of applications the tools will be used for and set limits on those the program watches to keep the program working efficiently. Special Event TypesThe people who created and continue to enhance Omnis Studio for our use have made some decisions in this area. There are some common data entry events that are automatically tracked whether or not we choose to acknowledge them with the event management methods we program into our individual applications. But there are a number of event tracking types that we must deliberately turn on in order to use them because they significantly increase the load on the Omnis Studio system and we may not want them on unless we need them. There are four such "special" event families: Mouse events, Right mouse events (which I also call "Context detail" events), Keystroke events and Status events. The first three of these break down other "common" user-initiated events (clicks, context clicks and data entry into a field) into smaller units if we need finer control over them. The fourth family is used to allow a field to react to a change in its own "status" (visibility or data entry accessibility) that is imposed by some method (outside any user control). In this article, we will focus only on the first two event families that deal with the use of the mouse, but there are still some basic issues to discuss about these "special" event families in general. Program EfficiencyAll of these event types significantly increase the processing load of the Omnis Studio program, so the authors of Omnis Studio have left it up to us to decide whether we need these event types tracked. This is not to say that these event types degrade performance to a serious degree. With the fast processors available today, there is no noticeable slowing of program execution if all of these event types are globally turned on. But many of us still have clients using older, less powerful machines and these may still show signs of the additional processing load if we don't limit the use of these event cycle generators. Beyond the concern for execution speed, efficiency is still a feature that I consider to be a responsibility application programmer - at least in my own work. Anywhere I can trim a few clock cycles from the process stack (without being too obsessed with the practice!), I take the opportunity to do so. For this reason, I generally only turn on these extensions to event tracking when I need them - and I most often use field-specific rather than global tracking of these event types. Global and Field-Specific TrackingIn the interest of efficiency, we have also been given the ability to turn on these event types at either of two levels in Omnis Studio: the library level or the field level. If we need global tracking of mouse events (that is, if we use this feature a lot), we may want to set this at the library level. If we only use this in a few places, we may well want to only turn it on for those few objects affected. In either event, tracking of such events is either a property of a library or a field. Tracking of each event type family is implimented independently. For example, to turn on mouse events at the library
level, we must use the Property Manager for our library, as illustrated
below, or issue the command "
If global tracking is switched on for any of these
families, the associated property at the field level is ignored. But if
global tracking is not currently on, we can turn it on at the field level
of any field object where it is needed. (Attempting to switch it off at
the field level has no effect if it is on at the library level.) To turn
on mouse events at the field level, we must use the Property Manager for
each field, as illustrated below, or issue the command "
We can, of course, set this property for many fields at once at design time by selecting all fields that require the same property value and then selecting "kTrue" in the Property Manager. If we want to switch this on dynamically for a number of fields in the current window instance and have identified these fields through some naming convention (or other means), we can use the $sendall method for the $objs group of the window instance to do this for all those fields in a single command. Assuming we have given the fields that require mouse events a prefix of "me" for "mouse events", we can use the following line of code:
There is no property at the window level for any of these event families, although mouse and right mouse events (down, double and up) can be detected at the window level. To be able to detect and react to mouse and right mouse events in the $event method of a window, they must be turned on at the library level. The properties mentioned in this section are not properties fo a Window class. Window-Only AvailabilityThere are four classes for which we track user-initiated events of any type that occur to them or their component objects: Window, Menu, Toolbar and Remote Form classes. Task instances can react to events passed up to them from GUI instances contained within them, but do not have GUI events that occur directly to them. Remote Task instances can have a method named "$event", but it only reacts to event types dealing with the connection between web client and server. A method named "$control" in a Remote Task never gets called as an event handler. The "special" event type families only apply to Window classes. Menu and Toolbar objects only react to the evClick event, but we are not given the opportunity to break these events down into the component parts we will examine in this article. The current level of communication between the server and client parts of Remote Form instances is limited to internet speeds - and to the speed of the slowest leg between client and server. Adding these additional event cycles could potentially bog down a browser-based application, so only a limited number of "common" event types are available with Remote Forms - and even these must be specifically turned on for each object that needs to track them so that unnecessary round trips between client and server are avoided. Mouse Event Sub-TypesThere are two sub-types for mouse-related events: mouse movement and mouse button events. The first sub-type reports motion relative to the boundaries of an object (the mouse either entering or leaving an object boundary). The other sub-type reports the sub-component events of a "click" or "double-click" event (the mouse button becoming up, down or "double-down" - the first part of a double click). Right mouse events are only of the "button" type. That is, they are only concerned with the sub-components of a "context click" action and not on whether the user is holding down the right mouse button as the mouse is being moved (although we can compare the location of the mouse at the "down" and "up" parts of the use of the right mouse button using the mouseover() function described below and detect such motion). For Macintosh machines with a single button mouse, the "context click" executed by clicking while the "control" key is held down is what these event variables report. They are, therefore, subcomponents of the "evOpenContextMenu" event in the same way that the "normal" mouse button events are sub-components of the "evClick" event. First, the mouse movement events: evMouseEnter and evMouseLeaveThe evMouseEnter and evMouseLeave events are sent to the $event method of a field when the mouse crosses that field's boundary. As the names imply, evMouseEnter is sent when the mouse moves into the field's area and evMouseLeave is sent when the mouse moves out of it. Both of these events show two parameters in the "Event Parameters" set of the "Variables" pane of the Catalog: pLineNumber and pRow. These are intended to return information about the current line in a list variable associated with the object field, so both return empty values for non-list field types as expected. But in my quick examination for this article, pLineNumber also returned empty values for list fields. "pRow.$name" returned the proper line number and "pRow.$fullname" the complete notation string for the current line in the list variable associated with a list field. For this reason, it is my recommendation that "pRow" be used in those cases where it is necessary to know something regarding the current line when the mouse enters or leaves a list field. I also noticed a curious thing when examining what happens when the mouse enters and leaves the window instance itself. evMouseEnter only happens once, either when the mouse crosses the boundary into the window instance or when the mouse is moved from within those boundaries after the instance is first created. evMouseLeave never happens at all! This behavior may differ on other platforms or under other circumstances I did not have the time to explore. I am using Omnis Studio 3.2.1 on a Titanium PowerBook running MacOS X.2.1 while on the road in Europe returning home from the EurOmnis 2002 conference as I write this and don't have access to Omnis Studio running on other operating systems. evMouseDown, evMouseDouble and evMouseUpThese events, along with their right mouse counterparts evRMouseDown, evRmouseDouble and evRMouseUp, are used to detect and react to various user actions involved in operating a button on the mouse. The separate actions of pushing the mouse button down and releasing it together constitute a "click". If the button is depressed a second time in quick succession and then released, a "double-click" is also generated. There are times when we may need to react to one of these primitive actions instead of the "composite" action of a click or double-click. If we track "click" events with mouse event detection turned on using the Trace Log as described in the previous article, we will usually see first evMouseDown followed by evMouseUp and then by evClick in that order in three separate event cycles. If done enough times, occasionally evMouseUp will preceed evMouseDown instead of follow it, but in either case evClick always follows the other two. A case could be made that trapping and reacting to one of the mouse events will be slightly more efficient than using the "click" event, but also consider that the computer is tracking all three cycles for every object, not just the one or two we are actually interested in. My recommendation is to only use mouse event detection when the mouse-specific event is the important one - not just as part of a "click". These events have no additional parameters beyond the pEventCode indicator, which is shared by all events. Occasionally we need to know exactly where the mouse is when one of these events is triggered in more detail than can be gleaned from "$cobj" alone. For this we have the mouseover() function described below... Mouse FunctionsThere are also a number of Omnis Studio functions that report various states of the mouse. Many people confuse these with the mouse event variables, so let's clarify them here: There are four mouse button functions: mousedn(), mouseup(), rmousedn() and rmouseup(). These all report the current state of the mouse buttons by returning either "kTrue" or "kFalse", but have nothing to do with mouse button events. The related mouse event variables report that the mouse button action has taken place to a specific object (indicated by "$cobj"). The functions only report the current state of the mouse button, but not that any action has happened regarding it. The functions do not cause an event handler to execute in reaction as do the event message variables. They are simply used in expressions within method commands, perhaps with Switch/Case, Repeat/Until, calculated If or other conditional commands, or with condition functions like pick(). A more useful (and incredibly versatile) mouse function is mouseover(). This function returns information about the mouse position based on a "mouse position" constant supplied as its single parameter. It is used in conjunction with a number of other mouse-related operations in Omnis Studio, including (but certainly not limited to) mouse events like evMouseUp and "drag and drop" events like evDrop, to determine how to proceed with a more complex process. There are seven "mouse position" constants that can be used to set the scope of "what the mouse is over": kMHorz and kMVert are used with mouseover() (one at a time) to determine the location of the mouse relative to the current window. Even if the mouse is over an object in a container field, the mouseover() function still reports the mouse position in window coordinates using either of these constants as its parameter. In contrast, "$cobj.$top" and "$cobj.$left" return the position of the object within its most immediate container. kMItemref is used with mouseover() determine which object the mouse is currently over. The mouseover() function returns an "item reference" value (full notation string) to that object. While this may not be necessary when using the mouse event variables, since $cobj provides this information, it is still useful for window click events and when used in a non-event handling method. kMLine and kMPLine are used to determine which line of a list the mouse is currently over. kMLine is used for any list, including a Complex Grid when it is not enterable and can, therefore, receive the click event directly. When a Complex Grids "enterable" property is set to "kFalse", it cannot receive click events directly and a line in the list can only be selected by clicking on a field contained within the grid. In such a case, the kMPLine ("Parent" Line) constant can be used with mouseover() to determine on which line of the grid the "$cobj" field lies. If the "$cobj" field is itself a list field, both kMLine and kMPLine will return values when used with mouseover(): kMLine will return the line in the object list that the mouse is over and kMPLine will return the line in the Complex Grid to which the object list field instance belongs. kMHorzCell lets mouseover() return the "horizontal" column number (counting from left to right) of a multi-column tree list field. The column containing the actual "tree" of the tree list is column number 1. kMLine is used here to report the line number the mouse is over as with other list fields. kMCharpos lets mouseover() return the character position within an edit field that the mouse is over. If the mouse is directly over a character, the function returns the position of that character in the $contents string of the field. If the mouse is over the insertion point between two characters, the function returns the higher of the two character positions - that is, the position an inserted character would have if entered. Exploring Mouse EventsWe can explore the order in which these mouse-related events occur and how they relate to other associated event cycles triggered by the same user action with the technique I explained in the previous article. If you haven't read that article (but please do so - it's free!), the technique is simply to remove all $event and $control method code except for a $control method for the task in which our window instances will run and place a single line of code in that:
This then puts a descriptive line into the Trace Log for each event that occurs - anywhere in the task. Take some time over the next two weeks and explore these a bit. So What Can We Do With These Events?That answer is going to have to wait until next time. In the next article I will present a number of examples of how we might use mouse and right mouse event detection |
|
| © 2002-2003 Copyright
of the text and images herein remains with the respective author. No part
of this newsletter may be reproduced, transmitted, stored in a retrieval
system or translated into any language in any form by any means without
the written permission of the author or Omnis Software. Omnis® and Omnis Studio® are registered trademarks, and Omnis 7™ is a trademark of Omnis Software Ltd. Other products mentioned are trademarks or registered trademarks of their corporations. All rights reserved. |


 Please logon or create a free account to download this file.
