Tech News Back Issues Issue: 050103
|
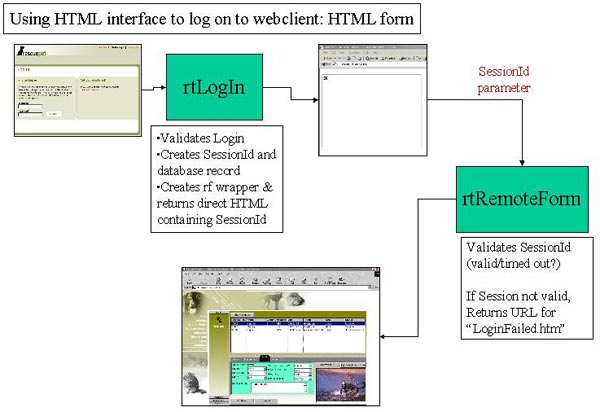
Introduction to the Omnis Web Client: Part 13, Log on to Web client using HTML interface - Validating SessionId for Remote Form By Dr Caroline Wilkins 57. In recent newsletters, we have been working through a technique that enables a user to log on to a web client application from an html form. We have created an html log on form which sends username and password parameters to a remote task. The remote task validates those login parameters against a UserLogon table and, if successful, creates a SessionId and database record to record the session data. It then responds to the user by returning a stream of html content that contains the web client plug-in. When the browser receives that html content, it will call the remote form application, sending the SessionId as an additional parameter. You can download the library etc. so far from RPLogon4.zip (libraries and datafiles may need to be converted in Omnis).
58. We could just leave the logon process at that. It would not be very secure though. A user could fake a web client session by creating their own local html page of the form required. The point of having created the SessionId and associated record in the database is to prevent this and to keep a good handle on the identity of the user. (If you had used a user id instead of a SessionId as an additional plug-in parameter, this would have given you a way of keeping track of the user, but it is not very secure and is easily faked.) 58.1 You will have already created a remote task called rtDog when you
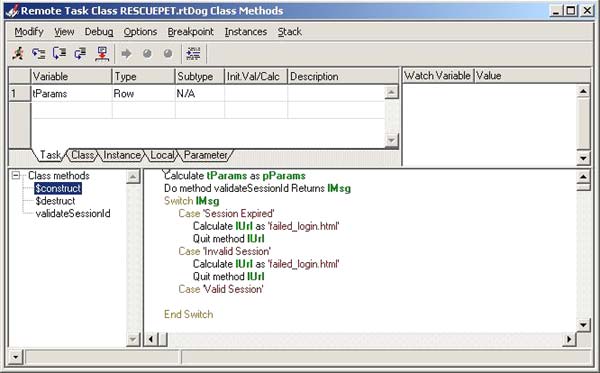
created the remote form rfDog. Open up the $construct method and create
the following variables: 58.2 Create a new method called validateSessionId. We will fill in the code for that in the next section (59). 58.3 Add the following code to the $construct method of rtDog: Calculate tParams as pParams
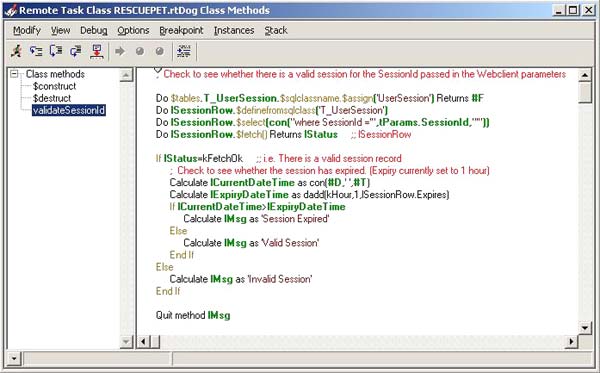
This remote task code will be called before the remote form is instantiated. The objective is to validate the session before allowing the user into the remote form application. If the validation fails, the user will be directed to the web page at the lURL and the remote form will not have been instantiated. If the session is valid, the user will not get redirected by the code in the remote task and the remote form will be instantiated in their browser as they will be expecting. This is a good point at which to test that everything is working as it should. Open up the html login page you created previously, place a breakpoint in the $construct method of rtDog and verify that you are reaching this. If you also place a breakpoint in the $construct of rtLogIn, you should see that the user is bounced through rtLogin, a page of html is returned to the user (containing the plug-in) and then the breakpoint in rtDog is hit before the remote form instantiates. If this is happening, clear the method stack and you are ready to add the code for the validateSessionId method. Note that we are using a task variable, tParams, to hold the SessionId parameter that has been passed with the plug-in request so we can share the data easily between the remote task and the remote form. 59. Add the following code to the validateSessionId method: Check to see whether there is a valid session for the SessionId passed in the Web client parameters Do $tables.T_UserSession.$sqlclassname.$assign('UserSession')
Returns #F If lStatus=kFetchOk ;; i.e. There is a valid session
record Quit method lMsg
This method looks for a UserSession record with the SessionId passed in as a parameter. If it finds one, it adds an hour to the value of UserSession.Expires (admittedly a poor choice of field name as this is really the session creation date - my apologies!). If the session is less than an hour old, it is deemed a Valid Session and this is returned in lMsg to the $construct method. Otherwise, lMsg is calculated as 'Session Expired' or 'Invalid Session' if no UserSession record has been found in the database with that SessionId. If you test the login process now, you should find that you have a smooth path between logon (we used username=user1 and password=pass1 for test account) and instantiation of the web client application on the user's browser. If you place a breakpoint in the construct method of your remote form, you will see that the values of tParams that we calculated from pParams in rtDog have been carried through to rfDog and you are able to retrieve the UserSession record and hence the username from the database for use within the remote form application. You therefore have both security and the ability to track you user from html login through to remote form. Attempts by a human to fake access to your web client application from a locally manufactured html page should be almost impossible as this would involve an attempt to guess a valid (fairly randomly generated) SessionId that is less than an hour old. It would probably be possible to write a cracker program that runs on a client and sends repeated requests for a sequence of SessionId values. If this is a concern, then you should reduce the expiry time of the Session from an hour to minutes or even seconds, thus reducing the number of cycles a cracker program could execute before the SessionId times out. This brings us to the end of the "html logon to a remote form application" technique. If all has gone to plan, you should have a library that looks something like RPLogon5.zip (libraries and datafiles may need to be converted in Omnis). The technique can be used to protect any web client application from public visitors and enables you to integrate a web client application intended for a particular set of users into a public website without putting undue load on your Omnis server or licenses.
Menu Classes and InstancesBy David Swain Over the past two years, I have spent most of these articles focusing on either windows or reports with a few forays into remote forms. Certainly some interesting side issues have come up regarding menus, but I have never dealt with them here head on. So for the next few issues, we will discuss various aspects of menus, beginning with the basics in this issue. (Most, but not all, of this first article will be "old news" to veteran Omnis developers, but we have to begin at the beginning...) Purpose of a MenuThe fundamental purpose of a menu is to allow the user to select (and thereby trigger execution of) a method. The use of "menus" of various forms goes back a long way in software history to the early days of "green screen" monitors and "interactive" programs (where the user could actually provide input while a program is running!). In those days, there were no "pointing devices" like mice or drawing tablets or touch screens. "Menus" were simply a listing (hence the name) of all the command keystrokes for launching subroutines that the program would recognize at some point in its operation (other than "back door" combinations, of course). Suffice it to say that we've come a long way since then. No reason to go through the entire litany of advances leading to the present day. (Although it is interesting to note that a parallel branch of software evolution still uses a "screen" containing multiple pushbuttons for navigation purposes in some touch-screen-based kiosk systems.) The objects we call "menus" today are vastly different from their early ancestors. Beyond this basic purpose of executing some code, menus can be used for a wide variety of jobs within an application. As programmers, we must decide what kinds of methods we want our users to access from a menu and at what points in an application we want to grant them that access. We even need to decide how and where a specific menu is to be "installed". A "short list" of uses for menus is:
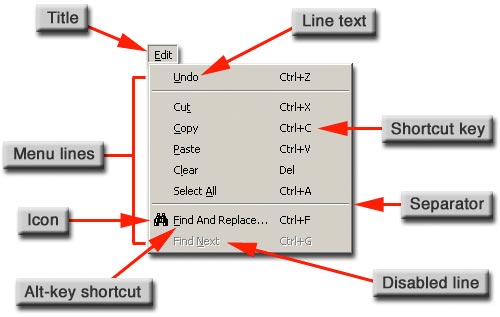
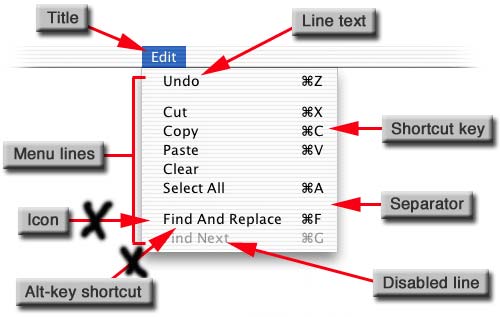
A method for any purpose (other than a dedicated event or error handling method that requires a different trigger) can be launched from a menu. Some methods are more appropriate for use in menus than others, but the circumstances of each specific program dictate how menus come into play. Before we go further down that path, let's examine the menu objects, components and properties we actually have to work with in Omnis Studio... Structure of a MenuFirst, a menu contains a title and a number of menu lines. The lines are only visible when the menu is in use and has been expanded. Otherwise, the menu is tucked neatly away out of view except for its title. In some installations of a menu, even the title isn't visible when it is not in use. We generally design menus to hold related methods. The title is used to indicate what kinds of methods are available through that menu. It is displayed when the menu is in its resting, non-expanded phase so that 1) the user knows that the menu is available and 2) the user knows where to click to expose the choices that menu offers. The various other features of a menu are shown here:
Each line has a number of features. There is text on a line to label it so the user knows what should happen when that line is selected. There can also be Command/Control-key and Alt-key shortcuts that "power users" can learn so they can work more efficiently (selecting a menu item from the keyboard rather than having to manipulate a pointing device). Contiguous lines can be visually "grouped" together (or rather isolated from other lines) by using a "separator" line. A menu line that is temporarily not available (for whatever reason) is displayed with "greyed" text. Some operating systems allow an icon to appear on a menu line, supposedly for faster visual identification of that lines function. Another common feature of a menu line is not shown in the illustration above. Certain menu lines used to a toggle a "state" of an application can also display a check mark in the same position where the icon is shown. This is used as an indicator that the application state associated with this line is currently switched on. We also have the ability to assign various text styles to the text of a menu line. This is a more archaic indicator of the state of a menu line and is less used today as most programmers have come to standardize on the check mark mentioned in the preceding paragraph. But some programmers still prefer to use italic or bold (or outline, underline, shadow or some combination of these) to represent the state of a menu line. The tools are certainly there to be used! (N.B.: Far be it from me to suggest not using a feature, but toggling between italic and plain text rather than between a line being checked or not may send a different message than the one you intend to a user with computer experience beyond your program. Some standards are worth heeding!) Platform DifferencesNot all of these menu features appear on all operating systems supported by Omnis Studio. Most notably, the Human Interface Guidelines for Macintosh OS X have no provision for menu line icons or “Alt-key” equivalents (since there is no “Alt” key and the “Option” key is better suited to its primary function of giving keyboard access to the extended ASCII character set). Developers working on this platform can still design applications that use these features when deployed on other platforms, but they will not be visible when the application is deployed on Mac OS X.
Also, only "command" keys can be used as shortcuts on this platform. "Function" keys (F-keys) and other "operational" keys (like "forward delete" or "arrow" keys) cannot be assigned to a menu line on Mac OS X. If a numeric command key (Command-1 through Command-9) is assigned to a menu line, the equivalent F-key (F1 through F9) can be used as an alternative on this platform if that F-key is not otherwise assigned by the operating system. This is important to remember when building applications on other platforms that might be deployed on this one. The "Shift" key can be part of a command/control key equivalent on all platforms, but only Macintosh can also include the "Option" key as well. On Windows and Linux/Unix, the "Alt" key is already used for "Alt-key" equivalents and inclusion of this key with "Control-key" equivalents as well must have been considered too confusing by the people who set up the interface rules for those platforms. Menu ClassA menu class is deceptively simple. It has relatively few properties at the class level beyond those shared by all classes. The ones we use most often are these:
A menu class can contain up to 500 line objects. Think of this as an "unlimited" number of lines...You will never even approach that many menu lines in any practical application! A menu class can also contain up to 501 methods at the class level. We will explore this a bit later in this article. Menu Component ObjectsJust as fields on a window are component objects of that window, so lines of a menu are component objects of that menu. The $objs group contains these components and they must be addressed as members of that group when we need to manipulate some aspect of them through notation. A menu line also has relatively few properties when compared with a window field. These are:
Each menu line can contain up to 501 methods as well, although most will only have (or need) a $event method. (A menu line without a $event method is a pretty useless menu line...) Menu Class EditorAs with all GUI classes in Omnis Studio, there is a dedicated editor for menu classes. As with the Window Editor, the Menu Editor simply displays the GUI view of the menu, but it does so on a background field with a simulated menu bar so we can see how the menu will look when installed in this manner. The background field can also be used to access class-level features when a menu line is selected in the Editor.
There are no menus or toolbars visible on the Menu Editor window, but it does sport a single context menu:
As one would expect with a context menu, various options only become available if the context-click that opens the menu is performs on specific objects. For example, the "Add Line", "Delete Line..." and "Line Methods..." items are only enabled if the context-click is performed on a menu line in the Editor. If it is performed on the menu title or on the background field of the Editor, only those items that apply to the class in general are enabled. If the "Accept All Key Strokes" item is checked, we can very quickly build our menu and its lines by simply typing the text and using the Return key to insert a new line. Any command keystroke typed will be accepted as the command key equivalent for the current menu line. In fact, that command keystroke is automatically set for all three platforms when assigned in this way. The downside to this is that we can't use command keystrokes for "normal" operations (like closing the Editor window) while editing a menu class in this manner. Once the basic build of the menu is completed, it is a good idea to toggle this option off. Menu Line MethodsEach line can contain up to 501 methods, each of which can contain up to 240 command lines. Since the primary purpose of a menu line is to allow the user to execute a method, at least one method must be assigned to a non-separator menu line. This must be the $event method. The $event method is invoked when the user selects a menu line. Unlike most window objects, there is only one possible event (evClick) to which a menu line can react. For this reason, it has become common practice to not even bother with an "On..." command in this method, but this command should be used whether or not it seems necessary. The same "common practice" used to apply to pushbutton fields too, but then mouse events were introduced and the $event method (without its now-necessary event qualification code) would fire twice every time the mouse passed over the pushbutton (once on "mouse enter" and once on "mouse leave"). The same could someday apply to menu lines, so please use "On evClick" in that $event method to avoid future conversion problems... Only rarely would we need additional methods for a menu line. Of course, this all depends on the practices of a specific programmer, but if code encapsulation is the norm for windows and reports in an application, menus will usually only be needed to launch those windows or reports or to invoke public methods inside them, so the need for "subroutines" in a menu line is greatly diminished from previous generations of Omnis. The same is not necessarily true for the menu class however... Menu Class MethodsA menu class can contain up to 501 methods at the class level. As with other class types, these methods can be either "public" or "private". Public methods (those whose names begin with "$") can be accessed from outside a menu instance and are used to communicate with it. There are a number of ways we can use these (which we will explore in future articles). But there is little or no need (at least in my work) to use private menu class methods because there are few, if any, reasons to have subroutines in a menu class. "But wait!" I hear you say, "All my menus use private class methods to dispatch the results of the menu line $event methods!" Let's examine why so many people do this - and why it is totally not necessary. First, let me clearly state: There is no need to call private class methods from the $event method of a line to perform an action. The $event method is perfectly capable of doing whatever it needs to do without any help. So why do so many people (including examples from experts) do this "the hard way"? This "technique" comes from the way conversion from Omnis 7 to Omnis Studio is handled (and was then propagated by many people's confusion and fear about how to do "object oriented" programming the proper way). In Omnis 7, we simply had 501 procedure slots in a menu format. The first twenty of these could be used as menu lines if the menu were installed, but there were no specific menu line objects. When the creators of Omnis Studio had to deal with Omnis 7 to Omnis Studio conversion issues, a decision had to be made as to how to handle this so that a converted menu would be "functional". Apparently, the easiest thing to do was to simply make all 501 methods in an Omnis 7 menu format into class methods in the Omnis Studio menu class. Then for each of the methods that might also have been deployed as a line in an installed menu (all methods up to number 20), give the menu line object a $event method with a single "Do method..." line that points to the corresponding converted class method. it couldn't be simpler! Unfortunately, this puts an extra and completely unnecessary level of subroutine call on the method stack. But the "technique" caught on like wildfire because "if the converter does it this way, it must be the right way..." I still see most people today building menus from scratch using this "technique". perhaps a "better" conversion technique is to copy the command lines from each of those private class methods into the $event method of the corresponding menu line and then remove the private class method. while not making the menu class any smaller, this would certainly streamline method execution! Uses for "Public" Menu Class MethodsIn Omnis 7 (and earlier versions), we used to use "uninstalled" menus as "code repositories" for "common code" procedures. Today, there can be some advantages in using certain "installed" menus for similar purposes. I know, I know...It is more politically correct to use Object Classes for this today, but hear me out...Here is what I mean: If our application has at least one static "main menu", it is possible to use this as a repository for globally required custom functions. This is especially useful in a multi-task or multi-library application. This is an alternative to putting those public methods in Object classes which must be instantiated for each task and which must be qualified by the name of the library in which the Object class resides in a multi-library application. Once our static "main menu" is installed, it is global to the application (as are its instance and class variables). It is easily referred to by "$imenus.mainMenu" and doesn't have to be instantiated multiple times in a multi-task environment, nor does it have to be referred to by the library to which its class belongs (so no worrying about the "external" property of that class). For convenience, we can create an "Item reference" variable at the "task" level for each task to point to this menu instance. If we name that variable "fn" (or some other "short and sweet" name), we can then issue "fn.$methodname()" or "fn.variablename" to invoke the menu instances public methods or access its variables. It doesn't matter where the parent class resides or in what task the menu instance resides because we access it through the global "$imenus" group. Admittedly, this is not quite as portable as a dedicated Object Class function repository, but it is more convenient in practice within an application for things that must truly be global. Getting AroundThe "glue" that holds many applications together is a basic "navigation" menu that allows the user to move from one area to another within the application. This is such a prevalent feature of applications that the "desktop" program provided by operating systems features a "menu bar" for the purpose of holding such menus. Most Omnis Studio applications are designed to install at least one such menu from the $construct method of their "startup" task. In fact, the "startup menu" was a core feature of all generations of Omnis until it was replaced by the "startup task" in Omnis Studio. But this is not the only use of menus in an application. Installing MenusThere are a number of ways that we can instantiate a menu class. Here is the short list:
Each of these has its own set of advantages and specialized techniques. In the Next ArticleSo much for the basics! Next time we'll take a closer look at the various ways a menu can be installed and used - and some lesser known ways we can manipulate them.
|
|||||||||||||||||||||||||||
| © 2002-2003 Copyright
of the text and images herein remains with the respective author. No part
of this newsletter may be reproduced, transmitted, stored in a retrieval
system or translated into any language in any form by any means without
the written permission of the author or Omnis Software. Omnis® and Omnis Studio® are registered trademarks, and Omnis 7™ is a trademark of Omnis Software Ltd. Other products mentioned are trademarks or registered trademarks of their corporations. All rights reserved. |
|||||||||||||||||||||||||||


 Please logon or create a free account to download this file.
