Tech News Back Issues Issue: 061103
|
Introduction to the Omnis Web Client: Part 16, Ultra-thin client: Planning a site By Dr Caroline Wilkins In the last newsletter, we looked at the various elements of html forms. In this newsletter, we will look at how to put them together to create a data-driven website. When data is sent from an html form to Omnis, it is up to the developer to determine what will happen with this data and how to respond to the user. In the case of an html form that logs on to web client, the response would be an html page with a web client plug-in embedded, with maybe a few additional parameters to maintain a session. If you want to make a purely html web interface, then you need to be planning a system of web pages and the flow between them.
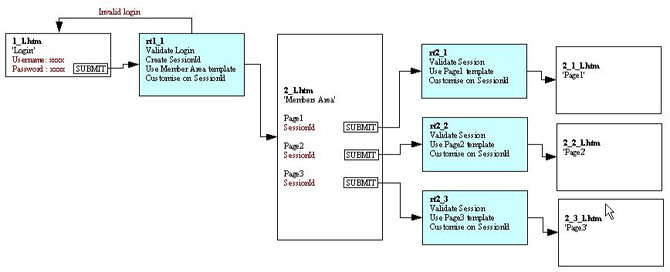
I find it helpful to draw out a system diagram, with paths mapped between each page, the remote task it calls, and the possible responses. This becomes increasingly important as the interface gets more complex. Without some means of tracking the intended flow in the site, it gets easy to lose track of your user and their data. In the graphic below, I give an example of the sort of diagram I might use to plot out an interface that validates a logon, returns a "Members Area" page to the user with 3 buttons to click. Each button calls a separate remote task which will validate the SessionId and return the user an appropriate web page. This process corresponds to 2 pieces of data entry (Username and Password) and two clicks from the user, yet requires this sort of planning from the developer to ensure correct flow.
In the diagram above, I have chosen to use a separate remote task for each html form in the system. This can be a convenient way of managing things and is easily documented. However, you will note that certain processes need to be accessed from multiple remote tasks. One way to address this is to put such methods (e.g. ValidateSession) in a superclass so that they are accessible from all the remote tasks and only need to be edited in one place. This is a sensible thing to do, particularly for methods like ValidateSession which are likely to be required throughout the system you design. The html code for this sort of MembersArea template would look like this: <html> <form method="GET" action="http://localhost/scripts/Omnisapi.dll"> <form method="GET" action="http://localhost/scripts/Omnisapi.dll"> <form method="GET" action="http://localhost/scripts/Omnisapi.dll"> </body> Note that the page contains 3 html forms, each calling separate remote tasks (rt2_1, rt2_2 and rt2_3). The SessionId created in rt1_1 would be substituted into the @[SessionId] placeholder using a "replaceall" in Omnis. To use the above example, you will also need to create image files (page1.gif etc) for the buttons.
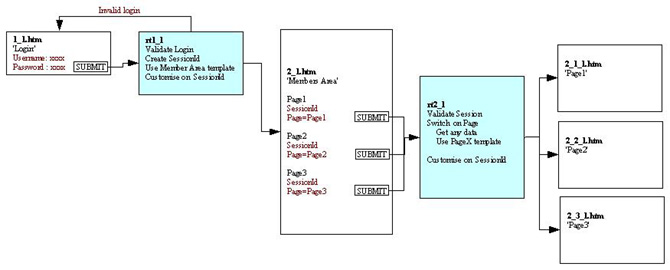
Alternatively, you could have groups of html forms accessing a shared remote task, as in the diagram above. In this case, I have grouped all 3 linkoptions on the 2_1.htm page so that they each call remote task rt2_1, but are distinguishable by an additional hidden parameter called 'Page'. rt2_1 can then switch on the value of page and prepare whichever htm page is being asked for i.e. 2_1_1.htm, 2_2_1.htm or 2_3_1.htm The html code for this sort of MembersArea template would look like this: <html> <form method="GET" action="http://localhost/scripts/Omnisapi.dll"> <form method="GET" action="http://localhost/scripts/Omnisapi.dll"> </body> You could extend this approach further and have all html forms in your system call the same primary remote task. You could then call methods designed to address each request either within that remote task or within a super class. Each developer will have his/her own views on the best way to layout, label and design a system. The choice will also be affected by the size and complexity of the interface that is being built. My objective here was to offer some options for consideration. In future newsletters, we will go through the exercise of building a simple interface of this type. Whilst it may seem a complicated job to plan a system like this, it should be noted that this process would be necessary for any website, particularly a data-driven one. If you were using asp, php or cgi instead of Omnis, you would still need to plan out the flow within a site and the behaviors of the scripts. When applied to this sort of interface, Omnis compares very well with the other web scripting languages. In fact, there are certain advantages to using Omnis in this "Omnis Server Pages" style environment. Principally, the developer has the advantage of the Studio IDE and debug environment. Whereas asp and php can be a little mysterious with their error reports, a developer can step through Omnis code line by line and inspect variables. This makes tracking down bugs substantially faster and less frustrating. The Omnis developer also has all the advantages and conveniences of object oriented design (although this is also available in php). Furthermore, there are things that Omnis can do very easily that you might have a hard time achieving in asp/php/cgi or least you would have to work a lot harder to achieve. This is particularly relevant in systems that have to do more than present a web interface. e.g. send faxes, emails, print reports, dial a phone, TCP communication with external devices, ftp files, call a batch file etc... Basically, pretty much anything that Omnis can do (and it never fails to amaze me what develops get it to do!), can be kicked off from the web interface. Next time someone asks if your clever new Studio-driven website can make the tea too, ask them if the kettle is networked and what COM ports the stepper motors will be plugged in to...:)
Installed Menus - Menu Lines and MethodsBy David Swain This article is the fourth in a series on Omnis Studio menus. In the last three issues of Omnis Tech News, we examined basic information about menus, the different ways we can install menu instances on the main menu bar of Omnis Studio and how to manage the position of a menu on the menu bar. In this issue we will continue this exploration of menus by examining ways we can work with methods in menu instances. The Instantiation ProcessAs with any instantiable class, a menu can contain a $construct method. This method can be used to augment the process of instantiating a menu by letting the menu modify its final configuration based on the current circumstances of the application. The $construct method works essentially the same for a menu instance installed on the main menu bar as it does for a standalone window instance or for an instance of any other instantiable class type. The method executes between the time the instance is first called for and the time it is finally drawn in position on the menu bar. That is, the menu appears on menu bar only after its $construct method completes execution. The configuration of our menu can therefore be "data-driven". The $construct method can examine relevant states of the data and the application and set up the menu instance based on what it finds. It can also perform tasks outside the menu instance (like installing other menus, installing toolbars or even opening windows, etc.) if necessary based on this same information. Construction ParametersIn addition to the $construct method looking out at states of the application, we can send parameters to the $construct method of a menu by whichever means we used to install that menu. All commands and notational methods that we can use to instantiate a menu on the main menu bar have a provision for sending construction parameters. The syntax of the Install menu command allows us to send a comma-delimited set of parameters enclosed in parentheses after naming the class to be installed and the optional name to be imposed on the instance. The general form looks like this:
We can also use notation to instantiate a menu. The $open method of a menu class allows us to list constructor parameters following the optional instance name and position discussed in previous articles. Of course, if we want to send parameters to $construct, those other parameters of the $open method are no longer optional! We can, however, leave them empty and only include the delimiting commas. The syntax looks like:
In a similar way, we can include constructor parameters with the $add method of the $imenus notational group.
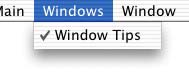
We just have to be careful that we count our commas so our first parameter isn't interpreted as the position value! Menu LinesJust as fields are component objects of a window instance or class, menu lines are component objects of a menu instance or class. They have much in common with window fields from the member of an object group standpoint. There are two basic types of menu line: normal menu lines and separator menu lines. The only difference between the two is that a separator line has an empty text property value while a normal line does not. Each line object has the potential for containing up to 501 method lines just like a foreground window object. A separator line displays the appropriate "look" for the platform on which our application is deployed when that line lies above a normal line within a menu instance. But if there are no normal lines following a separator line, that line is not visible. This is true even if there are many contiguous "trailing" separator lines in a menu instance. Here is the menu we will build in the exercise later in this article. There are two lines defined in the menu class, but the second has no text:
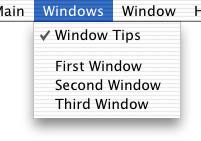
Here is the same menu with three lines dynamically added. Notice that now the line with no text serves its purpose as a separator:
Drag and Drop Menu Line CopyingMenu lines can even be dragged from one menu class and dropped onto another in their respective Menu Editor windows. Just as with window fields, this action copies all aspects of the menu line, including the methods it contains. For this reason, it is worthwhile to make each menu line self-contained if there is a possibility it might be useful in another menu. One might also consider putting a menu class with "commonly used menu lines" into one's Component Library for use in future applications. While there is no provision for dragging individual menu line components from the Component Store, we can certainly have one or more menu class templates in our Component Library and drag them to our Class Browser as needed, dragging commonly used lines to appropriate menus in our new library. Menu Line $constructIndividual menu lines can each contain their own $construct method. This allows the menu line to manage its own destiny. It can set the values of its own properties based upon states of the application that it can see as it comes into being. The only drawback to following this practice is that I see no way to pass parameters to the $construct method of an individual menu line. Since the $construct method of a line executes before the $construct method of the menu instance, we can't pass parameters to a line from the class level constructor. So if parameters are required to determining the initial configuration of a specific menu line, it appears we must manage that configuration at the class level. The $objs Group of a MenuMenu lines are component objects of a menu instance, so they belong to the $objs group of that menu instance just like fields on a window belong to the $objs group of that window instance. This same internal terminology is used consistently within Omnis Studio to refer to components of a GUI class or instance. The $objs group of a menu instance also contains the expected methods for such a group. So we can add and remove members ($add, $addbefore, $addafter and $remove), retrieve the current number of members in the group ($count), cycle through the members ($first and $next), locate a member by its name or ident value ($findname and $findident), make a list of specified properties of the members ($makelist, $appendlist and $insertlist), and broadcast a message to all or a subset of the members ($sendall). While there is neither time nor space in this article to provide practical examples of the use of all these built-in methods, they work exactly like the same methods for any other notational group. Notational Shortcuts to Method LinesAs with fields on a window or report, there are notational shortcuts that point to a given menu line in context. Both $cfield and $cobj are useful here. $cfield refers to the menu line to which the currently executing method belongs. While we don't generally consider a menu line to be a "field", we still use this notational shortcut in this manner. (There is not "$cline" or "$cmenuline", etc.) $cobj refers to the menu line that was clicked upon to launch the event that is currently being processed. This allows us to refer to properties and methods of that line in the $control method of the menu instance as well as to itself from its own $event method. Speaking of which... Menu Line $event MethodEach menu line can have a $event method (although this is not require, as we will see in an example later in this article). Only the $event methods of normal menu lines can be invoked, though. but if a separator line is given a non-empty text property value, its $event method becomes available for execution. Besides the obligatory pEventCode event parameter, which accompanies even an empty $event method, there are two other parameters that can be received by a $event method of a menu line. But these can only be seen if we use the On evClick qualifier line in this method. Many people still do not use this line because ("after all!") a menu line can only react to a click event in the first place. (Famous last words we used to say about pushbutton objects on windows, by the way...) But the block of code following such a line is also passed an important event parameter that will not otherwise be available... The pLineNumber event parameter reports the line of the menu that was clicked. This line count includes all separator lines and corresponds with the order property of the line receiving the click event. It is well worth including the On evClick line, even though it appears to be (currently) unnecessary, just to receive this event parameter. A second event parameter named pRow is also reported by the Catalog as being passed to this event, but it appears to be empty in my limited explorations... "Hidden" Menu Line PropertiesThere are two important properties of a menu line that do not appear in the Property Manager. They are both read-only properties, but they can be very useful! The $order property yields the line number of the specified menu line. Unlike the property of the same name for window objects, this value cannot be assigned through notation. That is, we can't move our menu line objects around like we can change the data entry order of window field objects. Still, we can use this property for many other purposes, like limiting a $sendall method to a range of menu lines (as just one example). It is used in a similar way in the example later in this article. The $ident property also exists for a menu line object. As with a window object, this is a four digit number that uniquely identifies the menu line. It is used to assign a default name for the menu line when it is first created, just like for a window field object. It is a minor mystery why these properties are not displayed by the Property Manager (at least up through Omnis Studio 3.2.1, the latest version I have to test), but I thought you should know they are available. Menu Class $control MethodAs with a window instance, a $control method in a menu can be used to react to menu line events at the menu instance level. Under certain controlled circumstances (like the one in the example below), this allows us to not use a $event method in a menu line. The example I include here demonstrates how this could be useful for dynamically created menu lines, like we find in a "Windows" menu. We can use the notational shortcut $cobj in such a method to refer to the menu line that received the original click event and therefore to determine what action to take. Menu Class $event MethodThere are no events detectable at the menu instance level, so a $event method in a menu class will never be executed in the current version of Omnis Studio. Putting This Information To Good UseWhat we need to help all this information "settle in" is a nice example. Let's create a simple substitute for the "Window" menu. We won't bother putting in the window closing and printing commands (although you're welcome to do these for extra credit!), but we will create a menu item that toggles the Omnis Studio Preferences setting for showing "window tips" and we will include a mechanism for tracking a list of open windows and bringing the window selected from our menu to the top of the open windows stack. First, let's create a new menu class and name it windowMenu. Open this menu class and type "Windows" for the title and then press the Return/Enter key. This should put the focus of the Menu Editor on the first line of our menu and this is where our exercise really begins. Window Tips ToggleThe first line we want to create is one that will toggle the showwindowtips property of Omnis Studio Preferences. We will also toggle the checked property of this menu line to indicate the current state of the property it controls. Type the string "Window Tips" for the text of the menu line (the easy part), and then let's consider the code we want to put behind it. There are two methods we eventually want to include for this menu line. Certainly we want a $event method that performs the "toggle" operation, but we should also include a $construct method for setting the initial checked state of the line. Certainly we could control this initial state from the class level $construct method, but having a constructor method at the line level makes the menu line self-contained and transportable - a fine candidate for a "commonMenuLines" menu class template for my Component Library! The line's $construct method doesn't have to do much. All it needs to do is set the checked property of the menu line to the same value as the showwindowtips property of $root.$prefs. Here is the code:
The $event method of the "Window Tips" menu line doesn't have to do much more than this either. First, we toggle the value of the showwindowtips property to its opposite value and then we cause the line's checked property to reflect this new value as well. For the sake of form, we will also include an introductory method line that detects the evClick event:
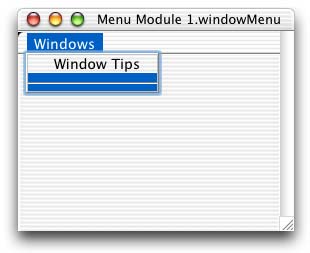
Our users can now decide for themselves whether they want to see window tips as the mouse pauses over the fields in our application. Dynamically Add and Remove Menu Lines for Open WindowsNow comes the fun part! We want to create a mechanism for tracking open windows and providing a menu line for each one. Selecting the menu line corresponding to one of our open windows should also trigger a method that brings that window to the top of the window stack. For good measure, we will begin by putting a separator line between the list of open windows and the line we created above that toggles the showwindowtips property. To do this, we simply select the existing menu line in the Menu Editor window and press the Return/Enter key. We then leave the text property for this second line with an empty value. Trailing menu lines with an empty text property value are not visible in the menu instance, so when this menu is initially installed it will appear to only have one line. But as soon as we add a third line to the menu at runtime, the separator will appear on line number two. This is how our menu class should appear in the Menu Editor in its final form:
The plan for bringing a window instance to the top of the open windows stack is equally simple. Rather than putting specific code into each new menu line we add dynamically, we will instead put all the code for handling this process in a $control method at the class level of our menu. As we add each new line, we will arrange to have the name property of that line contain the same value as the name property of the window it represents. The text property of the menu line will display the value of the corresponding window's title property. The title property value of an open window may not be unique, but the name property value will be. So the name of each menu line added to our menu will also be unique within the menu instance. We can then put the following code in the menu's $control method to handle the job of bringing the appropriate window to the top:
Notice that the order property is equivalent to the menu line number. So this will only be attempted when line 3 and higher of our menu instance has been clicked upon. The real trick here is to manage the lines we must dynamically add to our menu. If we add a class method to the menu named $addname, we can simply pass a parameter to that method from the $construct method of each window as we open it with a method line like this:
We can then use this parameter value to retrieve any other information (such as the title) that we need from the window instance itself since the name property value of the window is also its identifier within the $iwindows group. The $add method for the group of menu lines in our windowMenu instance requires three parameters: the text that the menu line is to display, a Boolean value that indicates whether the line will be enabled by default and another Boolean value that indicates whether it will be checked by default. The $add method also returns an Item reference value pointing to the newly created menu line, which we can use to assign further property values to that line. We will use a local variable named newItemRef to catch this reference. We must also declare a parameter value named name to catch the name of the window that is passed to the method. The menu's $addname method boils down to these two lines of code:
When a window instance is closed, we need to remove the reference to it from our menu. We can use the window's $destruct method for this purpose. If we add a class method to our menu named $removename, we can simply pass a parameter to that method from the $destruct method of each window as we close it with a method line like this:
The menu's $removename method must remove the appropriate line from the menu instance. If there are lines below that one, they will move up in order value to fill in the gap left by the missing line, just like removing a line from a list. The $remove method for the group of lines in our menu instance requires only one parameter: an exact notational reference to the line that is to be eliminated. By using the name value passed as a parameter (to a parameter variable named name in our $removename method) from the closing window, we can uniquely point to the corresponding menu line. The resulting code is merely:
To make our job as programmer even easier, we can create a base window class that contains the $construct and $destruct method mentioned here and then subclass all of our windows from this master class. This way we don't have to copy and paste the code listed above into every window we create. For each subclassed window that requires additional code in either the $construct or $destruct method, we can override the necessary method in the subclass, but we must remember to include the line "Do inherited" to also execute the code in the superclass.
|
|
| © 2002-2003 Copyright
of the text and images herein remains with the respective author. No part
of this newsletter may be reproduced, transmitted, stored in a retrieval
system or translated into any language in any form by any means without
the written permission of the author or Omnis Software. Omnis® and Omnis Studio® are registered trademarks, and Omnis 7™ is a trademark of Omnis Software Ltd. Other products mentioned are trademarks or registered trademarks of their corporations. All rights reserved. |


 Please logon or create a free account to download this file.
