The "Modify Report"
Field
By David Swain
Polymath Business Systems
As the name implies, the Modify
Report field lets us offer our users the ability to modify aspects
of a given Report Class. Through this window object, the user can
view a Report Class and then select, move, resize and delete existing
component objects within that class and select and drag section
boundaries without any additional programming on our part. But with
a little extra coding effort that involves the properties and methods
of this field, we can allow our users to also adjust property values
of component objects and sections and even to add new objects and
sections to the report.
In fact, the Modify Report field is the core of the "Adhoc
Reports" facility of Omnis Studio. Anyone who has used this
feature to create or modify an adhoc report will notice that it
is not quite the same as the complete Report Editor of the IDE,
but it is close. (And we certainly don't want our users messing
around to deeply in the classes of the libraries we give them!)
What we will do in this article is to explain and demonstrate what
is needed in order to create a Window Class with similar abilities
to the Adhoc Report and Report Editor windows. Most of this involves
the Modify Report field, but there are a few other practical matters
to address as well.
A Word of Warning ... and a Suggested Solution
This brings up an important issue - so before we begin, there is
one important thing of which we must remain aware: Any change made
to a Report Class using the Modify Report field takes effect immediately.
There is no "save"; there is no "undo". Once
an operation is performed on the Report Class or one of its component
objects, the change is permanent and can only be undone
by performing another operation that has the opposite effect.
Given this condition of use, we might want to consider only allowing
the user to work with a copy of the Report Class rather
than with the original. This then requires finding a way to store
these custom Report Classes so that our original library can be
replaced (for version updates and such) without destroying the custom
reports on which our users have spent so much precious time. Building
a separate library to hold just the custom reports is a viable option,
but the details of using this technique are beyond the scope of
this article (and I find it a bit clumsy as well).
Perhaps a cleaner and more flexible way of handling custom reports
is to store their binary class data in the database itself
and pull that data into a dummy report intended for this
purpose when a custom report is required. Each class has a $classdata
property which contains its entire internal definition (all the
functional bits other than the class name for our purposes). By
creating a File Class or database table to hold records for custom
reports that contains this binary information, we can implement
both "save" and "revert" operations for each
custom report. In fact, we can even tie specific custom reports
to different users of the same deployment if that makes sense for
our application! After a custom report is used for modification
or printing, we then just copy the original (empty) version of the
dummy report back into its shell (Report Class) so we can start
fresh each time.
We can also use this dummy report as the "report container"
for reports we access using our Modify Report field. Rather than
changing the $classname property of the field (which we
will explore further on in this article), we can simply change the
$classdata value of the Report Class already installed
in the field. This allows us both to access custom report data from
the database and to use existing Report Classes within our library
as templates for new custom reports.
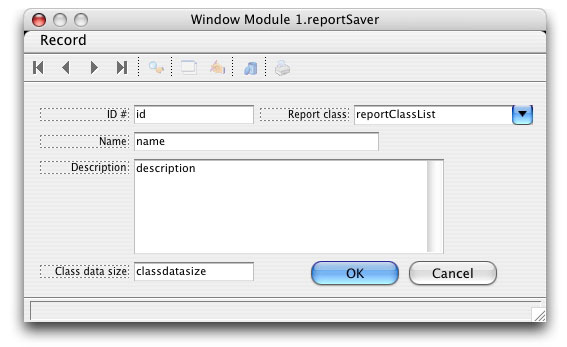
For this article, I created an empty Report Class and named it
"crashDummy" (in honor of the devastating effects that
can occur when we step out of bounds developing techniques like
this). I also created a File Class named "customReports"
with the following variables in it:
| Name |
Data Type |
Max Length |
| id |
Character |
8 |
| name |
Character |
40 |
| description |
Character |
1000 |
| classdatabin |
Binary |
10000000 |
Depending upon the needs of our application, we could also include
variables for originator id, creation and modification dates, authorization
level for use, etc., but this is sufficient for our needs here.
I also quickly built a simple window for saving the binary data
of existing reports into this database. (Actually, I only wanted
to get the virgin version of crashDummy into the database so its
original pristine state could be retrieved after each use.)
I only bring this up because there are a couple of useful things
to know about it. First, the list of Report Classes was build using
the $makelist method on the group of Report Classes in the current
library:
Calculate reportClassList as $clib.$reports.$makelist($ref.$name)
We can then use the value of the current line of this list selected
by the user to get the class data for that report and put it into
the record just before we save it:
On evClick

                Calculate customReports.classdatabin as $clib.$reports.[reportClassList.C1].$classdata

                Redraw {classdatasize}
The classdatasize field is simply used as a read-only
reference. It displays the length of the binary data in a calculated,
disabled field using the binlength() function, so its calculation
($text property) value is:
binlength(customReports.classdatabin)
I gave the "crashDummy" record an id value of
'00000000', making it both easy to remember and easy to pass over
when building a list of custom reports from this File. But we're
getting away from the main focus of this article...
Building A Report Modification Window
The reason we are given the Modify Report control (or so I assume)
is so that we can make our own Report Editor window in our applications
so that our users can adjust the Report Classes we give them to
suit their individual needs. This is most important for a "vertical
market" or "off-the-shelf" application, but it can
also be a beneficial feature for a custom application as well.
If our goal is to directly emulate the Report Editor window from
the Omnis Studio IDE, we need to create a Window Class with four
basic things: the Modify Report field, a toolbar containing controls
for that field, a means of modifying property values for selected
items within that field (or for the overall report) and a means
of selecting tools that allow us to create new component items within
the report. Because of the way we have chosen to store the report
data, we also need a means of storing and retrieving custom report
contents on this window.
Since there isn't enough space in a single article to cover all
of this work in minute detail, I will focus on the tools we have
at our disposal to manipulate the Modify Report field itself and
the Report Class that it displays - plus a few important (or interesting)
side trips. If you'd like to see the finished product, attend any
of the next Omnis international conferences (OzOmnis 2004, EurOmnis
2004 or AmerOmnis 2005) for my live presentation on this subject.
There are four main collections of controls we want to provide
for a Report Editor window:
- Standard (and extended) Report Editor tools
- Overall Report Class property adjustment tools
- Object creation tools
- Object property adjustment tools
(We could also subdivide these categories into functional groupings.
For example, we might want to separate "Appearance" property
tools from "Text" property tools. While this may result
in a better user interface, I will lump these all together here
in the interest of time. Again, a more complete product will be
shown at the conferences.)
The Omnis Programming manual (pp. 136-8) gives us some direction
for creating tools for many of these purposes - and it even includes
a few examples. In the manual, the creators of Omnis Studio suggest
using toolbars to hold controls for changing various aspects
of the contents of a Modify Report field. While this may seem unwieldy
due to the large number of controls that we would need to handle
both the creation of objects and the modification of property values,
I must agree that toolbars appear to be more stable currently than
other alternatives I have explored. In Mac OS X we have the ability
to add drawers (subordinate window instances that pop out
any or all of the four sides of a window) to our windows, but I
have not been entirely satisfied with my results so far. (Although
I have gotten them to work, there are redraw issues and
problems stemming from the fact that these windows never "come
to the top", so tooltips and other features do not function.
Some controls, like tab panes, also appear not to work in this environment
- at least in Mac OS X.) On the other hand, doing everything with
toolbars on Mac OS X is also unsatisfactory because tools that do
not fit along the toolbar become items in a menu that drops down
the right edge of the window:
So I have chosen to use toolbars for some things and window fields
(entry fields, pushbuttons, checkboxes, etc.) for others on my report
modification window - and to make the window wide enough for the
toolbar items I have included.
Enough background! What about this Modify Report field?
Modify Report Field Basics
A Modify Report field is a container for a Report Class.
It allows the user to perform certain modifications to that class
without any programming intervention, but it also allows other kinds
of modifications and queries to be performed through various properties,
built-in methods and events. There are a few parts or features of
this field labeled in the illustration above that are noteworthy.
The canvas area is always visible. It is the background
on which we view the report class. Depending on ceretain
property settings, we may see the report class as a piece of paper
with edges that is floating above the canvas or we may only see
the report class as a field of white completely covering the canvas.
We toggle the showpaper property value to change this view.
The Report Class that is displayed in the report class area is the
one whose name is given for the classname property value.
To help us judge locations as we drag objects around the report
class area, we can also expose a pair of horizontal and vertical
rulers in a Modify Report field. The vertical ruler is automatically
displayed for the section in which the user is currently working.
The visibility of this feature is controlled by the showrulers
property of the field. The rulers show either inch or centimeter
divisions depending on the setting of the usecms property
of Omnis Studio preferences ($prefs.$usecms).
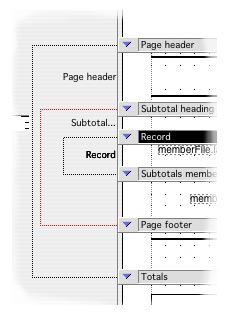
Another aid, especially for complex reports with many subtotal
levels, is the connections area. When exposed, this area
displays lines connecting section banners that encompass matching
subtotal level sections. For example, here we see a line connecting
the Page header and Totals sections, thereby encompassing
the Page header and Page footer sections (and
everything in between). Inside that there is another line connection
the Subtotal heading 1 and Page footer banners,
thereby encompassing the Subtotal heading 1 and Subtotals
level 1 sections. Notice that this line is currently red because
a section banner inside it is currently selected. It is showing
the current connection.)
The visibility of the connections area is controlled by the showallconns
property. In addition, the highlighting of the current connection
is controlled by the showcurrconn property. The two work
in combination so that the user can see all connections, no connections
or only the current connection. At runtime the user can drag the
edge of the canvas area to make the connections area wider or narrower.
We can use the connswidth property value to read the user's
choice in this matter in our code, but we can also use it to set
a default width for the connections area in design mode.
By just displaying a Report Class in this field, the user can select
any field, background or section object and drag it to a new position.
Groups of non-section objects can also be selected. As a group of
objects (or a single object) is being dragged, the location of the
edges of the bounding box encompassing the selection is shown on
the rulers if they are visible. Non-section objects can also be
resized by dragging their handles and duplicated by Option/Control-dragging
the object(s). Selected objects can be (permanently) deleted by
pressing the Backspace or Delete key. In Studio
4, the user can also collapse or expand a section
(like in a tree list) by clicking on the triangle at the left end
of the section banner. The user can even paste in background pictures
from the clipboard!
But we may want to offer our users more power than this, so we
must access other features of the field. To do so, we must supply
controls so the user can manipulate properties and methods of the
Modify Report field.
Manipulating Modify Report Field Properties
Since we decided to use a toolbar to set the basic properties of
our Modify Report field, I chose to model the main toolbar for this
window after the one used on the Report Editor window of the IDE
- with a few enhancements. Here is what I crafted:

I kept the labels short to keep the toolbar from getting too long,
but it is simpler than it might appear. From left to right, there
are:
a few pushbutton tools for dealing with printing the current report
directly from the editor window (including one to Prompt for
destination which does not appear on the built-in Report Editor)
- a group of checkboxes for toggling the showpaper, showrulers
and shownarrowsections properties of the Modify Report
field (shownarrowsections toggles the visibility of the
section banners on the report)
- a group of radio buttons that cycles through visibility options
for the connections area
- a couple of pushbuttons for opening the Sort fields and Page
setup windows for the current report
- two more pushbuttons for deleting and inserting a line in the
report
- a list for selecting an existing report class and moving its
classdata into our "crashDummy" class
Most of these controls contain very simple methods. (For convenience,
I have created an instance variable of Item reference
type named "targetRef" that points to the Modify Report
field in the report editing window.) For example, the $event
method for the checkbox that toggles the showpaper property
value contains:
On evClick

                If $cobj.$checked

                  Calculate targetRef.$showpaper as kTrue

                Else

                  Calculate targetRef.$showpaper as kFalse

                End If
The print-related pushbuttons at the left end of this toolbar contain
equally simple methods, but they do not directly involve our Modify
Report field so we won't dwell on them here. On the other hand,
the Sort fields and Page setup pushbuttons contain
even simpler methods, but we haven't yet discussed the built-in
methods of the Modify Report field that they invoke...
Modify Report Field Methods
Besides the $redraw() method (which is contained by every
type of field object we can place on a Window Class), the Modify
Report field contains two additional methods. These are $sortfields()
and $pagesetup(). When executed, these methods simply open
the windows implied by their names for the Report Class currently
contained by the Modify Report field. They require no parameters
and have no options of any kind. So, for example, the method behind
the pushbutton that opens the Sort fields window is:
On evClick

                Do targetRef.$sortfields()
While the inclusion of the other items to the right of these pushbuttons
might imply that there are built-in methods for deleting and inserting
lines in a report, this is not the case. These are a bit more complex
and will be explained later in this article. The next thing we have
to consider is how to select a report for display in this field.
Selecting a Report Class
Of all the properties contained by the Modify Report field, perhaps
the most important is classname. This holds the name of
the Report Class currently displayed by the field. We can set this
to the name of a specific Report Class using the Property Manager
if we want to set a "default" Report Class, but we can
dynamically change this at runtime to allow the user to work with
any existing Report Class. If a Report Class from a different library
is required, its name must be qualified with the name of that library.
For example, "specialReports.myReport". But that's not
how we're going to do it...
Earlier I mentioned setting up a "dummy" Report Class
and swapping binary report information into and out of its classdata
property as a means of retrieving and storing custom reports to
protect them from loss if the library needs to be replaced. The
dropdown list on the right end of the toolbar shown above is a first
step of this process. It is designed to bring the classdata from
another Report Class of our application into the "crashDummy"
Report Class, which is pre-installed in the Modify Report field
using the classname property. Here is how it works:
The dropdown list field represents an instance variable
of the Toolbar Class named "reportList". This list is
populated in the $construct method of the dropdown list
field using the following code:
Calculate reportList as $reports.$makelist($ref.$name)

              Calculate reportList.$cols.1.$name as 'name'
(The second line of this method is actually superfluous because
we can refer to the column as "reportList.C1", but a label
sometimes makes the code easier to read.)
When the user selects a line from this list, the $event method
of the dropdown list field puts the new report information into
our crashDummy report using this code:
On evClick

                Calculate $clib.$reports.crashDummy.$classdata as $clib.$reports.[reportList.name].$classdata

                Do $cwind.$redraw()
On Mac OS X (and perhaps other platforms) there is one slight anomaly
when we switch between a landscape and a portrait report. Although
the orientation of the report is transferred as part of the classdata,
the redraw does not change the "shape" of the "paper"
(if showpaper is set to kTrue). The only thing
that will do this is to open the Page setup window and
then close it again. It is not the technique that is at fault here,
because the same thing happens if we change Report Classes using
the classname property of the Modify Report field. While
this is not a devastating problem, it is important to be aware of
it.
Once we have the proper report in view, it is now time for the
user to make modifications. As with other field types, this is facilitated
by using event management techniques...
The evSelectionChanged Event
There is only one event of consequence for a Modify Report field.
That is the evSelectionChanged event. This event indicates
that the user has selected or deselected one or more items within
the displayed Report Class. We can use this to perform some important
responses to the user's action.
The evSelectionChanged event is accompanied by the pSelectionCount
event parameter. This parameter tells us how many objects are currently
selected. Since we want to be able to modify both object and overall
report properties on this window, pSelectionCount helps
us know when to switch between a view of report properties and a
view of object properties. If pSelectionCount equals 0,
we want to see report properties. Otherwise we want to see fields
on our window that can be used to modify the property values for
the selected objects.
Managing Properties
Because there are so many potential properties to work with, I
have chosen to use a paged pane field to display report and object
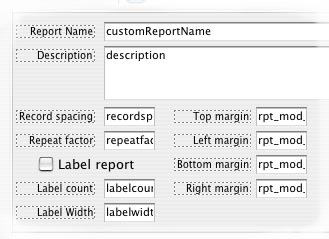
properties separately. Here is a view of some of the report
properties:
and here is a view of some of the object properties:
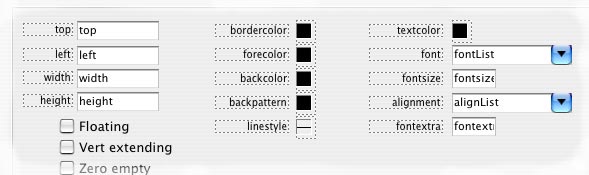
While I have not yet accomodated section properties, this
would also be easy to do. (It all just takes time!)
The $event method of the Modify Report field mainly switches
between these two pages of the paged pane. The entire method is
as follows:
On evSelectionChanged

                If pSelectionCount ;; items must be selected, so show
              field properties pane

                  Do $cinst.$setproperties()

                  Calculate paneRef.$currentpage as 2

                Else ;; show report properties pane

                  Calculate paneRef.$currentpage as 1

                End If
The fields for managing report properties do so directly.
That is, the dataname values for these fields directly access the
properties of the report class. For example, the repeatfactor
field has a dataname value of "$clib.$reports.[rptfld.$classname].$repeatfactor"
(where rptfld is an instance variable of Item
reference type that points to the Modify Report field). Dealing
with object property values is not quite as simple...
Getting and Setting Object Property Values
In order to access the objects that are currently selected in the
Modify Report field, we must set the applyselected property
of that field to kTrue. This property determines whether
notation involving the Modify Report field applies to the field
itself (kFalse) or to the selected items within the field
(kTrue). When it is set to kTrue, we can use our
Item reference to the field as though it were a reference
to the group of selected items. This allows us to both get
and set property values for those items. We generally set
this value to kTrue only for the method being executed, so my preference
is to set it in a reversible block like this:
Begin reversible block

                Calculate rptfld.$applyselected as kTrue

              End reversible block
Since we can't have a permanent link to individual items and their
properties, we must use instance variables in our report
editing window to represent those properties. In some cases where
we can use special "picker" pushbuttons, the contents
of those fields is used instead of variables. In any case, we have
to specifically set those values in our window to reflect the property
values of the selected objects. That is the purpose of the $setproperties()
method call in the $event method shown above.
For convenience, I use another Item reference variable
named "objRef" to point to the group of objects on my
window. It is initialized as "$cinst.$objs".
An example of setting the value of a "picker" pushbutton
is:
Calculate objRef.textColorButton.$contents
              as rptfld.$textcolor
and an example of setting a variable value (in this case, an instance
variable named "height") is:
Calculate height as rptfld.$height
We perform exactly the opposite calculation in the $event
method of each property mangement field on our window. So to set
the textcolor property for the group of selected objects,
our pushbutton contains this $event method:
On evClick

                Begin reversible block

                  Calculate rptfld.$applyselected as kTrue

                End reversible block

                Calculate rptfld.$textcolor as $cobj.$contents
A similar method would be used for a variable-based property field.
But what about properties that are not appropriate for the current
selection? Our interface is that much better if users are not tantalized
by features they can't use only to find out that such features "don't
work". There is a way to avoid this problem...
Disabling Inappropriate Property Fields
Every property has a canassign property. This indicates
whether that property can be modified for the current object. Of
course, we can only query this property-of-a-property if the (main)
property exists in the first place. But both foreground and background
report objects have essentially the same set of properties, with
different properties disabled for different object types, so this
is not much of a problem.
For each property we have chosen to manage, we should disable the
field on our window that represents it if the property cannot actually
be modified. For example, if textcolor is not an active
property of a selected object (like a line), we want the
pushbutton used to represent that property to be greyed out
(just like in the Property Manager). We can do this by including
a line of code like the following in our $setproperties()
method:
Calculate objRef.textColorButton.$enabled
              as rptfld.$textcolor.$canassign
Only fields representing properties shared (and assignable) by
all selected objects are enabled using this technique.
All this is fine for dealing with existing report objects,
but what about letting our users create new ones? We can
do that too!
Creating New Report Objects
The Modify Report field has another property that can be set to
make various object creation tools available for one-time use. This
is the tool property. We can use a number of Window
and Report objects constants to specify a value for this property
and if the user's next action is to draw a rectangular area somewhere
on the report area of the Modify Report field, an object of that
type will appear. The manual suggests that only background objects
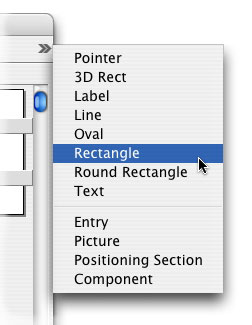
can be created in this way, but I have found that kEntry,
kPictureobj and even kSection (for Positioning
sections) work just fine as well.
All we need is another toolbar to hold all the possible tools.
I happen to have one here:

This toolbar is installed next to the one we built earlier. If
we make our window wide enough, both can appear without spilling
off the right edge of the toolbar.
I have used radio button tools for these both to save space and
because only one tool can be selected at a time. I made a separate
set for foreground object tools for cosmetic reasons only. The user
can still only wield one tool - foreground or background - at any
one time.
The $event method for each tool is incredibly simple. Here is an
example for the text tool:
On evClick

                Calculate targetRef.$tool as kText
Upon creation, an object is automatically selected and so it also
automatically triggers the evSelectionChanged event. With
the infrastructure we have already developed, we see that the property
management pane of our paged pane automatically opens and the fields
representing the available properties of our newly created object
await our input. In our single window we have now created the near-equivalent
functionality to the Report Editor, Property Manager and Component
Store! What more could we want?!
Adding and Removing Lines
Certainly there are many things still lacking from the combination
of the three IDE tools mentioned in the last section, but there
is one more issue to address: the insertion and deletion
of lines. The Report Editor window allows us to select one or more
lines and then to either insert that number of lines (above the
top selected line) or delete the selected ones (and all objects
that lie upon them). Interestingly, the Adhoc Report window, which
is based upon the Modify Report field, does not allow us
to select lines and show them highlighted. I certainly haven't discovered
how to do that.
What I have discovered is a technique for inserting or
deleting the line directly above the line on which the
currently selected object resides. If more than one object is selected,
they must lie on the same line in order for this technique
to work. While this will require some user training, the concept
should not be too difficult. Here is how it works:
Each object in a report, including each section banner, has a lineno
property that contains the line number within the Report Class on
which it lies. We can use notation to modify the value of this property
to move an object to a different line. The trick is, we have to
make room in the report for a new line first before we can "insert"
one. We do this by increasing the lineno value of the End
of report section before changing the lineno value
for any other object. So we are actually only adding a line to the
bottom of the report and then moving all the objects with line number
values greater than or equal to the currently selected object down
a line.
Of course, this assumes that we have captured the lineno
value of the selected object. We can do this by adding the following
line of code to our $setproperties() method:
Calculate linenumber as rptfld.$lineno
The variable linenumber is an instance variable
of our window and it has the Long integer datatype. Using
this, we can then put the following code in the $event
method of the Insert line pushbutton in our toolbar:
On evClick

                Calculate $reports.crashDummy.$objs.End of report.$lineno
              as

                       $reports.crashDummy.$objs.End
              of report.$lineno+1

                Do $reports.crashDummy.$objs.$sendall($ref.$lineno.$assign($ref.$lineno+1),

                       $ref.$lineno>=$cwind.linenumber&$ref.$name<>'End
              of report')

                Redraw {$cwind}
The "deletion" of a line is performed in a similar way,
but we make sure that we move the End of report section
up a line (the only action that actually removes a line from the
Report Class) after all other objects have been relocated. Here
is that code:
On evClick

                Do $reports.crashDummy.$objs.$sendall($ref.$lineno.$assign($ref.$lineno-1),

                       $ref.$lineno>=$cwind.linenumber&$ref.$name<>'End
              of report')

                Calculate $reports.crashDummy.$objs.End of report.$lineno
              as

                       $reports.crashDummy.$objs.End
              of report.$lineno-1

                Redraw {$cwind}
The ability to actually see the line highlighted that is the basis
for the insertion or deletion would certainly be nice, but this
still serves the purpose. I have not included code that would remove
items that line on the line to be "deleted", but I leave
that for you as an extra credit exercise. I have also not addressed
the creation of new customReport records or the retrieval
of existing ones, but I assume you know how to do that...
Until Next Time...
I think that's enough for now. I hope this proves to be of some
use to you. |
 Please logon or create a free account to download this file.


