Tech News Back Issues Issue: 071703
|
Introduction to the Omnis Web Client:
Part 18, Search engine promotion of a site By Dr Caroline Wilkins In the previous newsletter we discussed issues relating to the design and usability of a site. Let us assume that the site is written and ready for use. It is easy to imagine that your job is done once everything works and looks as it should. In reality, this is the point at which the project sinks or swims commercially. You have to promote it! There is very little point creating a web site or web database system intended for public use if you are not going to promote it effectively. This doesn't have to be an overly arduous or complex task. Nor do you have to pay a third party agency to do it for you. By following a sensible promotion strategy, you should be able to attract a reasonable amount of traffic to your site. Web promotion starts with search engine submission and that is what we are going to focus on in this article. DirectoriesDmoz is a web directory that is edited and monitored by volunteers. It can therefore take between a few days or weeks and a few months for your site to appear in the category you have selected, so it's worth getting your registration in as soon as possible. Don't register before you have completed your site however, as this may cause your registration to be rejected! All the other search engines of note refer to dmoz (Google, Lycos, Netscape Search, AOL Search, Hotbot, DirectHit). Also, ensure your metatags are in place (see below). Find the category in the directory that suits your site and then click the link to suggest/register a site. It is worth spending a bit of time looking at the various categories and making sure you are applying for the right one. This will make your registration faster, more likely to succeed and will be more effective in terms of your sites appearance in search results. For example, if you are selling accounting software on your website, it wouldn't be sensible to put it in a directory for computer hardware suppliers. The whole point of registering your website on a directory is so that people using a search engine will find you. You might also like to submit to Yahoo. Yahoo is a directory too, although the Yahoo search engine serves results from both its own directory and from spider engines such as Google. There are a couple of types of registration you can make on Yahoo: paid and unpaid. The unpaid listing are not guaranteed for acceptance and it could take a while for your site to appear in the Yahoo directory. CrawlersHaving done your registration with the directories, it is now time to think about attracting the spiders/crawlers. (We will use the term "crawlers" henceforth in this article as the author is arachnophobic and isn't going to enjoy writing this very much otherwise!). Crawlers go through the web, following links from site to site, assessing and recording each site as they go, gradually building and updating a database. There are a lot of crawler search engines out there! You can leave it to chance that they will find you by following a link to your site, or you can invite them to visit by submitting your site to them. This is obviously a better strategy. There are a lot of web promotion companies that will offer a service to do this for you. This will typically cost between £200 and £2000. You can save yourself that fee and put yourself in control of your web promotion by doing this yourself. I would not suggest that you try and submit your site to all the crawler engines manually as there are so many. Instead, get a software tool such as Hello Engines or Web Position which will submit your site to multiple crawler engines automatically. The web promotion companies will be doing very little more than running one of these software applications on your behalf, so you may as well buy the software and do it yourself. It will be cheaper and you will remain in control of your web promotion strategy. If there are regions within your site that you would like individual crawlers or all crawlers not to index, you can specify this wish in a robots.txt file. The crawlers should honour your preferences as stated in your robots file, although some may not. MetatagsBefore you submit to directories or crawlers, you should sort out the metatags on your site. It is unwise to invite a crawler to visit your site if it isn't going to find the appropriate metatags there. If that happens, it wont associate your site with the words you want it to, it will just have to form a judgment on the body text and alt tags of the site. (Having said that, some crawlers only take page content into consideration anyway!) If you take a look at the source of any of the www.RescuePet.org.uk pages, you will see something like the following in the head of the html document: <META NAME="keywords" CONTENT="rescue, pet, dog, cat, rescuepet, shelter, animal, search, database, adopt, welfare, uk, breed, artificia, omnis "> <META NAME="description" CONTENT="Search the RescuePet database for a rescue dog or cat to adopt at a UK shelter near you. Free database service to public, rescue shelters and breed rescue organizations. Photos, stories, chat and news about animal welfare and rescue pet adoption. "> <title>Rescuepet</title> These are the three most important tags to put in. The keywords should be a list of words that are most important on an individual page. If you were to do a manual submission to a directory or crawler, you would also be asked for keywords. In that case, you would give keywords that related to the entire site. The html metatag keywords are a separate issue and should ideally be page-specific, although many people use the same set of keywords in metatags throughout their site. The number of keywords you should use is a debatable issue. Some engines only consider a few of the keywords and might just look at the first 5 or 10. It is therefore important to put them in order of relevance with the most important words first. Other engines consider a keyword as a percentage of the total number of keywords. For those engines, adding extra keywords will dilute the effect of the important words. The solution is moderation. Use between 10 and 20 keywords and if a word is not relevant to your site, don't use it. The description of the site will often be what is displayed in search results. It has to read like proper English as it will be presented to human users of the search engines. It should aim to make maximum use of important keywords. Keep reasonably short, up to a maximum of 200 characters. RankingsRankings are dependent on the following, in this order:
Each search engine attaches different weightings and importance to each factor. If you optimise you site heavily to maximise it's ranking on one search engine, you might lower it's ranking on another engine. Again, the solution is common sense and moderation. Some web promoters go to a lot of trouble to guess/calculate the rankings algorithms used by each search engine. For some sites, this can pay off. In general, it isn't necessary to go to this much trouble. Just make sure you have selected about 20 sensible keywords, have set the title tag of the document and have written a concise description metatag that uses your keywords and this should be sufficient. Not all crawlers look at your description and keywords. Instead they look at just the content of your web pages and form rankings based on keyword density. Google, for example, ignores your description and creates it's own. Nevertheless, writing a short description wont take you long and will assist your rankings on certain crawlers, e.g. Inktomi (which is used by MSN and has recently been acquired by Yahoo). Links to your site add up to an important ranking factor. Crawlers will rank your site according to who is linking to you. They don't care who you are linking to, and you will not pick up ranking points by linking to big sites if they are not linking back to you. If you can persuade a "big" site to link to you however, it can be very good for your rankings. Crawlers look at the number of links to your site as well as the quality of those links. A link from a site that it already ranks very highly with respect to the search term in question will improve your ranking. However, there is little point trying to obtain from big websites if their content is not relevant to yours. What you are aiming for is links from highly ranked sites that have relevant content. In effect, this means that the highest ranking sites for particular search terms can control the "league table" below them by granting links. You can pay for top placement in search results on some search engines. These schemes can be done on a "pay per click" or flat fee basis. Depending on how they are integrated into the search results, they may or may not be effective. It can also work out expensive if the pay per click scheme is auction based. You can get into a bidding war with another website owner and find that you are driving up the price you are prepared to pay for top placement for a search term until it is no longer profitable for you to do so. In those sorts of schemes, you should consider what the average value of each customer to your website is. Don't let your pay per click rate get above that value! In order to assess average value of an eCommerce site, divide the profit of your web based sales revenue by the number of visitor sessions on the site for a given period. If you have a highly priced and specialised product that is unlikely to attract casual browsers, the pay per click might be for you. If you have a product that is likely to attract a lot of casual browsers who are likely to follow a search engine link but not make a purchase, then pay per click might work out unprofitable. UpdatingHow often should you update your directory and crawler registrations? The basic answer is that you should update with the crawlers every time you make a significant change to the content of your site. Unless the basic purpose of the site has changed, you don't really need to update or change your registration with directories. Note the difference between crawlers and directories! If you have changed the content of the site e.g. new articles, products, news etc., then you should re-submit to the crawlers. The crawlers will automatically return to your site to re-evaluate it every 6-12 months. If this is not enough, then you can ask them to visit sooner by re-submitting. There are no guarantees that they will and excessive requests of that nature may result in your site getting banned, so don't do it every day! Every month is about right, if your content is continually changing. If you have a software product like Hello Engines or Web Position, it is easy enough to put it in your diary to run the crawler submitter program each month. Summary Web promotion doesn't have to be expensive or complicated. As a minimum, add your site to dmoz. Ideally, get a software tool such as Hello Engines or Web Position to do monthly crawler submissions as well. If you want to stay informed of the success of your search engine strategy, you might buy a product such as Ranking Toolbox. I have found this a quick and effective way of generating reports on search engine placements. If you are managing multiple websites, a tool like this will save you a lot of time. There are other strategies that can help increase your search engine placement and traffic to your site. Some are more effective than others and some can end up damaging your search engine rankings. Common sense goes a long way with search engine strategies. You will soon work out what strategies are effective and which waste your time and effort. It's hard to argue with your site logs after all...:) The author would like to thank Victoria Field for her contributions and assistance with this article.
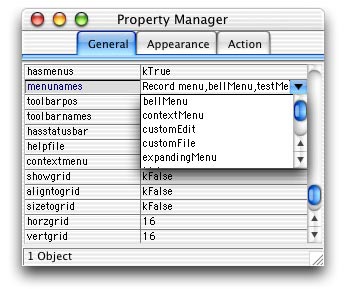
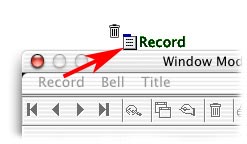
Embedded MenusBy David Swain In the past few articles, we have been discussing installed menus. That is, menu instances that are installed on the main Omnis Studio menu bar. This is the most traditional way to deploy a menu instance, but certainly not the only way in Omnis Studio. Every window, no matter which style property value is applied to it, has the option to display its own embedded menu bar. This option is controlled by the hasmenus property of the window. To switch on this option, we generally set this property to a value of "kTrue" for the window class at design time using the Property Manager and then specify which menus (and in what order) we wish to instantiate there using the menunames property (or other techniques to be explained below). These menus are then known as "embedded" menus within an instance of that window class.
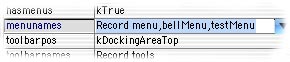
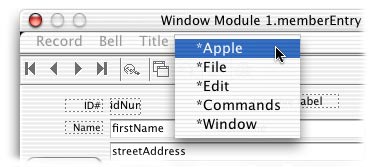
Purpose of Embedding Menus on WindowsThe idea behind embedding a menu in a window rather than having all menus installed on the main menu bar is that some menus contain commands that are specific to that window rather than applying generally to the application. Some philosophies of interface design teach that such menus should be part of the window in this manner - others feel that menus should always be on the main menu bar and should disappear if not appropriate for the top window, then reappear when an appropriate window is brought to the top. If the idea of embedding appropriate menus on specific windows appeals to you, then my one suggestion would be to only place menus on a window that deal with some function of that window. Navigation menus (those that transport the user to different parts of an application) are still best installed on the main menu bar in my opinion - unless the trip to the target window is dependent upon the current one and the record it displays. Examine a number of commercial applications to get a feel for when and how embedded menus should be used. But there are no restrictions on which menus can be placed on a window's menu bar as far as Omnis Studio is concerned. Even certain built-in menus can be embedded, although the options on those menus would suggest (at least to me) a scope larger than a single window for most cases. We will see how this is accomplished later in this article. Embedded menus are handled differently from installed menus in a number of significant ways. The user does not (and should not) notice these differences, but we programmers must deal with them differently from menus we install on the main menu bar. It helps to understand the "rules". Class-Instance Name SolidarityForget about having to keep track of instance vs. class names for menus embedded on window instances. Each embedded menu instance has the same name as the class from which it is spawned. There is no option to specify the instance name when placing a menu on the menu bar of a window (including when we use the $add methods of the $menus group for the window instance mentioned later in this article). The class name is automatically used as the instance name. Each menu class can only be instantiated once on any specific window, but there is no restriction on how many windows can contain an instance of the same menu class (with the same name). There is no naming conflict in this scheme because the "full" name or notational path to the menu instance is still unique throughout the application since it includes the path to the window instance, which is unique in its own right. Embedded Menu SetupThere are a number of ways by which we can establish and manage menus embedded in a window class at design time. First, we must set the hasmenus property value to kTrue. Then the Property Manager provides a convenient dropdown list of all the menu classes in the current library as part of the menunames property. We can select a menu class from this list to install on the window's menu bar.
This works fine if we only require one menu class in the window's menu bar. Unfortunately, selecting a menu class in this manner replaces any menus we have already selected. The usual modifier keys for making multiple selections in such a list appear to have no effect (at least on the platforms I've tried - I might have missed something...). In order to specify multiple menu classes through the Property Manager, we must manually type their names, separated by commas, into the property value field.
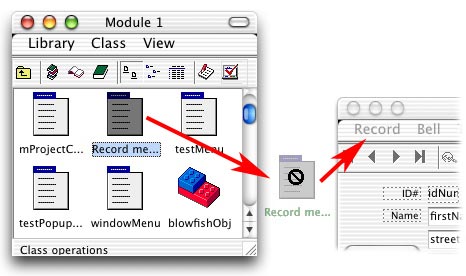
Drag-and-Drop Modifications of menunamesPerhaps an easier way to manage multiple menu classes on the menu bar of a window is through drag-and-drop actions. For example, we can add a menu class to the menunames property for the window class by dragging its image from the Class Browser and dropping it onto the menu bar of our window class. An image representing the menu class follows the mouse pointer, which appears as the "do not drop" symbol until the mouse is over the menu bar of a window. The image that represents the menu will vary depending on which view option (Large Icon, Small Icon or Detail) is currently displayed in the Class Browser.
Removal of a menu class from the menu bar of a window class is just as easy. We simply drag the title of the menu class off the menu bar until the mouse pointer icon switches to the trash can and then let go of the mouse button. The menu class is represented by the Small Icon image during this action.
We can also reorder the menus on the menu bar of a window class by drag-and-drop. We just begin dragging a menu title to a different location and an insertion bar appears to light our way. When the insertion bar appears in the desired position, we let go of the mouse button and the menu class is moved into its new position. Again, the Small Icon image of the menu class accompanies the mouse pointer.
We can also work with this group of embedded menu classes using Omnis Notation... Embedded Standard MenusWe can also embed many of the standard built-in menus of Omnis Studio on a window. To do this, we simply context-click on the menu bar of the window class in its design window. A context menu of standard menus will appear. The menu line for any such menus that are already embedded will be checked, so we can remove that menu by toggling its context menu line off.
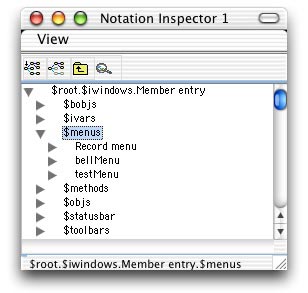
The name of a standard menu can also be typed into the menunames property value - just be sure to include the mandatory asterisk (*). The $menus Group of a Window Class or InstanceThe menu classes embedded on a window's menu bar constitute the $menus group for that window. This includes both custom menus and standard menus. Both the window class and any instance spawned from it contain a $menus notational group. We can examine this group and its members using the Notation Inspector.
The $menus group contains most of the usual methods for a notational group. Of particular interest to us here are the $add(), $addbefore() and $addafter() methods of the group in the window class and the $add() method of the group in a window instance. These differ slightly from the same methods for the $imenus group (those that are installed on the main menu bar) that we examined earlier in this series of articles in that none of these methods has a parameter that allows us to specify the name of the instance that will appear on the window's menu bar. The $menus group does not allow the instance to be independently named. Only the class name (which becomes the instance name) can be specified. (Note: The only property of a member of the $menus group of a window class is the text property. The value of this property defaults to the name of the menu class. It appears as an editable property in the Property Manager, but any attempt to change it results in an error.) To add a member to the $menus group for a window class, the $add() method has this simple syntax:
Executing this notational method appends the menu class to the value of the menunames property for that window class, but only if the design window for the window class is not open at the time of execution. We cannot notationally modify this aspect of an open window class. The $addbefore() and $addafter() methods for this group have an additional parameter that is inserted before the menu class name. This parameter is a notational reference to the member of the group to be used as a "position marker" for the addition of the new member. There are similar restrictions on the use of these methods. A menu can also be removed from this group using the $remove() method. The only parameter that is required by this method is a notational reference to the member of the $menus group that is to be removed. Again, this must be performed when the design window of the class is not open. Of course, sometimes it is just easiest to directly modify the value of the menunames property of the window class through a direct assignment instead of using the $add() and $remove() methods. The only problem here is that we need to list all the menus in the proper order:
The good news is that this can be performed whether or not the design window for the window class is open. Dynamically Adding and Removing Menu InstancesPerhaps some special set of users of an application (identified by some variable value within their logon record) require an additional menu on a window that the general user does not. Furthermore, this menu may need to be placed at a specific position within those already on the menu bar at design time. We can handle this in the $construct method of the window in one of two ways: We can either place this special menu on the menu bar at design time and then dynamically remove it as the window instantiates for a general user, or we can not place it at design time and dynamically install it at the appropriate position for a special user. The $add() method for the $menus group of a window instance differs slightly from that of a window class - and there is no $addbefore() or $addafter() method for this group. $add() has a second, optional parameter that allows us to specify the position where the new menu instance will be placed on the menu bar of the window instance. For example, to specify that we want a menu named "specialMenu" to be placed between the first and second menus already on the menu bar, we could issue this command in the $construct of our window:
The $remove() method for the $menus group of a window instance works the same as it does for a window class. Order On the Menu BarThere is no order property for the members of the $menus group in a window class. There is only the order in which they appear in the menunames property value. There is an order property for members of the $menus group of a window instance, but this order property is read-only. Unlike installed menus, embedded menus cannot be reordered by modifying their order property value. In order to change the order of the menus on a window instance, we must remove the menu and then add it again in the appropriate position - if this is absolutely necessary. Usually it is just a good idea to plan ahead and put the menu in the proper position in the first place. Shortcut Key Order of PrecedenceSo what if we embed a menu on a window instance that has shortcut keys that conflict with other menus on the same window, on other windows or on the main menu bar? (It could happen...) As far as other menus on the same window, the same rule applies as for the main menu bar: the rightmost embedded menu takes precedence when two embedded menus have the same shortcut. There is no conflict with other windows because only one window can be the top window - and only the shortcut keys for the top window are recognized. Embedded menu shortcuts take precedence over those of installed menus. We can think of this in a similar way to how we think of "scope" for variables. Embedded menus are "more local" to the window, so they take precedence when there is a "conflict".
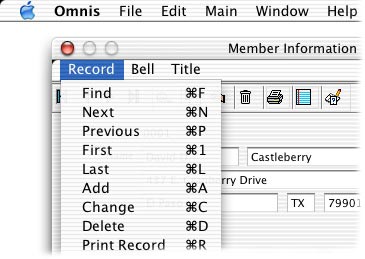
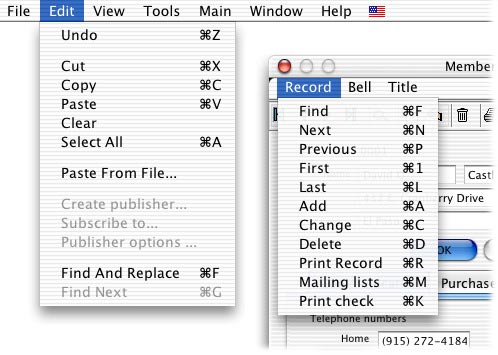
Sometimes we can take advantage of this situation. In the example above, we have some menu items in the embedded "Record" menu that conflict with the main "Edit" menu. This is OK because those "Edit" menu items are not even available until we are in a data entry mode and some text is selected. Before entering the data entry mode, we would disable the "Record" menu and any other menus that might cause problems (like shifting records in mid-edit!). There is no real operational conflict here. Menu Line Methods and Menu "Scope"Embedded menus will often be used to invoke public methods of the window instances on which they reside. We must be careful to use $cwind to refer to this window and not $cinst. From the point of view of a method command in a menu line, $cinst refers to the menu instance, not to the window that contains it. So we use $cwind because it specifically refers to the "master' window within which the current method executes. We use this from within embedded toolbar and subwindow methods as well. Enabling and Disabling Embedded Menus and Menu ItemsDuring data entry or other processes, access to potentially conflicting or disrupting menu items should be restricted. We can disable all our embedded menus by using:
Of course, we have to remember to re-enable these menus when the process is over. If we have a linear process (one that begins and ends in the same method, with an Enter data pause point somewhere in the middle) and if we only have one or two embedded menus, we can use a reversible block to have this status automatically revert at the end of the method - but only if we use a Calculate command to disable each individual menu like this:
The Calculate command is reversible, the Do command is not. Furthermore, only the value that is calculated is reversed, so if we do something silly like:
only the value of #F is reversed at the end of the method because that was the only thing directly assigned by the Calculate command. We must address the lines of an embedded menu through the $menus group. We may find that some menu items may not be appropriate for certain levels of user and we may need to disable them on instantiation. For example, if we don't want certain users to be able to delete records, we might put this command line in the $construct method of the window:
In the same way, some menu items may not be appropriate under certain conditions. We can again use a command line similar to that above to disable (perhaps in a reversible block, if appropriate) a temporarily inappropriate menu item. Dynamically Modifying Embedded MenusFinally, we may find that certain menus we use on many windows may require slight modifications on some. There may be some windows were certain lines are just not useful and other windows where a line or two might be added dynamically instead of creating an entire menu class just for that one case. Omnis Studio notation allows us to perform these feats. In anticipation of this need for my most commonly used menu (my "Record menu"), I create an instance variable of Item reference type for any window class where I might need to do some modifications on that menu. I name the variable menuObjRef and assign it the initial value of:
This shorthand makes it easier to write the code necessary to modify the lines of that menu. Removing a line is simple. All we must do is specify the precise line we need to remove as the parameter of the $remove() method of the $objs group of the menu. For example, if we want to remove the Find menu line from the "Record menu", we could use:
Adding a menu line requires a bit more work. We must first add the "shell" of the menu line and then fill it in with the necessary content - including a method and the command lines of that method. Suppose we want to add a menu line to the "Record menu" to access "Mailing lists". Further suppose that we already have a public method in our window class named $maillists that performs the actual operation. All we have to do is create a menu line that calls that method. Here is the code:
The variables newObjectRef and newMethodRef are both local variables of Item reference type. They are used to "catch" the references returned by the $add() methods so we can add additional features to those newly born items. A new menu line only contains a text value and an indicator as to whether the line is initially enabled and initially checked (the three parameters of the $add() method for the $objs group). When we add a member to the $methods group for a menu line (remember, each line can contain up to 501 methods), that method still needs to be given some code. In ConclusionI hope this discussion has been of benefit to you. In this next article, we will examine menus instantiated in Popup Menu fields on a window. These differ from both installed and embedded menus and it's important to understand how...
|
|
| © 2002-2003 Copyright
of the text and images herein remains with the respective author. No part
of this newsletter may be reproduced, transmitted, stored in a retrieval
system or translated into any language in any form by any means without
the written permission of the author or Omnis Software. Omnis® and Omnis Studio® are registered trademarks, and Omnis 7™ is a trademark of Omnis Software Ltd. Other products mentioned are trademarks or registered trademarks of their corporations. All rights reserved. |


 Please logon or create a free account to download this file.
