Tech News Back Issues Issue: 010803
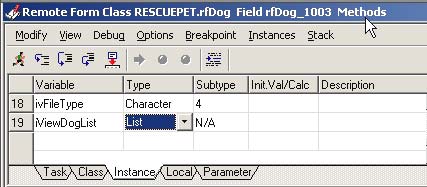
| Introduction to the Omnis Web Client: Part 7, Viewing Table Data By Dr Caroline Wilkins In the previous newsletters, we created an Omnis library, an Omnis database, programmed a startup task that will open a session to that database and created a schema in the library to represent a table in the database. We built a web client application that consists of a Sidebar controlling the pagenumber of a PagedPane component that enables a user to enter records into a table from a remote form. We added a facility to upload JPEG images to the web server using the remote form. Last time, we rationlized the number of instance variables by using the iRow.Field technique and cut out some unnecessary code. If you want to skip the stages in the previous newsletter, you can download the zip file RPRow.zip containing RescuePet.lbs and RescuePet.df1 (libraries & datafiles may need to be converted in Omnis). The numbering in this issue follows on directly from the last issue. Make sure that you either put your library and datafile in c:\RescuePet\ directory or change the path to the datafile in the Startup_Task $construct method: Set hostname {C:\RescuePet\RescuePet.df1} In this newsletter, we will add a feature to view the data in the Dog table with a view to doing updates of that data in the next newsletter. 28. Variables 28.1 In the previous newletter, we connected the 'Dog Database'
icon in the Sidebar to page 3 of the Paged Pane. You can verify
this by testing rfDog in the browser. We are going to use page 3
to display a list of data from the Dog table.
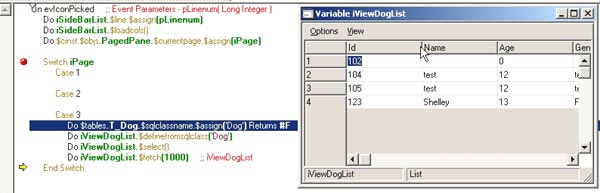
29. Selecting the List data 29.1 We would like the application to obtain the List data when the user clicks on the 'Dog database' Sidebar icon so we can display it immediately. We add a switch code block behind the Sidebar so we can add whatever behaviour we like to respond to sidebar clicks. Up until this point, a click of the Sidebar just changes the Paged Pane page number. Strictly speaking, we could get away with just using something like: If iPage=3 But it is likely that a larger application will require a range of behaviours in response to Sidebar clicks, depending on which icon was selected, so we will plan ahead and use the Switch statement. 29.2 Add the second part of the block below so that the event code behind the Sidebar looks like: On evIconPicked ;; Event Parameters - pLinenum(
Long Integer ) Note that we specify a maximum of 1000 rows in the fetch statement. If no number was specified, just one row would be returned. (Feel free to test and verify!) 29.3 Place a breakpoint on the 'Switch iPage' line. Close the method editor and test the form in the browser (Ctrl-T). Click the 'Dog Database' icon on the Sidebar in the browser. This should cause you to hit the breakpoint in Studio. Step the code through and verify that iViewDogList is being populated with data from the Dog table. (To see the contents of iViewDogList, right click on the commented 'iViewDogList' on the fetch line after you have stepped through that line and select 'Variable iViewDogList' option.)
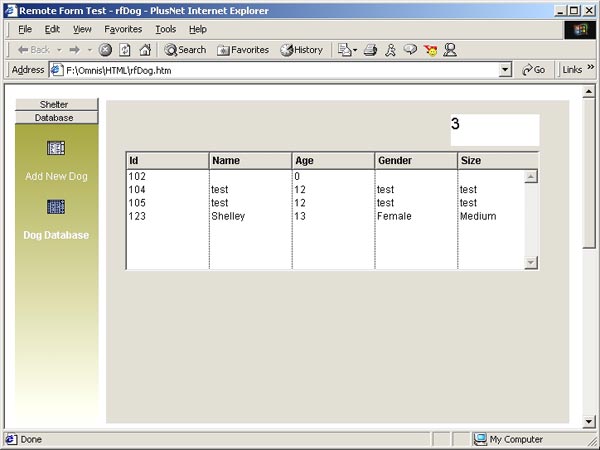
Note: If there is no data in iViewDogList, it may be that there is no data in your table yet. If you have used the df1 in the zip file download above, then there should be 4 rows. If you are using your own df1, then you can check the contents of your table by opening the SQL Browser (Tools>SQL Browser), clicking the running man icon and running the following line of SQL 'Select * from Dog' (without the quotes). If there is no data there, enter some using the remote form application in your browser and run the SQL query until you are happy with the data entered. 30. Displaying the List data 30.1 We now need to add a component to display the contents of
iViewDoglist. Go to page 3 of the Paged Pane of rfDog (click on
Paged Pane, F6 to display Properties window and set currentpage
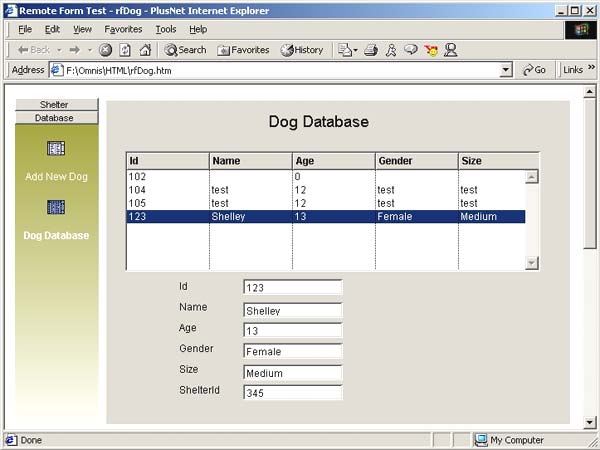
to 3). Do $cinst.$objs.ViewDogList.$redraw() Test in the browser and you should now find the Heading List is populated.
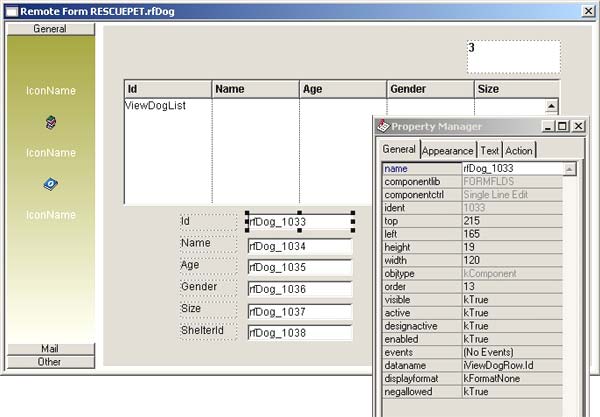
31. Displaying Row fields from the List data 31.1 We would like to be able to update row data from this list.
We start by creating some single line entry fields to display the
row data.
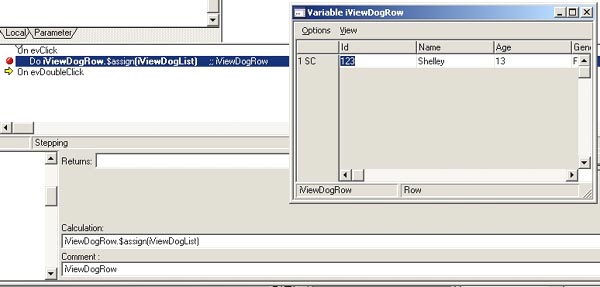
32. Assigning List row data to Row variable 32.1 Select the Heading List and enable the evClick event for it
(in the Proprty Manager, events property) On evClick 32.3 Place a breakpoint on the Do iViewDogRow.$assign(iViewDogList) line. Re-launch in your browser and verify that iViewDogRow is populated with the data from the line in the Heading list that you click. 33. Redrawing fields 33.1 You will probably find that, whilst the iViewDogRow variable
gets populated with the right data, this data does not appear in
the remote form application. To remedy this, we need to redraw those
single line entry fields. On evClick 33.4 If you test that now, you will still find it isn't working. Remember the secret of the iRow.Fields method from last time? You need to define iViewDogRow in the construct method of rfDog by adding the following lines: Do $tables.T_Dog.$sqlclassname.$assign('Dog')
Returns #F Just add them at the bottom of the construct method, below the similar definition lines for iDogRow. If you have problems finding the construct method, right click anywhere in the remote form within Studio and select 'Class methods'. You should then be able to see the $construct method. 33.5 For the finishing touch, move and reformat the label that currently says '3', so that it says 'Dog Database' (Change name property, set backpattern to transparent and select a more attractive font).
If all has gone to plan, you should have a library that looks something like RPView.zip (libraries & datafiles may need to be converted in Omnis) and a new feature on the remote form application which displays data from a table in a Heading List and responds to user clicks of the Heading List by displaying row data in single line edit boxes. Next time we will develop this further to perform updates of table data, and the viewing and changing of associated image files.
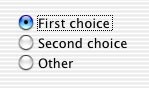
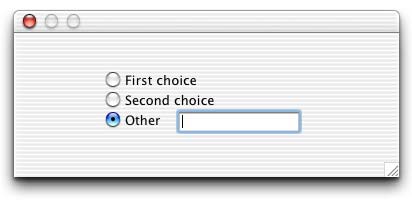
Status EventsBy David Swain In the previous few articles we have explored most of the "special" event types that have to be explicitly "switched on". In this article we will examine the last of these: Status Events. If you haven't read the previous articles in this series, I suggest doing so before reading this one as there is a great deal of background information in those that this article assumes you know. Method-Triggered EventsAs the name implies, "Status" Events are used to react to a change in status of an object. These events are a bit different from the event types we have already encountered - and all other event types for that matter. They are not triggered directly by some user action, but rather they are triggered by the execution of certain method commands. Perhaps the reason this family of events was put into the "special" category of events that are not automatically tracked is that the same status change can be imposed on many fields with the execution of a single command, which could trigger a large number of $event methods (even if the event is not trapped in those methods) and could seriously degrade the performance of the application. For this reason, it is my personal recommendation that you only switch on detection of these events at the field level (even though the library level is available) and then only for those fields where this detection is really necessary. Omnis Studio still runs on fairly slow machines and we should always remain conscious of the efficiency of our applications. While I will be using entry fields for most of my examples, these events do not only apply to entry fields. They can apply to any foreground object - and this includes external component objects. The properties whose changes trigger these events are shared by all foreground objects, so anything that can contain an event handling method on a window is fair game. Status events are simple events in a certain sense. They are accompanied by no additional event parameters beyond pEventCode (which just describes the basic event). In the $event method of the object receiving the event, "$cobj" (notational shortcut to the object receiving the event) and "$cfield" (notational shortcut to the object that contains the method being executed) can be used interchangeably (although we could make the case that "$cobj" is more appropriate). But if we choose to trap these events in the $control method of a container object, we need to refer to that field by "$cobj". (In other words, nothing is different about these events in this respect.) I haven't mentioned this explicitly before, but as with all event detection, the active property value of a field must be set to "kTrue" in order to receive these (or any) events. I bring this up now because many people get confused about the role of the active and enabled properties of a field and this article is a good excuse to explain and illustrate what they each do. Let's dive in and see what these events are all about! evHidden and evShownThe evHidden and evShown events allow us to program a field to react to a change in its own visibility. There are three ways this state can be changed: 1) The field can be included in the list of fields for the Hide fields command, 2) it can be included in the list of fields for the Show fields command, or 3) the $visible property can be directly modified by Notation (in any number of ways). So what good is this? Let's take the example of an entry field for starters. Consider why we might make an entry field hidden during a data entry cycle. Most likely this would be due to that field not applying to the current record based on some other information in the record. here is a simple case from my own work: Radio buttons offer a discrete number of choices for some attribute of a real world entity. Beyond that, the value generated by a group of radio buttons is a nice, tidy little single-byte code. The only problem is: Are we really certain we have offered the user all possible choices for that attribute? Being the cautious type, I often decide that neither I nor my client-informants can be that omniscient, so I hedge my bets by including a choice named "Other" in the group of radio buttons. But even that isn't good enough, because exactly what does "Other" mean? So along with this radio button option, I include an entry field to allow the user to explain their non-standard entry. (My client and I can even review such entries periodically and decide whether perhaps another radio button option is required for this variable based upon the repetition of one or more "Other" explanations.)
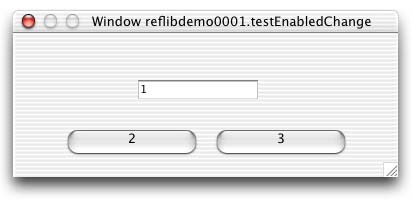
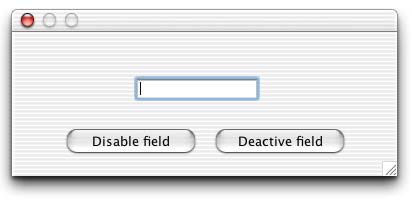
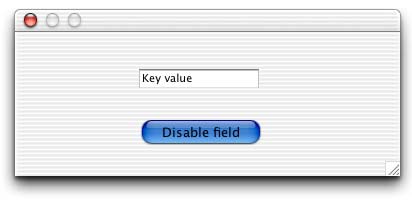
This "Other" entry field is associated with a Character variable. I have certain things I want to happen with the field for interface consistency and with the variable for data consistency. I want the field to appear only if the "Other" radio button option has been selected and to disappear as soon as any "non-Other" option is selected. If the field appears, I want it to appear empty (if there were an appropriate default value, wouldn't I already have a radio button for it?), ready to accept whatever the user feels must be put there. But if the field disappears, I want to put a value of "N/A" (not applicable) into the variable for storage as this would be the most appropriate value to show up on reports, etc. I must put the code to show or hide the "other entry" field in my radio buttons (or in the $control method of a Group Box field that contains them), but I can put the code that maintains the proper associated variable value in the field itself and use evHidden and evShown to trigger those maintenance routines. This example is detailed later in this article. evEnabled and evDisabledThese events allow us to program a field to react to a change in its own enabled property value. As with the visibility change events above, there are three ways this state can be changed: 1) The field can be included in the list of fields for the Disable fields command, 2) it can be included in the list of fields for the Enable fields command, or 3) the $enabled property can be directly modified by Notation. To explore possible uses of this ability, we must again consider why we change the data entry accessibility of a field. Here is another example from my work: There are many situations where my applications generate primary key values for records. A common example is an Invoice Number value. Since the value for this variable must remain the same once it has been created (assuming that my technique makes it unique and sequential), I must not allow the user to have data entry access to the associated entry field during insert or edit operations. However, the user must still be able to access this field to perform a find on this variable. This is the case for changing the enabled property value for the entry field. The case for trapping this change is status is this: I have chosen to follow certain interface rules consistently throughout my applications. One of these is to give the user a visual clue as to which fields are enterable by giving those fields an "inset" 3D effect while non-enterable fields are left with a "flat" 3D effect. When a previously disabled field becomes enabled, I need to change this effect for interface consistency. But it's not quite that simple either, because simply changing this effect moves the text display of the field to make room for the additional border lines that simulate the 3D effect. An additional 2 pixels are needed on each side - so I must both make the field larger to accommodate these additional lines and change the position of the field so the text display remains in the same place. Then when the field is disabled again, I must reverse the entire process. Now I'm not complaining about this. It is really much simpler than a verbal explanation might make it seem. But these are the things we must take into account to provide a "natural-looking" interface for our users. This technique is also detailed in the "Examples" section of this article. Active vs. EnabledI have seen these two properties confuse many a newcomer to Omnis Studio, so here is a quick explanation of what they each do: The active property determines whether an object can receive and react to events. The enabled property determines whether the object can receive the focus (assuming some other property doesn't also exert some influence on this as well), which is a specific set of data entry events. An implication of this (and a side effect that often leads to developer confusion about these properties) is that even if a field is enabled, it can't receive an evBefore event or even a direct evClick event if it is not also active. This means the field is (as we say in the States) "dead in the water" and can't receive the focus if the active property value is "kFalse". But a disabled entry field is still able to receive other kinds of events: click events, mouse events and status events among them - as long as it is active. If we click on an active and enabled entry field, an evBefore event is triggered. But if that same field is disabled (and still active), the result is an evClick event. Let's head for the "Examples" section and make this the first one. ExamplesHere are a few examples to illustrate what is explained above: Active vs. EnabledLet's create a window to demonstrate the combined effects of the active and enabled properties for an entry field. Start by creating a new Window class and give it the name "testEnabledChange". Make sure that this windows modelessdata property value is set to "kTrue". The window doesn't have to be large, since we will only be placing one entry field and two pushbutton fields on it. Go ahead and place such fields in positions similar to those shown in the following illustration, then assign the following property values.
Properties for the entry field (we don't need a dataname value for this test):
Properties for the left pushbutton:
Properties for the right pushbutton:
For our convenience, create an instance variable for this Window class named "fieldRef" of item reference type and give it an initial value of:
We want to test whether various events affect the entry field, so we must place some code in its $event method. Here is a suggestion:
This will provide some indicators to us as we test the window. Now we need some code in the pushbutton fields that changes key property values in the entry field. In the left pushbutton fields $event method, put the following command lines:
Now put these lines in the $event method of the pushbutton field on the right:
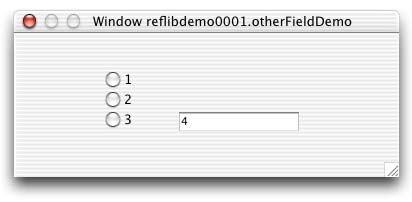
The last line in each of these will help us know the state of the entry field regarding the property that is manipulated by each pushbutton. Now open a test instance of the window and let's have some fun! Try a number of combinations of enabled and active property values with clicks and other actions on the entry field. Notice how the field just doesn't respond to anything when it is deactivated (including changes to its enabled property), but when it is active and disabled it still responds to evClick events (and changes in status). I hope this exercise was useful in clarifying these two properties for you. "Other" FieldNow let's examine the example of a field to extend a set of radio buttons by allowing the user the opportunity to enter a choice other than the standard one offered. We will need another Window class, so create one and name it "otherFieldDemo". Again, make sure that this windows modelessdata property value is set to "kTrue". Place three radio button fields and an entry field on this window as shown in the following illustration:
Create the following three instance variables for this Window class:
Now we can assign property values to our fields:
In the $event method for each of the first two radio button fields, place the following command lines:
The commented line can be used as an alternate technique for changing the visibility of the "other" field - to demonstrate that both 4GL and Notation techniques work equally well. Now place the following command lines in the $event method of the third radio button field:
Notice that we are helping the user along by placing the focus in the entry field when we make it visible. Now all we need is the event handling method for the entry field itself. This method will manage the value in the associated variable for the entry field as dictated by a visibility change. Place these command lines in the $event method for the entry field:
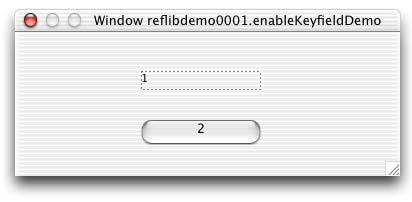
Notice the use of indirection in determining the variable that is the target of the Calculate commands in this method. This code will work no matter what variable is represented by the entry field. I have placed a copy of such a field in my Component Library since I use this technique so frequently. There are those who would advocate using object classes to manipulate things like this, but this technique is a lot less convoluted and much more efficient than that. Of course, this simple example only assumes the data entry side of this problem. When a new record is retrieved and displayed, we would also need to modify the visibility of the "other" entry field. But in that case, we certainly wouldn't want to calculate a new value for the "other" variable. This and other more complex cases are addressed in Volume 1 of the new OmniScience Omnis Reference Library that should ship by the end of this week (January 11, 2003). "Primary Key" FieldThis last demonstration relies on some fieldstyles taken from the #STYLES system table that is contained in the Component Library that ships with Omnis Studio. Perhaps you didn't know, but there are objecttype-specific cross-platform fieldstyles in this sytem table for all built-in object types. All we have to do is open the Component Library in the Browser, show the system tables using "Browser Options" and drag the #STYLES table to our library. If this technique is unknown to you, I have written about it in (very) past issues of Omnis Tech News. It's worth a trip to the archives! Let's begin this exercise by creating a new Window class named "enableKeyfieldDemo". This window will contain one entry field and one pushbutton field as in the illustration below:
Create the following two instance variables for this Window class:
Now we can assign property values to our fields:
The pushbutton fields $event method is the same as that for the "left" pushbutton in the first example (repeated here for your convenience):
Now we just need some code in the entry fields $event method:
The adjustments made to the $top and $left properties of the field are intended to keep the displayed value in the field in the same position as we change the fieldstyle, which in turn changes the border. If we were switching between two border types of different thicknesses, we would also have to adjust the $height and $width properties. Go ahead and try out the window. Notice how the field now manages to maintain a steady look while manipulating all these interface options as its enabled status changes. |
|||||||||||||||||||||||||||||||||||||||||||||||||||||||||||||||||||||||||||||||||||||||||||||||||||||||||||||||||||||||||||||||||||||||
| © 2002-2003
Copyright of the text and images herein remains with the respective
author. No part of this newsletter may be reproduced, transmitted,
stored in a retrieval system or translated into any language in any
form by any means without the written permission of the author or
Omnis Software. Omnis® and Omnis Studio® are registered trademarks, and Omnis 7™ is a trademark of Omnis Software Ltd. Other products mentioned are trademarks or registered trademarks of their corporations. All rights reserved. |
|||||||||||||||||||||||||||||||||||||||||||||||||||||||||||||||||||||||||||||||||||||||||||||||||||||||||||||||||||||||||||||||||||||||


 Please logon or create a free account to download this file.
