Dynamic HotPICT Options
By David Swain
Polymath Business Systems
In the last issue of Omnis Tech News, we explored
the basic setup and use of the HotPICT component. I hope you've
been having a great time exploring how you might take advantage
of these features. But there is more to this extension object than
first meets the eye. Let me up the ante a bit...
There are two additional properties of this field type that I deliberately
didn't mention last time. These properties open up some interesting
possibilities for certain types of application once we understand
what they do and how they work. Both of these properties are only
available on an instantiated window (not on a remote form
at this point, sorry!), so to see them, we must have Runtime
Properties switched on for the Property Manager (which we do
from the Property Manager's context menu, accessed by right-clicking
on any "open" area on that window). Once we do, the "HotPict"
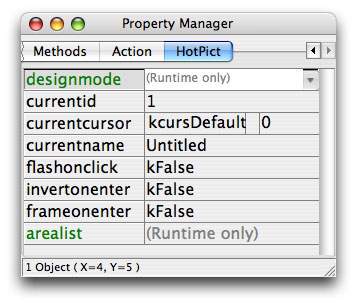
tab of the Property Manager looks like this for a HotPICT field:
| |
| Fig. 1 - Runtime Properties
of a HotPICT Field |
And to use them, we have to plan ahead a bit. Since these
are runtime properties, we cannot use them while working on a window
class. We can only take advantage of them on a window instance.
This means that we must write methods for our window class that
anticipate our use of these properties. They allow us to do some
interesting things for the benefit of the users of our applications
- we just have to understand how they work. Let's begin with the
"easy" one...
Design Mode
The first of these HotPICT component properties we will examine
here has appeared in recent versions of Omnis Studio. It is the
$designmode property. When this property is set to kTrue
(which we can do dynamically using Omnis Studio Notation), we can
perform all of the same hot area creation and modification operations
described in the previous article - but we can perform these actions
in the window instance. And so can the users of
our applications if we make the effort to train them.
In essence, this property is used to make the HotPICT field updateable
at runtime without affecting the definition of the field in the
window class. Changes made by the user are not saved to the class,
but will persist as long as the window instance is open. This is
not as limiting as it might seem, but we'll look into those details
later in this article.
To switch on this property, we need to execute the following code
in the window instance:
Calculate <HotPICTref>.$designmode
              as kTrue
The item labeled <HotPICTref> is a notational reference to
the HotPICT field in the window instance. It could be an Item
reference variable or an explicit notational string. We could
instead use a notational assignment:
Do <HotPICTref>.$designmode.$assign(kTrue)
Either one will do. This code could be put in the $construct
method of the window instance (or of the field itself) if we want
the field to be in design mode from the beginning - or we could
include it in the $event method of some pushbutton field.
There are many variations we could use.
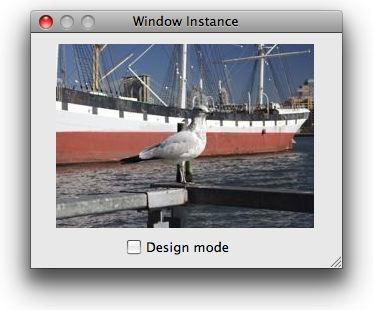
Of course, if we just want the user to be able to switch this property
on and off rather than make that action part of a more complex process,
we could simply place a checkbox field on the window and assign
the notational path that points to the $designmode property
as the value of the $dataname property of that field. Yes,
we can do just that if we wish! A value-containing property of a
field is only another variable, so no reason we can't have some
sort of field (entry, checkbox, etc.) represent it on screen. Here
is how that might look:
| |
| Fig. 2 - Design Mode
Off |
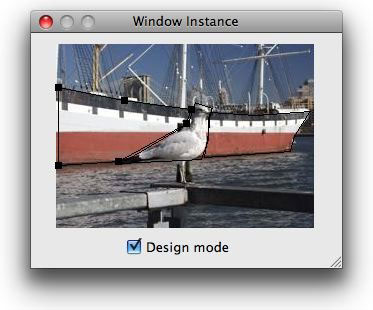
| |
| Fig. 3 - Design Mode
On |
However we do it, switching this property on for a HotPICT field
in a window instance allows the user to create, modify and/or remove
hot areas in that field. We could add further fields to this window
that allow the user to assign other property values for the current
hot area - with a little creativity.
Extending Design Mode
As the name suggests, the field itself now works exactly as it
does on a window class - at least, with regard to selecting,
creating, modifying and removing hot areas. But creating a complete
interface for detecting which hot area has been selected and assigning
properties to it takes a little more work than it might seem on
the surface. This is because there is no event that indicates that
an area has been clicked while the field is in design mode. The
evAreaClicked event is not active in this mode. So we must
get more creative to detect a hot area selection.
In the normal design mode (working on a window class), we change
the hot area by right-clicking on it. The same is true when $designmode
is switched on for a HotPICT field in a window instance. To detect
this selection, we must first switch on the $rmouseevents
property for the field and then put an On evRMouseDown
section in the $event method for that field. In that section,
we can then copy the various properties of the current hot area
into instance variables for display or modification. I have noticed
a few issues, however, that I would like to share here (so you don't
think you're crazy if they happen to you). These have only been
tested on Mac OS X 10.5.6, so they may not be noticed (or may be
entirely different!) on other platforms or Mac OS X versions.
First, I have noticed that if an OK message dialog is
opened while a HotPICT field is in design mode, the current hot
area is put into a "dragged" state and moves as the mouse
pointer moves. Clicking the mouse somewhere on the HotPICT field
is the only way to release the hot area. But if the mouse pointer
was not over the hot area when the dialog is closed (for example,
if the OK button on the dialog is clicked by the mouse), the hot
area being dragged is offset from the mouse pointer - and it is
possible that it can't be replaced into its original position because
the mouse would not be over the field when it is. The solution:
Don't open a dialog from the $event method when in this
state.
Another thing I have noticed is that either a right-click
or a normal click will select a hot area when the field
is in this mode. So to make sure that the proper things happen when
either of these types of click are performed, we should have an
On evMouseDown,evRMouseDown section in the $event
method of the HotPICT field to cover the entire range of possibilities.
(This also implies we should have the $mouseevents property
switched on for the field as well.) We can't detect just one or
the other because hot areas can still only be created or removed
with a right-click, but the user might select a hot area
with only a simple click.
The final thing we must do if we wish to retrieve hot area properties
into instance variables for display and manipulation on our window
instance is to make the Process event and continue command
the first command in the On block mentioned above. If we
don't do this, we will be retrieving the properties of the hot area
that was current before the click occured. Remember, a
$event method traps the intention to perform an
action, but the action has not yet been realized (so that we can
reject it if the situation demands). The Process event and continue
command realizes the event so that we can deal with its
occurance rather than its anticipation. That code
might look like this:
On evMouseDown,evRMouseDown

                 Process event and continue

                 Calculate id as $cobj.$currentid

                 Calculate name as $cobj.$currentname

                 Redraw
Of course, if we just want the user to be able to assign property
values to hot areas on some kind of setup window, we can simply
create entry fields for entering those values and assign the notational
paths to the properties we want to expose as the datanames of those
fields as detailed above. We must still use the Process event
and continue command in an On evMouseDown,evRMouseDown
block in the $event method of the HotPICT field, though.
That is, we must still realize the change of hot area selection.
But with this technique, we only need to issue a simple Redraw
command once the change has been realized to properly populate those
entry fields instead of issuing multiple commands to assign values
to instance variables. And any of those properties is changed as
soon as the user types in a different value, rather than our having
to include code in an On evAfter block in the $event
method of that field to assign the property value from the instance
variable value. That code would look like this:
On evMouseDown,evRMouseDown

                 Process event and continue

                 Redraw
I mention both techniques because each may be appropriate in certain
situations - or each may simply appeal to to different developers.
By this time, the astute reader might be wondering, "If we
can only perform these operations on a HotPICT field on a window
instance, then what's the point? Sure, the user could have a great
time playing around with creating hot areas, but those areas will
just vanish into the ether once the window instance is closed. Is
there any practical value to this feature?" Rest assured that
I do have a practical use in mind, although it doesn't apply to
all applications. The $designmode feature, when combined
with the other property we explore in this article, opens up some
interesting possibilities! We just have to combine them in the proper
way...
The $arealist Property
That other useful HotPICT runtime property is $arealist.
It is the main focus of this article - mainly because there is more
to discuss about it. While we can't examine the contents of this
property directly, we can use this property to populate
an Omnis list variable. Once we do this, we will see that the list
variable has been populated with the definitions of all the hot
areas in a HotPICT field. Such a list allows us to gain a further
understanding of how hot areas are defined (for example, how the
node coordinates are specified and ordered). And we will do this
shortly.
But that's just for starters! We can also modify these
definitions - and even add new ones (once we understand how they
are constructed) - using that list variable (or any other list variable
defined with precisely the same column structure) and then reapply
the list contents to the $arealist property to change the
current instance of that HotPICT field. Dynamic hot areas! There
are some useful techniques we can build using this property (along
with the $designmode property), but let's first see how
this all works.
Again, to use the $arealist property of a HotPICT field,
we must first copy its contents into a list variable at
some level of scope. I will use an instance variable for
these examples, which allows us to view the contents of the list
variable in a list display field of some type on the window instance.
The most obvious thing we can do with this property is to examine
the existing hot areas of a HotPICT field and learn how hot areas
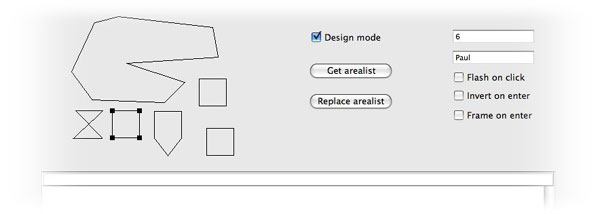
are defined internally. Here is a simple window with a HotPICT field
and a Data Grid field with some pushbuttons that perform various
actions with the $arealist information:
| |
| Fig. 4 - Window Used
To Explore $arealist Options |
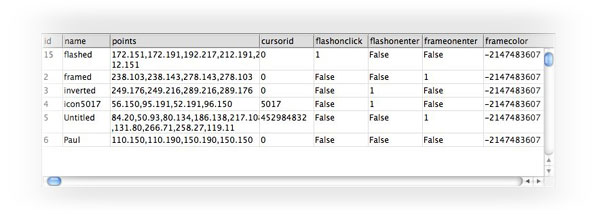
To begin our exploration, let's retrieve the contents of the $arealist
property of our HotPICT field into a list variable named areas.
This variable is used as the dataname for our Data Grid field on
the lower half of our window. To do this, we put the following code
into the $event method of the "Get arealist"
pushbutton (followed by a Redraw command):
Calculate areas as $cinst.$objs.hotpictfld.$arealist
The list we retrieve contains eight (8) columns - which are already
named for us in the target list variable! (And using a Data Grid
field allows us to see those column names directly - as well as
to modify the contents of each cell in the list variable.) The hot
areas are shown in this list in the order in which we defined them:
| |
| Fig. 5 - Hot Area List
Derived From $arealist |
This may look a little cryptic at first, but the column names can
help us determine what we're looking at. Here are brief definitions
of those columns:
| id |
The $currentid
value we assigned to the hot area. |
| name |
The $currentname
value we assigned to the hot area. |
| points |
A list of the positions
of the nodes that define the hot area - in their drawing order. |
| cursorid |
The icon number
of the cursor id icon we assigned to the hot area. |
| flashonclick |
Displays "1"
if we have set the hot area to flash when clicked, otherwise
displays "false". |
| flashonenter |
Displays "1"
if we have set the hot area to highlight when the mouse enters
its borders, otherwise displays "false". |
| frameonenter |
Displays "1"
if we have set the hot area to display an outline when the mouse
enters its borders, otherwise displays "false". |
| framecolor |
The numeric representation
of the color assigned as the border color for the hot area;
defaults to "-2147483607", which stands for kRed. |
| Table
1 - Column Names In The $arealist Value |
But each of these could use a bit more explanation:
The id and name columns are
pretty straightforward. They simply contain the values we have already
assigned to the $currentid and $currentname properties
of the hot area when it was the current one. It is assumed that
we have assigned meaningful values to these items. The id
values are assigned a sequential number by default and the name
value defaults to "Untitled". I would also suggest that
we assign unique values to each hot area in most cases as well,
although there are reasonable arguments that could be made for assigning
the same name and/or id value to more than one area as a means of
having those areas perform the same action on a click, if that is
desired. (There are other ways of doing this as well.) But we discussed
all that in the previous article.
The points column is pretty easy,
too - once we understand how the points (nodes) of an area are defined
there . This column contains a comma-separated list of node coordinates.
The list is maintained in the order in which the nodes are defined
for the area - in classic follow-the-dots fashion. "But what
are all those decimal numbers?", I hear you say. "Aren't
pixel positions integers?" It's true: the positions of the
nodes of a hot area are pixel positions relative to the upper left
corner of the HotPICT field - and pixels are counted as
integers. The "decimal" values we see is just a special
way of combining the x and y coordinates in a way that multiple
pairs of them can be listed in a comma-separated fashion with no
confusion. They are given as "x.y". So a value shown as
"40.40" means that both the x and y coordinates of that
point equal 40. So the "decimal" values are the coordinates
of a specific node - no actual decimal values are involved.
The order of the nodes for a hot area is
also significant. This is given with these values as well. Drawing
of a hot area begins with the first coordinate pair listed and proceeds
through each successive pair. (By default the areas are drawn counterclockwise,
but this can be changed by manipulating the node order if we wish.)
This is important to keep in mind if we intend to dynamically add
hot areas to this list. If we're not careful, we could end up with
crossed lines and a strange-looking hot area - unless that is our
intention. On the other hand, it is quite possible to create hot
areas with holes in them - or to completely surround one hot area
with another - if we are careful. Having access to these node definitions
allows us to fine-tune the exact position of each node.
The cursorid column contains an
integer number that specifies the cursor icon that the mouse pointer
will display when over that hot area. A value of 0 means that the
default icon for the window will appear. A very large number indicates
that a cursor keyword (such as kcursArrow) was assigned
for that area, while a smaller number (in the thousands) indicates
that the icon was assigned from an icon id (with the keyword of
kcursCustom assigned) - and the number is, therefore, the
icon id of the cursor icon to be used over that hot area. Here is
a chart that explains the cursor constant keywords (found under
the Constants tab in the Catalog window in the group named "Cursors"):
| Icon |
Constant Name |
Description |
ID |
cursorid value |
| |
kcursArrow |
The arrow cursor |
1 |
16777216 |
| |
kcursArrowWatch |
The application startup cursor |
21 |
352321536 |
| |
kcursCopy |
The copy cursor |
11 |
184549376 |
| |
kcursCrossHair |
The cross-hair cursor |
22 |
369098752 |
| |
kcursDefault |
The default cursor for the object |
0 |
0 |
| |
kcursDragData |
The drag datacursor |
14 |
234881024 |
| |
kcursDragObject |
The drag objectcursor |
13 |
218203808 |
| |
kcursExamine |
The examine cursor |
19 |
318767104 |
| |
kcursFinger |
The finger cursor |
27 |
452984832 |
| |
kcursHelp |
The help cursor |
18 |
301989888 |
| |
kcursHsplitter |
The horizontal splitter cursor |
16 |
268435456 |
| |
kcursIbeam |
The I-beam cursor |
2 |
33554432 |
| |
kcursInsert |
The insert cursor |
10 |
167772160 |
| |
kcursLock |
The lock cursor |
4 |
67108864 |
| |
kcursMcopy |
The multiple copycursor |
12 |
201326592 |
| |
kcursMove |
The move cursor |
5 |
83886080 |
| |
kcursNogo |
The no go cursor |
17 |
285212672 |
| |
kcursSizeBlTr |
The bottom-left and top-right sizing cursor |
9 |
150994944 |
| |
kcursSizeHorz |
The horizontal sizing cursor |
7 |
117440512 |
| |
kcursSizeTlBr |
The top-left and bottom-right sizing cursor |
8 |
134217728 |
| |
kcursSizeVert |
The vertical sizing cursor |
6 |
100663296 |
| |
kcursTrash |
The trash-can cursor |
20 |
335544320 |
| |
kcursVsplitter |
The vertical splitter cursor |
5 |
251658240 |
| |
kcursWatch |
The watch cursor |
3 |
50331648 |
| Table 2
- Cursor Constant ID Values And The Values We See For $cursorid |
The large cursorid values that
indicate the use of a cursor constant might be a little bewildering
since the ID values associated with each constant, which we see
in the Catalog window, are quite small. But they are only mysterious
until we notice the pattern: Each one is simply the ID value of
that cursor constant times 16,777,216 (that's 2^24 or 16*1024*1024).
It is not clear why these large values are used (perhaps
to not conflict with the icon id values of other icons in the icon
tables?), but that is the relationship between the values we see
using the arealist and the cursor icons we assign to our
hot areas.
The next three columns contain either the
numeral "1" (apparently indicating "True") or
the string "False". The "1" value means that
the property represented by that column is switched on. The flashonclick
column represents the hot area option of the same name. The flashonenter
column represents the invertonenter hot area property.
And the frameonenter column again represents the hot area
property of the same name. So up to here we've covered all of the
hot area properties discussed in the previous article. But wait
- there's more...
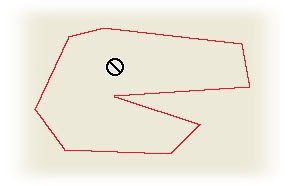
The framecolor column is something
we haven't seen before with this field type. "So what could
this be?", I hear you say, curiously. This column controls
a special feature that only seems to be available on the Windows
platform (although I must admit, I have not tested it on any of
the Linux platforms and I expect it to work there as well). Specifically,
it controls the color of the frame around a hot area that appears
if we have switched on the frameonenter property of that
hot area and then move the mouse cursor over it. There is no property
that appears in the Property Manager for this attribute, so I must
assume that we are required to set it dynamically if we want to
use it. (Good thing I'm writing this article...) In the following
screen shot, the default frame color is used along with the "NoGo"
cursor:
| |
| Fig. 6 - Hot Area Frame
Color on Windows Platform |
The default value for this
column appears to be -2147483607, which is the numeric value associated
with the kRed color constant. So on platforms where this
additional property of a hot area has an effect, the frame that
appears when the mouse passes into a hot area with its frameonenter
property switched on will be red, as shown here.
But we can change this behavior
by changing this columns value to a different one and then reassigning
the $arealist value. We can use either other color constants
or values generated using the rgb() function to specify
other colors for this purpose. The rgb() function generates
large non-negative values which do not conflict with the
color constant values. So we can use any color we want for framing
hot areas (on those platforms that support this) rather than being
limited to the Omnis Studio color constants. In fact, performing
such changes is exactly what the $arealist property is
for...
Now For The "Dynamic" Part...
We cannot manipulate the detailed contents
of the $arealist property directly, but we can
replace those contents with the contents of another properly defined
list. One way to do this is to copy $arealist into a list
variable, make whatever changes we need to that list variable and
then copy the changed list contents back into $arealist.
We have seen this behavior before with the color list of the Graph2
component and the format of the Report Data Grid component. The
techniques we use here are very similar to those techniques.
Combined with the $designmode
property detailed at the beginning of this article, we could also
create "lab" windows where the end user (or we ourselves)
could configure a HotPICT field overlay for use with an imported
image and then store the overlay information (the $arealist
value) in a database for later retrieval and application to a HotPICT
field on another window (along with the image itself - or the path
to the image - so we can apply that to a picture field or background
picture object underneath the HotPICT field at the same time). Not
all applications could take advantage of this technique, but it's
another tool in the kit that could come in handy some day.
One minor disappointment that I discovered is that this technique
does not appear to work for remote form components currently. This
is because access to the notation tree is not supported on the remote
form instance. This technique requires having access to the $designmode
and $arealist properties for both reading and setting their
values, but neither of them can be accessed for either purpose on
a remote form instance.
There are many possibilities for how we could take advantage of
these two properties. It just takes a little imagination - along
with the realization that we can only affect the instance
of a HotPICT field. So we need to store our revised hot area lists
somewhere for retrieval at runtime. We could cache an updated list
in the $userinfo value of a field (in the class) so that
we can apply any necessary corrections or fine-tuning when the field
is instantiated. We could use a list field to update or fine-tune
hot areas where trying to make single-pixel corrections could be
difficult. We could store overlay data along with an associated
picture in a database and then swap combinations of picture and
overlay for kiosk systems or other uses. The list goes on...
There are other operations we could perform
on our list of hot areas as well, while we have control of that
information. For example, we could change the order of the lines
of this list if we felt that would organize them better. Of course,
reordering the lines of this list has no effect on the functioning
of the field or on the id values or other properties of
the hot areas, but we may still have our reasons for wanting to
put the lines of this list into some specific order.
What does have an effect on the
field is adding new lines to this list. We can add or remove
lines as needed, which will add or remove hot areas for the field.
Now that we know what criteria are required for a hot area and how
those property values are defined, specified and organized, we should
have no problems creating new hot areas if we know the coordinate
positions of the objects on an image that we want to overlay with
active areas.
When we have the hot area list configured
just the way we want it, we can then reapply it to the $arealist
property of our HotPICT field. Here is the line of code that will
do the job:
Calculate $cinst.$objs.hotpictfld.$arealist
as areas
In this statement, the areas item is a list value. It
may be a list we had recently extracted from the $arealist
property or one we had retrieved from some storage location. The
hot areas on our HotPICT field will then be replaced by the ones
defined in this list. It couldn't be simpler!
In The Next Issue...
I hope you found the subject this time to be intriguing, at least
- and I hope you can find a use for it somewhere in your work. In the next article we will explore the HWND properties of objects
in Omnis Studio to see how we can use them to our advantage.
|
 Please logon or create a free account to download this file.