Tech News Back Issues Issue: 041603
|
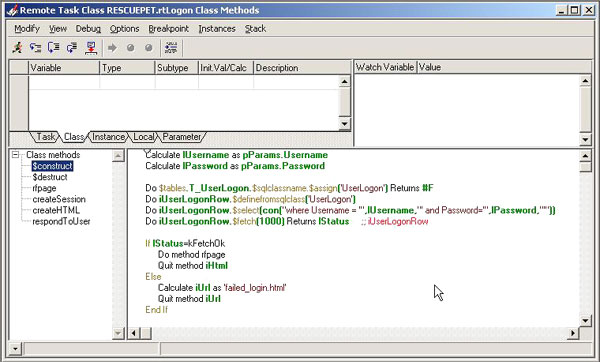
Introduction to the Omnis Web Client: Part 12, Log on to Webclient using HTML interface - Responding to user By Dr Caroline Wilkins 51. In the previous newsletters, we have been developing an interface that enables a user to log on to a webclient application from an html form. We had created a remote task called rtLogIn that receives a username and password from the html form, validates them against a database and then either sends the user to a failed login page or creates a session record in anticipation of formulating and sending a response to the user. We used #CT to create a 'random' session id to ensure uniqueness of this value in our code. You can download the library etc. so far from RPLogon3.zip (libraries and datafiles may need to be converted in Omnis).
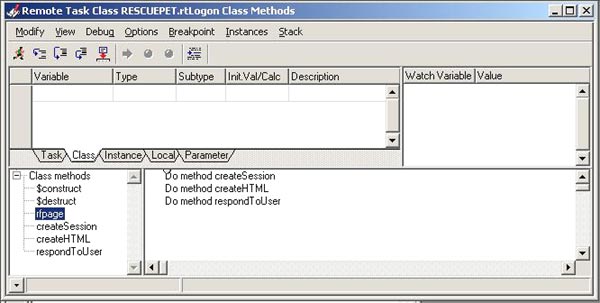
Of the 3 methods in the rfpage method, we had written method createSession. In this newsletter, we will add the createHTML and respondToUser method code. 52. Options for creating html block for use in createHTML
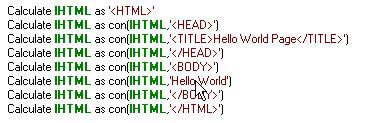
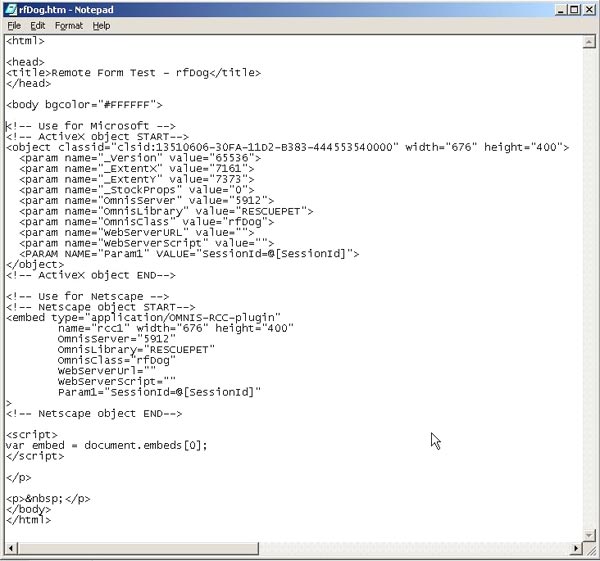
This may be fine for simple html pages, but can get a bit involved and unfeasible for more complex pages. In practise, this approach is better suited to the creation of small text blocks that get substituted into a template based html page. Another approach is to create a super class that has a range of methods each designed to build sub sections of an html page. Again, this can lead to a lot of lines of code within your Omnis application and may not be very easy to maintain, particularly if you want to work with web designers. My preferred method for generating html content is to use template files. This involves creating a template html file with a series of strings that are intended to be replaced by your Omnis code. For example, you might create a page similar to the above example in a text editor and save it as an html or text file: <HTML> You could then ask your Omnis method to read the template and replace the string "@[Message] with the message of your choice. N.B. There is no particular reason to make your replace strings of the form "@[Message]". It is just a fairly identifiable string that is unlikely to be used elsewhere in a more complex html page. (Thanks to Richard Mortimer for that tip and much of the theory behind this technique..:)..) If you use this approach for specifying the html that you will use to respond to your users, you will find it a lot easier to work with web designers. A designer can create as complex an html page as they like, as long as the replace strings are in there for your Omnis code to use. 53. Preparing a template for use in createHTML Our objective in this method is to create a block of html that contains an Omnis webclient plug-in section, customised to identify the session and hence the user to the remote task and form that it will call upon instantiation in the client browser. Open your remote form, rfDog. Ctrl-T to run it in your browser. This causes Omnis to create an html page in the "html" directory within your Omnis installation e.g. C:\Program Files\RainingData\OS321\html\rfDog.htm View the source of that file. (In Internet Explorer, this is typically "View - Source" from the tool bar or available by right clicking.) Save that source to an html file in a directory off wherever you are saving your RescuePet Omnis library, e.g. C:\RescuePet\Templates. Edit the source (i.e. Add the additional parameters to the objects) so you end up with something like:
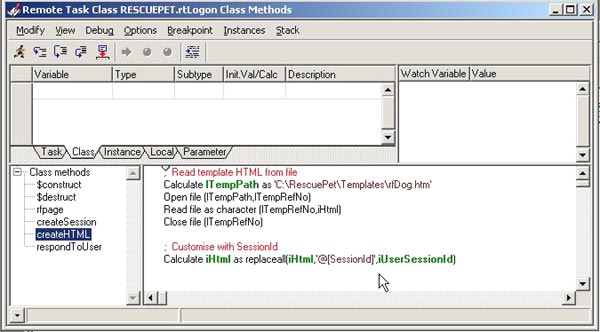
54. createHTML method
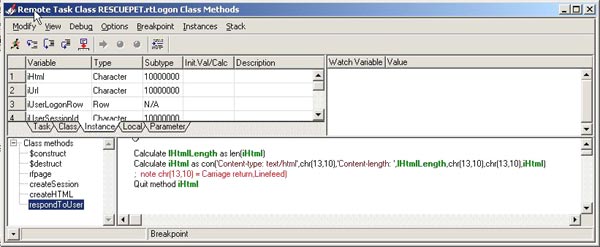
This is a good point to test your code. Open your logon.html file in your browser and enter a valid username and password (we were using user1, pass1 for this example). Place a breakpoint in the $construct of rtLogon then click submit on the html page. You should find that you are brought into Omnis debug mode and can step through the code. Ensure that you have used a valid name and password (iUserLogonRow should have the values you entered). If that has happened, you should find that you can step into rfpage, and then through the createSession and createHTML methods. By the end of the createHTML method, you should find that the iHtml variable contains the html page you read in, customised with the value of iUserSessionId that you generated in the createSession method. 55. respondToUser method A more elegant approach has been available since version 3 of Studio. You can stream html directly back to the user instead of a URL. This means that you don't need to be creating temporary html files on the server and consequently doesn't involve you having to configure the URLs and temporary html file paths for each server or development machine you use. It is a much more portable way to work. Add the following code into your respondToUser method: Calculate lHtmlLength as len(iHtml)
56. $construct method
If you test your code now, you should find that you can enter a username and password in the logon.html page and be returned a page of html that contains your remote form application. If all has gone to plan, you should have a library, database, logon.html and rfDog template that looks something like RPLogon4.zip (libraries and datafiles may need to be converted in Omnis).
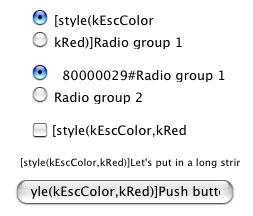
style() Continued – Remote FormsBy David Swain Last time in my article on the style() function, I made an erroneous statement. That's easy enough to do when I'm not one of the engineers that wrote Omnis Studio, but I still pride myself on my thoroughness and I apologize that I had not pursued this just a bit further. I said that no remote form component supports styled text. This is not quite correct. What I should have said was that no remote form component has a styledtext property, but a couple of them do support styled text – under certain circumstances. I went back and took a second look when I saw a message on the Omnis Underground list from Doug Kuyvenhoven where he said that he had used styled text in a Heading List field on a remote form. There were some surprises that came up as my exploration progressed, so I thought a second article was warranted – especially since we were already on the subject... Embedded Escapes The remote form components that do support styled text only do so under certain circumstances. First, the escape sequences have to be put directly into the content of the associated list variable to be displayed by the field. This works like with the Treelist component for a window that we explored in the last article. This is also the reason I didn't notice styled text support at first glance. The other circumstances vary from one field type to the other. I tested all the remote form components that ship with Omnis Studio and tried to be thorough. Simple fields (Single line entry, Radio group, etc.) don't appear to support styled text at all. For entry fields, this is to be expected since the user can't possibly know the proper escape sequences or type them in. The telltale sign of this not working is the appearance of the printable characters (and gaps for the non-printable ones) of the escape sequence appearing in the field's display value. On the off chance that a display field (enabled property value set to "kFalse") might still support styled text, I tried that too – but no luck.
For button controls, there appeared to be two options to test: use the style() function in square bracket notation or directly embed the necessary escape sequence. Again, both options failed. Square bracket notation is not supported in these remote form fields (or any others, to my knowledge) and the directly embedded escape sequences display in all their glory as above. Labels "worked" the same way. Notice how the comma separating the two parameters in my attempted style() function was simply used as the separator between the first and second radio button label in the Radio group object. Since square bracket notation is not recognized in this text-based property, one comma is the same as the next.
This process went on for a while. Many remote form components have their own ways of dealing with things like text color and font style for different parts of the component, so it makes sense that styled text would not be supported in them. Others that allow direct data entry (like the data grid) simply can't allow styled text because the user would have to know what to type and the escape sequence would become part of the data sent for storage in the database. The only viable candidates for styled text support then would be those field types that only display data and have some internal segmentation that might need character-by-character color, font style or internal tabs for enhancement of that display. The only remote form components I could get to properly display styled text are the List component and the Heading List component. (I failed with the Webtree component.) Both of these have some interesting options, though, that made it worth the effort. List Component At first glance, the List component for a remote form does not seem to support styled text. It appears to only support a single display column just like a List Box field on a window. The difference is that the List Box on a window has a calculation property that allows us to specify how values from multiple columns in the associated list variable are combined to create this display value on a line-by-line basis. On a remote form, the List component does not have a calculation property. It simply displays the value in the first column of its associated list variable. This column must contain the value that would have been generated by a calculation property if we want to display composite values like we can in a window List Box. The temptation is to revert to using the jst() function to simulate columns within this collection of string values and to then use a monospaced font to get those "columns" to properly align. For some purposes, this will work just fine.
The calculation used for generating the value for the first column of the associated list variable for the above example was:
Attempting to embed escape sequences under these conditions was a dismal failure. Here is the result of trying to embed tab escapes so the list could be displayed with a proportionally spaced font.
The calculation used for generating the value for the first column of the associated list variable for the above example was:
Interesting, but not very readable! (This font has symbols for the "non-printable" characters as well!) Used like this, the List component does not appear to support styled text. So why am I spending so much space on it? There is an interesting property of this component that actually leads us to what we seek... A remote form List component actually can display raw values from multiple columns of its associated variable, in column definition order beginning with the first column. They just don't appear as "columns" in the display. In fact, they appear as separate "sub-rows" (another sub rosa property?) on a multi-line line. Perhaps an illustration can say this better...
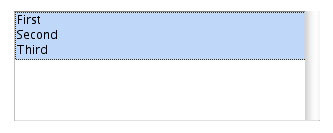
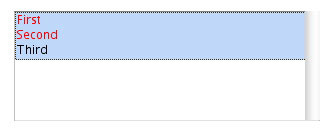
Here I defined a list with three columns and then added a line like this:
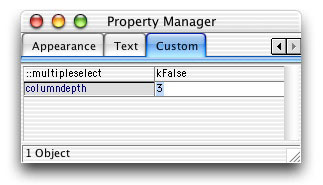
Notice that the selected area is only one line of the list display, even though that line contains three rows of text. We can tell this is a single line because the dotted selection rectangle that indicated the current line surrounds all three display lines here. So how did I manage to do this? A remote form List component has a special property named columndepth. This property is used to specify how many columns from the associated list variable are to be displayed – but each of those columns is given its own row within the display line. In the case above, I set the columndepth property value to "3". This seems strange when we are used to the way List Box fields on a window work, but this is how List components on a remote form work so we need to explore it further and see how we can best exploit this feature.
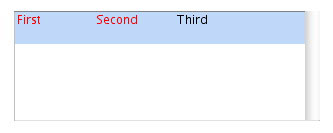
The best part is that when the columndepth property value is greater than "1", the List component supports styled text! If I add some style() functions to the calculation that creates the list variable value, I can do some interesting things. For example:
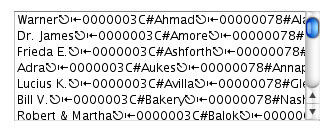
Here I use the same list definition, but embed escape sequences using the style() function. Notice how the escape sequence must be included in a specific column value:
Here we switched on a red text color at the beginning of the first column value and then switched back to a black text color at the beginning of the third column value. The red text color was retained for the second column, indicating that the entire multi-column (multi-row?) line is treated as a continuous string. Each multi-row list line is treated as a separate text run (just as we learned in the last article), so the color resets to the default at the beginning of each line. So if we can embed color escape sequences, perhaps we can embed tab escape sequences as well. The only problem is, we need to have each line display at least two columns and, therefore, at least two rows of text per line. But we can always make the second column (and so the second text row) empty. Here is an example:
This time tab escapes were also included and the entire calculation was targeted for column 1. Since no calculation was included for generating a value for column 2, it remains empty.
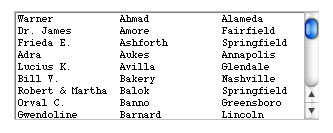
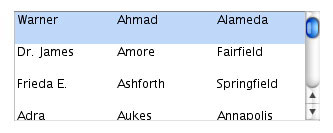
It might look a little odd compared to what we are used to with List Box fields on a window, but this serves our purpose of displaying multiple columns in this component while using a proportional font. here is what that might look like using more realistic data:
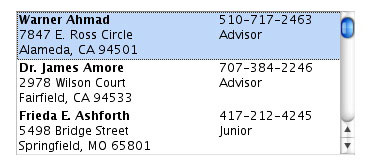
But since we have these additional text rows on each line at our disposal, why not make use of them? We can display formatted address information in a much more complex way:
Of course, the calculation gets a bit more complex as well...
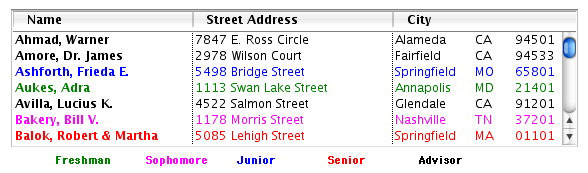
Once we know how the tool works, what we do with it is only constrained by our creativity. Heading List Component Heading Lists have two basic sections: the body and the heading. Styled text appears to only be supported in the body. Attempts to embed escape sequences into the heading yield similar results to those shown above for button-type fields. Other than the fact that the escape sequences have to be embedded into the list variable content, we have basically the same options for using styled text in a Heading List on a remote form as we have for using it with a Headed List on a window. We can create Heading Lists that use text color as a meaningful indicator, style for emphasis, icons and even tab escapes within columns if necessary.
Our problems arise when we want to have the styles that are applied to our content dynamically change. Since the display is not based upon a calculation applied to the values in the associated list variable as it is with list display fields on a window, we must actually change the formatted list variable content to effect a change in the display. As long as our styles are applied so that they affect entire columns, we can accomplish this very easily by including "style columns" within our list variable. In the simplest case, we might want to apply text color to specific lines to indicate some status. When that status changes, we need to change the color for that line. Since we want to affect the entire line, we need our first column in the associated list variable to contain the escape sequence. To avoid having to replace any of the data content when we make such changes, we will create a separate column in the list for this color information.
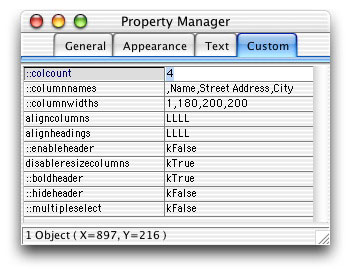
In the above example, we have created a Heading List field that toggles the color of a line when the user double-clicks on it. We have chosen a red text color to indicate that the line is selected for some purpose. The lines all default to black (unselected). here is how this is done: First we set up the Heading List field. Even though we want to display three columns, we must specify "4" for the $::columncount property. We do not give the first column a name and we only make it one pixel wide. If we try to make it zero pixels wide, Omnis Studio kindly replaces our "0" with the default width value of "100". (We could create a $construct method for this field to set the $::columncount property value to "0,180,200,200", but it has no real visual impact.) We must also make sure that we have switched on the ability to detect double-clicks using the events property of the "General" tab in the Property Manager.
We must now create the method to define and populate the associated list variable. Here is the code:
The four variables in the definition of the list as well as the list variable itself are all instance variables. The variables for the columns are all Character variables. Notice that the first column contains only the result of a style() function – an escape sequence. Now we just need to create the code for the $event method that reacts to a double-click event by toggling the escape sequence in the style column between black and red text.
The line that sets the line number of the list to "0" is an attempt to defeat a side effect of the redraw of the list field. This side effect makes the current line the top line in the list display, so the list appears to "jump" when the redraw occurs. There may be other ways to handle this, but this is good enough for now...
|
|
| © 2002-2003 Copyright
of the text and images herein remains with the respective author. No part
of this newsletter may be reproduced, transmitted, stored in a retrieval
system or translated into any language in any form by any means without
the written permission of the author or Omnis Software. Omnis® and Omnis Studio® are registered trademarks, and Omnis 7™ is a trademark of Omnis Software Ltd. Other products mentioned are trademarks or registered trademarks of their corporations. All rights reserved. |


 Please logon or create a free account to download this file.
