Chapter 2—Libraries and Classes
The components for your Omnis application or project are stored in an Omnis library file. This file contains all the class definitions that define the data and UI objects in your application. The class types available in Omnis include remote forms (for web or mobile apps), remote tasks for handling web communications, schemas for defining your data structures, reports for presenting your data, and so on.
Omnis Classes are predefined structures that control the appearance and behavior of the objects in your application, and therefore classes are the main components or building blocks in your application. You can create classes using the wizards provided in the Studio Browser, or you can create them from scratch using class templates. You can create any number of classes in each library file and modify them at any time while you develop your application.
You can manage the classes in your application or project in the Studio Browser, or for a multi-library project, involving multiple developers, you may like to use the Omnis VCS and work on different parts of your library on a collaborative basis (depending on the developer license you have).
Omnis Libraries
Each library file contains a number of system classes and preferences that control the behavior of your library and its contents. A library has certain properties (preferences) too, which you can examine and change using the Property Manager.
You can create and open any number of library files in the Studio Browser, and each library can contain any number of classes. In practice, you may want to split your whole application into one or more libraries and store different types of objects in different libraries.
Creating a New Library
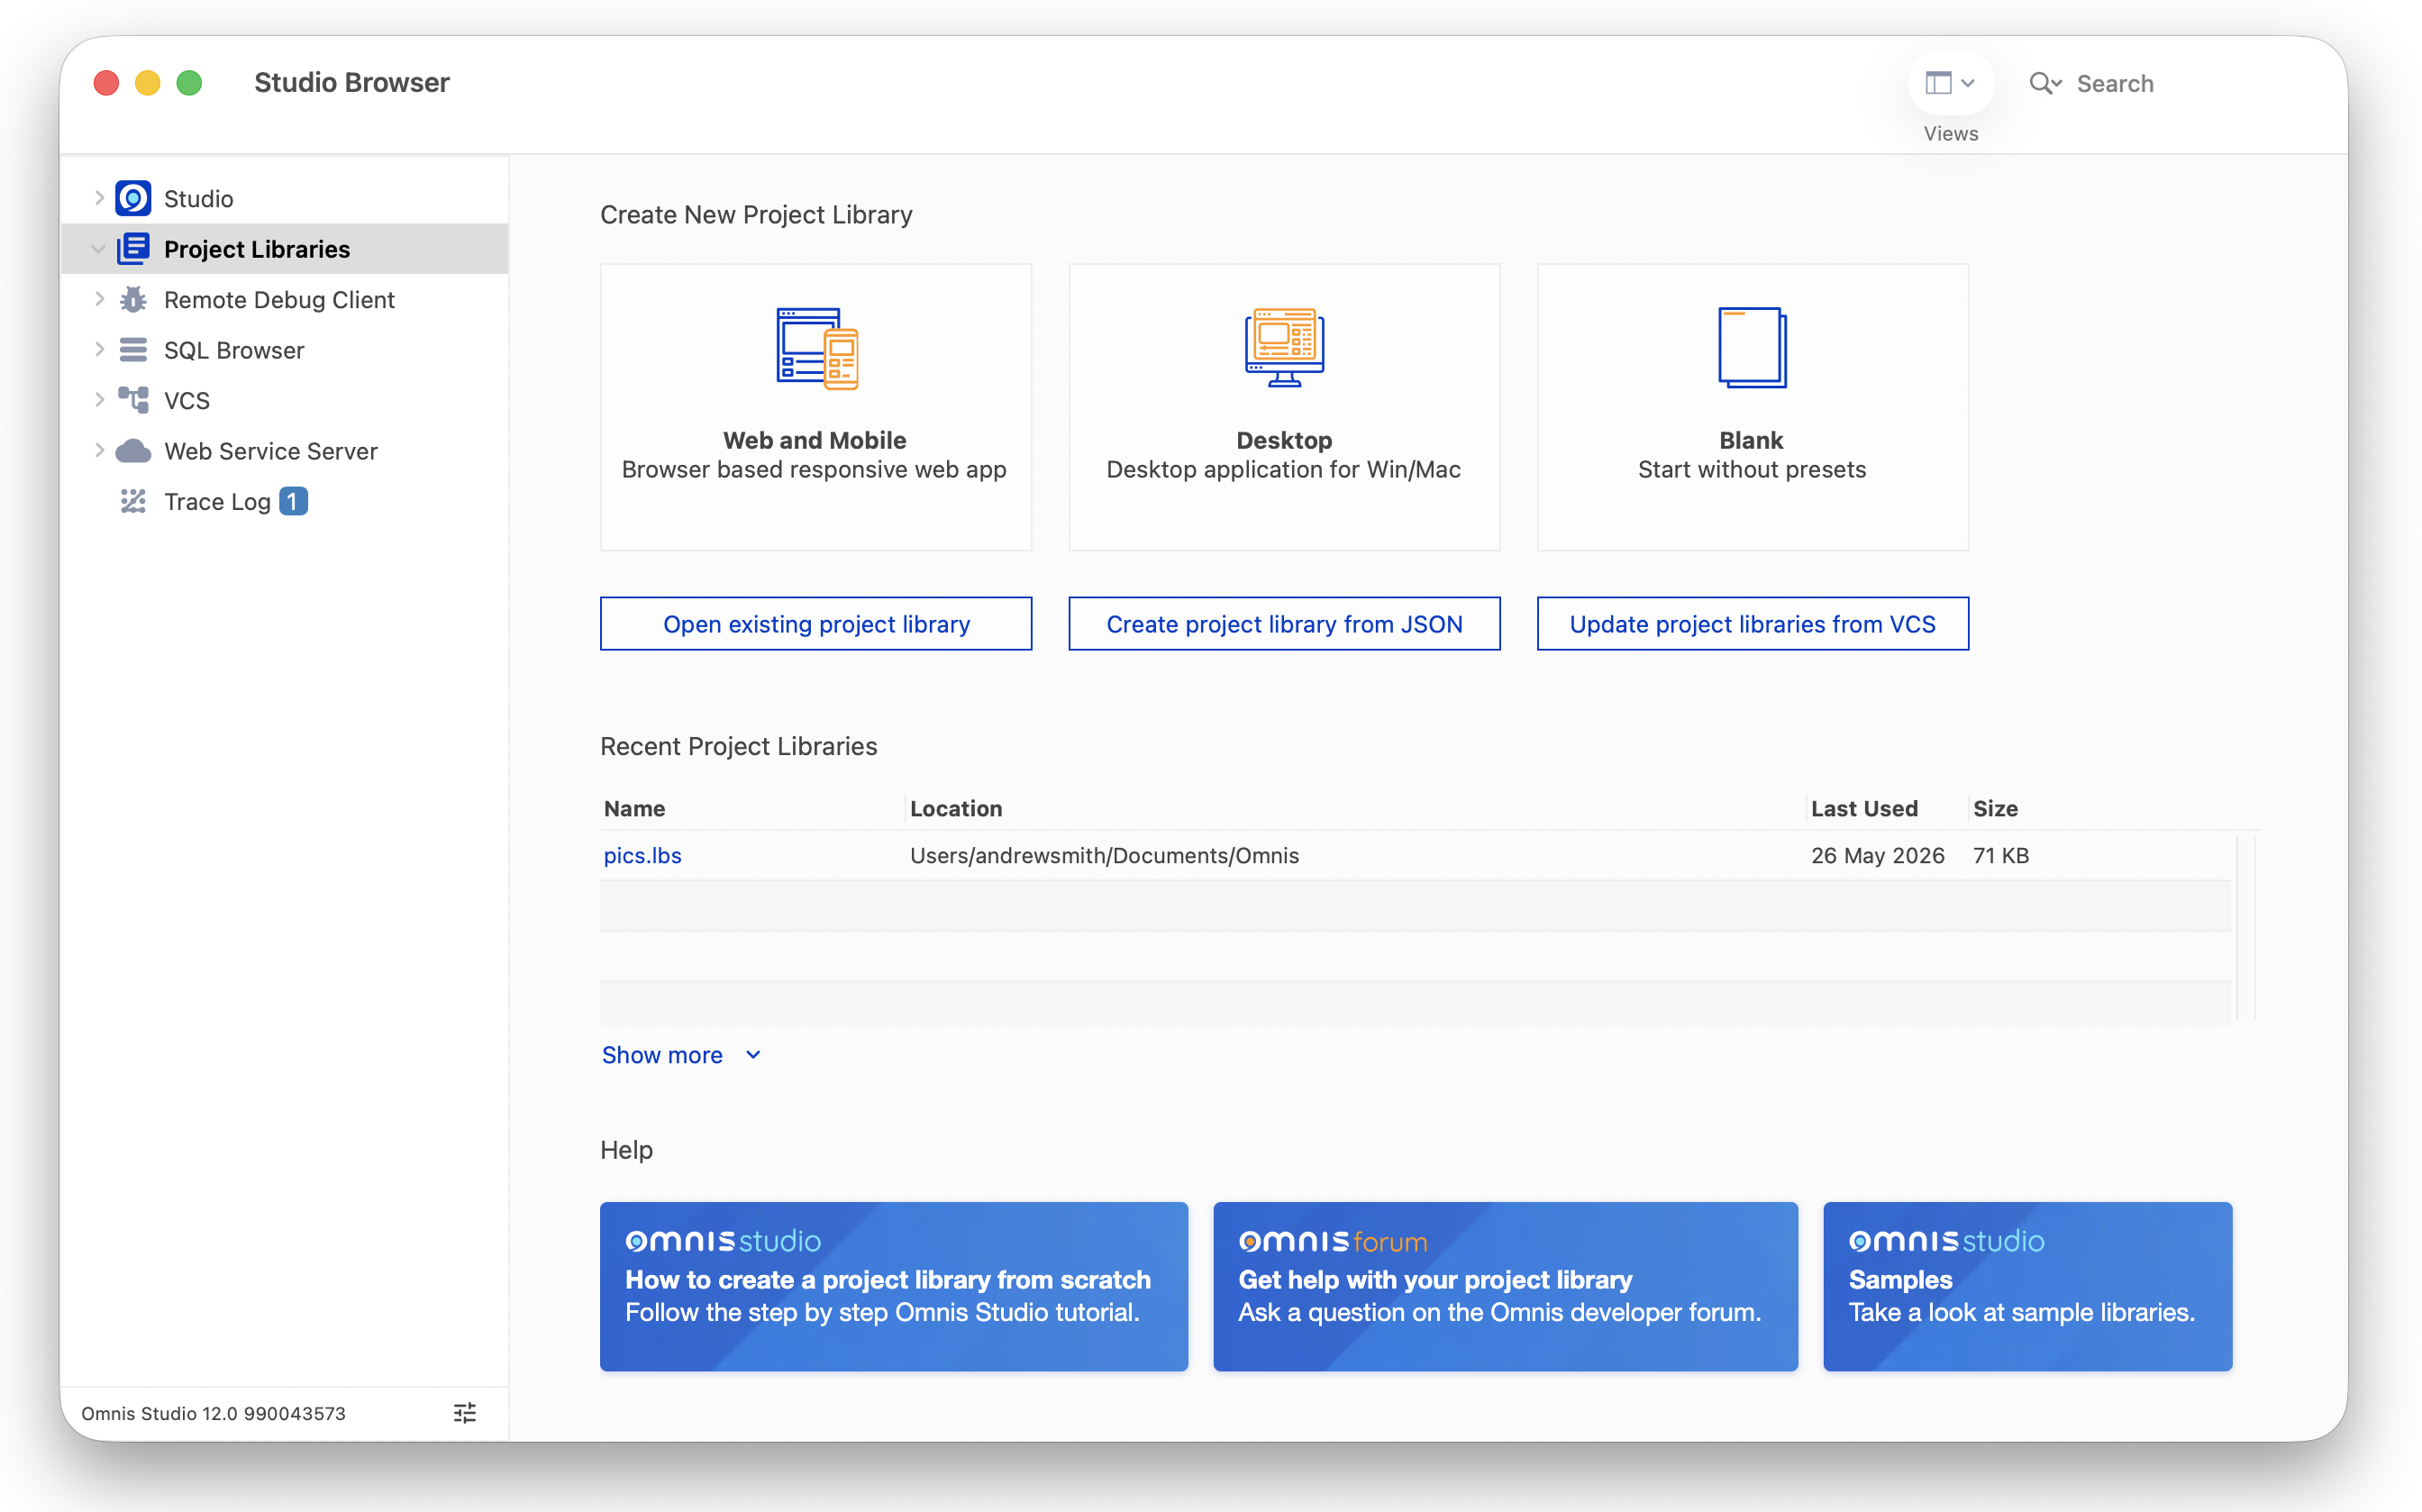
Start Omnis and open the Studio Browser: the Studio Browser should open by default, but if it is not open you can press F2/Cmnd-2 to open it or bring it to the top, or you can select the Browser option from the View menu, or in Windows you can click on the Browser button on the main Omnis toolbar (you can enable the toolbar via the View menu).
Click on the Project Libraries option to create a new library or open an existing library
- To create a new library, click on one of the options under Create New Project Library, enter a name for the new library, including the .lbs file extension and click on Save or press Return
The New Project Library options are:
- Web and Mobile
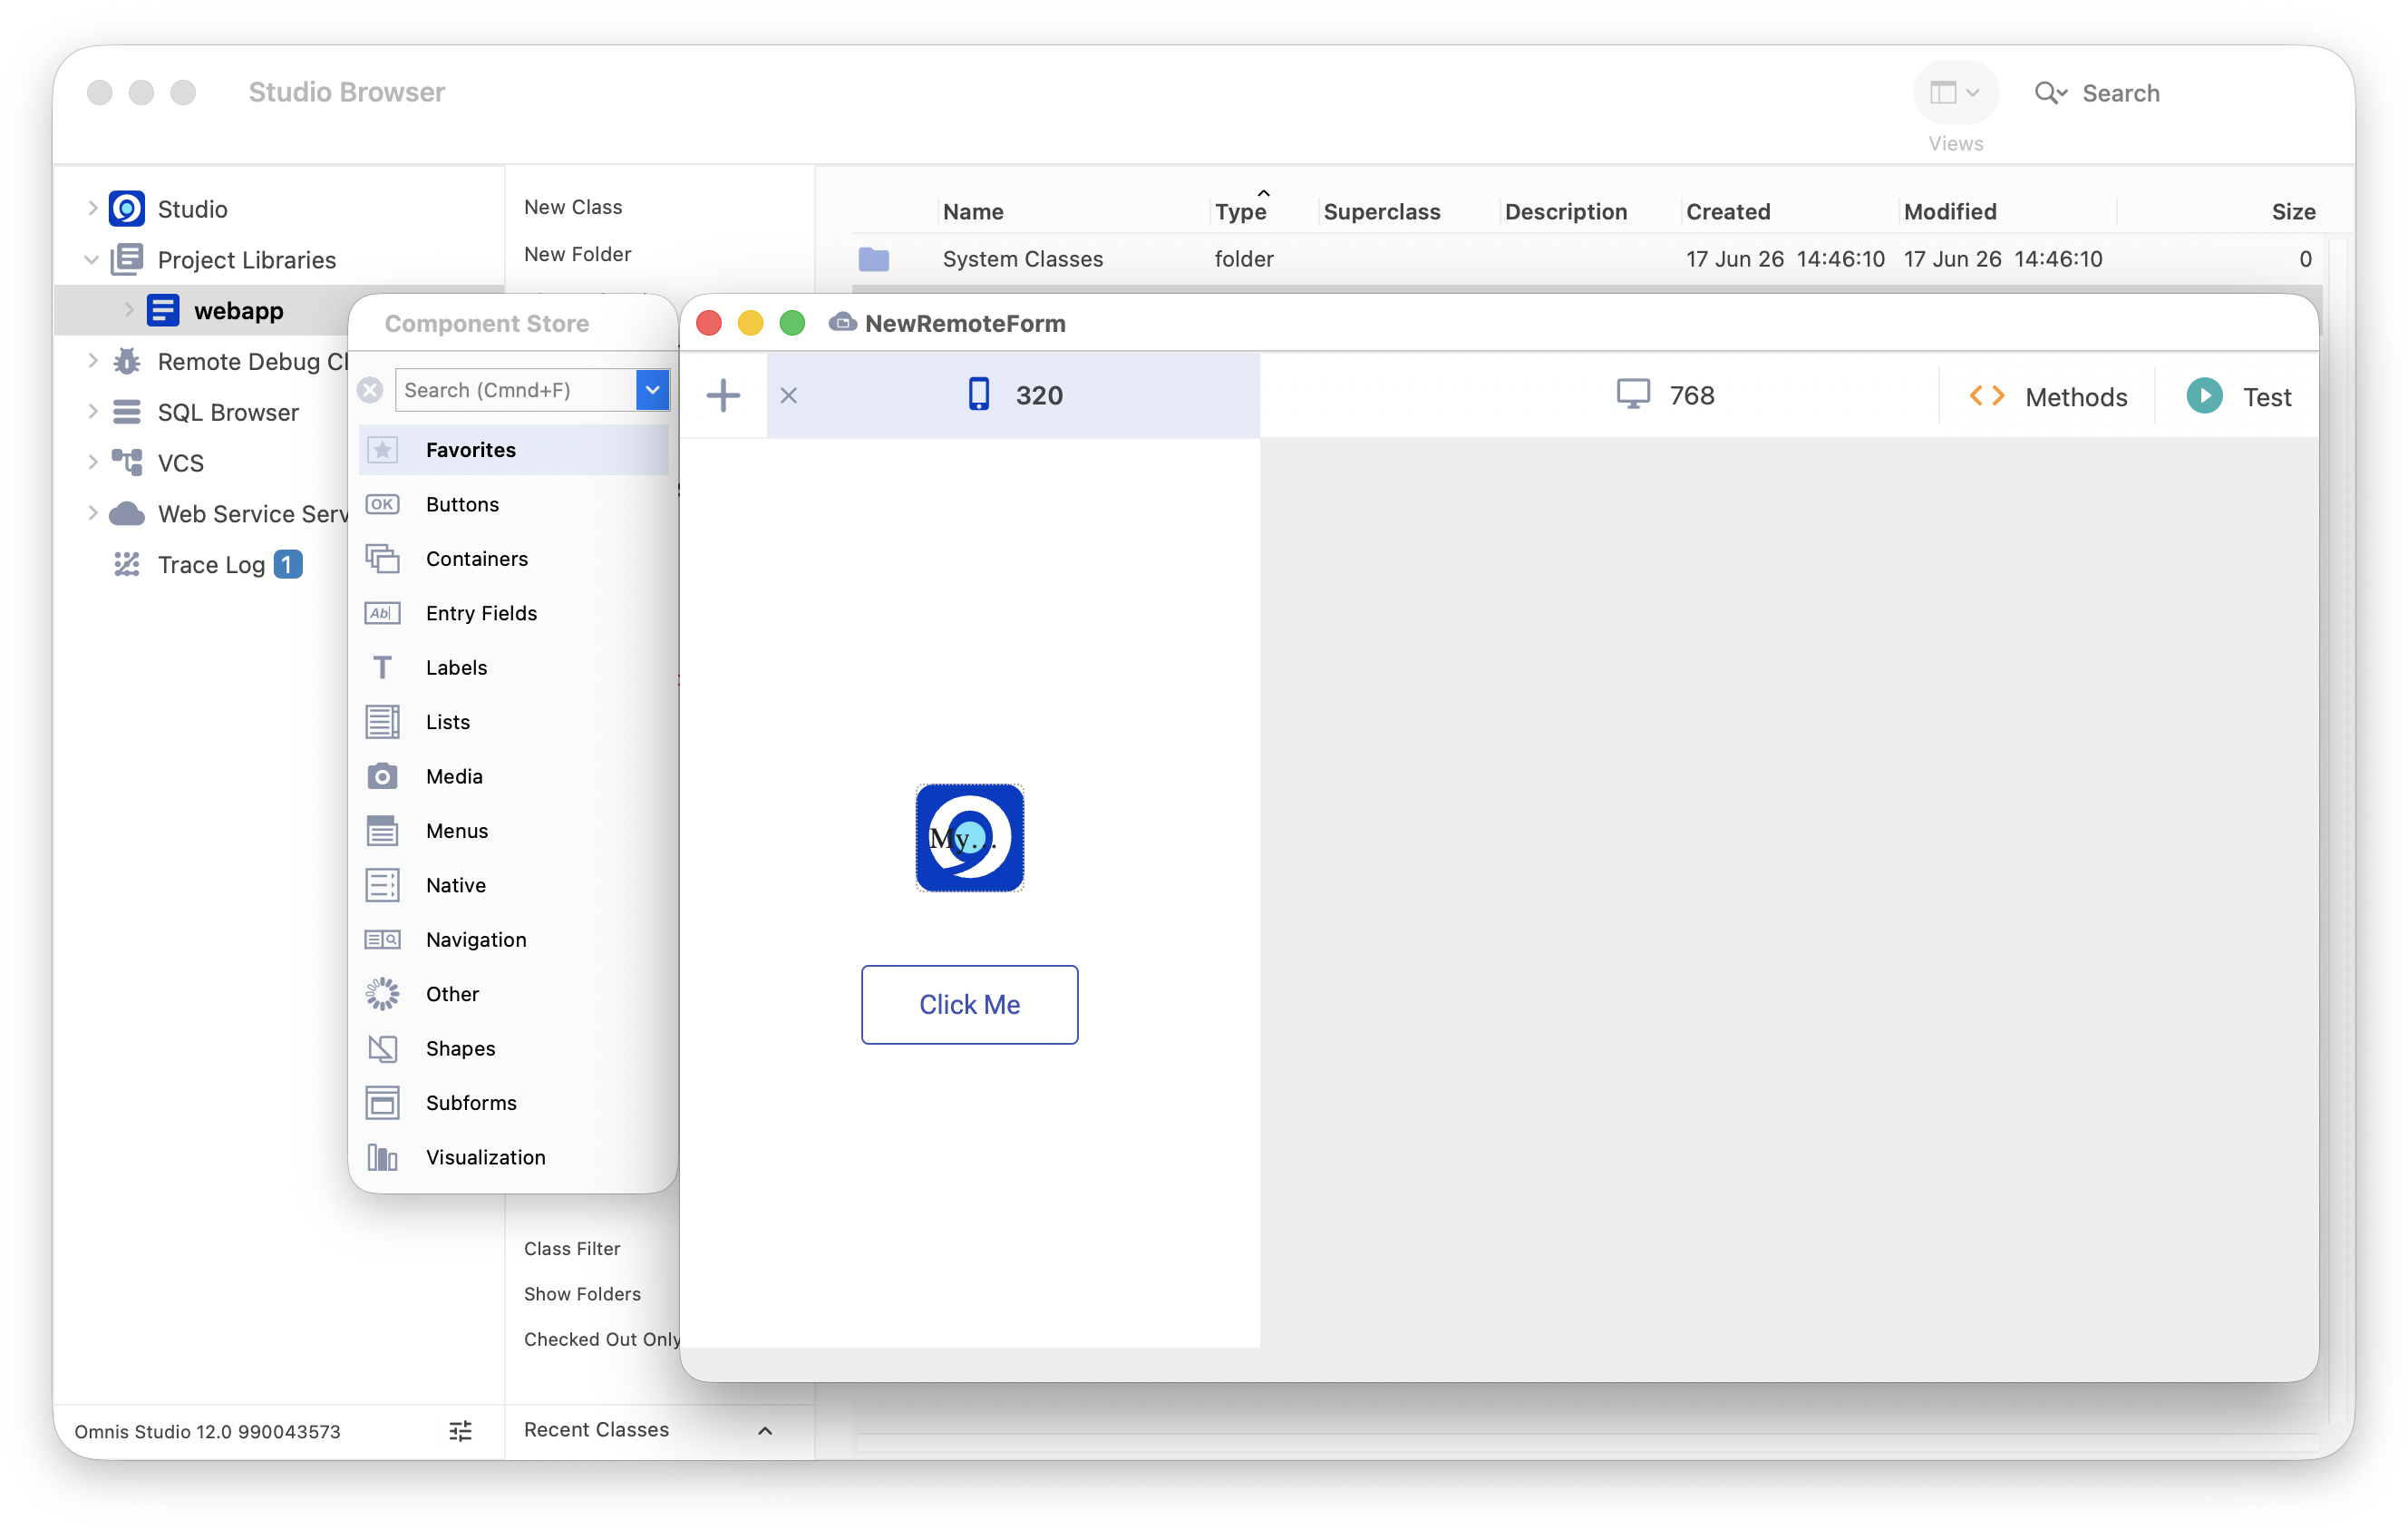
creates a new library containing a NewRemoteForm template ready for you to start designing & coding your first web and mobile form layout; the library also contains a Remote_Task, a Startup_Task, and a folder containing various System Classes
You can click on the Test option, or Press Ctrl-T, to open the form in a web browser, or you could double-click on the button (in design mode) to view its code in the Method Editor.
See JavaScript Remote Forms for more information about creating Remote forms and Remote tasks, or JavaScript Components for information about adding components and other objects to your remote form.
Desktop (hidden in the Community edition)
creates a new library containing a NewWindow template ready for you to start designing a form for Windows or macOS desktop use only; the library also contains a Startup_Task, and a folder containing various System Classes
Blank
creates an empty library containing only a Startup_Task and the System Classes
See Startup Task and System Classes for more information.
Library Name
When you name a new library, you can use the file naming standards for the current operating system. The .LBS file extension is not obligatory, i.e. on macOS, but it will help you distinguish library files from other types of file in your file system. The new library is opened in the Studio Browser under the Project Libraries option and shown as a single icon in icon view, or as a single line in details view.
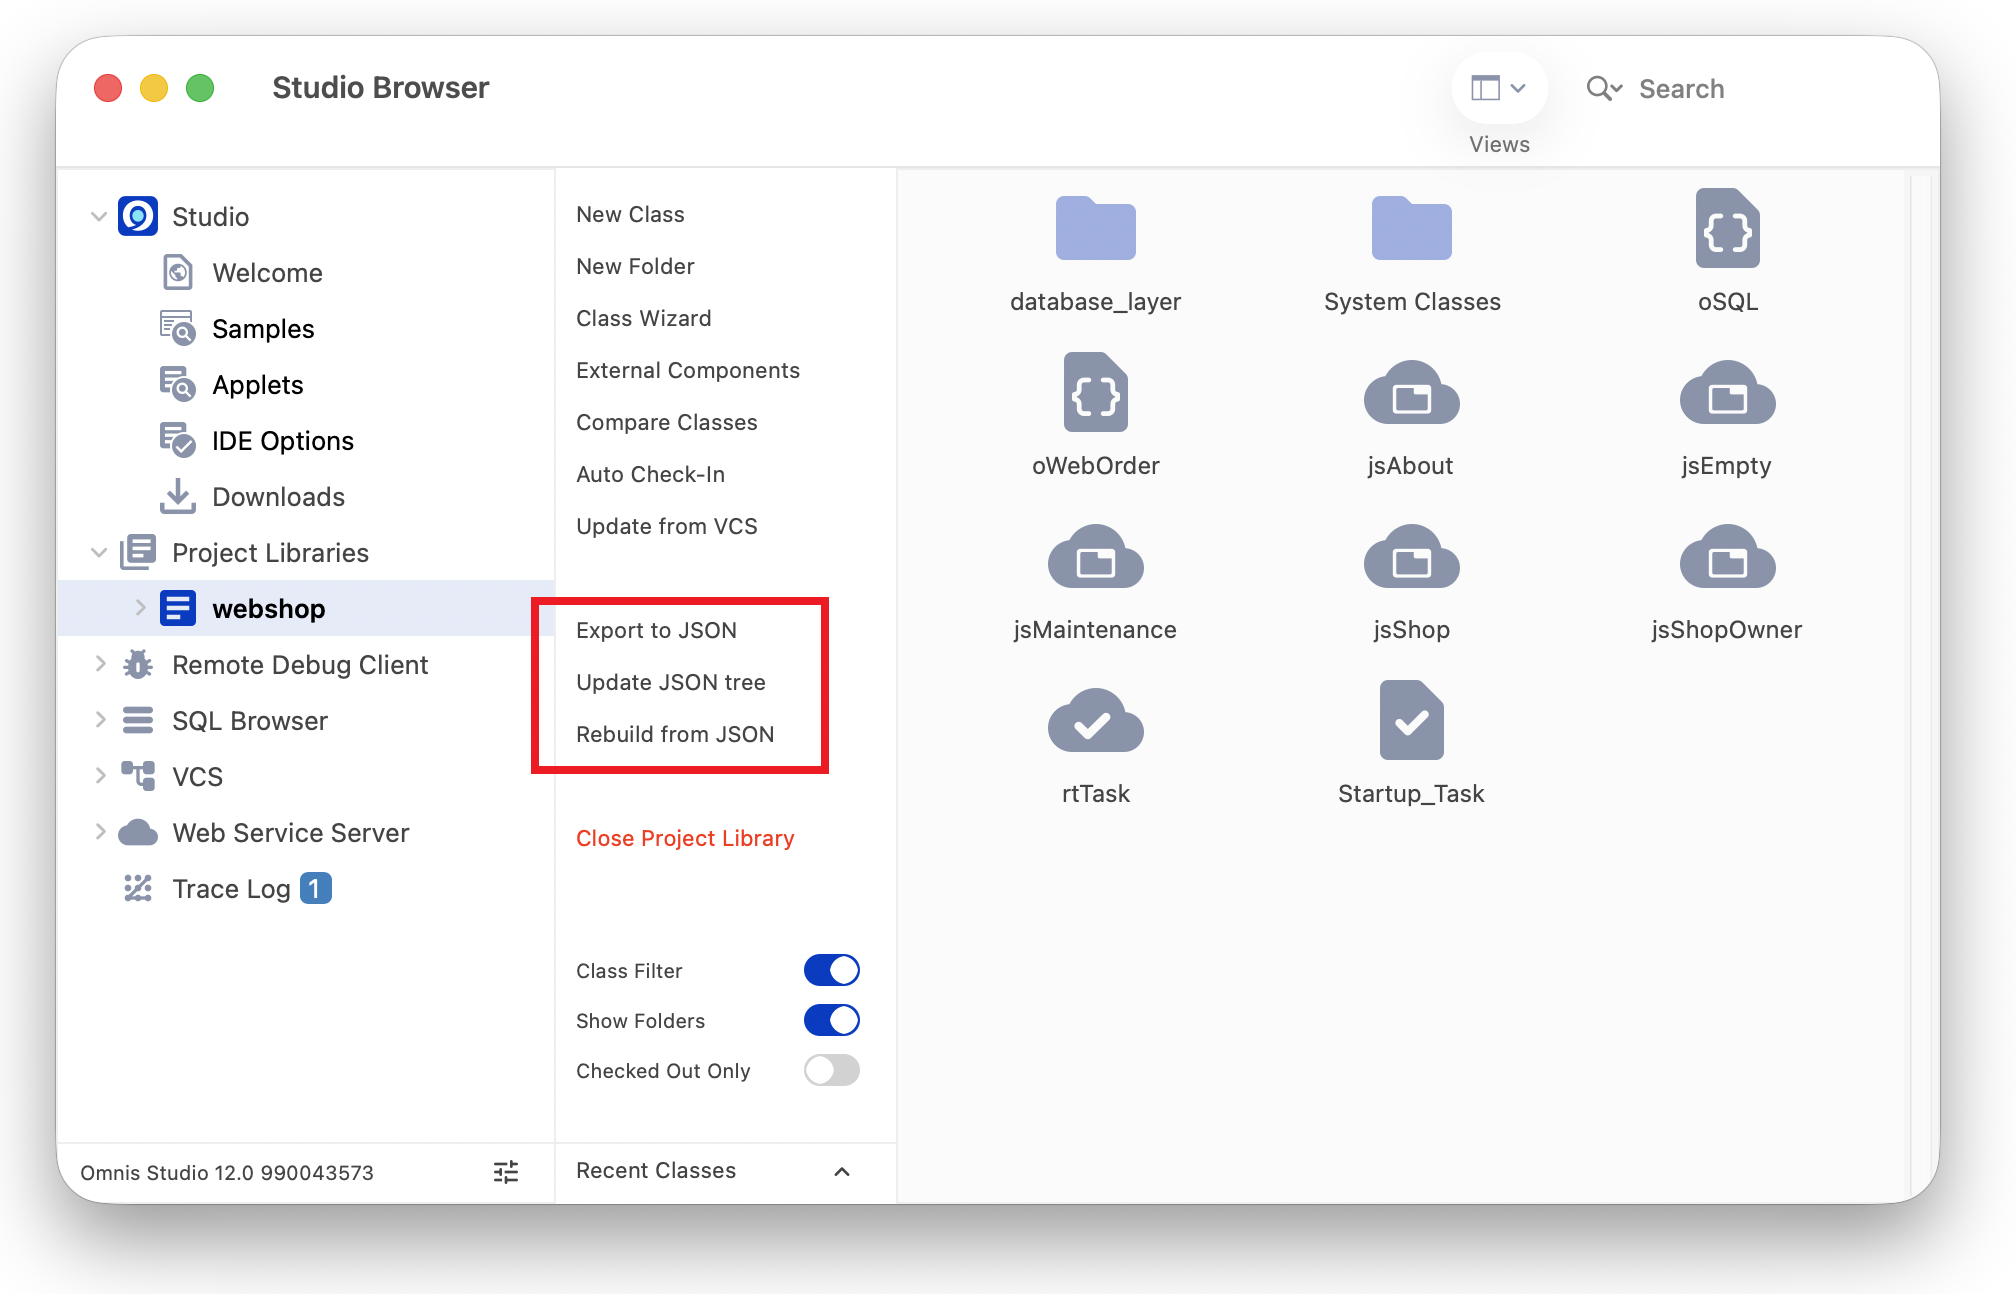
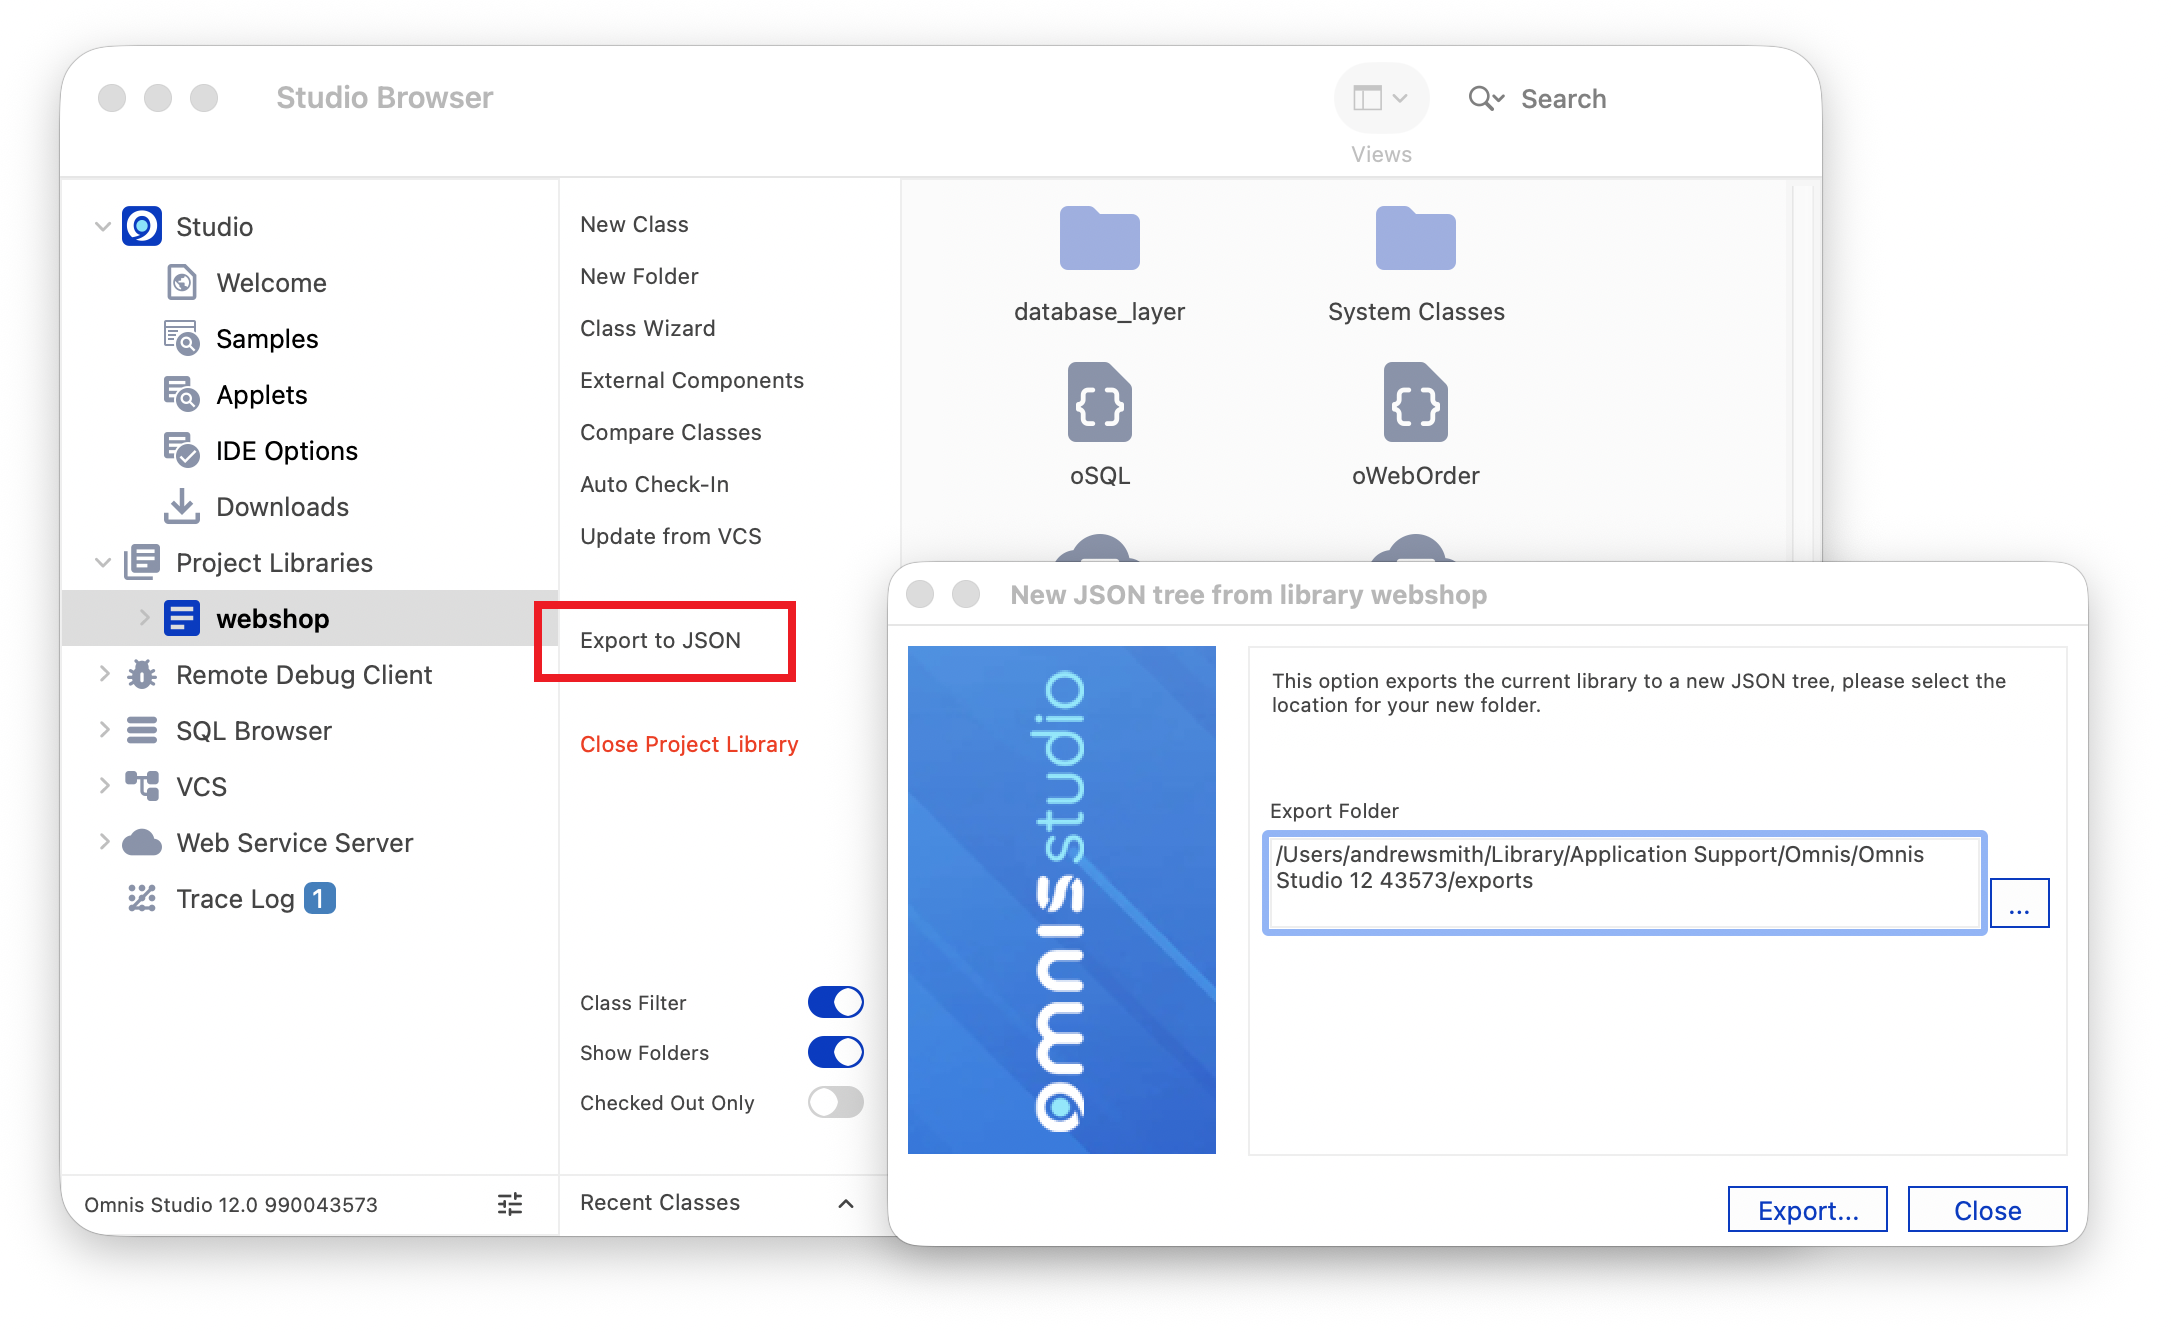
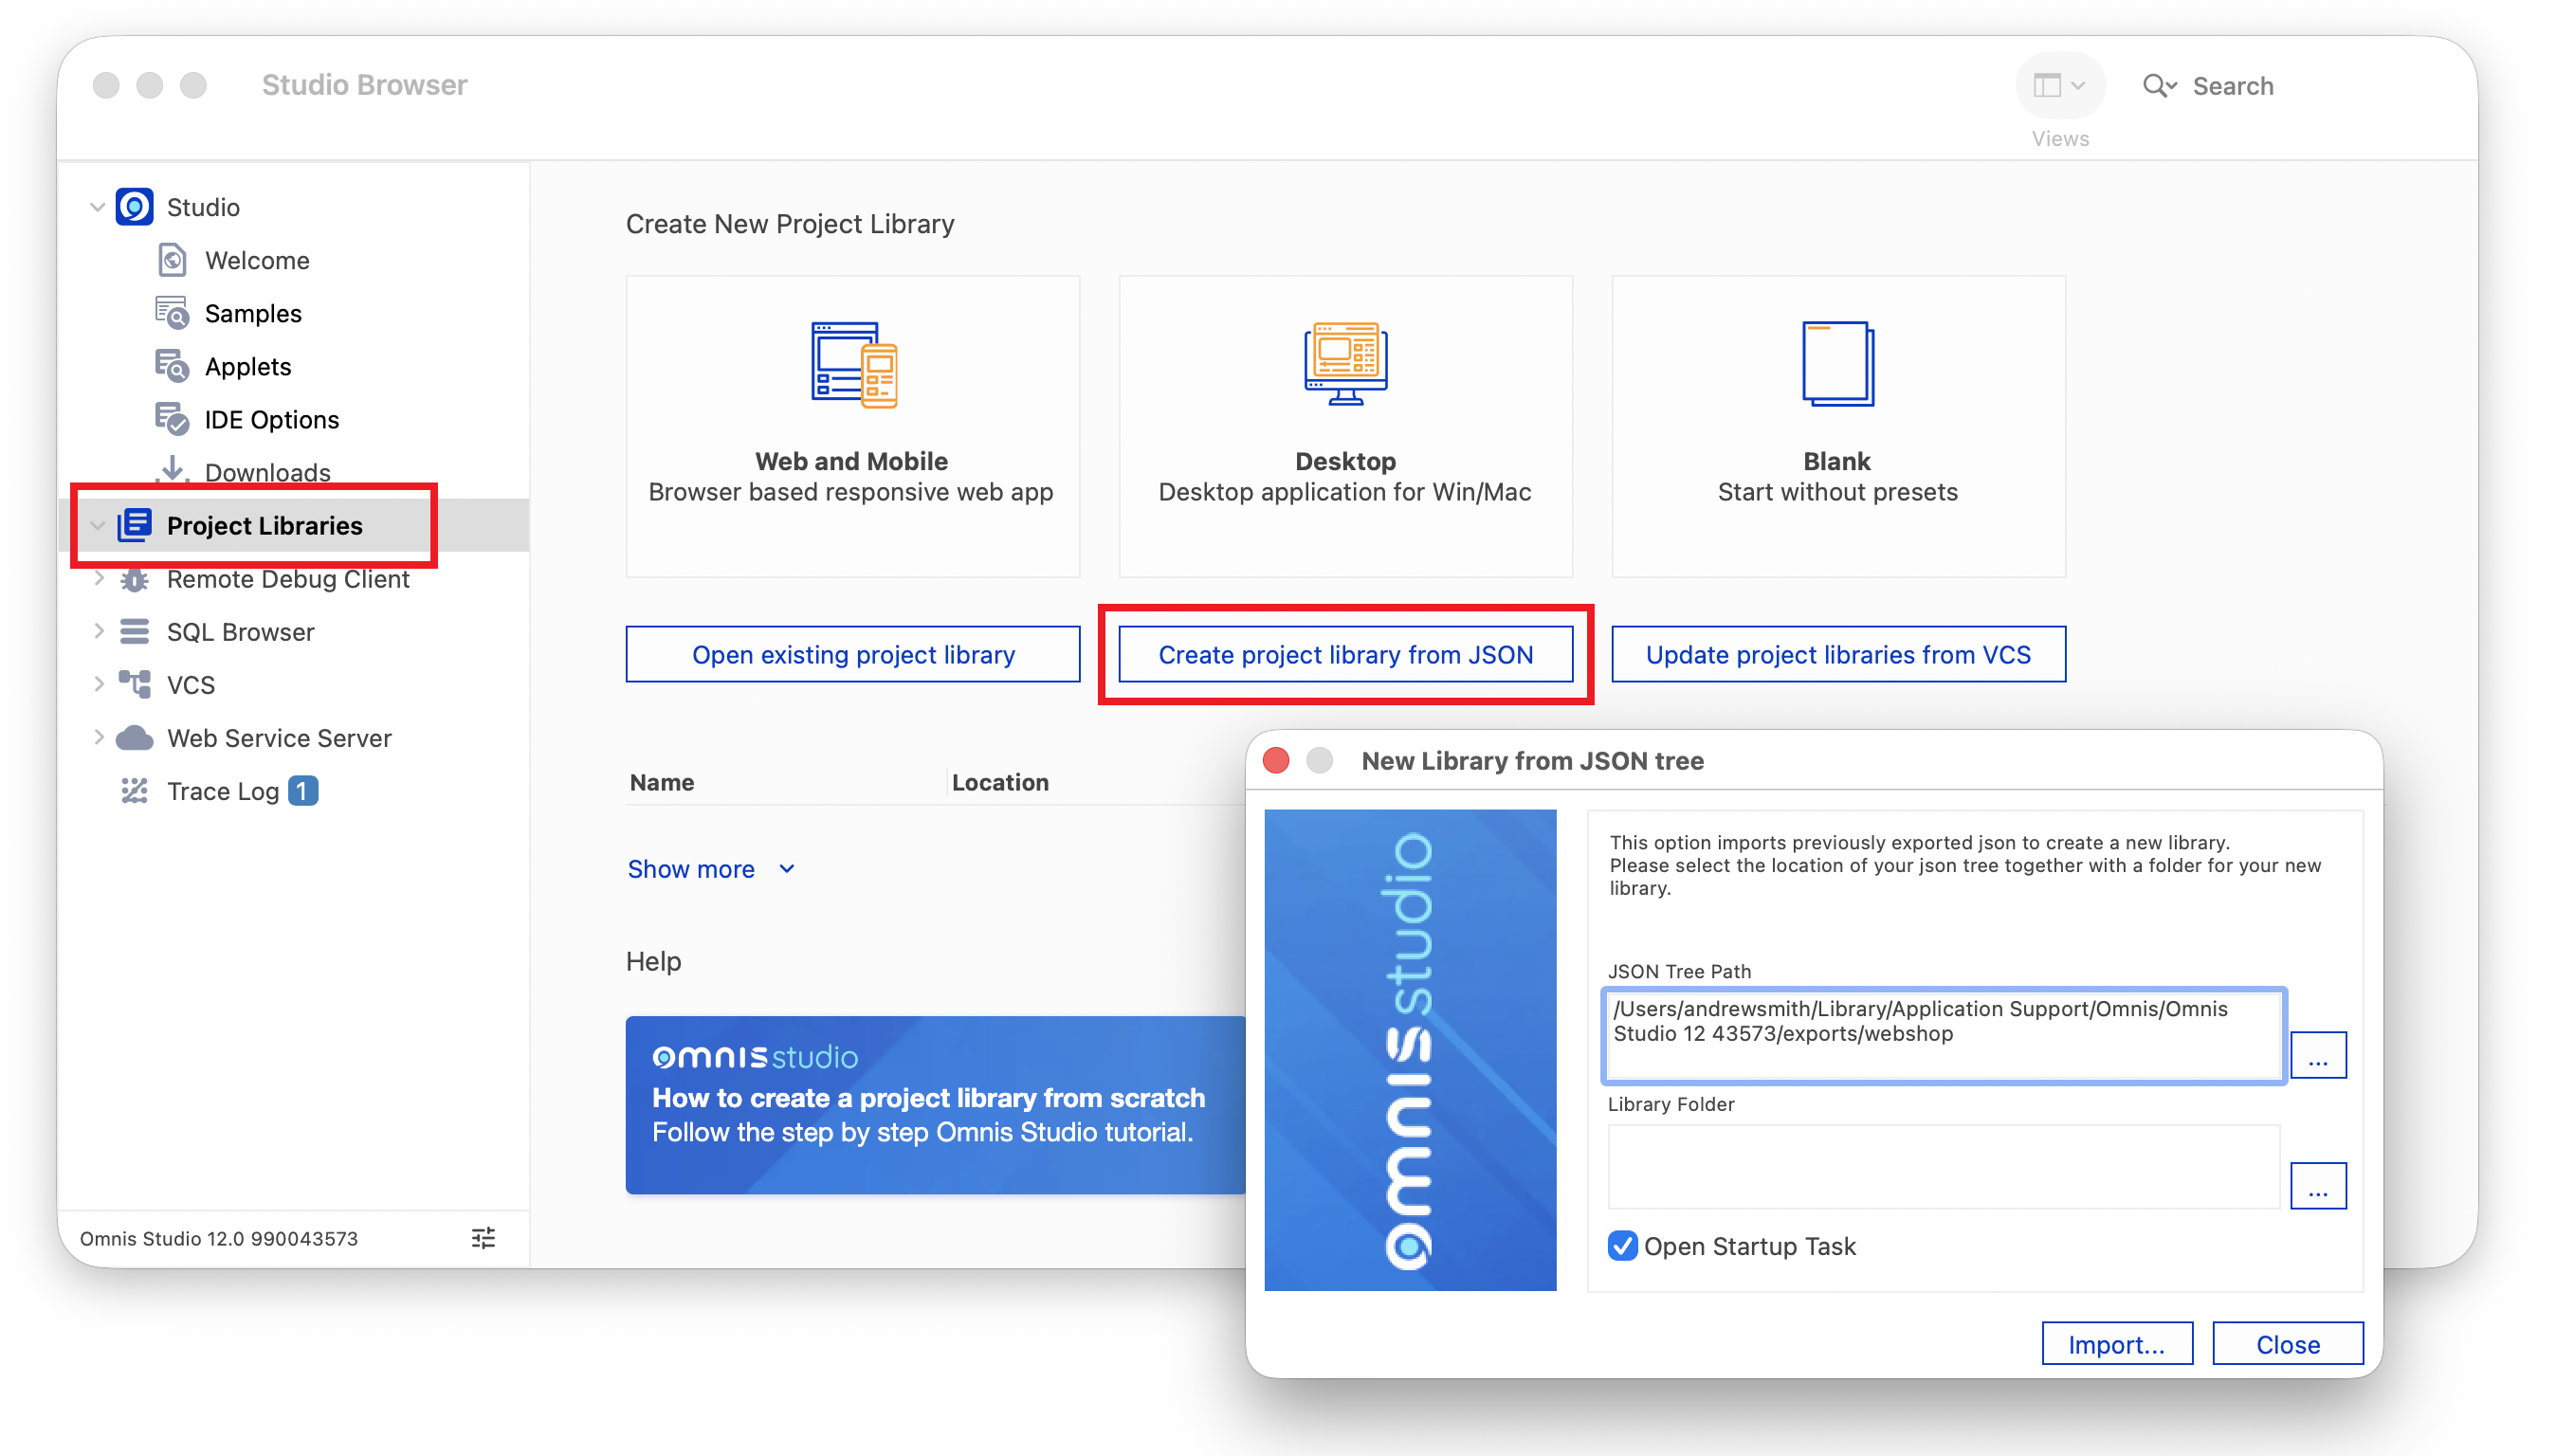
You can also create a new library by importing a JSON tree using the Create Project Library from JSON option in the Studio Browser (not available in some editions): the JSON tree must previously be exported from Omnis Studio using the export to JSON option: see Importing Libraries.
Note that libraries created in the Community Edition cannot be opened in the Professional Edition of Omnis Studio, and vice versa.
Opening a Library
To open an existing library, select the Project Libraries option in the Studio Browser and click on the Open existing project library button and navigate to the library file to open it. Alternatively, you can double-click on a library file (icon) on your desktop to open it in Omnis Studio.
In addition, when Omnis starts up it opens any libraries and classes that were open when Omnis last shutdown; see Restoring Open Libraries & Classes.
If you open a library created in a previous version of Omnis Studio it will need to be converted: see Library Conversion.
Recent Project Libraries
If you have already opened a library, it will be listed in the Recent Project Libraries list in the right-hand panel of the Studio Browser. You can click on a library name in this list to open that library.
By default, when a sample library is opened from the Hub it will not be added to the Recent Project Libraries list. There is an option in the IDE Options to control whether sample libraries are added to the list.
You can remove a library from the Recent Project Libraries list by right-clicking on it in the list and selecting Remove from list.
Opening a Library in code
You can open a library in your code, which can be useful if your application needs to open additional libraries at runtime. You can use the $add() method which has the following syntax:
Do $libs.$add(cPath [,bCreate=kFalse, cIname, cPword, &iErrCode, &cErrText, iFlags=kLibFlagNone, startupParams...]) Returns LibraryRef
Opens or creates library at cPath and returns an item reference to the library. The parameter cIname overrides the default internal name, and cPword is the library password (if required).
If an error occurs, the returned item reference is NULL; if passed, the iErrorCode and cErrorText parameters identify the error.
The iFlags parameter allows different options to be set when the Omnis Runtime opens a library. The iFlags parameter is a sum of one or more of the following kLibFlag... constants:
| kLibFlagNone |
If specified, has no effect |
| kLibFlagDoNotOpenStartupTask |
If specified, do not open the Startup_Task |
| kLibFlagEnableConversionByRuntime |
The Omnis runtime version will offer to convert the library |
| kLibFlagConvertWithoutUserPrompts |
If specified, and conversion is allowed, Omnis will immediately perform conversion without giving the user any prompts that require a response; note the user cannot cancel the conversion in this case |
Any further parameters are passed to the $construct method of the Startup_Task (in the case where the Startup_Task is allowed to run).
If you prefix cPath with "!!!", then Omnis does not open the startup task of the new library.
Closing a Library
To close a library, select the library in the Studio Browser and click on the Close Project Library option, or you can right-click on the library icon in the Studio Browser and select Close Project Library from the context menu.
Closing All Libraries
In the Runtime (desktop) and Server versions of Omnis Studio only, you can close all open libraries in a single command using the Close All Libraries option in the File menu; note this option is not available in the Development version.
Deleting a Library
You can delete a library file via the Studio Browser using the Delete Project Library option in the library context menu (right-click on the library). Omnis will prompt you to confirm the library deletion. WARNING: this option deletes the library file from your file system which is irreversible.
Restoring Open Libraries & Classes
When Omnis starts up, it opens any libraries that were open at shutdown, together with any class editors that were open in design mode (this applies to the development version only). This is controlled by the restoreOpenLibsAtStartup item in the “ide” section of the config.json file, that defaults to true.
When the development version of Omnis shuts down successfully, it saves a list of libraries to re-open. The library list saved excludes all libraries in the startup and studio folders, and all private libraries (these libraries will typically re-open anyway). In addition, Omnis will only run the startup task of a library that it re-opens, if the startup task was open when Omnis last shut down successfully. Running the startup task is controlled by the openStartupTaskWhenRestoringOpenLibrary item in the “ide” section of config.json. If this is true (the default), Omnis will run the startup task of each library that had an open startup task when Omnis closed. Set this to false if you do not want the startup tasks of libraries to be run.
In addition to libraries, Omnis opens any class editors that were open at shutdown when it next starts up (this applies to the development version only). This is controlled by the restoreOpenClassEditorsAtStartup item in the “ide” section of the config.json file (the value of this configuration entry is ignored, and treated as false, if the restoreOpenLibsAtStartup entry is false). If true (the default), after completing startup, the development version of Omnis tries to re-open class editors that were open when Omnis last shut down successfully. Note the system table editors are not reopened.
For class editors other than remote form and window editors (which automatically save their last position), the restored editors open in their last screen position, provided that the screen configuration has not changed since Omnis was shut down; if the screen configuration has changed, then the editors open at their default position for the new screen configuration.
The method editor attempts to restore the selection to the method line being edited. The remote form, report and window editors attempt to restore their current selection. These attempts will work unless the class has been changed, that is, by replacing the library (or class) with a modified copy before restarting, e.g. from the VCS.
The restored class editors open behind any user windows opened by either startup libraries or libraries opened due to the restoreOpenLibsAtStartup config.json entry.
Library Properties
A library has a set of Properties and Preferences that control its settings and behavior. You can use the Property Manager to display or change the properties of a library, or the properties of a library can be accessed in your code using the notation: $clib.$<PropertyName>, or LibraryName.$<PropertyName> in a multi-library application.
To view the properties of a library
- Select the library icon or name in the Studio Browser and press F6/Cmnd-6 to open the Property Manager, or click on the Props button on the main Omnis toolbar
or
- Right-click on the library icon or name in the Studio Browser, and select the Properties option from the library context menu
The Property Manager displays the properties of the currently selected library: to view all the properties (preferences) of a library, ensure that the Advanced option is enabled. As with any property in the Property Manager, you can move the pointer over a property name to display its help text. The following is a summary of all the Library Properties under the General tab; the default value is provided below, where applicable.
| $disabledefaultcontextmenu |
kFalse |
If true, the default context menu for the object will not be generated in response to a context click (clib.disabledefaultcontextmenu and $cobj.$disabledefaultcontextmenu must both be false for the menu to be generated) |
| $disksize |
|
The total disk size of the file (in bytes) |
| $extension |
kFalse |
If true, the library is an extension library |
| $freesize |
|
The estimated free bytes within the file |
| $ignoreexternal |
kFalse |
The ignore external mode for the library |
| $isprivate |
kFalse |
If true, the instance or library is private |
| $name |
|
The name of the library, minus the extension: see Library Default name below |
| $nodebug |
kFalse |
If true, the local debugger is disabled for the library |
| $parentfolder |
|
The pathname of the folder containing the library (with a trailing pathname separator): see below |
| $pathname |
|
The full pathname of the library, including the library file name |
| $prefs |
|
The library preferences group is a property of a library, shown on its own tab in the Property Manager: see Library Preferences |
| $remotedebug |
kFalse |
If true, remote debugging of this library is allowed. Cannot be set to true in an always private library |
| $shared |
kTrue |
If true, the file is open in shared mode. On OSX 64 bit this property cannot be set to true as shared access is not supported |
| $userinfo |
|
A developer property that can store data of any type. The property manager only allows assignment if its current value is empty, null, or has character or integer data type. Must be character to be used with client methods in the JavaScript client |
| $userlevel |
0 |
The current user level of the library |
| $vcsbuilddate |
|
The date and time when this library was built using the VCS |
| $vcsbuildersname |
|
The name of the user who built this library using the VCS |
| $vcsbuildnotes |
|
The notes entered by the user when this library was built using the VCS |
Library Parent folder
The $parentfolder property returns the pathname of the folder containing the library file (with a trailing pathname separator). Note that this is only visible in the Property Manager when the properties of the library are accessed via the Notation Inspector. Using this property, you could, for example, find the full notation for the library folder (path) and drag it to the Code Editor.
Library Methods
The Property Manager shows any methods for a library. The $modifypasswords([bSilent=kFalse]) method opens the #PASSWORDS system table which contains the master and user passwords for desktop libraries only, not JS Client applications.
The $overridetables method lets you override individual entries within the System Class tables at runtime: see Overriding System Class Tables.
Library Preferences
The library preferences are displayed under the Prefs tab in the Property Manager when viewing the properties of a library, or they can be accessed in your code using the notation: $clib.$prefs.$<PropertyName>, or LibraryName.$prefs.$<PropertyName>. The following is a summary of all the Library Preferences; the default value is provided, where applicable.
| $alwayslog |
kFalse |
If true, the Send to trace log command and tracelog() function always write non-diagnostic messages to the trace log (overriding the check for debuggable code) |
| $centuryrange |
1980 |
The start of the default range for dates entered without a century |
| $defaultname |
|
Default internal library name: see below |
| $disableclassdatanotation |
kFalse |
If true, $classdata for all classes in the library will not be accessible. Setting this property is an irreversible operation |
| $disablemethodtextnotation |
kFalse |
If true, $methodtext and $methodlines will not be accessible. Setting this property is an irreversible operation |
| $disablewebservicelogging |
kFalse |
If true, WSDL Web Service Server logging does not log any requests to services in the library |
| $errorprocessing |
kEPreport |
A kEP... constant that indicates how unhandled errors in methods belonging to this library are processed kEPlogStackAndContinue kEPlogStackAndReport kEPreport |
| $exportcontrolcharacters |
kFalse |
If true, export types which normally map control characters to spaces,leave the data unchanged |
| $exportedquotes |
kTrue |
If true, exported text is enclosed in quotes |
| $fiscalyearend |
31 Dec 1900 00:00:00 |
Fiscal end of year date |
| $iconlib |
|
Internal name of the alternative library for retrieving icons from #ICONS |
| $iconsets |
|
Comma separated list of icon set folders to be used for the library. Folder names datafile, lib, studio and studioide are reserved and cannot be used. Omnis searches the icon sets for icons in the order specified by this property |
| $initiallayoutbreakpoints |
320,768 |
A comma separated list of layout breakpoints. The initial value of $layoutbreakpoints when making a remote form responsive |
| $justifiedtextthreshold |
75 |
A percentage value,0-100. For fields with justification kJustifiedJst, the minimum percentage of the total field width that an end of paragraph line must occupy before the line of text is expanded to fill the entire field width |
| $osdroplimit |
100000000 |
Maximum number of bytes of dropped data that can be included in pDragValue for evDrop when $osdropflags contains the flag kOSDROPincludeData. kOSDROPwithoutDataIfOsDropLimitExceeded specifies if evDrop still occurs when the limit is exceeded |
| $reportcalculationerrors |
kTrue |
If true, Omnis reports errors that occur during calculation evaluation |
| $reportnotationerrors |
kTrue |
If true, notation warnings will be handled as errors |
| $sensitivefieldnames |
kFalse |
If true, field names are case sensitive |
| $serverlessclientstringtable |
|
The string table (tab-separated value .tsv file in library folder) shared by all JavaScript client remote forms in the library Serverless Client Application File. Only assignable if your serial number enables SC development |
| $sharedpictures |
kSharedPicModeNone |
Indicates if Omnis uses shared picture format. One of kSharedPicModeNone, kSharedPicMode256Color or kSharedPicModeTrueColor |
| $sqlstripspaces |
kTrue |
If true, Omnis strips trailing spaces from retrieved character columns; provides backwards compatibility with v2 if true |
| $startuptaskname |
Startup_Task |
The name of the startup task class |
| $styleplatform |
<the current platform> |
The field styles platform group to use for this workstation kJavaScript kmacOS kMSWindows kUnix |
| $userexportdelimiter |
; |
The character the library uses for user-delimited import/export |
| $validcolumninbadrowisnull |
kFalse |
If true, a valid list column in a bad (non existent) row evaluates to #NULL rather than an empty character string |
| $weekstart |
kMonday |
The beginning of the week, a day constant: kMonday kTuesday kWednesday kThursday kFriday kSaturday kSunday |
Disabling Class Data and Method Text
The library preferences $disableclassdatanotation and $disablemethodtextnotation control whether or not other Omnis libraries can access class data and/or method code within the library. They can be set using the Property Manager or via the VCS when building a library.
When $disableclassdatanotation is kTrue for a library, you will no longer be able to read or write $classdata from any Omnis class using Omnis code. In addition, JSON export of the library is disabled as the class data is disabled. IMPORTANT: future access to this library in the Omnis VCS will no longer be possible.
When $disablemethodtextotation is kTrue for a library, you will no longer be able to read or write $methodtext or $methodlines from Omnis code or via the Property Manager. In addition, method text will not be exported during a JSON export of the library.
Library Default name
A library has an internal name stored in $name which Omnis uses to reference the library in your code and elsewhere, such as the prefix for a class name in a multi-library structure, i.e. Libraryname.classname. The default internal library name is created automatically using the name of the disk file, with the file extension removed. Any remaining characters in the set . $ ( ) [ ] (dot, dollar, open and close parenthesis, open and close square bracket) are converted to _ (underscore), although you should avoid using these characters in your library name. The default internal library name will have the case of the library name to be consistent with Omnis running on the macOS and Linux platforms. (Prior to Studio 10, library name and file paths on the Windows platform were converted to upper case when opened which resulted in the default internal name for a library being upper case on the Windows platform.)
You can assign an alternative internal name for a library by setting the $defaultname library property and once set this is used to reference the library, overriding the auto-generated name. The characters and format of the string allowed in $defaultname are limited: no leading or trailing spaces, the name cannot start with a digit, or contain the following characters: . $ ( ) [ or ].
Omnis prevents the internal name of a library from being set to the name of a static function group, such as FileOps, by appending a digit (or digits) to the internal name that would otherwise be used, in the same way as it does when opening a library which would result in a duplicate internal name. So in the case of FileOps, the internal name of the library would typically be fileops1. However, it is best to avoid using a function group name, or any other function or command name, as a library name to avoid any possible conflicts.
If you rename the library file on disk the $defaultname remains the same retaining all class references. If you change the $defaultname property after you start developing your library, all class references that use it will fail: therefore, in a multi-library system you should set it once before you start adding classes to your library.
Multi-library Projects
Omnis lets you structure your application into one or more libraries that you can load either together or separately. This lets you
break up your application into smaller, less complex subsystems
develop the subsystems in different programming groups or departments
test the subsystems or modules separately
reuse libraries in different applications, mixing and matching reusable code without modification
Although Omnis always ensures the integrity of objects, there is no built-in locking or concurrency checking to prevent two users from modifying the same object. If more than one user opens an object in design mode, the last one to close the object overwrites the changes made by the other users. There is no way to ensure that changes made to an object are seen by other users before the library is reopened: objects are cached in memory and it is not possible to predict when Omnis will discard an object from the cache. In a team of developers you should therefore use the Omnis VCS.
Library APIs
You can use the $getapiobject method to expose the methods in a library to be used in another library. The $root.$modes method $getapiobject returns a reference of an object in another library, allowing you to use its methods. You can use $root.$modes.$getapiobject("libraryA") from libraryB to call into $getapiobject method of libraryA startup task which must return an object reference. For example, the startup task method $getapiobject of libraryA can do:
Quit method $clib.$objects.libAPI.$newref()
Where libAPI is an object within the library which implements some methods that you can use. If libraryA does not return an object reference, the returned value to the caller is NULL. The startup task in the called library must be named ‘Startup_Task’ (the default name) in order for this to work.
Omnis VCS
The Omnis VCS provides you with a full-featured version control system for your Omnis libraries and other components. If you put your application under version control, you eliminate the inherent risks involved in group development. See later in this manual for details about the Omnis VCS.
Comparing Classes
The Studio Browser includes a tool that lets you compare classes in two different versions of the same Omnis library or different revisions of the same class in a VCS project. The Compare Classes tool lets you compare all the classes in one library (or VCS project) or individual classes. To use it, click on the Compare Classes option in the Studio Browser. See Comparing Classes for more info.
Shared Access to Libraries on macOS
The 64-bit macOS version of Omnis Studio does not support shared access to libraries. For libraries ($root.$libs.LIB) on 64-bit macOS, the $shared property cannot be set to true as shared access is not supported: in effect, this property is redundant on this platform.
Starting Omnis with a file
Omnis can be started up by double-clicking on a file, such as a library file, or via the command line. The sys(250) function returns a list of files which were used to open Omnis, e.g. double-clicked from the Finder or passed on the command line. This is empty if Omnis was opened directly by double-clicking.
In addition, the task method $openfiles can be overridden and will be called when Omnis is used to open a file or set of files by the OS. This will be passed the list of files as a parameter.
On Windows, the $singleinstance root preference needs to be set to kTrue to use the same instance of Omnis to open a file, otherwise another instance of Omnis will be started.
Opening Initial File As Library error
The reportErrorOpeningInitialFileAsLibrary item in the “defaults” section of the config.json file (default value true) allows you to control whether or not Omnis reports an error trying to open the initial file as a library; this applies when a file is dropped on the Omnis program, or the file is double-clicked. If the option is set to false, the error message is not shown.
Library Conversion
When you try to open an existing Omnis library, created in a previous version of Omnis Studio, Omnis will prompt you to convert the library. You should make a secure backup of the old library before you open and convert it in the latest version of Omnis Studio since THE LIBRARY CONVERSION PROCESS IS IRREVERSIBLE.
The library conversion prompt applies to libraries you open manually in Omnis Studio and any libraries located in the Startup folder that are loaded automatically and require conversion.
Class Locking and Library Conversion
In order to enhance the integrity and security of deployed Omnis Studio libraries, the mechanism used to lock classes in a private library has changed in Omnis Studio Revision 35659.
Consequently, all libraries opened in Omnis Studio 11 revision 35659 or later WILL REQUIRE CONVERSION, INCLUDING LIBRARIES CREATED WITH ALL PRIOR REVISIONS OF OMNIS STUDIO 11 (as well as Studio 10 or earlier libraries). THE LIBRARY CONVERSION PROCESS IS IRREVERSIBLE.
THEREFORE, AND IN ALL CASES, YOU SHOULD MAKE A SECURE BACKUP of all existing Omnis Studio 11 libraries BEFORE OPENING THEM in Omnis Studio 11 Revision 35659 or later.
Library Conversion Logs
The library converter adds an entry to the Find and Replace log that allows you to quickly navigate to each change made by the converter by double-clicking on a line in the log. In addition, the converter writes a log file to the ‘conversion’ folder in the logs folder in the data part of the Studio tree. The log file provides a more permanent record of the changes applied to the converted library.
Conversion Log Delimiter
The conversion log file uses tab-delimited format, with exported text in quotes (the default). You can change both of these options using configuration items in the config.json file, in the log section:
  "conversionLogDelimiter": "\t",

  "encloseConversionLogTextInQuotes": true
If conversionLogDelimiter is empty, Omnis uses the default log delimiter, a semicolon (;).
Conversion Prompts & Working Messages
You can enable the option "disableAllLibraryConversionPrompts” to suppress conversion prompts when a library that needs to be converted is opened from the Startup folder: the option is in the "defaults" section of the Omnis Configuration file (config.json) and defaults to false, so you can set this option to true to prevent library conversion prompts.
You can disable the working messages such as "Converting class..." during library conversion by setting the "showLibraryConversionWorkingMessage" option located in the "defaults" section of the config.json file. The option defaults to true, but you can set it to false to disable the conversion working messages.
Default Classes
When you create a new library in Omnis, it contains certain default classes including a task class called Startup_Task, a remote task called Remote_Task (in a web/mobile app), and various System Classes that control the behavior and appearance of your library. As you begin to prototype your application, you don’t need to modify the default classes, but this section gives you a brief overview of how they affect your library.
Startup Task
When you create a new library, it contains a task class called Startup_Task. When you open your library in design mode (or in a runtime environment), the Startup_Task is opened and the initialization code within it is run automatically. Therefore, if you want your library to perform some action when it starts up (such as open a remote form or a database session), you can put the code to do it in the $construct method in the Startup_Task. (Many of the example apps under the Samples option in the Hub use the Startup_Task to setup the data or open the forms for the demo, so examine those to get an idea how the Startup_Task can be used.)
The Startup_Task is not relevant for web or mobile apps, since the end user will be opening your application in their web browser or application wrapper: any initialization of a web or mobile app should be done in the initial remote form to open in the end user’s browser.
Each library has a preference called $startuptaskname which stores the name of the startup task, and is set to Startup_Task by default. To change the task that is run when your library opens, you need to change this property, but in most cases you can leave it set to Startup_Task.
The startup task has a special function when you are designing your library and adding other classes and variables to your library. When you start to create or prototype your app you don’t need to change the Startup_Task, so you can proceed to create your data schemas and UI classes in your library.
Library Startup Task
The Omnis root preference $clibstartuptask reports the startup task for the library containing the current executing method.
Open/Close Library Notifications
There is a task message $openlibschanged that is sent after a library or libraries have been opened or closed. It is sent in a development version of Omnis only.
Remote Tasks
To open or test a Remote form it needs a Remote Task, therefore you need to create a Remote Task in your library and assign it to the $designtaskname property of the remote form. If you use a wizard to create a Remote form, you can create a remote task during the wizard process which is assigned to the remote form automatically.
When you create a new web/mobile library using the Create New Project Library option in the Studio Browser it will contain a Remote_Task class.
System Classes
Every new library contains a number of System Classes, contained in a folder called ‘System Classes’. You can hide or show them using the Class Filter option in the Studio Browser (the Class Filter option is visible when the library is selected).
System classes are special types of class that hold information about the Omnis environment, including field styles, fonts, input masks, and external components. You can edit some of the system classes to change the way Omnis behaves. The settings for these tables are stored for each separate library. You can copy system classes from one library to another and you can edit them, but some options available for normal classes are not available for these tables. Like other classes, you can check system classes into the Omnis VCS, so you could maintain one set of system classes for use with a number of different libraries in a multi-library project.
| #BFORMS |
Boolean formats: these specify the format of Boolean fields allowed in your library |
| #DFORMS |
Date formats: these specify the format of short date, and date and time values |
| #EXTCOMPLIBS |
the External components available in the current library: here you can load or remove ext comps for your library or Omnis itself |
| #ICONS |
the icon datafile for the current library used in legacy apps (double-click to edit it); use Icon sets for new web and mobile apps using the JS Client |
| #JSMASKS |
input masks for edit controls in remote forms |
| #JSWFONTS |
font table for remote form classes |
| #MXRFONTS #WIRFONTS #UXRFONTS |
font table for report classes under macOS, Windows, or Linux/Unix; cross platform apps may contain all these |
| #NFORMS |
number formats for numeric data entry fields |
| #STYLES |
character styles for window and report fields, and text objects: you can print a list of styles by right-clicking on the class and selecting Print Class |
| #TFORMS |
text formats for character-based fields |
| #DEBUGGER |
the current local debugger code breakpoint locations, which means code breakpoints (and their conditions) are restored when a library is reopened. #DEBUGGER does not appear in the Studio Browser class list, but it is included in clib.classes |
The following system classes relate to window classes and desktop library user access only, and therefore are not used for web or mobile apps:
| #MASKS |
input masks for data entry fields in window classes only |
| #MXWFONTS #WIWFONTS #UXWFONTS |
font table for window classes under macOS, Windows, or Linux/Unix; cross platform apps may contain all these |
| #PASSWORDS |
the master and user passwords for desktop libraries only, not JS Client: this is hidden by default, but you can show it via the Class Filter option or by pressing Shift+Ctrl+A in the Studio Browser |
You can edit a system table by double-clicking on it in the Studio Browser. For example, you can double-click on #DFORMS which opens the Date formats dialog showing all the date formats for the current library.
By using the FONT system tables for remote forms, report classes (or window classes), you can map fonts used on one operating system to fonts appropriate for the other operating systems.
Formats used for the $formatstring property in Masked Entry fields when $formatmode is set to kFormatBoolean.
| 1 |
T |
| 2 |
t |
| 3 |
Y |
| 4 |
y |
| 5 |
O |
| 6 |
1 |
| 7 |
[GREEN]O;[RED]O |
| 8 |
[GREEN]Y;[RED]Y |
The entries in #DFORMS are used to specify the format of Date Time variables (when defined in the Method Editor), and for the $formatstring property in Masked Entry fields when $formatmode is set to kFormatDate.
| 1 |
D m y |
| 2 |
H:N |
| 3 |
h:N A |
| 4 |
H:N:S |
| 5 |
H:N:S.s |
| 6 |
D m Y H:N |
| 7 |
D m Y H:N:S |
| 8 |
D m Y H:N:S.s |
| 9 |
M/D/Y |
| 10 |
w, n D, y |
| 11 |
D/M/Y |
| 12 |
w, D n, y |
| 13 |
M/D/Y h:N A |
| 14 |
D/M/Y H:N |
The following standard date formatting characters are supported:
| D |
Day (12) |
| V |
Day of week (Fri) |
| w |
Day of week (Friday) |
| E |
Day of year (1..366) |
| n |
Month (June) |
| M |
Month (06) |
| m |
Month (JUN) |
| y |
Year (1989) |
| Y |
Year (89) |
| A |
AM/PM |
| H |
Hour (0..23) |
| h |
Hour (1..12) |
Formats used for the $inputmask property in Masked Entry fields.
| 1 |
>>(###) ###-#### |
| 2 |
>>(###) ###-#### Ext(#####) |
| 3 |
>>(####) ###### |
| 4 |
>>(####) ###### Ext.### |
| 5 |
>>#### #### #### #### |
| 6 |
>>###-###-### |
| 7 |
>>aa ## ## ## a |
| 8 |
>>##-aaa-## |
| 9 |
>>##-aaa-#### |
| 10 |
>>##/##/##D/M/Y |
| 11 |
>>##/##/####D/M/y |
| 12 |
>>##/##/##M/D/Y |
| 13 |
>>##/##/####M/D/y |
Formats used for the $formatstring property in Masked Entry fields when $formatmode is set to kFormatNumber.
| 1 |
0 |
| 2 |
0.00 |
| 3 |
#,##0 |
| 4 |
#,##0.00 |
| 5 |
#,##0;[RED](#,##0) |
| 6 |
#,##0.00 'cr';#,##0.00 'dr' |
| 7 |
'£' #,##0;[RED]'£'-#,##0;;'Nil' |
| 8 |
'$' #,##0;[RED]'$'-#,##0;;'Nil' |
| 9 |
0% |
| 10 |
0.00% |
| 11 |
0.00 E+00 |
| 12 |
0.00 E-00 |
#TFORMS – Text formats
Formats used for the $formatstring property in Masked Entry fields when $formatmode is set to kFormatCharacter.
| 1 |
'('@@@')' @@@'-'@@@@ |
| 2 |
'('@@@')' @@@'-'@@@@ 'Ext('@@@@@')' |
| 3 |
'('@@@@')' @@@@@@ |
| 4 |
'('@@@@')' @@@@@@ 'Ext.'@@@ |
| 5 |
@@@@ @@@@ @@@@ @@@@ |
| 6 |
@@@'-'@@@'-'@@@ |
| 7 |
@@ @@ @@ @@ @U |
Overriding System Class Tables
You can override individual entries within the System Class tables at runtime, without modifying the system classes in the library. This may be useful in a multi-library deployment, where all the libraries need to share the same base set of system classes, but you may want to change individual settings in the formatting tables, such as the date format, according to the language or location of the end-user.
The definitions for these alternative formatting tables can be stored in a JSON file, which should be named “tables.json” and placed in the Studio folder under the main Omnis folder. You can use the $overridetables method to load an entry from the JSON file to override an entry in one of the default system tables in the current library.
The override only applies while the library is open: therefore, if you close and re-open the library, you need to call $overridetables again if you want to override the default system tables: typically, you would do this at the start of $construct in the Startup task of your library.
The tables.json file should contain a JSON object, and each member of the JSON object defines the content of one or more of the formatting tables: tables which do not have an entry for a member are not affected when that member is used. The following format is used:
{

  "en": {

    "#BFORMS": [ "[GREEN]Y;[BLUE]Y","y","Y" ],

    "#DFORMS": [ "D/M/Y H~N", "D m Y  H:N"],

    "#TFORMS": [ "@@ @@ @@ @@ @U", "'('@@@@')' @@@@@@ 'EXT'@@@"],

    "#MASKS": [ ">>###-###-###", ">>##/##/####~M/D/y~"],

    "#NFORMS": [ "0.00 E+00"]

  },

  "de": {

    "#BFORMS": [ "[GREEN]Y;[YELLOW]Y" ],

    "#DFORMS": [ "D/M/Y H~N" ]

  }

}
The $overridetables method has the following syntax:
- $clib.$overridetables(cJsonPath,cEntry[,&cErrorText])
Uses member cEntry in JSON table file cJsonPath to override the system tables with entries stored in member cEntry. Returns Boolean true for success, false and cErrorText for failure
Therefore, you could execute the following to load tables.json from the Studio folder:
Do $clib.$overridetables(con(sys(115),"studio",pathsep(),"tables.json"),"en",lErrorText) Returns bStatus
Locale-style names have been used, such as “en”, to indentify the members for which the tables are to be loaded, but the text could be anything to identify the set of tables to be loaded so long as you use the same name in the $overridetables() method.
$overridetables replaces the contents of the system tables with the members of the array, and sets any entries after the array members to empty. The corresponding system table class becomes read-only: you can open its class editor, but you cannot change it within the class editor.
Using the $clib.$prefs notation group for the table will change the table used at runtime, but a change made using the notation will not be saved to disk.
Class Types
There are several different types of class in Omnis, each one performing a particular function in your library, or your application as a whole. In general, classes are either Data classes or UI classes, depending on whether they define the data structures or the UI and other visual elements in your application. The types of class are:
Schema class
data class that defines a server table and its columns on your server database; see Schema Classes
Query class
data class that defines one or more server tables and their columns on your server database; see Query Classes
Table class
data class that maps to a schema class and contains default methods for processing your server data; see Table Classes
See SQL Classes and Notation for more info.
Remote form class
UI class that defines the forms to be displayed on web or mobile devices using the JavaScript Client; all remote form instances require a remote task to open; see JavaScript Remote Forms
Remote menu class
UI class that that can be used by the JS Popup menu component; see Remote Menus
Remote task class
a remote task class controls JavaScript remote form instances and a remote task class controls JavaScript remote form instances and maintains the connection between a client and the Omnis App Server in web and mobile apps; see Remote Tasks
Report class
UI class that defines the reports that can be generated in your code, saved to a file and displayed in the JS client as a PDF; see PDF Printing
Task class
all libraries contain a Startup_Task class used to initialize the library when it is opened (not required for web & mobile apps, use a Remote task class); otherwise, a task class can be used to control instances and events in a Desktop application
Object class
class that contains methods and variables defining your own structured data objects that can be instantiated in your UI
User Constants
class that contains user-defined constants for use in your methods and expressions. A user constant is a named value, where the value cannot be changed during execution; see User Constants
Code class
class that contains methods you can use throughout a library, but only in server executed or local desktop code (code classes cannot be used in client methods so should not be used for web or mobile apps using the JavaScript client)
The following classes are used for Desktop applications (thick client) only, and should not be used for JavaScript web or mobile applications (these are hidden in the Community Edition):
Window class
UI class that defines the data entry windows and forms for Desktop apps only (do not use for web or mobile apps)
Menu class
UI class that defines standard pulldown, popup, and hierarchical menus for Desktop apps only (described under Window components)
Toolbar class
UI class that defines the toolbars for Desktop apps only; the toolbars can be installed on the main Omnis toolbar or floating in the application window (described under Window components)
See Window Components for information about Window, Menu, and Toolbar classes.
The following classes are used for accessing Omnis data files in legacy applications, and are only included for backwards compatibility, so they should not be used for new applications (these are hidden in the Community Edition):
Creating New Classes
The Studio Browser gives you the option of creating new classes using the blank or empty class templates, using the New Class option, or using the class wizards which let you build fully functional classes complete with data fields and methods created for you automatically. These methods of creating classes are accessed using the list of hyperlink Options in the Studio Browser.
The New Class option in the Studio Browser (available when a library is selected) lets you create a blank or empty class that you can build and modify from scratch. Templates are available for all the different class types in Omnis. If you are new to Omnis or you want to prototype your application quickly, you can use the Class Wizards. When you are more experienced, or you want to create classes from scratch, then you can use the New Class templates.
Class Names
The name of a class can be anything you like, but the name would normally take account of its function within your application. You may like to use a prefix in the class name to denote the type of class, so for example, you could prefix the name of a Schema Class that is linked to a Customer server table with “s”, therefore you could name it “sCustomers”. Similarly, a JavaScript Remote Form used for Customer information could be named “jsCustomerForm”, prefixed with “js” to denote a JavaScript remote form class.
To remove all possibilities of any conflicts or errors in Omnis code, it is recommended that you only use alphanumeric characters and do not use spaces in class names; however, you can use _ (underscore) to separate words if necessary.
You cannot use the following characters in class names: any character with a value less than space, a character in the string " . , ; : ! ? ) ] } ( [ { + - * /| & > < = ", or a single or double quote character. In addition, a class name cannot start with the dollar character $.
Remote Form names should not include the hash symbol (#) or other special symbols since this may cause unexpected results in a web browser, or in the case of #, the remote form may not open in test mode at all.
For Studio 11, stricter class name validation was introduced to prevent certain characters from being used in class names, including most of the characters described above. The extraClassNameValidations item in the ‘defaults’ section of the config.json file is set to True meaning that Omnis performs extra validations before assigning a name to a class. This extra validation is strongly recommended, as using the characters it excludes in class names can cause confusion and potentially errors. This property is present only to allow code from previous versions to continue working if the additional validations cause any code to fail.
Class Wizards
The Class Wizards option in the Studio Browser (available when a library is selected) lets you create fully functioning classes (e.g. remote forms) based on the selections you make during the wizard, and in the case of UI wizards, the class you are building can be linked to other classes in your library. The class wizards are good for building or prototyping your application very quickly and save you building classes from scratch. For example, you can create a JavaScript remote form based on a schema class in your library using the SQL JavaScript Remote Form wizard.
Data Classes and Wizards
Depending on the type of data you want to enter or retrieve in your client application you will need to define certain structures in your library to handle this data. These structures are stored in your library file as data classes.
This section introduces schema, query, table, file, and search classes. All these classes are covered in greater detail later in this manual.
Accessing SQL databases
If you want to handle data from a SQL-compliant DBMS, you must create Omnis schema and/or query classes that map to the table and column structures on your server database. You can create schema classes from scratch, or you can create them automatically from the tables on your database server using the SQL Browser (the Tutorial shows you how to do this).
Data type mapping
When creating schema classes, you need to choose column data types that map directly to the tables or views on your server database. To do this successfully, you need to choose the data type for each column that best represents the type of data in your database server. See SQL Programming for more information.
Omnis Datafiles
File classes and Search classes are used for accessing Omnis data files in legacy applications, and are only included for backwards compatibility, so should not be used for new applications.
If you want to store and retrieve your data using a non-client/server setup, you can store it in an Omnis data file. In this case you need to design the structure for your data using Omnis file classes. In addition, you can use an Omnis search class to filter the data stored in an Omnis data file.
File and Search Classes
File classes are used to define the structure of a file (the Omnis equivalent of a table) in an Omnis data file. When you create a file class, you need to define the columns in the file using the Omnis Data Types.
The file class editor includes userinfo for each field in the file class which can be used to store data of any type for the field. This maps to fileclass.field.$userinfo.
Search classes can be used to filter the data stored in an Omnis data file.
A good alternative to using an Omnis data file is to use SQLite and if you are converting a legacy Omnis app that uses an Omnis data file, you may like to convert your data to SQLite using the Convert Data File to RDBMS option, available under the Add Ons option in the Tools menu. See Omnis Data File Migration for more details.
Omnis Data Types
This section describes in detail the standard data types you can use to represent data in Omnis. Choosing the right type for your data ensures that Omnis will do the right thing in computations requiring conversion. It also lets Omnis validate the data as you enter or retrieve it. Some of the basic data types have subtypes, or restrictions of size or other characteristics of the data that give you finer control over the kind of data you can handle. The following data types are available.
| Character |
standard character set sorted by ASCII value or UTF32 encoded characters |
| National |
Same as Character but sorted by National sort order |
| Number |
multiple types for representing integers, fixed point and floating point numbers |
| Boolean |
single-byte values representing true or false values, or their equivalents |
| Date Time |
multiple types for representing simple dates and times, or composite date and times, between 1900 and 2099 to the nearest hundredth of a second |
| Sequence |
proprietary data type for numbering Omnis data file records |
| Picture |
stores color graphics of unlimited size and bit-depth in platform-specific format or in a proprietary shared picture format |
| List |
structured data type that holds multiple columns and rows of data of any type |
| Row |
structured data type that holds multiple columns of data in a single row |
| Object |
your own structured data type based on an object class |
| Binary |
stores any type of data in binary form, including BLOBs |
| Item Reference |
stores the full notation of an object in your library or Omnis itself |
| Field Reference |
passes a reference to a field (parameter variables only) |
| Object Reference |
lets you create an object instance of local, instance, class or task variable scope |
Character
Character data can contain characters from any of the various single-byte standard character sets or UTF32 encoded characters. You can define a Character column of up to 100 million (100,000,000) characters in length, so can store up to 400MB of character data. Omnis only uses the amount needed for each string, and not the maximum amount.
Character columns or fields in Omnis generally correspond to SQL VARCHAR data on database servers and have a varying length format.
In Omnis character data is sorted according to its ASCII character set representation, not the server representation. The ASCII character set sorts any upper case letter in front of any lower case letter. For example, these character values
adder, BABOON, aSP, AARDVARK, Antelope, ANT
are sorted as
AARDVARK, ANT, Antelope, BABOON, aSP, adder
National
Like Character data, National data can contain characters from any of the various single-byte standard character sets or UTF32 encoded characters. You can define a National column of up to 100 million (100,000,000) characters in length. However, when you sort National data, Omnis sorts the values according to the ordering used by a particular national character set.
The ordering for the English language follows: A, a, B, b, C, c, D, and so on. For example, if the previous values were values of a national column or field, Omnis would sort them as follows:
AARDVARK, ANT, Antelope, adder, aSP, BABOON.
If you store data in an Omnis data file, Omnis stores a copy of the ordering in the file along with the data. If you use the data file on another machine, Omnis preserves the original ordering.
Number
A number variable can be an integral or floating point number having various storage and value characteristics, depending on its subtype. The following table summarises the different subtypes for numbers.
| Integer |
|
|
| Short integer |
1 |
0 to 255 |
| 32 bit integer |
4 |
-2,000,000,000 to +2,000,000,000 |
| 64 bit integer |
8 |
-9,223,372,036,854,775,808 to +9,223,372,036,854,775,807 |
| Number |
|
|
| Short 0 dp ** |
4 |
Single-precision floating point
approx -3.4E38 to +3.4E38 *
Display format: n decimal places |
| Short 2 dp ** |
4 |
e.g. 123.50 |
| Floating dp |
8 |
Double-precision floating point
approx. -1.8E308 to +1.8E308 *
Displayed using 16 significant digits |
| Number 0 dp |
8 |
Display format: n decimal places,
e.g. 123 |
| Number 1 dp |
8 |
e.g. 123.4 |
| Number 2 dp |
8 |
e.g. 123.45 |
| Number 3 dp |
8 |
e.g. 123.456 |
| Number 4 dp |
8 |
e.g. 123.4567 |
| Number 5 dp |
8 |
e.g. 123.45678 |
| Number 6 dp |
8 |
e.g. 123.456789 |
| Number 8 dp |
8 |
e.g. 123.45678901 |
| Number 10 dp |
8 |
e.g. 123.4567890123 |
| Number 12 dp |
8 |
e.g. 123.456789012345 |
| Number 14 dp |
8 |
e.g. 12.34567890123456 |
*When Number fields are used to store integer values, the largest scalar value that can be stored precisely is 9007199254740992 (2^53). Values larger than this will incur rounding error proportional to their magnitude. Numeric values with precision > 16 will also incur rounding error.
** The types Short 0 dp and Short 2 dp can temporarily store numeric values outside their range, until they are converted to their CRB storage format. To prevent this behavior and ensure the correct values are stored, you can add validation to your code.
File Classes and Integers
You can use 64 bit integers in file classes, provided that a field (column) is not indexed. In Integer subtype droplist in the file class editor, the 64 bit subtype is available but only when the field is not marked as indexed, otherwise if the field is indexed 64 bit is not present: the 64 bit subtype is not allowed in compound indexes either. The notation to manipulate file classes and indexes does not allow 64 bit integers to be used for indexed fields.
Floating Point Numbers
There are many pitfalls in using floating point numbers in programming. Computers do not represent these numbers exactly, only approximately within the precision of the machine. This can lead to all kinds of anomalous problems with comparison of values, particularly with equality comparisons. Two floating point numbers may differ by an infinitesimal amount depending on the technique used to generate the values, even though logically they should be the same.
In general, you should not use equality comparisons with floating point numbers. If you are working with “fixed-point” data such as money values, use scaled integers for comparison and arithmetic.
For example, instead of comparing two floating point variables F1 and F2 containing the amounts $5.00 and $10.00, compare two integer variables I1 and I2 containing 500 and 1000. Display I1 * .01 when you need a decimal value. You can also use the rnd() function to round the numbers to a certain number of decimal places before comparing them.
Technical Note: When comparing values, Omnis considers two Short Numbers to be equal if the first 12 decimal digits are identical.
For Number types 0..14dp and floating dp, Omnis considers two values to be equal only if they have exactly the same fractional part (stored using 52 bits). There is a new entry in the config.json file; numericCompareDps which can be used to specify the number of decimal digits that should be tested when comparing Number types. Although zero(disabled) for backward compatibility, numericCompareDps accepts values in the range 0..19. For example if numericCompareDps is set to 8, Omnis will consider the following two values to be equal:
Calculate lNum1 as 3.14159265
Calculate lNum2 as #PI
Calculate #F as lNum2=lNum1
Boolean
The boolean data type represents single-byte values of true (yes), false (no), empty, or null. You should take care to give each Boolean column or field an initial value, because Omnis initializes boolean data to “empty”, not NO or null.
When used in a data entry field in a window, boolean data is treated as three characters in which any data entry is interpreted as a YES or NO. A 'Y', 'YE' or 1 is seen as YES while an 'N' or 0 will suffice for No. If the field is a check box, you enter the boolean value by clicking on the box. If you don't initialize the field and the user does not click on the box, the field has an “empty” value.
You can use boolean values in expressions. The numeric value is 1 for Yes values and 0 for No and empty values. NULL values are treated as undefined in numeric calculations. For example, (null+1) is null and (null>1) is null.
When converted to character strings, Boolean columns or fields can take values "YES", "NO", "NULL", or empty, "". In some cases, for example when setting up search criteria, you can enter values other than these for a Boolean field: in this case, Omnis converts them and matches them with empty. Thus, for example, the value 'FALSE' is converted to empty, as are values like SAM, HAPPY, and so on.
Date time
The date and time group of data types contains three basic subtypes: a four-byte Short date, a two-byte Short time, and an eight-byte Long date and time. The following table summarizes the date and time subtypes.
| Short date |
4 |
1900..1999 |
| Short date |
4 |
1980..2079 |
| Short date |
4 |
2000..2099 |
| Short time |
2 |
Minute resolution |
| Date time(#FDT) |
8 |
Formatted #FDT, to centiseconds |
| Date time(D m Y) |
8 |
Formatted D m Y, to centiseconds |
Note that the display of dates depends on the settings in the #DFORMS system table. Also the long date and time subtypes are identical in value, only displaying differently in window fields.
Short Date
The short date type spans the range JAN/1/0000 to DEC/31/9999. There are three specific built in ranges: 1900 to 1999, 1980 to 2079, and 2000 to 2099. By choosing the appropriate range, you can enter just two digits for the year and Omnis recognizes the century correctly. For example, if you select the range as 2000 to 2099, a date you enter as 7,12,57 will be read as 7,12,2057 rather than 1957. To enter a date outside the three specific year ranges, you need to set up your own date display format.
Omnis accepts dates in different formats automatically, with the exact format depending on whether your system is US or European. For example, you could enter the 7th of December, 1998, as any of the following strings.
| 12-7-98 |
07-12-98 |
| 12/7/98 |
7/12/98 |
| 12%7%98 |
7%12%98 |
| DEC 7 98 |
7 DEC 98 |
You can use any character to delimit the day and month figures. If you don't specify the year or month and year, Omnis assumes the current year or month and year, respectively.
Omnis supports three kinds of date arithmetic in expressions.
Addition of days:
Date + Days = Date (forward)
Subtraction of days:
Date - Days = Date (back)
Subtraction of dates to yield number of days between the dates:
Date1 - Date2 = Number of Days between the dates
Omnis uses the string variable #FD to define the display format of dates. There are also several date functions that let you manipulate date strings.
Short Time
Short time types have two-byte values in the form HH:NN. The range of possible time values is from 00:00 to 23:59.
You can use time in expressions. Omnis automatically converts the time into numeric values using the conversion HH*60+NN, giving the total number of minutes. The #FT string variable controls conversions between time and string types.
Long Date and Time
The combined Date Time type can hold a complete date and time to 1/100th second. It has various subtypes depending on the display format you select (stored in #FDT) and uses 8 bytes when stored in a data file.
Date and Time Calculations
The numeric value of a date or time variable in an expression depends on the format string for that variable. So, if DATE1 has date format string H:N and DATE2 has date format string H:N:S, DATE1 has a numeric value equal to the number of minutes since midnight and DATE2 has numeric value equal to the number of seconds since midnight. It follows that DATE1+1 adds 1 minute to DATE1 and DATE2+60 adds 1 minute to DATE2.
Addition and subtraction involving two date/times cause the numeric value of each to adjust so that they are both based on a common denominator. Thus DATE1-DATE2 returns a numeric value equal to the correct difference between the two times in seconds. However, DATE1*1-DATE2*1 loses the information that DATE1 and DATE2 represent date times and returns a meaningless difference between the DATE1 value in minutes and the DATE2 value in seconds, for example, 500 minutes - 600 seconds.
Note that calculations involving combined dates and times do not work properly if the date part is before 1900. Comparisons between two datetimes with different date format strings work properly.
When you compare parts of dates, for example, the month part of a date, dtm('11 June 98'), Omnis compares the string representation of the month unless some calculation forces it to use the number representation of the month. Thus the expression dtm('11 Dec 98') is less than dtm('11 June 98') because 'D' is before 'J' in the alphabet. To force a correct numeric comparison, add 0. For example
If dtm('11 June 98')<(dtm('11 Dec 98')+0)
  OK message {6 is less than 12}
End If
You should try to use straight date comparisons if you are comparing full dates. Don’t try to convert them into integers or other types of data. Let Omnis do the work for you.
Century Ranges for Dates
When entering data into a date time field or variable without specifying the century, the date normally defaults to be within the hundred year range starting with 1st January 1980. However, you can specify the start of the hundred year default range as a library preference with the option of overriding it for individual date types.
You can use the $centuryrange library preference to set the default century range ($clib.$prefs.$centuryrange), a four digit year is specified which defaults to 1980. So if, for example, $centuryrange is set to 1998, dates for which no century is entered default to between 1st January 1998 and 31st December 2097.
In addition, the 30 date formats which are stored in the #DFORMS system table can include the century range by including a four digit year at the end of the date format. For example, date formats starting at 1st January 1998 include ‘D m Y H:N:S 1998’ and ‘YMD 1998’. This can be used to override $centuryrange for particular date types.
The same mechanism can be used to control the conversion of character values to dates using the dat() function, for example:
Do dat(charvar,'D m Y 1998') Returns dat
Century ranges are used when dates are entered from the keyboard or when a character string is converted to a date. If you enter a date that includes the century, the century range is ignored. Century ranges do not affect how a date value is stored or displayed, Omnis always stores the full date including the century.
Sequence
Every time Omnis inserts a new record into an Omnis data file, it assigns a unique number, a record sequencing number or RSN to that record. There is a special data type, the sequence, for this type of data. Each RSN references a location in the data file. If you delete a record, Omnis does not reuse the RSN. The RSN is stored as a 32-bit integer so its maximum value is 2^32-1, which is approximately 4,295 million! The sequence type is not applicable to client/server data.
Omnis assigns record sequencing numbers (RSNs) according to the following rules:
The first record in a file has RSN 1, the second record RSN 2, and so on
An RSN is never used again, even though the record may no longer exist
A window field with sequence type provides a way for the user to see the RSN for any record in an Omnis data file, even though they cannot change it.
Omnis assigns the RSN just before saving the record in the data file, so it is not available for any calculations prior to the Update files command.
Picture
The picture data type holds color graphics with a size limited only by memory. The space each picture consumes depends on the size and resolution of the image. The internal storage of a picture is either in native format (Windows bitmap or DIB or metafile or Mac PICT) or in Omnis shared color format. Server databases store picture data as binary objects (BLOBs).
List
The list is a structured data type that can hold multiple columns and rows of data. A list can hold an unlimited number of lines and can have up to 400 columns. When you create a list variable you set the type of each column. The data type of each column in your list can be any one of the other data types including Character, Number, Date, Picture, and List: Yes, you can even have lists within lists!
Omnis makes use of the list data type in many different kinds of programming tasks. Normally you would create a variable with list data type and build your list in memory from your server data or Omnis data file. Then you could use your list data as the basis for a grid or list field on a window, or you could use it to generate a report.
You can store lists in Omnis data files directly. To store a list in a SQL table on a server, you can map it to a binary field of some kind.
Row
The row is a structured data type, like a list, that can hold multiple columns and types of data, but has one row only: it is essentially a list type with a single row. A row can have up to 400 columns. When you create and define a row variable, you set the type of each column. As with lists, the data type of each column in your row can be any one of the other data types including Character, Number, Date, Picture, List, and Row.
Object
Object classes let you define your own structured data objects. Their structure, behavior, and the type of data they can hold is defined in the variables and methods that you add to the object class. A variable with object type is a variable based on an object class: the subtype of the variable is the name of an object class. For example, you can create an instance variable of Object type that contains the class and instance variables defined in an object class.
Object instances created from an object class (via subtype) belong to the current task at the point of their creation; this provides consistency with object instances created via $new.
When you reference a variable based on an object class you create an instance of that object class. You can call its methods with the notation VarName.$MethodName(). For an object variable the initial value contains the parameters which are passed to $construct() for the class when the instance is constructed. The instance lasts for as long as the variable exists.
You can store object instances in a list. Each line of the list will have its own instance of the object class. You can store object variables, and hence their values, in an Omnis data file or server database which can store binary values. If an object variable is stored in a data file the value of all its instance variables are stored in binary form. When the data is read back into Omnis the instance is rebuilt with the same instance variable values.
Object reference
The Object reference data type provides non-persistent objects that you can allocate and free using notation. Non-persistent means that objects used in this way cannot be stored on disk, and restored for use later.
You can use the Object reference data type with local, instance, class and task variables. It has no subtype. To create a new Object instance, referenced by an Object reference variable, you use the methods $newref() and $newstatementref(). These are analogous to the $new() and $newstatement() methods, and they can be used wherever $new() and $newstatement() can be used.
Object references are deleted automatically when they are no longer required in order to free up memory. Object references are deleted when a variable or list column no longer contains the reference. Therefore calls to $deleteref are not required unless you want to release memory sooner than would otherwise occur under the automatic process. Object reference variables are no longer valid after the task that created the variable closes.
Binary
The binary type can store structured data of unlimited length up to your maximum available memory. Omnis does not know anything about the format and structure of the data in a binary column or field. In this type of column or field you could place, for example, desktop publishing files, MIDI system exclusive files, CAD files, and so on. You could store the definition of an Omnis class in a binary field.
Binary data corresponds to binary large objects (BLOBs) on most database servers.
Item Reference
You can use a variable of type Item reference to store an alias or reference to an object in Omnis or in your library. You assign the notation for the object to the item reference variable using the Set reference command. You can use an item reference variable in calculations or expressions which saves you having to quote the full path to the object. You can also use an item reference variable with the Do command to return a reference to the object or instance created by the command.
Field reference
You can pass a reference to a field using the field reference data type, available for parameter variables only. A parameter variable with the field reference type must have a valid field in the calling method. Once the field reference parameter variable is set up, a reference to the parameter is the same as using the field whose name is passed.
Nulls and empty values
A variable or column of any data type can be NULL. This means the value is unknown or irrelevant, and that there is therefore no way to operate on the column value. A null value is distinguishable from an empty value, which represents empty or uninitialized data.
When defining a file class, you can specify that a field Can Be Null or Cannot Be Null. This controls the handling of rows written to Omnis data files only and is irrelevant for client/server data, since it doesn’t prevent fields from getting null values in Omnis calculations. Null data from a SQL database corresponds to null values in Omnis fields and variables, and null values are sent to a server database as SQL nulls.
You can use the hash variable #NULL to represent null values in calculations. For example, to set a variable to null:
Calculate LV_Variable as #NULL
The result of arithmetic, comparison, and logical operators on null data is always null. With string functions such as con() and jst(), however, Omnis translates null to empty. The isnull() function returns kTrue if the value is null and kFalse if not.
When you use an Omnis sort on columns or variables with nulls, Omnis sorts the nulls first and separately from the empty values (or, for a descending sort, last). In a sorted report the nulls come first and do generate a break.
When exporting records in a text format, null values export as an unquoted string NULL, unless a particular format doesn’t support nulls. In this case, Omnis translates the null to empty. Occurrences of this unquoted string in an import file import as nulls.
NULL values sent to the JS Client
NULL values are retained when sent to the JavaScript Client. In revisions of Omnis Studio prior to 39291, the Omnis server converted NULL values of several data types to Empty or 0 when sending variables to the client.
You can further structure the display of Character, Number, Date, and Boolean data using Masked Entry (window class) fields and the $formatmode and $formatstring properties.
Current Record Buffer
The Current Record Buffer, or CRB, is an area of RAM, that Omnis uses to hold your current data. For example, if you are accessing a number of file classes or a SQL view, the CRB holds the current record or data for those files or view.
Schema Classes
A schema class is a type of data class that represents a table or view on your server database. A schema class contains the name of the server table or view on your server, and a list of column names and Omnis data types that map directly to the columns in your server table or view. The Omnis data types defined in a schema class should map to the equivalent server types, and the column names must conform to any conventions about case used by the server. For example, if the server column names are case sensitive, the column names in your schema class must be in the correct case.
Schema classes do not contain methods, and you cannot create instances of them. You can however use a schema class as the definition for an Omnis list using the $definefromsqlclass() method, which lets you process your server data using the SQL methods against your list.
To create a new schema class
Select your library in the Studio Browser
Click on the New Class option, then click on the Schema option
Name the new class and press Return
To edit the class, double-click the class in the Studio Browser
The schema editor lets you enter the name of the server table or view and the column definitions You can move from column to column in the editor either using the Tab key, by clicking in the column, or with the keyboard Up and Down arrows.
Having created a schema (or query) class, you can use the SQL Form Wizard to create a SQL form based on the class to view and enter data into your server database.
Creating a schema class automatically
You can create a new schema class from scratch, as described above, or you can create one based on a server table on your SQL database. To do this:
This process creates a schema class that maps to your server table (or view) automatically, and ensures that the data classes in your Omnis library map to the data on your server exactly. You can then use the SQL Form Wizard (described in the UI wizard section) to create a form based on the automatically generated schema class. This is covered in the Tutorial in the Making a Schema section.
Query Classes
A query class is a type of data class that lets you combine one or more schema classes or individual columns from one or more schemas, to give you an application view of your server database. A query class contains references to schema classes or individual schema columns.
Query classes do not contain methods, and you cannot create instances of them. You can however use a query class as the definition for an Omnis list using the $definefromsqlclass() method, which lets you process your server data using the SQL methods against your list.
To create a new query class
Select your library in the Studio Browser
Click on the New Class option, then click on the Query option
Name the new class and press Return
To edit the class, double-click the class in the Studio Browser
Enter the names of the schema classes or schema columns
When you open the query class editor the Catalog pops up which lets you double-click on schema class or column names to enter them into the query editor. Alternatively, you can drag schema class or column names into the query editor. Furthermore, you can reorder columns by dragging and dropping in the fixed-left column of the query editor, and you can drag columns from one query class onto another. You can also drag a column from the schema editor to the query editor.
Table Classes
A table class provides the interface to the data modeled by a schema or query class. When you create a list based on a schema or query class, a table instance is created automatically which contains the default SQL methods. You should only need to create a table class when you want to override the default methods in a table instance, or you want to add methods to a table. A table class contains the name of the schema or query class it uses, and your own custom methods that override or add to the default table instance methods.
To create a new table class
Select your library in the Studio Browser
Click on the New Class option, then click on the Table option
Name the new class and double-click on it to edit it
You add methods to a table class in the Method Editor, and change its properties in the Property Manager. To associate a table class with a schema or query class, you need to set its $sqlclassname property to the name of a schema or query class.
Like Schema and Table classes, you can use a table class as the definition for an Omnis list using the $definefromsqlclass() method, which lets you process your server data using the methods you added to the table class. See the Omnis Programming manual for further details about the SQL lists and their methods.
Exporting Libraries to JSON
The ability to export and import Omnis libraries in JSON format allows you to use a third-party version control system, such as GIT or SVN, in order to manage Omnis application (library) source code. This will allow efficient and secure application development in a team of Omnis developers, as well as the sharing of Omnis libraries and third-party tools among members of the Omnis community: we have a repository on GitHub containing many example libraries: https://github.com/OmnisStudio
You can export an Omnis library to a directory tree containing several text files in JSON format representing your library. Additionally, you can import an Omnis library from a JSON tree previously exported from Omnis. Exporting and Importing libraries is done in the Studio Browser, but there are several methods you can use to create your own library export and import tools.
Note the options to import or export a library from or to JSON are not available in some editions.
If you are using GIT to store your JSON files, all 'end of line' (eol) characters in .omh files need to be converted to 'carriage return linefeeds' (crlf), to avoid errors when importing the files. Therefore, you should create a .gitattributes file in the root of your GIT repo, and add the following line to it, to configure the line feeds:
*.omh text eol=crlf
Exporting Libraries
To export a library to JSON, you need to select the library under the main Libraries option in the Studio Browser. After selecting the library, the Export Lib to JSON option will be visible in the library options, allowing you to export the library to JSON. (After you have exported a library to JSON, the Update and Rebuild options will appear in the Studio Browser.)
If you have multiple libraries open in the Studio Browser, the Export, Update and Rebuild options will apply to the currently selected library. In addition, different libraries will be exported to different JSON trees, under the export folder.
Export Lib to JSON
The Export Lib to JSON option exports the currently selected library to a new JSON tree. The location of the export folder defaults to ‘exports’ in the main Omnis tree, and the export process automatically creates and names a sub-directory in the export folder using the name of your library.
You can export multiple libraries to JSON by selecting the Libraries node in the Studio Browser tree and selecting one or more libraries in the Library pane (on the right). The ‘Export to JSON’ option will appear allowing you to export the selected library/libraries.
The old Web Client plugin or iOS client remote forms are not exported (or imported). In addition, #PASSWORDS or the old system table classes such as #MAWFONTS are not exported (or imported).
Update JSON tree
The Update JSON tree option exports the library to its associated JSON tree, which in effect will update any classes or methods that have changed, or add any new classes in your library. You should be aware that the update process deletes the existing JSON tree, and replaces it with a completely new JSON tree built from the updated library.
The update process first checks for any conflicts and reports these if any are found. For example, Omnis will report an error if a JSON file or folder is missing or has been renamed. You need to rectify these errors before you can update, or you can ignore the conflicts in the error log window and proceed with the update.
The conflict detection process uses the modify date of each file in the JSON tree for the class, so if a date has changed a conflict will still be reported even if the file contents have not changed.
Rebuild from JSON
The Rebuild from JSON option archives the current library open in the Studio Browser to the ‘archives’ folder and replaces it with a new library built from the associated JSON tree.
Each time you use the Rebuild option, Omnis places a new copy of the current library in the archives folder and appends a number to the name of the library. The last version of the library in the archive folder is then used during the restore process as the most recent archive.
Once the Rebuild option has been run, the Restore Library option appears.
Restore Library
The Restore Library option overwrites the current library in the Studio Browser with the previously archived version.
Library and JSON mapping
The Studio Browser maintains a log of which library maps to which JSON folder, which is essential when working with multiple libraries. A file called ‘exports.json’ is created in the ‘studio’ folder that contains the mapping for all your exported libraries, so for each library there is a record of the name and path of the Omnis library file, the name and path of its associated JSON folder, and the path of the archived library, if it exists: note the name of the most recent archive library is used.
Importing Libraries
You can import a library into the Studio Browser from an existing JSON tree that was previously exported from Omnis Studio using the Export Lib to JSON option. For example, you could check out an Omnis JSON tree from a third-party VCS, such as GIT or SVN, and import it into Omnis to start a new project. For example, you can get sample Omnis libraries in JSON format from our GitHub repository at: https://github.com/OmnisStudio
Note you cannot open a library from a JSON tree using the standard Open Library option in the Studio Browser (which can only open a .LBS file). You have to import a JSON tree first to create the library before it can be opened in the Studio Browser.
New Library from JSON
To import a library from a JSON tree, you need to select the Libraries node in the Studio Browser and click on the Create Library from JSON option.
The Create Library from JSON option imports a JSON tree that was previously exported from Omnis and creates a new Omnis library file (.LBS); the import folder must already exist. When you have imported and created the new library, its classes will appear in the Studio Browser.
Directory and JSON File Structure
The following sections describe the JSON file & folder structure of a library exported from Omnis Studio using the Export Lib to JSON option, which may help you understand how the exported JSON could be managed. Note that all text files exported from Omnis use UTF-8 encoding, including the .json and .omh files, and are formatted suitable for viewing in a text editor.
Libraries
An Omnis library is represented by a folder that contains the file called ‘library.json’: this folder has the same name as the library and is referred to as the ‘library folder’. library.json contains top-level information about the library, such as the library preferences and version number.
Within the library folder, there is a tree of class directories that represents the folder structure of the Omnis library. Each class in your library has its own directory, and if the class itself is an Omnis folder class, it contains sub-directories for the Omnis classes contained in that Omnis folder.
Classes
Each class directory has the same name as the class name (see the note on directory and file naming below). Every class directory contains a JSON file named ‘class.json’. This contains top-level information about the class, including:
File classes also have a file called ‘indexes.json’ within the class directory, if the file class defines any indexes.
Methods
If the class supports methods, the class directory also contains a JSON file named ‘methods.json’ provided that there are some class methods. methods.json contains an array of the class methods, where each entry contains various properties of the method and definitions for parameters and local variables.
There is a file in the class directory for each method defined in methods.json, named <method name>.omh (subject to the file naming rules below), that contains the method code. The ‘.omh’ file extension is proprietary to Omnis, but the file format is text like the other files.
LF (linefeed) characters in code are exported as Unicode private-use character 0x2fffe, to reduce issues with other tools (note CR characters are also mapped to 0x2ffff).
Objects
If the class can contain objects, then there are two different structures depending on the class type:
For file, query, schema and search classes, all objects and their properties etc. are in a single file called ‘objs.json’ in the class directory. objs.json contains an array of objects.
- For all other class types that can have objects, the class directory can have a number of sub-directories:
- objs
- bobjs
inheritedobjs
The ‘objs’ directory contains a sub-directory for each object in the class, where the directory name is the object name (subject to the directory naming rules below). Each object sub-directory contains a file named ‘object.json’ that contains object properties etc, and if the object has methods, there is an identical structure to that used for the class methods: a methods.json file, and <method name>.omh files.
The ‘bobjs’ directory is only present for window classes (JavaScript forms do not have background objects). It contains a sub-directory for each background object in the class, named using the object ident (subject to the directory naming rules below as older libraries can unfortunately contain objects with duplicate idents). Each background object sub-directory contains a file named object.json that contains object properties, etc.
The ‘inheritedobjs’ directory is only present for classes that support inheritance. It contains a sub-directory for each superclass object that either defines or overrides a method in the subclass. Each sub-directory contains methods.json and <method name>.omh files just like those used for class and object methods, representing the methods defined or overridden for the object.
Binary Data
There are various properties which require a binary representation in the JSON library representation. These are handled in two ways:
If Omnis recognises a PNG, e.g. in #ICONS or a report background picture, it outputs a PNG file to the tree, and the JSON contains the name of the PNG file.
Otherwise, Omnis outputs the BASE 64 encoding of the binary data to the JSON file.
Directory and File Naming
Where possible, directories and files are named using the Omnis name (class name, object name, object ident, or method name). However, there are some considerations:
Although it is not recommended for naming objects in Omnis, class and object names can contain characters that are not allowed in file system names, e.g. path separators for all platforms, ?, *. To cater for this, the JSON library representation escapes these characters as % followed by the 2 lower case hex characters that represent the escaped character. As a consequence, Omnis also escapes the % character.
Omnis libraries can contain classes where the names only differ by their case. In addition, they can contain objects with duplicate names. In these cases, the JSON library representation prefixes the name with the string %_<n>_ where <n> is an integer index (for objects this is the order value, and for classes this is a value starting at 1 and incremented for each class with the same case-insensitive name: note that Omnis always exports classes in ascending name order, meaning that the prefix for each class in a set of classes with the same case-insensitive name will be the same each time you export the classes, unless you add or remove a class with the same case-insensitive name).
Library Dependencies
Libraries can depend on other libraries. In many cases, the presence of the external library is not required for Omnis to successfully import or export the JSON library representation. However, there are three cases that affect tokenization, and as a consequence, mean the external library or libraries must be open when exporting or importing a library:
Design task. If the design task is in an external library, the external library must be open.
Superclass. If the superclass is in an external library, the external library must be open.
External file classes. If the code or tokenized properties use a variable in a file class in an external library, the external library must be open.
The export option detects the required external libraries in cases 1-3 above while it generates the JSON library representation. It adds an error to the error list when it encounters a reference to an external library that is not open, and returns kFalse. In addition, if the export succeeds, it adds an array to library.json named “includes”: this is an array of all required external libraries. The import library option will fail if any of the included libraries are not open.
External File classes & Tokenization
By default, Omnis tokenizes variables in external file classes using the file name and a field token. For development, you should use both file and field names (to avoid untokenization issues when the external library is not open), whereas for deployment it might be more desirable for performance to use both file and field tokens.
In Studio 8.0, the only control over these tokenization options is via the browser context menu Retokenize… option. For Studio 8.1, there are some new root preferences that you can use to control this:
$tokenizeexternalfilenames: If true, Omnis uses tokens rather than text when tokenizing external file names
$tokenizeexternalfieldnames: If true, Omnis uses tokens rather than text when tokenizing external field names
You can use these preferences when importing a library to control how the output library tokenizes variables in external file classes. The values of these preferences are stored in the “defaults” entry in config.json.
Export & Import JSON Notation
$exportjson
The $exportjson method can be used to export a library to a JSON tree.
- $root.$exportjson(rLib, cOutPath [,&lErrList, &lWarningList])
exports a JSON tree for the library and returns kTrue for success, or kFalse for failure. Parameters:
rLib is an item reference to the library to export.
cOutPath is the pathname of the directory into which $exportjson will generate the JSON for the library, or the pathname of a directory which already contains a previous JSON representation of library, and which $exportjson will update to reflect the current contents of the library.
lErrorList and lWarningList are lists that receive errors and warnings about the export process. $exportjson defines these lists, so there is no need to define or clear the parameters before calling $exportjson. See Error Messages
In the case of failure, lErrorList contains error reports, and subject to the Omnis preferences discussed later $exportjson may have cleaned up by removing any partially output JSON library representation before it returned.
In the case of success, lErrorList is empty. lWarningList may contain various warnings about the export process, such as duplicate object idents or object names.
In addition, certain errors or warnings contain a note that there is an entry in the Find and Replace log, which allows you to identify the problem. Errors in the Find and Replace log are drawn in the theme red color.
The error list and warning list each contain 3 columns:
class: Item reference to the class for which the error or warning is being reported.
errorcode: Unique integer error code for the error or warning.
errortext: Error text corresponding to the errorcode.
The $exportjson method displays a working message if it executes for more than a second, allowing you to cancel the export if required, in which case $exportjson returns kFalse and adds error 23433 to the error list.
If $exportjson is being used to overwrite an existing JSON library tree, and an error occurs during the export of a class, Omnis will mark the class.json file for the class in error by adding an “error” entry. This allows a subsequent export to recognise classes exported with an error, and automatically attempt to replace their content.
$importjson
The $importjson method allows you to import a JSON tree previously exported with $exportjson; the method creates an Omnis library file at the specified path.
- $root.$importjson(cJsonFolder, cLibPath [,&lErrorList, &lWarningList , bReplaceExisting])
imports a JSON library representation tree, and returns kTrue for success, and kFalse for failure. Parameters:
cJsonFolder The pathname of the JSON library representation directory. $importjson validates this by checking for the presence of library.json in this directory.
cLibPath The pathname of the new library file to be created from the input JSON library representation. This file must not already exist.
lErrorList and lWarningList are lists that receive errors and warnings about the import process. $importjson defines these lists, so there is no need to define or clear the parameters before calling $importjson. See Error Messages
bReplaceExisting allows you to replace an existing library, backing up the existing library; see below
In the case of failure, lErrorList contains error reports, and $importjson has deleted a partially created output library.
In the case of success, lErrorList is empty. lWarningList may contain various warnings about the import process, such as duplicate object idents or object names.
The error list and warning list each contain 4 columns:
pathname: The pathname of the file containing the problem.
errorcode: Unique integer error code for the error or warning.
errortext: Error text corresponding to the errorcode. If a method line cannot be parsed, the text causing the error is included in the error message.
lineno: For some errors, the line number (in the file with the specified pathname) where the error occurred.
The $importjson method displays a working message if it executes for more than a second, allowing you to cancel the import if required, in which case $importjson returns kFalse and adds error 23433 to the error list.
Note that $importjson ignores classes where the folder name ends in .conflict<n> (see later).
If bReplaceExisting is true (the default is kFalse), $importjson() closes the library if it is already open, backs it up to the import archives folder, and imports the library to replace the backed up version; if the import fails, $importjson() restores the original library from the archived copy. Omnis keeps the last 10 archived copies.
The archived copies are stored by default in the archives folder in the Omnis data folder. Each library has its own sub-folder in archives, named using the library name. You can override the archive folder by setting the archivefolder member of $prefs.$exportimportjsonoptions Omnis preference.
$comparejson
The $comparejson method checks the specified library against the JSON library tree stored at cOutPath, and returns wChangesRow to indicate what will occur when $exportjson runs. The method behaves identically to $exportjson, except that it builds wChangesRow.
- $root.$comparejson(rLib, cOutPath, &wChangesRow[, &lErrList, &lWarningList]) checks the specified library against the JSON library tree; returns kTrue for success.
For success (kTrue returned), wChangesRow has 4 columns, and each column is a 2 column list, where column 1 is the class name and column 2 is the path to the class representation in the JSON library tree. The columns in wChangesRow are:
new Each entry in the list identifies a new class, that is, a class that will be exported because it is in the library, but not the JSON library tree.
delete Each entry in the list identifies a class that will be deleted from the JSON library tree, because either it is no longer present in the library or it has been moved to a different folder in the library. NOTE: If a folder is to be deleted, there will not be delete entries for its content (which is implicitly deleted).
replace Each entry in the list identifies a class which has changed in the library since the last JSON import or export of the class.
conflict Each entry in the list identifies a class which has possibly been changed in the library, but more importantly, the copy of the class in the JSON library tree has definitely changed since the last JSON import or export of the class.
The $comparejson method provides you with some information before overwriting the contents of an existing JSON library tree.
There are two conditions which will cause Omnis to arbitrarily overwrite a class during export:
The method text file extension has been changed (see the section on Omnis preferences).
The copy of the class in the JSON library tree is marked to indicate that an error occurred during a previous export.
Export & Import JSON Preferences
The $exportimportjsonoptions root preference (a row containing parameters) affects the behavior of the $exportjson(), $importjson(), and $comparejson() methods; the settings are also stored in the ‘exportimportjsonoptions’ group in config.json. The parameters are:
hideexportworkingmessage
If true, the working message is hidden for $exportjson and $comparejson.
hideimportworkingmessage
If true, the working message is hidden for $importjson.
deleteexportoutputtreeifcancelled
If true, $exportjson deletes a partially exported output tree, if the export is cancelled by the user.
exportoverwritesconflicts
If true, $exportjson replaces conflicts when overwriting an existing tree (conflicts are ignored when the method text file extension has changed, or class.json contains the error marker - in other words, in these cases, the class is always replaced). If false, $exportjson does not replace the folder for a conflicting class, and before it exports the class, renames the folder for the class to be of the form name.conflict<n> where <n> is an optional integer added if the .conflict folder already exists from a previous export; this makes both the original JSON and the new JSON available in the library tree.
importtreatsunknownpropertyaswarning
specifies whether or not unknown properties in imported JSON are treated as a warning.
exportcodefoldingstate
controls whether or not the code-folding state in methods in your library is exported; the option is set to false by default so the code folding state is not exported.
includenotationinide
Specifies whether the notation methods $comparejson(), $exportjson() and $importjson() are present in the IDE property manager tables. This also controls whether these notation methods appear in the code assistant.
- fullexportimport
When true, all library information is included in the JSON export. If set to false, Omnis does not export certain information which is not required to represent the library, including 'internalversion', 'omnisbuild' and 'moddate'.
Note: A library exported with fullexportimport set to false can only be imported if fullexportimport is set to false.
- fullexportimport
When true, all library information is included in the JSON export. If set to false, Omnis does not export certain information which is not required to represent the library, including 'internalversion', 'omnisbuild' and 'moddate', as well as various VCS-related properties including $vcsbuilddate, $vcsbuildersname, $vcsbuildnotes, $vcsrevision, $showascheckedout.
Note: A library exported with fullexportimport set to false can only be imported if fullexportimport is set to false.
The 'order' member for methods or variables is only exported to JSON if the 'fullexportimport' option in $exportimportjsonoptions is true.
This may result in a change to the JSON on the first export after upgrading to this revision, such as a re-ordering of the methods and variable definitions within the JSON array.
Exporting with the 'fullexportimport' option set to false (strongly advised for use with Git) means you will not be able to import the JSON in earlier revisions of Studio.
Regardless of the value of 'fullexportimport', the 'order' member of methods and variables is ignored on import.
You are advised to run a full export of the library after upgrading to this revision (or above) and committing all of the automatic changes in one commit. To force a full export, you can use the following code to re-save all classes in a library:
Do $libs.[iLibName].$classes.$makelist($ref) Returns lClassList
For lClassList.$line from 1 to lClassList.$linecount step 1
    Set reference lRef to lClassList.C1
    Calculate lRef.$classdata as lRef.$classdata
    Save class [iLibName].[lRef.$name]
End For
When the library property $compatiblejsonexport is set to true, the export will include the now unnecessary members in JSON library exports (e.g. the 'order' member for methods or variables), to allow them to be imported in older revisions of Omnis Studio. When false, smaller JSON exports are created.
Exporting Method Bookmarks
When exporting a library to JSON, the method bookmarks are exported. However, the bookmarks system table #BOOKMARKS is not exported. In this case, bookmarks are exported as part of the method, and when importing the library from JSON, the bookmarks table is rebuilt.
Error Messages
The following error messages may be returned by the export & import JSON methods.
| 23428 |
Property in input JSON is only allowed in custom styles:$ |
| 23429 |
Bad fieldname in object $ |
| 23430 |
Import requires external library to be open: $ |
| 23431 |
Export requires external library to be open: |
| 23432 |
JSON import and export must be executed on the main thread |
| 23433 |
Operation cancelled by user |
| 23434 |
Invalid class type: |
| 23435 |
Image file is not a PNG |
| 23436 |
Error reading PNG file: $ |
| 23437 |
Error opening PNG file: $ |
| 23438 |
Error reading method text file |
| 23439 |
Error opening method text file |
| 23440 |
Internal error: invalid path: |
| 23441 |
Superclass is missing: |
| 23442 |
Error creating class: |
| 23443 |
External class must be available before the library can be imported: |
| 23444 |
File does not exist |
| 23445 |
Error creating output library: |
| 23446 |
Output library path is invalid |
| 23447 |
Output library already exists |
| 23448 |
library.json does not exist in the input JSON folder |
| 23449 |
Error creating directory: |
| 23450 |
Error writing output file: |
| 23451 |
Cannot export class because it is protected |
| 23452 |
Cannot export class because its superclass '$' is not available |
| 23453 |
Cannot export class because its design task '$' is not available |
| 23454 |
Added external library dependency for library that masks the export library $defaultname: |
| 23455 |
Parameter 2 of $exportjson() must be the pathname of an existing folder |
| 23456 |
Parameter 1 of $exportjson() must be an item reference to a library |
| 23457 |
See find and replace log: |
| 23458 |
Object number $ (ident $) has a duplicate name: $ |
| 23459 |
Input JSON folder does not exist |
| 23460 |
Object number $ has a duplicate ident: $ |
| 23461 |
Internal error: property definition does not contain data source for property:$ |
| 23462 |
Internal error: Invalid field number when accessing fields CRB:$ |
| 23463 |
Internal error: Unable to access CRB for object:$ |
| 23464 |
Internal error: no CRB for property:$ |
| 23465 |
Internal error: invalid property data type:$ |
| 23466 |
Cannot export or import custom style because the property cannot be found:$ |
| 23467 |
Internal error: cannot extend field list |
| 23468 |
Internal error: Error extracting multi-value property when generating JSON property definition |
| 23469 |
Internal error: cannot get list for multi-value properties |
| 23470 |
See find and replace log: Invalid method line - tokenizing and untokenizing the method line does not result in the same text: |
| 23471 |
Error setting up new imported object: |
| 23472 |
Cannot export or import custom style because the object cannot be found:$ |
| 23473 |
Invalid property: $ |
| 23474 |
Internal error: Unknown property in library information property definitions:$ |
| 23475 |
Internal error: Bad format table id:$ |
| 23476 |
Internal error: Invalid attribute passed to getExporterValue() or setImporterValue():$ |
| 23477 |
Internal error: Cannot create temporary complex grid object |
| 23478 |
Internal error: Invalid external component set property:$ |
| 23479 |
Cannot obtain object definition for field: $ |
| 23480 |
Cannot create output directory: $ |
| 23481 |
Invalid user tool type value encountered when exporting toolbar object:$ |
| 23483 |
Internal error:External component has no data block:$ |
| 23484 |
Internal error:Invalid row:$ |
| 23485 |
Error parsing responsive position information: |
| 23486 |
Cannot export remote form $. Only JavaScript client remote forms can be exported to JSON |
| 23487 |
Imported object with a duplicate ident: $ |
| 23488 |
Imported object with a duplicate name: $ |
| 23489 |
Discarded inline comment ($) as Omnis cannot tokenize Sta: command with inline comment appended using libConverterAddsInlineCommentToStaCommandParameter from config.json |
| 23490 |
Member missing: |
| 23491 |
Row has no content: |
| 23492 |
Cannot obtain row: |
| 23493 |
Unknown property in input JSON:$ |
| 23494 |
Cannot import table from JSON:$ |
| 23495 |
Invalid type for property $ (expected Boolean) |
| 23496 |
Invalid non-primitive data for property $ |
| 23497 |
Object has invalid member count: |
| 23498 |
Invalid type (expected Character): |
| 23499 |
Invalid constant for $ |
| 23500 |
Invalid date for $ |
| 23501 |
Invalid type for $ (expected Integer) |
| 23502 |
Value is too long for property $ |
| 23503 |
Invalid value for property $ |
| 23504 |
Integer value of property $ is outside valid range |
| 23505 |
Invalid constant: |
| 23506 |
Class type in JSON does not match destination class type |
| 23507 |
Error creating temporary class: $ |
| 23508 |
Error getting imported class data: $ |
| 23509 |
Error setting imported class data: $ |
| 23510 |
Error creating record definition or list: $ |
| 23511 |
Internal error:cannot obtain member name for record definition for file $ |
| 23512 |
Column of array is not defined as expected: |
| 23513 |
Invalid or missing integer value: |
| 23514 |
Invalid or missing constant value: $ |
| 23515 |
Invalid record definition entry: |
| 23516 |
Missing parameter number for parameter: |
| 23517 |
Object name is empty |
| 23518 |
Non-primitive value must be stored as an object: |
| 23519 |
Unable to allocate method number for imported method $ |
| 23520 |
Error setting method name: |
| 23521 |
Error setting operation id: |
| 23522 |
Error setting method text: |
| 23523 |
Error storing method in class: |
| 23524 |
Duplicate object name: |
| 23525 |
Invalid or missing Boolean value: |
| 23526 |
Could not add file class object: |
| 23527 |
User constants or file class entry already used when importing: |
| 23528 |
Could not add file class index: |
| 23529 |
Could not set file connection: |
| 23530 |
Could not find index part name: |
| 23531 |
Could not find object type: |
| 23532 |
Could not find section type: |
| 23533 |
Invalid object type: |
| 23534 |
Invalid section type: |
| 23535 |
Invalid screen size: |
| 23536 |
Invalid layout breakpoint: |
| 23537 |
Unable to resolve search object name: |
| 23538 |
Error tokenizing calculation: |
| 23539 |
Invalid or missing calculation value: |
| 23540 |
Invalid order value for object |
| 23541 |
Error saving system table: $ |
| 23542 |
Invalid number of hotspots: |
| 23543 |
Custom property entry count does not match custom property value count: |
| 23544 |
Invalid or missing character value: |
| 23545 |
Cannot find field name: |
| 23546 |
Error setting page setup item: |
| 23547 |
Could not locate constant value for property: |
| 23548 |
Value not stored as an object: |
| 23549 |
Cannot find column: $ |
| 23550 |
Invalid events: |
| 23551 |
Object does not support events: |
| 23552 |
Value out of range: |
| 23553 |
Invalid property value: |
| 23554 |
Custom property name does not match: |
| 23555 |
Error setting shortcut value: |
| 23556 |
Cannot resolve parent folder name: |
| 23557 |
Error importing date: |