Chapter 3—Omnis Programming
Omnis Studio has a powerful programming environment that lets you create almost any type of enterprise or web application. The Omnis programming environment contains hundreds of 4GL commands and functions, as well as a low-level scripting language, called Omnis Notation, that allows you to manipulate objects dynamically in a web browser, on a phone, or an end user’s desktop computer. To program in Omnis, you must consider the following things:
Variables
variables are the principal data container in Omnis: most objects in Omnis can contain variables, but their scope and the kind of data they can contain depends on the type of variable: you can use the method editor to add variables to an object: the definition and dynamic manipulation of variables is at the heart of programming in Omnis Studio.
Methods
methods are pieces of Omnis code contained within the objects in your application, each performing a particular operation specific to the object or the application as a whole: creating and modifying methods in your library is key to creating the UI and business logic in your application.
Events
almost all user actions in Omnis generate an event: when an event occurs a message is sent to the object in which the event occurred: you can write methods behind the objects in your library to handle the events.
Tasks
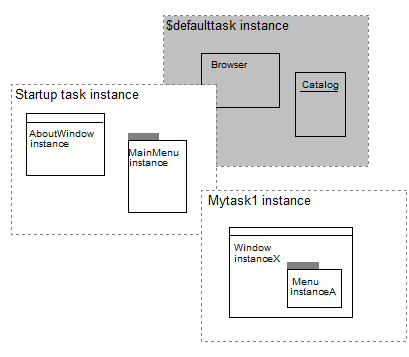
when your application runs in Omnis many object instances are created, such as web forms, reports, and data objects: these instances are opened and handled within a task. Omnis creates a default task for web & desktop apps, but you can create your own tasks that allow you to handle the objects in your application.
All the above topics are covered in this chapter. You create and modify methods in Omnis using the Method Editor and Omnis code is written in the Code Editor.
Variables
Variables can hold different types of data and are visible in different parts of your application depending on their data type and scope. For example, if you create a variable of list data type in a remote form, the list variable and hence its data is visible within the remote form and all its instances, but is not accessible elsewhere in your library. The Data Types available in Omnis are described in detail in the Libraries and Classes chapter.
Declaration and Scope
A variable may be global, accessible from all parts of your application, or it may have its scope restricted to certain areas so that it cannot be referred to from elsewhere. By declaring variables in the proper scope, you limit the potential for arbitrary connections across your application and thus reduce the potential for error and the complexity of your application.
The following table lists the different kinds of variables and their scope. It also shows when they are initialized and destroyed.
| Parameter |
on calling the method |
returning to the calling method |
the recipient method |
| Local |
on running the method |
on terminating a method |
the method |
| Instance |
on opening an instance |
on closing the instance |
a single instance of a class |
| Class |
on opening a library |
on clearing class variables or closing a library |
the class, and all instances of the class |
| Task |
on opening an instance of the task |
on closing the task instance |
the task, and all its classes and instances |
| Hash |
on starting Omnis |
on quitting Omnis |
global |
Apart from hash variables which are permanently built into Omnis, you must create all variables with the appropriate type and scope in the objects in your library using the method editor. After you have declared them, variables that are in scope are listed in the Catalog, or in the Code Assistant in the Method Editor. You can remove a variable using the Delete Variable option in the variable pane context menu. Declared variables are removed from memory when they are destroyed.
Parameter Variables
You can use a parameter variable to receive a value in a method, for example, a value that has been passed to the method using the Do method. You would normally do something with the value in the method and possibly return a new value. Parameter variables are visible within the called or recipient method only. They are initialized when the method is called, and cleared when the method returns to its caller.
Local Variables
Local variables are local to the method. You can refer to the variable within that method only. Local variables are initialized when the method begins execution, and are cleared automatically when the method terminates.
Instance Variables
Instance variables are visible to the instance only, that is, all methods and objects in the instance. You can define an instance variable only for classes that can be opened or instantiated, that is, remote forms, remote tasks, tasks, tables, reports, and object classes, as well as External Objects (in desktop apps you can also instantiate window, menu, and toolbar classes). Note that you cannot declare instance variables in code classes. There is a set of the declared instance variables for each instance of a class: these are initialized when the instance is constructed (opened) and cleared when the instance is destructed (closed).
Class Variables
Class variables are visible within the class and all its instances. You can declare class variables for tasks, tables, reports, and code classes (in desktop apps you can add class variables to window, menu, and toolbar classes). Any object or method in the class can refer to a class variable, and all instances of the class also have access to the class variable.
Class variables are not automatically cleared from memory. You can remove them from memory by closing the library containing the class, or using the Clear class variables command.
Task Variables
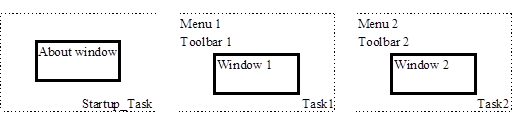
Task variables are visible within the task, all its design classes and instances. In practice, you can refer to a task variable from any method within any class or instance that belongs to the task. Omnis initializes task variables when you open the task: so for the Startup_Task this is when the library opens. Note that you cannot declare a task variable for a class until you have set the $designtaskname property for the class.
Hash Variables
Omnis has a built-in set of global variables, called hash variables since they start with the "#" symbol. You can view them in the Catalog (F9/Cmnd-9). Hash variables are global, unlike any other variables, so all libraries have access to them. The advantage of having global variables is that you can use these variables to pass data between libraries in an application. The disadvantage is that any data you place in hash variables remains there when you switch between libraries or combine libraries, with potentially unpredictable results.
Adding a Variable
You can add variables to a class or object in the Variable Pane of the Method Editor. If the variable pane is not visible you can show it using the View>>Show Variable Panes menu option on the Method Editor menu bar. Alternatively, you can add a new variable simply by typing its name in a line of code in the Code Editor and declaring the variable in the Create Variable dialog; see below.
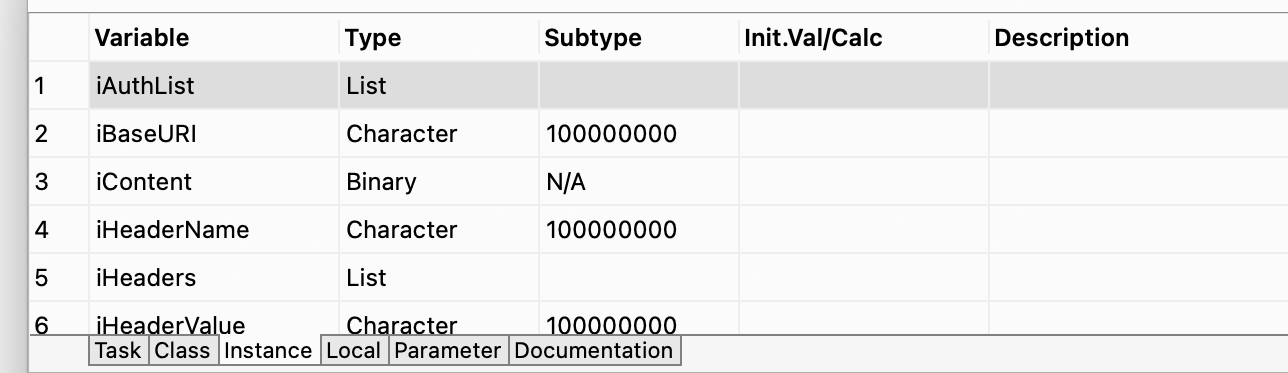
The tabs in the Variable Pane let you define Task, Class, Instance, Local and Parameter variables: note that the local and parameter tabs only appear after you have added or selected a method in the method editor. You can add up to 400 variables of each type to the current object, including 400 local and parameter variables for each method in the current object. The name, type, subtype, and initial value of each variable is listed in the variable pane. You can size the columns in the variable pane by sizing the column headers.
You cannot declare a task variable within a class until you have set the $designtaskname property for the class: see the section below on Adding Task Variables.
To add a new variable
The variable pane is at the top of the Method Editor window:
Choose the tab for the type of variable you require, for example, the Instance tab to create an instance variable
Click in the blank field under the Variable column header
Enter the name of the variable
or
Right-click in the variable pane to open the variable context menu
Choose Insert New Variable and click in the variable name to edit it, or type over the new variable name if it is selected (see Variable naming below)
Tab to the Type box and choose the type from the droplist using the mouse or arrow keys
or when the focus is in the Type box
- Type the first letter(s) of a data type to select it, for example, you can type “nu” to select the Number data type, or “b” for Boolean and “bi” for Binary type
For Number and Date Time variables
- Tab to the Subtype box and choose a subtype: again, you can type the first letter(s) of a subtype, for example, for Numbers you can type “L” to select the Long Integer subtype
For Object and Object Reference variables
Click on the dropdown list in the Subtype box to open the Select Object dialog
Open the External Objects node and choose the object for your variable; you can use the Search box to find an object in the list
You can enter an initial value or calculation for all types of variables. The initial value allowed for a variable depends on its type.
Variable Type
As well as scope, the data type you choose for a variable is critical to how it functions in your code and any calculations, The types available include Character, Number, Boolean, Picture, List, Row and Object, which are described in full under the Omnis Data Types section in the Libraries and Classes chapter.
Variable Naming
Variable names can be up to 255 characters long, although in practice you should keep them as short but descriptive as possible. When you name a variable you should prefix its name with one or more letters to indicate its scope. For example, parameters variables can begin with the letter “p”, local variables “lv” or just the letter “l”, instance variable “iv” or just the letter “i”, and so on. (You could use the variable prefixes described in the Creating Unrecognized Variables section.)
There are certain limits or restrictions on the characters you can use in a variable name. Each character in a variable name must either be a Unicode alpha character, a decimal digit, or a character in the range U+80 to U+ff inclusive. The first character cannot be a decimal digit. As with class names, you cannot use the following characters in variable names: . $ & ( ) [ ] and #. In addition, do not use spaces in variable names, however you can use _ (underscore) to separate words if necessary.
Duplicate names and Scope
To avoid all ambiguity between variables of different scope, you should not use duplicate names, and use a naming convention similar to the one described above. When two or more types of variable use the same variable name, a reference to that variable could be ambiguous. In a situation where more than one variable of the same name exists, Omnis automatically uses the variable with the smallest scope. Therefore, it is possible, though not good practice or recommended, to have local, class, and task variables called "MYNAME". As Omnis resolves ambiguity, a reference to MYNAME will refer to the local variable if it exists for the current method.
Adding Local and Parameter Variables
Local and parameter variables are inserted into the currently selected method. Therefore, to insert these variables for a particular method, you need to select the method before inserting local and parameter variables.
Parameter variables receive values from a calling method in the order that they appear in the variable pane. You can reorder parameter variables by dragging them into position in the variable pane. To do this, click and drag the fixed-left column or row number for a parameter variable in the list.
Normally you must declare all types of variable, including local variables, in the variable pane before you can use them in your code. However, you can declare a special type of local variable in your code without first declaring it in the method editor. To declare such a variable, prefix the variable name with %% to create a string variable, or prefix the variable name with % for a numeric variable of Floating point type. You can type such variable names directly into your code in the method editor, at which time their names are added to the Local variables pane.
Item Reference Classes
When creating an Item Reference variable, the variable subtype dialog (that allows you to enter the class for a variable) has two tabs at the bottom: Generic and Instance:
An item reference that uses a class in this way provides code assistance for both the built-in methods and properties of an instance of the class, as well as user methods for instances of the class.
In addition, there is an entry field that allows additional notation to be appended, e.g. $objs.objname (this field has code assistance; the additional notation must start with a $). For example, if you have a field named test in window class myWindow, you can enter $objs.test in the entry field, and select the window class from the tree. This results in an item reference class @myWindow.$objs.test. When using the variable, code assistance is for this field, so you get both the built-in methods and properties and the user methods for the field.
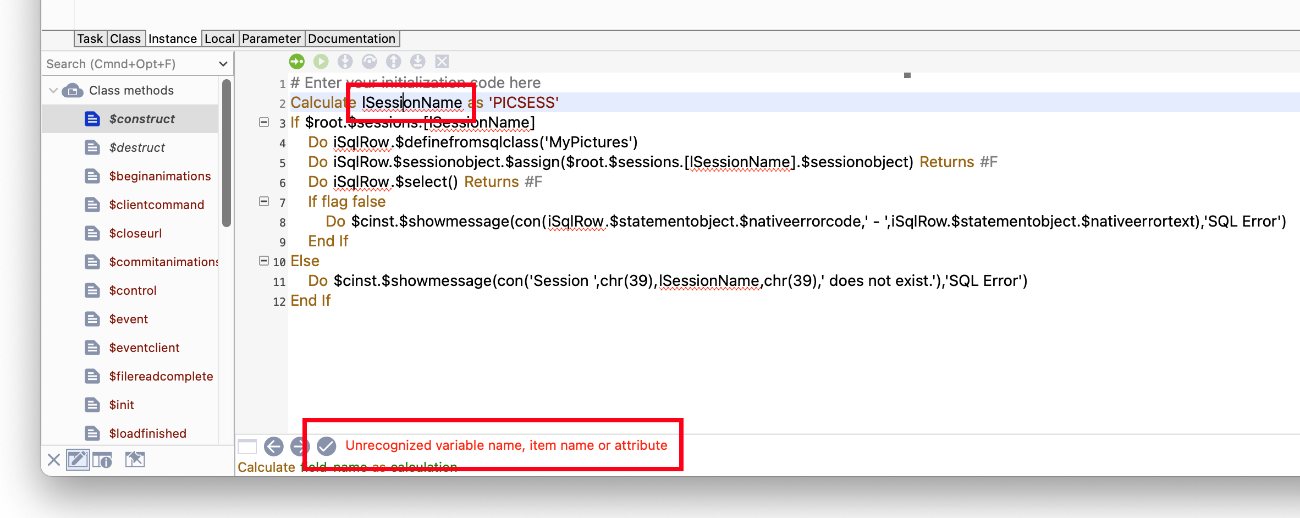
Creating Unrecognized Variables
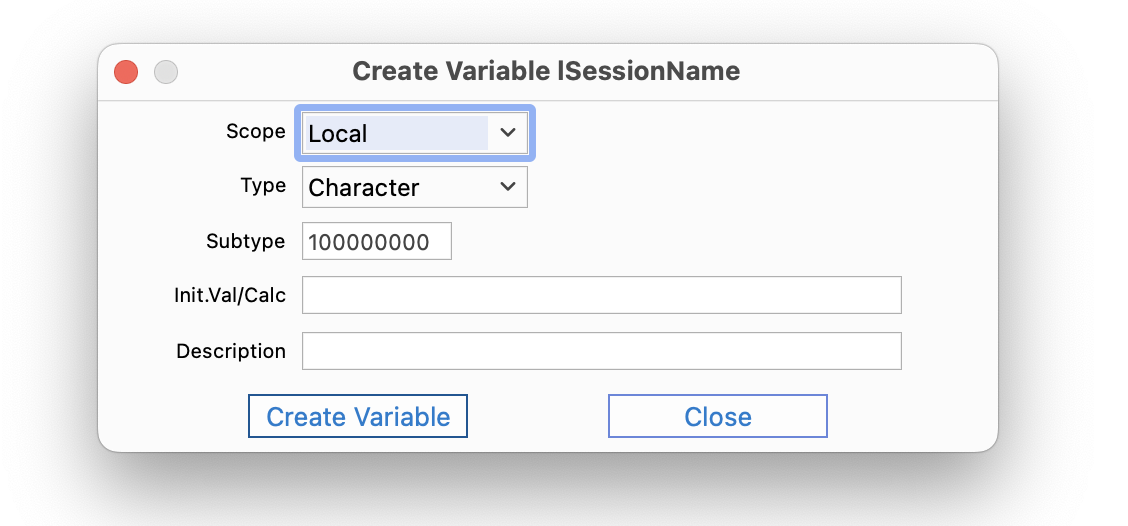
You can add a new variable simply by typing its name in a code line and declaring the variable in the Create Variable dialog. When you type the name of the new variable in your code, initially it will not be recognized and is marked as an error (red curly underline by default).
You can click on the Fix button (at the bottom of the Code Editor window, as above) to open the Create Variable dialog, allowing you to declare the new variable, including its scope, data type, subtype, initial value and description (Omnis will try to guess the scope and type based on the current context and variable name; see below about naming).
The unrecognized variable dialog can open when assigning a new or unknown variable name to a property in the Property Manager. In this case, for properties such as $dataname, the initial type of the variable creation dialog is set to the most likely data type for the control, e.g. List data type for a list form control. The dialog restricts the scope of the new variable to what makes sense based on class type, and so on.
The Create Variable dialog will open when Omnis encounters an unrecognized variable name, but you can disable this behavior if you set the "canUseCreateVariableOnVarNotFound" setting in the "ide" section of config.json to false (it is true by default).
Create Variable Prefixes
When you type the name of a new variable in your code, you can specify the initial scope for the variable using a predefined prefix; in this case, the Create Variable dialog will select the scope automatically. For example, you can begin the variable name with “i” to create an instance variable, or “p” to create a parameter. The default variable prefixes are:
| i |
Instance |
| c |
Class |
| p |
Parameter |
| l |
Local |
| t |
Task |
The prefixes allowed in the Create Variable dialog can be configured in the Omnis configuration file (config.json) using the entry called “createVariableScopePrefixes” located in the ‘codeAssistant’ section in config.json:
"createVariableScopePrefixes": [

  "i:Instance",

  "c:Class:",

  "p:Parameter",

  "l:Local",

"t:Task"

],
The Create Variable dialog processes these entries in array order, and as soon as it finds a scope that is allowed for the method being edited (e.g. instance variables are only allowed for class types that have instances), where the first part of the entry value case insensitively matches the start of the variable name, it uses the configured scope (the second part of the entry value after the colon) to set the initial scope suggested by the dialog. If no prefix match occurs, the scope suggested is local.
Create Variable Suffixes
As well as setting the scope of a variable, using a prefix, you can specify the data type of a variable using one of a set of predefined suffixes. For example, you could enter the name “iDataRow” which would create an instance variable of type Row, or typing “iDataList” would create a list, and typing “iVarRef” would create an item reference. The default variable suffixes are:
| Row |
Row variable (kRow) |
| List |
List variable (kList) |
| Ref |
Item reference variable (kItemref) |
| Date |
Date variable (kDate) |
| Obj |
Object variable (kObject) |
| Bin |
Binary variable (kBinary) |
The suffixes allowed in the Create Variable dialog can be configured in the Omnis configuration file (config.json) using the entry called “createVariableTypeSuffixes” located in the ‘codeAssistant’ section in config.json:
"createVariableTypeSuffixes": [

  "Row:kRow",

  "List:kList",

  "Ref:kItemref",

  "Date:kDate",

  "Obj:kObject",

  "Bin:kBinary"

],
Omnis strips any consecutive digits from the end of the desired variable name, and then compares (case independently) the end of the resulting name string against the suffixes in the config.json array (strings before the colon in each array entry). If there is a match, and if the variable type is suitable (e.g. it is not a non-client executed type when creating a variable for a client-executed method), then the initial type is set using the type constant after the colon.
Deleting Unused Variables
The context menu of the Variable pane has the option Delete Unused Variables…, available by Right-clicking on the variable pane away from a variable line. When selected, it opens a dialog from which you can select variables to delete. The dialog displays the variables of the current type displayed in the variable pane, which are potentially unused. This means the variables could still be in use, for example, they could still be used in subclasses or notation.
Adding Task Variables
To add a task variable for a class you have to set its $designtaskname property. In most cases, the design task for a class is specified as the Startup_Task by default. You can change it using the Property Manager or the notation. The design task for a class is ignored at runtime.
To set up the design task for a class
Click on the class in the Browser
Display the Property Manager or bring it to the top (F6/cmnd-6)
Click on the droplist in the $designtaskname property to view the current tasks
The list of tasks will contain a Startup_Task, and any tasks you may have created.
- Select the design task by clicking on it
You will now be able to define task variables for this class.
You can change the scope of a variable at any time by dragging the variable from one variable pane to another. For example, you can change a class variable into an instance variable by dragging and dropping it onto the instance variable tab. Note you cannot change the scope of task variables.
Variable Initial Values
When you declare a variable in the variable pane of the method editor you can assign it an initial value. The first time a variable is referenced in a method, Omnis assigns the specified initial value to the variable. You can set the initial value to be a number, string, calculation, some notation, an Omnis constant, or another variable name. In the latter case, when you first use the variable it gets the value in the other variable, regardless of the order of declaration.
For class variables only, the Clear class variables command clears the current values in all class variables and resets them to their initial values.
You can set the initial value of parameter variables, which in effect gives them a default value, but when and if a value is received in the method the initial value is overridden. For example, you may want to assign an initial value of zero to a parameter value to avoid it being null if a value is not received.
For instance variables, the initial value is assigned when the instance is created, e.g. when a form is opened.
Initial Parameter Values
Any parameters that are omitted when you call a method are initialized using their initial value. This is the default behavior for new libraries. The library preference $clib.$prefs.$useoldparameterpassing controls this behavior. If true, an empty parameter that is not the last parameter is initialized to empty or zero, rather than its initial value in the called method parameter definition (this does not apply to client executed client methods in the JavaScript client). The library preference defaults to false in new libraries, and true in converted libraries to maintain backwards compatibility.
You can lookup and edit the value of any variable or constant in Omnis at any time using its context menu. You can Right-click on a variable name wherever it appears in Omnis to open its context menu and view its current value. The Variable context menu displays the variable name, its current value, which group of variables or class it belongs to, and its type and length. You can also perform various debugging functions from this menu as well.
If you select the first option in the Variable context menu, Omnis opens a variable window containing the current contents of the variable which you can edit. Note that you cannot edit binary variables.
You can pass the pointer over a variable or constant and a variable tooltip will pop up displaying the variable’s current value and description. Variable tooltips are available wherever variable names appear in Omnis including the method editor and Catalog. However, they are not available if Help tips are enabled for the tool containing the variable.
For some variable types, such as list or binary variables, the tip may say “not empty” which tells you the variable has a value, but it is too long to display.
The value of Boolean variables is shown when you hover over the variable. The "Show Empty Booleans" option in the Debugger Options menu in the Code Editor controls whether empty Booleans are shown as Empty or No/False; the default is on, meaning that unset Booleans are shown as empty.
Variable panel
The Variable panel is displayed in the lower-right section of the Method Editor and allows you to view and modify variables while debugging or stepping through your code. This is described in more detail in the Debugging Methods chapter.
Viewing Variables in the Catalog
You can view the variables in your library and the current class using the Catalog (press F9/Cmnd-9 to open it). The Variables pane shows all the Task, Class, and Instance variables for the current class, plus all Local and Parameter variables for the currently selected method. Following the Event Parameters group, the Catalog also lists any file classes in your library. You can enter the name of any variable that appears in the Catalog into your code either by double-clicking on the name in the Catalog (assuming the cursor is at a position that can accept input), or by dragging the variable name out of the Catalog into the method editor.
When you drag a variable from the Catalog, Omnis shows you what type of variable it is and its name. Note that you can also drag variables from the Catalog and drop them onto window and report classes to create a data field for the variable.
You can also drag a variable from the variable pane in the method editor to any calculation or entry field in the command palette. To drag a variable name you need to click and drag the fixed-left column or row number in the variable list.
Auto Fill Variable Option
When you want to enter a variable in the method editor command palette and you can’t remember its full name, you can type the first few characters of the variable, wait a short while for a list to appear, and choose the variable from the list that pops up. The list contains all the variables beginning with the characters you typed. The time it takes for the autofill option to work is set in the $notationhelptimer Omnis preference (the default is 1000 milliseconds).
Custom Variable Types
You can define your own custom variable types. To do this you have to create a custom method called $<customatttribute name>.$assign, and then the $type, $subtype and $sublen properties of the custom variable return their value according to the type of parameter 1 of $<customatttribute name>.$assign.
Comparing Variables
You can do comparisons in the Omnis language between binary variables, object variables and object reference variables, when both sides of the operator are the same type.
Binary comparisons compare the data byte by byte until there is a non-matching byte, in which case the first variable is greater than the second variable if the non-matching byte in the first variable is greater than that in the second variable. The comparison extends to the length of the shortest variable: if all bytes match, then the first variable is greater than the second if it is longer than the second, and vice versa.
Object comparisons compare the object instance – if the instance is the same, the variables are equal.
Methods
Omnis provides a complete 4GL programming language comprising over 400 commands, each command performing a specific function or operation. In addition, Omnis provides a means to manipulate the objects in your library called the notation: this accesses the standard properties and methods contained in the objects in your library. Method are added or updated in the Method Editor.
In previous versions of Omnis, the number of method lines was limited 1024, but this limit has been removed. However, although the number of method lines is theoretically unlimited, the maximum number of method lines is capped at 256,000 to maintain efficiency in your code.
Each method line can contain an Omnis command, or some notation, or often a combination of these: you can also add comments to method lines. For example, to open a window from a menu line you only need one command in your method, that is the Open window instance command, which as the name suggests opens an instance of a window. A method that connects you to a server database requires several commands executed in a particular order. You can perform most operations using the notation and the Do command. For example, you can open a window using the Do command and the $open() method.
For further details about specific commands and notation used throughout this chapter, see the Omnis Help (press F1 to open it), or the Omnis Reference manuals. When you start to program methods, you will need to use the debugger which is described in the Debugging Methods chapter.
Notation
Omnis structures its objects in an object tree, or hierarchical arrangement of objects and groups that contain other objects. The complete tree contains all the objects in Omnis itself, together with your design libraries, classes, and other objects created at runtime. You can view the complete object tree in the Notation Inspector.
The object at the base of the tree is called $root. The $libs group contains all the current open libraries and lets you access each library and its classes at design time. The classes and objects in each library are stored in their own separate groups: for example, the $remoteforms group contains all the remote form classes in a library. Most of the other groups directly under $root contain the objects created at runtime when you run your application: for example, the $iremoteforms group contains all the remote form instances currently open, or $iremotetasks contains all the remote task instances currently open.
When you want to reference a particular object, a class or instance perhaps, you must access the right branch of the object tree. For example, you must access the $remoteforms group to reference a remote form class. Whereas, to access a remote form instance, say an instance of the same remote form class, you must reference the remote form instance via the $iremoteforms group, which is contained directly under the $root object.
To facilitate a system of naming or referring to an object in the object tree, and its properties and methods, Omnis uses a system called the notation. The notation for an object is really the path to the object within the object tree. The full notation for an object is shown in the status bar of the Notation Inspector. You can use the notation to execute a method or to change the properties of an object, and you can use a notation string anywhere you need to reference a variable or field name.
In the notation all property and standard method names begin with a dollar sign “$”, and methods are further distinguished from properties by having parentheses after their name. Standard objects and group names also begin with a dollar sign. To write the full notation for an object you need to include each object and group in the path to the object, separating each object using “.” a dot. For example, to refer to a remote form class in a library you would use the following notation
$root.$libs.LIBRARYNAME.$remoteforms.RemoteFormName
This notation includes $root as the base object, the $libs group containing all the open libraries, the name of your library, the $remoteforms group containing all the remote form classes in your library, and lastly the name of the remote form itself. If you want to refer to a particular object in your remote form you need to add the $objs group and the name of the object
$root.$libs.LIBRARYNAME.$remoteforms.RemoteFormName.$objs.Objectname
In addition, there are a number of shortcuts that let you reference objects, without always referring right back to the $root object, and certain global objects that you can use to make your code more generic. These are described below.
Item References
To save you time and effort, and to make your code more efficient, you can create an alias or reference to an object which you can use in place of the full notation for the object. To do this, you create a variable of type item reference and use the Set reference command to assign the notation to the variable. The item reference variable can be of any scope, and the notation can be any valid Omnis notation for an object, a group, or even an object property. For example
Set reference WinRef to Libraryname.$windows.Windowname
Do WinRef.$forecolor.$assign(kBlue)
You can enter the notation for an object in the initial value field for the item reference variable. You can also find the full notation for an object in the Notation Inspector and drag it to the notation field when you enter the Set reference command.
You can also use an item reference variable to return a reference to a new object, when using methods to create a new class, instance, or object. Furthermore Omnis contains a special property called $ref which you can use to return an item reference to an object. Both these features are used in the section describing the Do command below.
Note that WinRef.$parentfolder, where WinRef is an item reference to a class, will return an item reference to the parent folder of the class and not the $ident value of the folder class containing the class which is usually the case.
Max Chain Depth
The maxChainDepth item in the ‘defaults’ section of config.json allows you to configure the maximum number of field or item references that Omnis will chain through in order to reach the referenced variable.
The default or minimum is 20, and in all but exceptional cases, you should leave this item set to 20. You can change it if you have a heavily recursive method that uses field reference parameters. Since the minimum value is 20, setting this to any value less than 20 results in Omnis using the value 20. The debugger field menu still only chains through up to 20 references.
Current Objects
Under $root, Omnis contains a number of global state variables that tell you about how Omnis is currently executing, or what objects, instances, and methods are currently being used. These objects provide a shortcut to the current object or instance that is currently executing. Mostly their names begin with “$c”, and they include
$cclass
the current class
$cdata
the current open data file
$cinst
the current instance: usually the instance containing the currently executing method
$cfield
the field where the current method is executing
$clib
the current library
$cmethod
the current executing method
$cobj
the current object within a class or instance
$cparmcount
the number of parameters that the caller has passed to the current method
$crecipient
the current recipient of an event: if a custom method is being processed, $crecipient is the recipient of that method
$ctarget
a reference to the target field, that is, the field which currently has the focus (shows the caret and is sent keyboard events)
$ctask
the current task: is usually the startup or default task until you open another task
$cwind
the current window instance
$topwind
the topmost open window instance
You can use the current objects in place of the full notation for a specific object to make the object and its code reusable and portable between libraries. For example, you can use $cinst in a method within a window instance to refer to itself, rather than referring to it by name
$cinst
$root.$iwindows.WindowInstanceName
You can refer to the current library using $clib. For example, to make the current library private use
Do $clib.$isprivate.$assign(kTrue)
Do $libs.MyLibrary.$isprivate.$assign(kTrue)
The Flag (#F)
Many of the Omnis commands set a Boolean Omnis variable called the flag, or #F, to true or false depending on the success of an operation. Other commands test the current value of the flag and branch accordingly. The Omnis Studio Help documents whether or not a command affects the flag. You can return the current status of the flag (#F) in client executed methods in the JavaScript Client using the flag() function.
Functions
There are over 350 functions available in Omnis to perform all types of operation and actions that you can include in your Omnis methods. For example, the sys() function returns information about the current system, such as the current printer name, the pathname of the current library, or the screen width or height in pixels. The group of String functions can be used to manipulate character data, such as the replace() function which replaces the first occurrence of a target string, within a source string, with a replacement string, and returns the resulting string. The functions that you can use in your methods are listed in the Omnis Function Reference, where they are listed in functional groups to show the full range and scope of the functions available in Omnis.
Commands
The following sections outline the more important commands or groups of commands in Omnis. The commands that you can use in your methods are listed in the Omnis Command Reference. Here the commands are listed in functional groups to show the full range and scope of the commands available in Omnis. For example, the Calculations... group contains the Calculate command that lets you do calculations and assign a value to a variable, and the Do command that lets you execute and modify objects using the notation. The Constructs... group contains programming constructs such as If...Else If, Repeat...Until, and For loops.
Custom Methods and Properties
You can add methods to the objects in your library and call them what you like; you execute these methods from within the class or instance using the Do method command.
You can also create your own properties and methods and execute them using the notation, as you would the standard properties and methods. These are called Custom Methods and Custom Properties, or collectively they are referred to as Custom Notation. Custom notation can only be executed at runtime, in an instance of the class (e.g. Do $cinst.$custommethodname), and applies either to the instance, or an object contained in the instance.
The name of a custom property or method is case-insensitive. It can be any name starting with the dollar “$” sign, except for the set of reserved names (reserved words) in the following table.
| $add |
| $assign |
| $canassign |
| $chaincount |
| $default |
| $findname |
| $ident |
| $isinherited |
| $makelist |
| $name |
| $ref |
| $serialize |
| $wind |
Any class that can be instantiated can contain custom notation, including remote form, report, table, and object classes (and window classes). In practice you can use custom notation to override the behavior of the standard notation, or to add your own properties and methods to an object.
With the exception of the names in the above table, if the name of a custom method (or property) is the same as a standard one, such as “$printrecord()”, it will override the standard one.
You create custom methods for an object in the method editor. You enter custom notation for a field in the Field Methods for the field, and for a class in the Class Methods for a class.
The code for a custom method must define the method parameters as you would for any other method, and then return the result of executing the method.
The code for a custom property typically comprises two methods. The first, called $propertyname returns the value of the property using the Quit method command. The second called $propertyname.$assign defines a single parameter, which is the new value to be assigned to the custom property; this method usually returns a Boolean value, which is true if the property was successfully assigned. Note that $canassign is always true for custom properties.
An instance of a class contains whatever custom methods and properties you define in the class, together with the properties and methods for that type of instance. The object group $attributes contains all the built-in and custom notation for an instance. You can use $first() and $next() against $attributes, but $add() and $remove() are not available.
You can reference custom notation using the notation "Notation.$xyz", where Notation is some notation for an instance of a class and “$xyz” is the name of your custom property or method. If you specify parameters, such as Notation.$xyz(p1,p2,p3), they are passed as parameters to the custom method, and a value may be returned.
You can use the Do default command within the code for a custom method or property, to execute the default behavior for a method or property with the same name as the custom notation. You can use the Do redirect command to redirect execution from custom notation in one instance to another instance containing custom notation with the same name.
To create a custom method
Open the Class or Field methods for a class
Right-click on the method names list, and select Insert New Method from the context menu
Enter a name for your custom method, including a dollar sign at the beginning of its name
Enter the code for the custom method as you would any other method
Userinfo property
File, window, report, menu, toolbar, schema, and query classes have the $userinfo property which you can use to store your own value. The Property Manager only allows you to assign to $userinfo if its current value is empty, null or has character or integer data type. The data stored in $userinfo can be of any other type but it must be assigned to the class at runtime using the $assign() method.
Using Custom Methods
The following example uses a task class containing a custom method called $printprinter(). You can call this method from anywhere inside the task instance using
Do $ctask.$printprinter()
The $printprinter() method sets the print destination and calls another class method depending on whether the user is accessing SQL or Omnis data; it contains the following code
Begin reversible block
Send to printer
Set report name REPORT1
End reversible block
If iIsSQL
Do method printSQLData
Else
Begin reversible block
Set search name QUERY1
End reversible block
Do method printOmnisData
End If
The next example uses a window that contains a pane field and a toolbar with three buttons. When the user clicks on a button, the appropriate pane is selected and various other changes are made. Each button has a $event() method that calls a custom method called $setpage() contained in the window class. Note that you can send parameters with the custom method call, as follows
Do $cwind.$setpage(2)
The $setpage() custom method contains a parameter variable called pPage, and has the following code
Switch pPage
Case 1
Do $cwind.$objs.MainPane.$currentpage.$assign(1)
Do $cwind.$title.$assign('Queries')
Case 2
Do $cwind.$objs.MainPane.$currentpage.$assign(2)
Do $cwind.$toolbars.$add('tbModify1')
Do $cwind.$title.$assign('Modifying')
Case 3
Do $cwind.$objs.MainPane.$currentpage.$assign(3)
Do $cwind.$menus.$add('MReports')
Do $cwind.$title.$assign('Reports')
Default
Quit method kFalse
End Switch
The final example uses a window containing a subwindow, which in turn contains a tree list. The subwindow contains a custom method called $buildtree() that builds and expands the tree list. You can call the $buildtree() method from the parent window and send it parameters, using the notation
Do $cwind.$objs.SubWin.$buildtree(lv_ClassList)
The $buildtree() method contains a parameter variable called pv_SourceList of List type that receives the list passed to it, and a reference variable called TreeRef set to the tree list field, and contains the following code
Do TreeRef.$setnodelist(kRelationalList,0,pv_SourceList)
Do TreeRef.$expand()
Do Command and Executing Methods
While you can use Calculate to change an object property or evaluate an expression, you can use the Do command for all expressions that execute some notation, including custom methods. In this respect, the Do command is the single-most powerful command in Omnis. You can use the Do command to set the value of a property, or to run any standard or custom method. The Do command has several variants which include
Do
sends a message to an object in your library, or assigns a value to an object property. Normally you should execute the Do command in the context of the current object or instance to execute one of its methods or assign to one of its properties. There are a number of common methods that you can use with the Do command including $open() to open an instance of a class, $assign() to change an object property, and so on
Do inherited
executes the inherited method for the current method
Do default
runs the default processing for a custom method
Do redirect
redirects method execution to a custom method with the same name as the current method contained elsewhere in your library
Do method
calls a method in the current class and returns a value
Do code method
runs a method in a code class and returns a value
Note that you can display a list of built-in methods for an object or object group by clicking on the object in the Notation Inspector and opening the Property Manager. The methods for an object are listed under the Methods tab in the Property Manager: to view all the methods of a class or object, ensure that the ‘Show All’ option in the Property Manager is enabled. See Omnis Studio Help for a complete list of methods for all the objects in Omnis. The Show Runtime Properties option in the Property Manager context menu lets you view properties that are normally available in runtime only, that is, properties of an instance rather than a design class. When runtime properties are visible in the Property Manager the methods for the instance are also shown. You cannot set runtime properties or use methods shown in the Property Manager, they are there as a convenient reference when you are writing code.
Do command
You can use the Do command in Omnis to do almost anything: execute some notation, evaluate an expression, and so on. Specifically, you can use it to execute a method for an object or assign a value to one of its properties. The Do command returns a value to indicate whether the operation was successful or not, or for some methods a reference to the object operated upon. This section shows you how you can use the Do command and introduces some of the most useful methods.
Calling Private Methods
The callprivate() function allows you to call a private method within the current class or instance and return a value. The syntax is:
Do callprivate(method[,parameters...]
The function can be called in client methods in the JavaScript Client.
$open() method
Using the Do command with the notation you can perform many operations that are otherwise performed with a command. For example, the class types that you can open contain an $open() method which you can execute using the Do command. For example, you can open a window using
Do $windows.WindowName.$open('InstanceName',kWindowCenter)
The $open() method returns a reference to the instance created. For example
Set reference WindRef to LIB1.$windows.WindowName
Do WindRef.$open('WindowInstance') Returns WindRef
Do WindRef.$forecolor.$assign(kBlue)
You can use a null value instead of an instance name: therefore CLASS.$open(‘’) would force Omnis to use the class name as the instance name. Alternatively, you can use an asterisk in place of the instance name and Omnis assigns a unique name to the instance, using the notation CLASSNAME_number. You can return the instance name in an item reference variable and use the reference in subsequent code. For example
Do $menus.MCUSTOMERS.$open('*') Returns iMenuRef
You can close an instance using the $close() method. For example, the following method opens a window instance, lets the user do something, and closes the instance
Do WindRef.$open('WindowInstance') Returns WindRef
Do WindRef.$close()
You can close the current window from inside the instance using
Do $cwind.$close()
Classes that contain the $open() methods also have the $openonce() method. This method opens an instance if one does not already exist (excluding window menus, window toolbars, and cascaded menus). In the case of a window, $openonce() brings the window to the top if it is already open. $openonce() returns an item reference to the new or existing instance, like $open().
$assign() method
You can change the properties of an object, including the properties of a library, class, or field, using the Do command and the $assign() method. The syntax for the $assign() method is Notation.Property.$assign(Value) where Notation is the notation for the object, Property is the property of the object you want to change, and Value is a value depending on the context of the object being changed. Usually you can use an Omnis constant to represent a preset value, and for boolean properties, such as preferences, you can use kTrue or kFalse to set the property as appropriate. For example
Do $clib.$prefs.$mouseevents.$assign(kTrue)
Do $cclass.$closebox.$assign(kTrue)
Do $cfield.$textcolor.$assign(kGreen)
$add() method
You can create a new object in your library using the $add() method. In the notation you are really adding a new object to a particular group of objects. For example, to create a new field on a window you need to add the object to the $objs group of objects for the window, as follows
Do $cwind.$objs.$add(kPushbutton,iTop,iLeft,iHeight,iWidth)
When using $add(), you can return a reference to the new object in a return field of type item reference. You can use the reference to change the properties of the new object. For example
Do $windows.$add('NewWindowName') Returns WindRef
Do WindRef.$style.$assign(kPalette)
Do WindRef.$title.$assign('Window title')
Do WindRef.$clickbehind.$assign(kTrue)
Do WindRef.$keepclicks.$assign(kFalse)
Do WindRef.$modelessdata.$assign(kTrue)
Do WindRef.$backcolor.$assign(kRed)
Do WindRef.$forecolor.$assign(kWhite)
Do WindRef.$backpattern.$assign(2)
$redraw() method
Note the $redraw() method is only relevant for fat client windows, not JavaScript Remote Forms which redraw content automatically.
When you change an object or several objects on an open window using the Do command, you often need to redraw the window. However if you change an object before $construct() completes execution for the window instance, you don’t need to redraw the window. You can redraw an object, window, or all open windows using the $redraw() method. For example
Do $cfield.$redraw()
Do $cwind.$redraw()
Do $root.$redraw()
The $redraw() method has three parameters that allow you to specify the extent of the redraw for window fields and/or background objects: the parameters are: $redraw(bSetcontents,bRefresh,bBackObjects) where bSetcontents defaults to true, bRefresh defaults to false, and bBackObjects defaults to false.
$root.$redraw(kTrue,kTrue)
$root.$redraw(kFalse,kFalse,kTrue)
$sendall() method
You can send a message to all the items or objects in a group using the Do command and the $sendall() method. For example, you can redraw all the objects in a group, you can assign a value to all the members of an object group, or you can hide all the members of a group using the $sendall() method and the appropriate message. The full syntax for the method is:
Do [group].$sendall({message|message,condition [,bIgnoreUnrecognizedCustomAttribute=kFalse,bRecursive=kFalse]})
where message is the message you want to send to all the objects and condition is a calculation which the objects must satisfy to receive the message. For example
Do $iwindows.$sendall($ref.$objs.style="font-variant: small-caps;">FieldName.$redraw())
Do $cwind.$objs.$sendall($ref.$textcolor.$assign(kYellow))
Do $cwind.$objs.$sendall($ref.$visible.$assign(kFalse),$ref.$order<=5)
The optional third argument bIgnoreUnrecognizedCustomAttribute causes $sendall() to ignore unrecognized custom attribute errors, which would otherwise cause a runtime error when the library preference $reportnotationerrors is kTrue. This argument defaults to kFalse if omitted.
In addition, when bIgnoreUnrecognizedCustomAttribute is omitted or is kFalse, the Omnis Root preference $ignoreunrecognizedcustomattribute property will be used. When set to kTrue, $ignoreunrecognizedcustomattribute prevents errors being reported at runtime when unrecognized custom attributes are detected when calling $sendall (also applies to $makelist). This defaults to kFalse, so that errors are generated to allow genuine issues such as typos to be raised. When kTrue, errors are ignored.
If bRecursive is kTrue, $sendall() sends the message to all items recursively in window class and instance $objs/$bobjs groups,and remote form class $objs groups.
$sendallref() method
When using $sendall(), you can use $ref to refer to the group member receiving the message. However, you can use $sendallref, which is an item reference to the item currently receiving the message sent with $sendall (note that $sendallref is not supported in client methods). Consider the case where a parameter passed to the message is evaluated by calling another method, or a function implemented in an external component. In this case, if you use $ref in the parameters passed to this other method or function, it will actually refer to the item involved in making the call to evaluate the parameter. This is where $sendallref() could be used, if you wish to pass some property of the group member receiving the message to the other method or function.
For example:
Do $cinst.$bobjs.$sendall($ref.$text.$assign(StringTable.$gettext( $cclass.$bobjs.[$sendallref.$ident].$text)))
The example uses the text stored in the class as the row id in the string table, and assigns the text stored in the string table to the background object. In the example, $sendallref.$ident returns the ident of the background object receiving the message. If you were to use $ref.$ident, the $ref would refer to the custom attribute representing the external component function, and the call to $sendall would not have the desired effect.
$makelist() method
Quite often you need to build a list containing the names of all the objects in a group, and you can do this using the makelist() item group method. The syntax is:
- Itemgroup.$makelist($ref.$att1,$ref.$att2,...) generates a list from the item group
Some examples: to build a list of all the classes in the current library and places the result in cLIST:
Do $clib.$classes.$makelist($ref.$name) Returns cLIST
To build a list of all the currently installed (desktop) menus:
Do $imenus.$makelist($ref.$name) Returns cLIST
To return only the methods overridden if "MyObject" has a superclass:
Do $clib.$objects.[MyObject].$methods.$makelist (...)
To build a list of external components currently available in your system:
Do $components.$makelist($ref.$name) Returns lXcompList
To build a list of window instances currently open in the order that they appear on the screen:
Do $iwindows.$makelist($ref.nam) Returns lWinList.
If the first argument is the constant kRecursive, the $makelist method ignores containers and adds all objects to the returned list; this also applies to $appendlist, $insertlist, and $count methods for window class and instance $objs and $bobjs groups, as well as remote form class $objs groups.
Do inherited
The Do inherited command runs an inherited method from a method in a subclass. For example, if you have overridden an inherited $construct() method, you can use the Do inherited command in the $construct() method of the subclass to execute the $construct() method in its superclass.
Do default
You can use the Do default command in a custom method with the same name as a standard built-in method to run the default processing for method. For example, you can use the Do default command at the end of a custom $print() method behind a report object to execute the default processing for the method after your code has executed.
Do redirect
You can use the Do redirect command in a custom method to redirect method execution to another custom method with the same name that is contained in another object in your library. You specify the notation for the instance or object you want execution to jump to.
Inheritance and custom methods are further discussed in the Object Oriented Programming chapter.
NULL values in Calculations
The item “nullValuesWhenORtestedBecomeZero” in the “default” section of the Omnis Configuration file (config.json) controls how null values are treated in calculations.
If “nullValuesWhenORtestedBecomeZero” set to is true, when Omnis finds a NULL value as part of an OR '|' in an If calculation it will treat the NULL as zero. If false (the default), a NULL in a calculation results in the entire calculation becoming NULL. For example:
If kTrue | #NULL
End if
By setting “nullValuesWhenORtestedBecomeZero” to true, Omnis will process this if statement as true.
Calculate Command and Evaluating Expressions
This section describes how you use the Calculate command with an expression. It also discusses using square bracket notation for strings.
The Calculate command lets you assign a value to a variable calculated from an Omnis expression. Expressions can consist of variables, field names, functions, notation strings, operators, and constants. For example
Calculate var1 as var2+var3
in this case, “var2+var3” is the expression.
Calculate var1 as con('Jon', 'McBride')
Here the expression uses the con() function which joins together, or concatenates, the two strings ‘Jon’ and ‘McBride’. You must enclose literal strings in quotes.
See the Omnis Studio Help for a complete list of functions. In expressions, functions appear as the function name followed by parentheses enclosing the arguments to the function. The function returns its result, substituting the result into the expression in place of the function reference. Calling a function does not affect the flag.
The Omnis operators are shown below, in precedence order, that is, the order in which they get evaluated by Omnis. Operators in the same section of the table are of equal precedence, and are evaluated from left to right in an expression.
| () |
Parentheses |
| - |
Unary minus |
| * / |
Multiplication, Division |
| + - |
Addition, Subtraction |
| < > = <= >= <> |
Less than, Greater than, Equal to, Less than or equal to, Greater than or equal to, Not equal to |
| & | |
Logical AND, Logical OR |
When you combine expressions with operators, the order of expressions will often make a difference in the interpretation of the expression: this is a consequence of the mathematical properties of the operators such as subtraction and division. You can group expressions using parentheses to ensure the intended result. For example
Calculate lv_Num as 100 * (2 + 7)
evaluates the expression in parentheses first, giving a value of 900. If you leave off the parentheses, such as
Calculate lv_Num as 100 * 2 + 7
Omnis evaluates the * operator first, so it multiplies 100*2, then adds 7 for a value of 207.
Square Bracket Notation
You can use a special notation in strings to force Omnis to expand an expression into the string. You do this by enclosing the expression in square brackets: Omnis evaluates the expression when the string value is required. You can use this in all sorts of ways, including the technique of adding a variable value to the text in the SQL or text buffer.
You can use square bracket notation wherever you can specify a single variable or field name, including
- Command parameters, for example, OK message
OK message {Your current balance is [lv_curbalance]}
- Window or report fields: you can include values in text objects, such as
Your current balance is [lv_curbalance]
Square bracket notation lets you refer to a value indirectly letting you code general expressions that evaluate to different results based on the values of variables in the expression: this is called indirection. For example, you can include a variable name enclosed in square brackets in a text object to add the value to the text at runtime. However in general, there is a significant performance penalty in using indirection.
If you need to use [ or ] in a string but do not want the contents evaluated, then use [[ and ] to enclose the contents—double up the first or opening square bracket. This is useful when you use square bracket notation with external languages that also use square brackets, such as the VMS file system or DDE.
Type Conversion in Expressions
Omnis tries its best to figure out what to do with values of differing data types in expressions. For example, adding a number and a string generally isn't possible, but if Omnis can convert the string into a number, it will do so and perform the addition. Some other examples are
Calculate lDate as 1200
Calculate lDate as 'Jun 5 93'
OK message {Answer is [jst(lDate,'D:D M CY')]}
Calculate lNum as lDate
Boolean values have a special range of possibilities.
YES, Y, or 1 indicate a true status
NO, N, or 0 indicate a false status
FALSE and TRUE are not valid values: Omnis converts them to empty.
Calculate LBOOL as 1
Calculate LBOOL as 'Y'
Calculate LBOOL as 0
OK message { The answer is [LBOOL] }
Calculate LBOOL as 'fui'
Calculate LBOOL as ''
You can convert any number to a string and any string that is a number in string form to a number.
Calculate lChar as 100
OK Message { [lChar], [2 * lChar], and [con(lChar,'XYZ')] }
Calculate lNum as lChar
Calculate lChar as lNum
OK Message { [lChar], [lNum * lChar], and [con(lChar,'ABC')] }
Constants
You will often find situations in Omnis where you must assign a value that represents some discrete object or preset choice. Omnis has a set of predefined constants you should use for this kind of data. For example, a class type can be one of the following: code, file, menu, report, schema, and so on. Each of these is represented by a constant: kCode, kFile, kMenu, kReport, kSchema, respectively. You can get a list of constants from the Catalog: press F9/Cmnd-9 to open the Catalog. You can use constants in your code, like this
Calculate obj1.$align as kRightJst
Do obj1.$align.$assign(kRightJst)
Although you can use the numeric value of a constant, you should use the predefined string value of a constant in your methods. In addition to ensuring you're using the right constant, your code will be much more readable. Moreover, there is no guarantee that the numeric value of a particular constant will not change in a future release of Omnis.
Calling Methods
You can execute another method in the current class using Do method (or call a method in a code class using Do code method). These commands let you pass parameters to the called method and return a value in a return field – note that the value of the return field is cleared before the method is called. For example, the following method named Setup calls another method named Date and returns a value.
Do method Date (lNum,lDate+1) Returns lDate
OK message {Date from return is [lDate]}
OK message {Date from calling method is [lpDate], number is [lpNum]}
Quit method {lpDate + 12}
Note that when you call a code class method from within an instance the value of $cinst, the current instance, does not change. Therefore you can execute code in the code class method that refers to the current instance and it will work.
WARNING Omnis does not stop a method calling itself. You must be careful how the method terminates: if it becomes an infinite loop, Omnis will exhaust its method stack.
Quitting Methods
You can use the Quit command, and its variants, to quit methods at various levels.
Quit method
quits the current method and returns a value to the calling method, if any
Quit event handler
quits an event handling method
Quit all methods
quits all the currently executing methods, but leaves Omnis running
Quit all if canceled
quits all methods if you press Cancel
Quit Omnis
exits your application and Omnis
You can also clear the method stack with the Clear method stack command, which does the same thing as the debugger menu Stack>>Clear Method Stack: it removes all the methods except for the current one. If you follow Clear method stack with Quit method, it has the same effect as Quit all methods.
Note: By enabling the Use Minimum Lengths option on the Modify>>Filter Commands submenu in the Method Editor, the Quit method command is selected by default when you type just the letter 'q' (rather than the Queue commands); by typing ‘qu’ all the Quit methods will be shown in the Code Assistant help list.
The Quit method command allows you to exit a method and return a value to the calling method (it is the same as Return in other languages). For example:
Do method myMethod Returns lReturnFlag
Yes/No message {Continue ?}
Quit method #F
It is possible to call another method in the return value of a Quit method command, but this can lead to unpredictable results, especially if the called method contains an Enter Data command, e.g.
Quit method Returns iOtherObject.$doSomeThingThatContainsEnterData
Flow Control Commands
The Constructs... group contains many commands that let you control the execution and program flow of your methods. If statements let you test a condition and branch accordingly: loop commands iterate based on tests or sequences: the Comment command lets you comment your code: and reversible blocks let you manipulate objects and values and restore their initial values when the block terminates.
Several commands in this command group have starting and terminating commands (If and End if, for example). You must use the correct terminating command, or you will get unexpected results. If chromacoding is enabled, the beginning and terminating commands for most branching and looping constructs are highlighted. You can enable chromacoding using the View>>Show ChromaCoding menu option in the method editor.
Highlighting Blocks
The start and end of any block commands are highlighted when one of the statements that makes up the construct formed by the commands is selected in the method editor. For example, if a For statement is the current line, then the "End for" and "For" will both be highlighted. Or if a Case statement is the selected line, then all cases in the same switch, "Default", "Switch" and "End switch" will all be highlighted. The style or color of the highlighting uses a pair of chroma coding options, $currentblocktextcolor and $currentblockstyle.
Branching Commands
The If command lets you test the flag, a calculation, or a Cancel event. The Flag is an Omnis variable with a True or False value which is altered by some commands to show an operation succeeded, or by user input. The Else command lets you take an alternative action when the If evaluates to false, Else if gives you a series of tests. You must use the End If command to terminate all If statements.
A simple test of the flag looks like this:
If flag true
  Do method Setup
End If
You can do a sequential checking of values using a calculation expression:
If CollCourse ='French'
  Do method Languages
Else If CollCourse = 'Science'
  If CollSubCourse = 'Biology'
    Do method ScienceC1
  Else
    Do method ScienceC2
  End If
Else
  OK message {Course is not available.}
End If
While Loops
The While loop tests an expression at the beginning of a loop. The While command will not run the code block at all if the expression is false immediately. You would use a While command when you want to loop while an expression is true.
While Count <= 10
OK message {Count is [Count]}
Calculate Count as Count + 1
End While
This loop will output 10 messages. If the condition was ‘Count <= 1’, it would run only once.
Repeat Loops
A Repeat loop lets you iterate until an expression becomes true. Repeat loops always execute at least once, that is, the test specified in the Until command is carried out at the end of the loop, after the commands in the loop are executed, whereas While loops carry out the test at the beginning of the loop.
Repeat
OK message {Count is [Count]}
Calculate Count as Count + 1
Until Count >= 10
This loop will output 9 messages.
For Loops
The For field value command lets you loop for some specific number of iterations, using a specified variable as the counter. The following example builds a string of ASCII characters from their codes using the functions con() and chr().
Calculate cvar1 as ''
For Count from 48 to 122 step 1
Calculate cvar1 as con(cvar1,chr(Count))
Do $cwind.$redraw()
End For
The For each line in list command loops through all the lines in the current list.
Set current list LIST1
For each line in list from 1 to LIST1.$linecount step 1
End For
Switch/Case Statements
The Switch statement lets you check an expression against a series of values, taking a different action in each case. You would use a Switch command when you have a series of possible values and a different action to take for each value.
The following method uses a local variable lChar and tests for three possible values, “A”, “B”, and “C”.
Calculate lChar as mid(pString, 1, 1)
Switch lChar
Case 'A'
Case 'B'
Case 'C'
Default
End Switch
It is a good idea to use the Switch command only for expressions in which you know all the possible values. You should always have one Case statement for each possible value and a Default statement that handles any other value(s).
Escaping from Loops
While a loop is executing you can break into it at any time using the break key combination for your operating system: under Windows it is Ctrl-Break, under macOS it is Cmnd-period, and under Unix it is Ctrl-C. Effectively, this keypress ‘quits all methods’. When Omnis performs any repetitive task such as building a list, printing a report, or executing a Repeat/While loop, it tests for this keypress periodically. For Repeat/While loops, Omnis carries out the test at the end of each pass through the loop.
To create a more controlled exit for the finished library, you can turn off the end of loop test and provide the user with a working message with a Cancel button. When the Cancel button is visible on the screen, pressing the Escape key under Windows or Cmnd-period under macOS is the equivalent to clicking Cancel. For example
Disable cancel test at loops
Calculate Count as 1
Repeat
Working message (Cancel box) {Repeat loop...}
If canceled
Yes/No message {Do you want to escape?}
If flag true
Quit all methods
End If
End If
Calculate Count as Count+1
Until Count > 200
The If canceled command detects the Cancel event and quits the method. To turn on testing for a break, you can use the Enable cancel test at loops command.
The Break to end of loop command lets you jump out of a loop without having to quit the method, and the Until break provides an exit condition which you can fully control. For example
Repeat
  Working message (Cancel box) {Repeat loop...}
  If canceled
    Yes/No message {Are you sure you want to break out?}
    If flag true
      Break to end of loop
    End If
  End If
Until break

OK message {Loop has ended}
If you have not disabled the cancel test at loops, a Ctrl-Break/Cmnd-period/Ctrl-C terminates all methods and does not execute the OK message. Having turned off the automatic cancel test at loops, you can still cause a Quit all methods when canceled. For example
Disable cancel test at loops
Calculate Count1 as 1
Calculate Count2 as 1
Repeat
  Repeat
    Working message (Cancel box) {Inner repeat loop}
    Calculate Count2 as Count2 + 1
  Until  Count2 > 12
  Calculate Count2 as 1
  Working message (Cancel box) {Outer repeat loop...}
  Quit all if canceled
  Calculate Count1 as Count1 + 1

Until  Count1 > 20
If the user selects Cancel in the outer loop, the method quits, but from the inner loop there is no escape.
Optimizing Program Flow
Loops magnify a small problem into a large one dependent on the number of iterations at runtime, and other program flow commands can use a lot of unnecessary time to get the same result as a simpler command.
Here are some tips to help optimize your methods.
Use the For command instead of the equivalent While or Repeat commands. For has a fixed iteration, while the other commands test conditions. By eliminating the expression evaluation, you can save time in a long loop.
Use the Switch command instead of equivalent If/Else commands where possible. Arrange both the Case commands within a Switch and the several If and Else if commands so that the conditions that occur most frequently come first.
Use the Quit method command to break out of a method as early as possible after making a decision to do so. This can be a tradeoff with readability for long methods because you have multiple exits from the method: if falling through to the bottom of the method involves several more checks, or even just scanning through a large block of code, you can substantially improve performance by adding the Quit method higher up in the code.
Avoid using commands that don’t actually execute within a loop. For example, don’t put comment lines inside the loop. You can also use Jump to start of loop to bypass the rest of that iteration of the loop.
You can speed up a frequently called method by putting Optimize method at the start: refer to Omnis Studio Help for details of this command.
Reversible Blocks
A reversible block is a set of commands enclosed by Begin reversible block and End reversible block commands: a reversible block can appear anywhere in a method. Omnis reverses the commands in a reversible block automatically, when the method containing the reversible block ends, thus restoring the state of any variables and settings changed by the commands in the reversible block.
Begin reversible block
End reversible block
Reversible blocks can be very useful for calculating a value for a variable to be used in the method and then restoring the former value when the method has finished. Also you may want to change a report name, search name, or whatever, knowing that the settings will return automatically to their former values when the method ends.
The Omnis Help (press F1) indicates which commands are reversible.
Consider the following reversible block.
Begin reversible block
Disable menu line 5 {Menu1}
Set current list cList1
Define list {cvar5}
Build window list
Calculate lNum as 0
Open window instance Window2
End reversible block
When this method terminates:
Omnis closes window Window2
Omnis restores lNum to its original value
The definition of cList1 returns to its former definition
Omnis restores the former current list
Omnis enables line 5 of Menu1
At the end of the method, Omnis steps back through the block, reversing each command starting with the last. If there is more than one reversible block in a method, Omnis reverses the commands in each block, starting from the last reversible block. If you nest reversible blocks, the commands in all the reversible blocks are treated as one block when they are reversed, that is, Omnis steps backward through each nested reversible block reversing each command line in turn. You cannot reverse any changes that the reversible block makes to Omnis data files or server-based data unless you carefully structure the server transaction to roll back as well.
Losing property values
Certain notation properties affect other properties when they are assigned, for example, assigning $calculated to kFalse clears $text for the field. Therefore, if the $calculated property is set within a reversible block, and the state of $calculated is reversed, the value in the $text property is not reinstated. Such relationships between properties are not supported by the reversible block mechanism. If you wish to maintain the value of a property that may get cleared during notation execution, you should store the value in your own variable and assign the value to the property at runtime.
Error Handling
When you enter a command, Omnis automatically checks its syntax. When a command is executed in a method, you can get a runtime error, a processing error rather than a syntax error. Fatal errors either display a message and stop method execution or open the debugger at the offending command.
You can cause a fatal error to occur with the Signal error command, which takes an error number and text as its argument. This lets you define your own errors, but still use the standard Omnis error handler mechanism.
In addition, Omnis maintains two global system variables #ERRCODE and #ERRTEXT that report error conditions and warnings to your methods. Fatal errors set #ERRCODE to a positive number greater than 100,000, whereas warnings set it to a positive number less than 100,000.
You can trap the errors and warnings by adding a method to test for the various values of #ERRCODE and control the way Omnis deals with them: this is called an error handler. The command Load error handler takes the name of the method and an optional error code range as its parameters:
Load error handler Code1/1 {Errors}
Once you install it, Omnis calls the error handler when an error occurs in the specified range. Please refer to the Omnis Studio Help for a detailed description of the Load error handler command and examples of its use.
There are several commands prefixed with SEA, which stands for Set error action. Using these commands, you can tell Omnis what to do after an error:
SEA continue execution
continues method execution at the command following the command that signaled the error: if the error handling routine has not altered them, #ERRCODE and #ERRTEXT are available to the command
SEA report fatal error
if the debugger is available, it displays the offending command in the method window and the error message in the debugger status line
SEA repeat command
repeats the command that caused the error.
Repeating a command should be done with care since it is easy to put Omnis into an endless loop. If the error has a side effect, it may not be possible to repeat the command. If an ‘Out of memory’ condition occurs, it may be possible to clear some lists to free up enough memory to repeat the command successfully.
Errors in the JavaScript Client
You can return the values of #ERRCODE and #ERRTEXT in client executed methods in the JavaScript using the functions errcode() and errtext().
Error Reporting for External Components
The item "allExternalComponentErrorsAreFatal" in the "defaults" section of the Omnis configuration file (config.json) allows you to manage whether or not #ERRCODE and #ERRTEXT are reported by external components. When allExternalComponentErrorsAreFatal is true (the default), and an external component sets #ERRCODE and #ERRTEXT, the error always generates a runtime error, entering the debugger in the development version of Omnis.
Calculation Errors
The library preference $reportcalculationerrors (default is true) specifies whether or not calculation errors are reported. When true, Omnis will report errors that occur when evaluating calculations, such as divide by zero errors. The report message is sent to the trace log, containing the error and code that caused the problem.
In addition, when executing calculations using Do and Calculate, Omnis enters the debugger when the error occurs (provided debugging is allowed). (This will not occur when these commands execute in the Omnis Web Client plug-in.)
Notation Errors
The item “stricterNotationErrorChecks” in the “defaults” section of the Omnis configuration file (config.json) allows you to control the sensitivity for detecting certain errors in notation. When set to true (the default), certain unresolved name errors, e.g. such as notation in the form $cinst.name or $ctask.name, result in a debugger (or runtime) error if $clib.$prefs.$reportnotationerrors is kTrue.
Redrawing Objects
There are a number of commands that let you redraw a particular object or group of objects. The Redraw command has the following variants.
Redraw field or window
redraws the specified field or window, or list of fields or windows: note this command with refresh all instances of the window
Redraw lists
redraws all list fields on the current window or redraws all lists in your library
Redraw menus
redraws all the currently installed menus
Redraw toolbar
redraws the specified custom toolbar
You can use the $redraw() method to redraw a field or fields, a window or all windows, as described earlier in this chapter.
Refreshing window instances
You can use the $norefresh window instance property to control the refreshing of windows. When set to kTrue screen updates are disabled and the window is not refreshed. You can use this property to improve performance, for example when setting a large number of exceptions for a complex grid. Setting the $norefresh property to kFalse will enable screen refreshing.
Message Boxes
There are a number of message boxes you can use in your library to alert the user. The commands for these messages are in the Message boxes... group. They include
OK message
displays a message in a box and waits for the user to click an OK button. For emphasis you can add an info icon and sound the system bell. You can use square bracket notation in the message text to display the current value of variables or fields. For example, OK message {[sys(5)]} will display the user’s serial number. You can use the kCr constant enclosed in square brackets to force a line break in the message, e.g. 'First line[kCr]Second line'.
Yes/No message, and No/Yes message
displays a message in a box and waits for Yes or a No answer from the user. Either the Yes or the No button is the default. You can use the kCr constant enclosed in square brackets to force a line break in the message, e.g. 'First line[kCr]Second line'.
Prompt for input
displays a dialog prompting the user for input
Working message
displays a message while the computer is processing data or executing a method: with a Cancel button the user can break into the processing with Ctrl-Break/Cmnd-period/Ctrl‑C
Events
Events are reported in Omnis as Event Messages. These messages are sent to the event handling methods as one or more Event Parameters. The first parameter of an event message, pEventCode, contains an event code representing the event. Event messages may contain a second, a third, or subsequent parameters that tell you more about the event. For example, a click on a list box will generate an evClick event plus a second parameter pRow telling you the row number clicked on. All event codes are prefixed with the letters “ev”, and all event parameters are prefixed with the letter “p”. You can use the event codes in your event handling methods to detect specific events, and the event parameters to test the contents of event messages.
When an event occurs the default action normally takes place. For example, when the user presses the tab key to move to the next field on a data entry field, the default action is for the cursor to leave the current field and enter the next field on the window, and normally this is exactly what happens. However you could put a method behind the field that performs any one of a number of alternative actions in response to the tab. That is, the event handling method could use the tab to trigger a particular piece of code and then allow the default action to occur, it could pass the event to somewhere else in your library, or it could discard the event altogether and stop the default action from happening.
Event Handling Methods
You can write an event handling method for each field and object contained in remote form, remote menu, window, menu, toolbar, and report classes. The other class types do not generate events. Events for remote forms and the JS components are described in the Creating Web & Mobile Apps manual.
You can add the event methods for window and report fields in the Field Methods for the class. For menu classes you can add an event method to the Line Methods for a menu line, and for toolbar classes you can enter an event method in the Tool Methods for each toolbar control.
Window fields, toolbar controls, and menu lines contain a default event handling method called $event, and report fields contain a default event handling method called $print. If you open the field methods for a window field, toolbar control, or menu line you will see an $event method, and for each report field you will see a $print method for the object. These are the default event handling methods for those objects.
To view the event handling method for a field or object
Show the design screen for the class
Right-click on the field, menu line or toolbar control
Choose Field Methods, Line Methods, or Tool Methods, as appropriate
The method editor opens showing the first method in the list for the field or object. If this is not the $event method, select it from the list to view it. Some event handlers will contain code to handle a range of possible events in the object.
The event handling method for some types of field may be empty, because there is only one possible event for the object. For example, the event handling method for a menu line is empty since you can only select a menu line. Therefore any code you put in the $event method for a menu line runs automatically when you select the line.
To enter the code for an event handling method
Assuming you have opened a default $event method for a field, click on the next command line after the On event command
Then on the next line enter the code you want to run for that event
For example, you can open the event method for a pushbutton, that contains a single On evClick command which will detect a click on the button.
Some $event methods are empty, so for these:
Select the first line of the method
Type on to select the On command
Type ev plus the first letter of the event you want to enter, or select the event from the Helper window that pops up in the Code Editor
Omnis validates the event codes you have entered, that is, it checks to see if the event code is valid for the current object, and if not, it will flag it as an error.
- When the line is complete, press Return and enter the code for your event method
The code for an event method could literally do anything, but in practice it would generally perform an action of some kind related to the object triggering the event (e.g. a button might trigger a Save, so you need to write code to do the save operation). You could use the Do command and some notation in your event handling method, or you can use the Do method command to run another method in the current class or instance, or the Do code method command to run a method in a code class: in all cases, you can put literally any code in an event handling method and it will run given the right event.
The On Command
You can use the On command to detect events in your event handling methods. Fields from the Component Store may contain a default event handling method with one or more On commands to detect different events. For example, an entry field contains the method
On evBefore
On evAfter
These lines detect the events evBefore and evAfter, which are the event codes contained in the message sent when the user enters or leaves the field, respectively. The in-line comments indicate which event parameters Omnis supplies for that event. In most cases, the event parameters are references containing values to do with the context of the event: the field clicked on, the list row number, the menu line number, and so on.
When you select the On command in the method editor, the list of possible events changes to reflect the events supported by the object to which $event belongs. You can also view events divided into categories, by using the Events tab of the Catalog.
You can use the default event handling method for a field or add your own. The following event handler for a data entry field detects an evBefore as the user enters the field and performs a calculation changing the value of the field.
On evBefore
Calculate cDate as #D
Redraw {DateField}
Quit event handler
Code which is common to all events should be placed at the start of the event handling method, before any On commands. You can use the On default command to handle any events not covered by an earlier On command line. The general format is
On evBefore
On evAfter
On default
When you enter the On command in an event handling method, it displays a list of all the available event codes in the command palette. You can click on the one you want, or you can enter more than one event code for a single On command, for example On evClick, evDoubleClick. On commands cannot be nested or contained in an If or loop construct.
When you have entered the On command line for a particular event and selected the next command line, you can open the Catalog to view the event parameters for that event code.
Click on the line after an On evClick command line
Open the Catalog (F9/Cmnd-9)
Click on Event Parameters under the Variables tab
For example, an On evClick command displays the parameters pEventCode and pRow in the Catalog. You can use these event parameters in your event handling methods to test the event message. A click on a list box generates an evClick event message containing a reference to the row clicked on, held in the pRow event parameter. You can test the value of pRow in your code
On evClick
If pRow=1
End If
If pRow=2
End If
All events return the parameter pEventCode, which you can also use in your event handling methods.
On evAfter,evBefore
If pEventCode=evAfter
End If
If pEventCode=evBefore
End If
The parameters for the current event are returned by the sys(86) function, which you can use while debugging or monitoring which events are handled by which methods. For example, you could use the Send to trace log command and the functions sys(85) and sys(86), to report the current method and events, in the $event method for a field
Send to trace log {[sys(85)] - [sys(86)]}
WindowName/10/$event - evAfter,evTab
WindowName/10/$event - evTab
You can use any of the parameters reported for an event in your event handling methods. However, if you enter an event parameter not associated with the current event, the parameter will be null and lead to a runtime error.
Mouse Events
Mouse events allow you to detect user mouse clicks inside fields and the background of a window. Mouse and right- mouse button events are generated only if the $mouseevents and $rmouseevents library preferences are enabled. Under macOS, right-mouse events are generated when you hold down the Ctrl key and click the mouse.
evMouseDouble and evRMouseDouble
the mouse, or right-mouse button is double-clicked in a field or window
evMouseDown and evRMouseDown
evMouseUp and evRMouseUp
the mouse, or right-mouse button is held down in a field or window, or the mouse button is released: for the mouse-down events you can detect the position of the mouse, se below
evMouseEnter and evMouseLeave
the mouse pointer enters, or leaves a field
evDrag
the mouse is held down in a field and a drag operation is about to start: the parameters report the type and value of the data
evCanDrop
whether the field or window containing the mouse can accept a drop: the parameters reference the object being dropped, the type and value of the data
evWillDrop
the mouse is released at the end of a drag operation. The parameters reference the object being dropped, the type and value of the data
evDrop
the mouse is released over the destination field or window at the end of a drag operation. The parameters reference the object being dropped, the type and value of the data
For the evMouseDown, evMouseUp, evRMouseDown and evRMouseUp events you can return the position of the mouse as the X-Y coordinates relative to the window background or field.
pMouseX
Mouse x coordinate
pMouseY
Mouse y coordinate
pMouseHwnd
window identifier of the hwnd receiving the mouse event: the mouse coordinate parameters are relative to this hwnd
The coordinate origin is the top-left of the hwnd.
Move Behind Events
From Studio 10, the $movebehind property allows you to control whether or not to allow mouse move events on fields in window classes, other than the top window. By default $movebehind is set to kTrue and will allow mouse move events to be processed in other windows when the window is the top window, e.g. evMouseEnter and evMouseLeave. Set the property to kFalse to turn off this behavior for the window.
In previous versions, only evMouseEnter and evMouseLeave in a complex grid in a window that was not top were allowed. To revert to the legacy behavior, add an entry called "oldMouseMoveBehindBehaviour" to the "defaults" group in the config.json file and set it to true.
Gesture Events
Gesture Events enable you to detect touch gestures in some window controls generated by touchscreen devices or computer trackpads. Gesture events are enabled using the $touchgestures root, library or field property.
Gesture events are triggered by devices that support touch like touchscreens or trackpads, and include a two-fingered scroll, pinch (to zoom in or out), rotation, swipe, or double tap. A mouse may also generate the same event using a mouse wheel and key combination.
Gesture events are generated only if the $gestureevents library preference or field property is enabled. The field property only applies when the same library preference is false. On macOS, gestures other than scrolling and double tap are only recognized when the window containing the field is active.
evGestureScroll
The device performed a scroll gesture on the field. Usually the two-finger scroll gesture is performed by placing two fingers on the trackpad and moving them up, down, left, or right. Sliding your fingers up or down scrolls vertically, while sliding them side to side scrolls horizontally, like using a scroll wheel on a mouse. On a touchscreen, scrolling is usually done by placing one finger on the screen and swiping in the direction you want the content to move. Swiping up scrolls down the page, swiping down scrolls up, and swiping sideways moves horizontally when supported. Scrolling with a mouse is typically done by rolling the scroll wheel to move up or down through content.
evGestureZoom
The device performed a zoom gesture on the field. On a trackpad and touchscreen, the zoom gesture is a pinch motion with two fingers. Moving your fingers apart zooms in and pinching them together zooms out. With a mouse, zooming is usually done by holding the Control key and scrolling the scroll wheel up to zoom in and down to zoom out.
evGestureRotate
The device performed a rotate gesture on the field. On a trackpad or touchscreen, this is achieved by placing two fingers on it and rotating them in a circular clockwise motion to rotate right or counter clockwise to rotate left. With a mouse wheel, rotate can also be simulated by holding the shift key while rolling the wheel.
evGestureSwipe
The device performed a swipe gesture on the field. This is typically achieved by quickly sliding two or more fingers across a trackpad or touchscreen in the same direction.
evGestureTwoFingerDoubleTap
The device performed a two-finger double-tap gesture on the field. This involves quickly tapping the trackpad twice simultaneously with two fingers. It’s commonly used to trigger actions like smart zooming in or out or accessing secondary features in apps such as map zoom or item previews.
Event parameters
Scroll and swipe gestures define the X and Y coordinate change. Zoom and rotate gestures specify magnification, angle and the anchor point for zoom and rotation.
pDeltaX
The x-coordinate change for an evGestureScroll or the signed right or left direction indicator for an evGestureSwipe event.
This delta is usually negative for left scrolling or panning and positive for right scrolling or panning. For a left swipe the value is 1 and for a right swipe it’s -1.
pDeltaY
The y-coordinate change for an evGestureScroll or the signed-up or down direction indicator for an evGestureSwipe event.
This delta is usually negative for an up scroll or pan and positive for a down scroll or pan. For an up swipe the value is 1 and for a down swipe it is -1.
pDelta
The delta change for an evGestureZoom and evGestureRotate event.
A positive delta for a zoom gesture indicates an increase in the scale factor and a negative delta indicates a decrease. This means either zooming in or out. For a rotate gesture, a negative delta indicates a clockwise rotation, and a positive delta indicates a counter clockwise rotation. This is specified in degrees.
pMouseX
The x-coordinate of the anchor point for an evGestureZoom or evGestureRotate event.
pMouseY
The y-coordinate of the anchor point for an evGestureZoom or evGestureRotate event.
MacOS and Windows may use slightly different gestures for these events. Mac typically uses three fingers for swiping while Windows uses two. On Windows, horizontal mouse wheel events can be simulated from the trackpad and are usually inverted.
Gesture Properties
The following properties control the behavior of the gesture events.
$touchgestures
A root preference ($root.$prefs.$touchgestures), a library property, and an object property, specifically a Picture component, Tab pane, or Fisheye control.
A boolean property, which if true will enable touch gestures other than evGestureScroll. The object property only applies when the same library preference is false. This can be globally disabled using the root preference. By default, this is kTrue at the root and library level to make touch gestures active.
$usemousewheeldelta
A boolean property ($root.$prefs.$usemousewheeldelta), which if true will divide the delta change for a mouse wheel event by the standard mouse wheel delta to increase the granularity of the event. This is kFalse by default and is only used on Windows. Turn this on if the primary input device on Windows is a mouse with a wheel and the wheel sends large, fixed mouse wheel deltas for each wheel step change.
$inverthorzmousewheel
A boolean property ($root.$prefs.$inverthorzmousewheel), which if true will reverse the delta received from a non-touch screen device. This is only used on Windows and is kTrue by default. Typically on Windows, trackpads simulating horizontal mouse wheels will send a positive delta when scrolling to the left and a negative delta when scrolling to the right. This reverses those deltas to provide the expected behavior when scrolling with the trackpad.
$doubletapmsinterval
An integer property ($root.$prefs.$doubletapmsinterval) which sets the interval for double tap gestures. Zero uses the platform double-click interval (500ms). Otherwise, this is the interval in milliseconds. Alter this to control the responsiveness to double tap.
Discarding Events
In certain circumstances you might want to detect particular events and discard them in order to stop the default action from occurring. You can discard or throw away events using the Quit event handler command with the Discard event option enabled. Note however, you cannot discard some events or stop the default action from taking place since the event has already occurred by the time it is detected by an event handling method. In this case, a Quit event handler (Discard event) has no effect for some events.
Being able to discard an event is useful when you want to validate what the user has entered in a field and stop the cursor leaving the field if the data is invalid. The following method displays an appropriate message and stays in the field if the user does not enter the data in the correct format.
On evAfter
If len(CustCode <> 6)
If len(CustCode = 0)
OK message {You must enter a customer code}
Else
OK message {The customer code must have 6 digits}
End If
Quit event handler (Discard event)
End If
You can also handle or discard events using the Quit method command with a return value of kHandleEvent or kDiscardEvent, as appropriate.
The Quit event handler Command
If you want to discard or pass an event you can use the Quit event handler command to terminate an On construct. A field event handling method might have the following structure.
On evBefore
On evAfter
On evClick,evDoubleClick
Quit event handler (pass event)
On default
The Quit event handler command has two options
Window Events
Note the following section refers to events in window classes only, so to do not apply to remote forms or JavaScript components.
So far the discussion has focused on field events, which you would normally handle in the field using an event handling method. However you can enter methods to handle events that occur in your window as well. Like fields, the event handling method for a window class is called $event, and you enter this method in the Class Methods for the window class.
Window classes do not contain an $event method by default, but you can insert a method with this name. You enter the code for a window $event method in exactly the same as for fields using the On command to detect events in your window.
Window events affect the window only and not individual fields. They include clicks on the window background, bringing the window to the front or sending it to the back, moving it, sizing it, minimizing or maximizing the window, or closing it. For example, when you click on a window’s close box, the evCloseBox and evClose events are generated in the window indicating that the close box has been clicked and the window has been closed. You could enter an $event method for the window to detect these events and act accordingly.
The following window $event method detects a click on a window behind the current window, and discards the click if the user is inserting or editing data.
On evWindowClick
If cInserting | cEditing
OK message {You cannot switch windows while entering data}
Quit event handler (Discard event)
End If
Quit event handler
The following window $event method checks for events occurring in the window and runs the appropriate methods elsewhere in the class.
On evToTop
  Do method Activate

  Quit event handler
On evWindowClick
  Do method Deactivate

  Quit event handler
On evClose
  Do method Close

  Quit event handler
On evResized
  Do $cwind.$width.$assign($cclass.$width)
  Do $cwind.$height.$assign($cclass.$height)

  Quit event handler (Discard event)
When a window with the $edgefloat property set to floating edges is resized the evResized event is reported; this can occur either when the window itself is resized, or due to the main Omnis application window being resized (the latter only applies on the Windows platform, since on macOS the Omnis application occupies the whole screen).
Note you cannot trap an evResized and discard it since the resizing has already occurred, but you can reverse the resizing by setting the size of the open window back to the size stored in the class.
Window Event Handling (macOS)
Under macOS, whenever the end-user clicks on a window title bar (or a button on the window title bar) the evWindowClick event is generated. The event parameter pStayingBehind is true if the window receiving the click will not come to the front as a result of the click (this event can only ever be true on macOS). For example, when the user clicks on the zoom box of a window that is not on top, the window will zoom or restore, but will not come to the top.
Key events
You can detect which key or key combination is pressed by trapping the evKey event. The $keyevents library preference must be set to kTrue to enable the evKey event to be called for all window class foreground objects, including entry fields. The evKey event is sent to the target field when a key is pressed, and has three parameters as follows:
| 0 |
Letter/Number |
27 |
Tab |
| 1...12 |
F1...F12 |
28 |
Return |
| 17 |
Up Arrow |
29 |
Enter |
| 18 |
Down Arrow |
30 |
Backspace |
| 19 |
Left Arrow |
32 |
Esc |
| 20 |
Right Arrow |
34 |
Delete |
| 21 |
Page Up |
35 |
Insert |
| 22 |
Page Down |
53 |
Context Menu |
| 25 |
Home |
100 |
Pause * |
| 26 |
End |
|
|
*The pSystemKey event parameter has a value of 100 to signal the Pause button (Windows VK_PAUSE virtual key) has been pressed.
Control Methods and Passing Events
As already described, you handle events for fields using an event handling method contained in the field, but you can add a further level of control over field events by adding a method called $control to your window. This method is called a window control method. To allow this method to handle events you must pass events to it from the field event handling methods. You do this by including in your field event handler the Quit event handler command with the Pass to next handler option enabled.
As a further level of control, you can add a method called $control to your tasks. This method is called a task control method. Events are passed to the task control method from the window control method contained in the window belonging to the task. Therefore, an event may be generated in the field, passed to the window control method, and then passed to the task control method.
Window events that are handled in the $event method for a window can be passed to the task $control method as well.
At each level an event handling method can discard the event or pass it on to the next event handler. At the task level, the highest level of control, the event can be processed and the default action takes place, or the event can be discarded and no further action occurs.
The Omnis event processing mechanism gives you absolute control over what is going on in your application, but it also means you need to design your event handling methods with care. It is important not to pass on an event to higher levels unnecessarily and to keep control methods short, to limit the time spent processing each event.
In the following example, the $control method is contained in an Omnis data entry window. It sets the main file for the window when it is opened or comes to the top, and does not let the user close the window if Omnis is in data entry mode.
On evToTop
Set main file {FCUSTOMERS}
Quit event handler
On evClose
If cInserting | cEditing
OK message {You can't close in enter data mode}
Quit event handler (Discard event)
End If
Event Processing and Enter Data Mode
Normally, the default processing for an event takes place when all the event handler methods dealing with the event have finished executing. It is not possible to have active unprocessed events when waiting for user input so the default processing is carried out for any active events after an Enter data command has been executed or at a debugger break. Therefore if required, you can use the Process event and continue command to override the default behavior and force events to be processed allowing an event handling method to continue.
The Process event and continue (Discard event) option lets you discard the active event. For example, in an event handler for evOK the following code would cause the OK event to be thrown away before the subsequent enter data starts.
On evOK
  Process event and continue (Discard event)
  Open window instance {window2}

  Enter data
Container Fields and Events
Container fields are fields that contain other fields: examples of container fields include subwindows, tab panes, page panes, scroll boxes, and complex grid fields. The logic for handling and passing events within a container field is the same as for simple fields, it just has more levels of control.
For the purposes of event handling, you can regard the container field as both a field on the parent window, and a window since it contains other fields. In this respect, a container field can have an $event method that handles events for the container field itself, and a $control method that handles events passed to it from the individual fields inside the container field. Each field in the container field has a $event method to handle its own events. If the control method for your container field allows it, events are passed to the parent window control method, which in turn can be passed onto the task control method or discarded as appropriate.
You can nest container fields such as subwindows and tab panes, but nested container fields do not pass events.
Queuing Events
Some user actions generate a single event which is handled as it occurs by your event handling methods. The event may be dealt with completely in the field or it may be passed up the event chain as required. However some user actions generate a whole series of events, one after another. These events are placed in an event queue. Each event is handled by your event handling methods strictly in turn on a first-in, first-out basis. For example, when the user tabs from one field to another the current field is sent an evAfter and then an evTab event, then the new field is sent an evBefore event: all these events are placed in the event queue in response to a single user action, the tab. Similarly when you close a window, the current field is sent an evAfter, the window is sent an evCloseBox event, then it is sent an evClose event. Each one of these events is sent to the appropriate object and is handled by your event handling methods before the next event in the queue is handled.
In addition to events generated by user actions, you can append an event to the event queue using the Queue commands in the Events... group.
Queue bring to top
Queue close
Queue cancel
Queue set current field
Queue click
Queue double-click
Queue keyboard event
Queue OK
Queue scroll (Left|Right|Up|Down)
Queue tab

Queue quit
These commands let you simulate user actions such as key presses and clicks on buttons or windows. For example, the Queue bring to top {Windowname} command brings the specified window instance to the top and simulates a user clicking behind the current window. Events generated by these commands are handled after those that are currently queued. You can queue several events in succession.
User Constants
You can define your own User constants in a User Constants class for use in your methods and expressions. A user constant is a named value, where the value cannot be changed during execution. Generally speaking, user constants can be used anywhere in Omnis code and expressions, although there are exceptions, because they cannot be used anywhere that would attempt to modify them, for example:
As the result of a Calculate command
As the Returns component of commands such as Do
As the dataname of a variable
To define user constants, you add their names and values to a User Constants class. The types and therefore values are restricted to Character, Integer, Number and Boolean. You can have multiple user constants classes, each of which defines a number of user constants and their values.
Internally, user constants are handled as a special type of file class, meaning that the same naming rules as those for file classes apply, i.e. the library preferencs ($clib.$prefs) $uniquefieldnames, $sensitivefieldnames and $sensitivefilenames all apply. For naming and tokenisation purposes, user constant names are essentially file class variable names.
Also, user constant classes are always treated as memory only, and file class commands such as Clear all files, and Set memory-only files have no effect on user constant class CRBs.
When exporting a library using the JSON export, user constants classes are included, using a similar syntax to that used for file classes.
Creating User Constants
You can create a User Constants class this using the New Class hyperlink in the Studio Browser, or by Right-clicking in the Studio Browser and selecting the New Class>>User Constants context menu option. There is also a class filter that controls whether user constant classes are visible.
The User Constants class editor allows you to define the name, type, subtype, value and description of user constants. User constants can be named however you like, including the prefixes “k” and “ev” which are used for built-in constants and events.
When entering new user constants, Omnis looks at the previous user constant and if it is of type Integer, Omnis adds 1 to the value of the newly created constant. If the previous constant is not of type Integer, Omnis uses the default value.
If you try to delete a user constant, the editor will check the current library to see if the constant is in use, and warn you about this.
The Catalog lists the user constants under the User Constants tab. This has similar behaviour to the Variables tab.
Method Editor and Code Assistant
User constants have a syntax colour and style defined in the “IDEmethodSyntax” group of appearance.json: userconstantcolor and userconstantstyle.
The code assistant default sort order includes user constants at the start of the list, sorted with instance variables, etc.
Also, the option click menu, opened when you right click on a user constant, is a subset of that which applies when you right click on a file class variable.
The Method Editor and other editors in the IDE have validations to prevent user constants from being used where their value could be changed. Similarly, debugger variable windows do not allow user constants to be modified. However, it is impossible for the IDE to detect every such situation, e.g. due to expressions generated at runtime using square bracket notation, so in addition, as a fallback, the low-level code managing the CRB also checks for attempts to modify a user constant, and generates a runtime error if something attempts to do this.
Notation
There is a notation group in $clib, named $userconstants, supporting similar notation to $files. However, user constants classes do not have $conns, $datahead or $indexes members, and user constant objects only have the properties $desc, $ident, $name, $objinitval, $objtype, $objsubtype, $objsublen and $userinfo. $objinitval contains the value of the constant.
Using the class notation for a user constants class is the only way you can programmatically modify the value of a user constant.
The $classtype value for a user constants class is kUserConstants.
Using Tasks
Omnis contains two environments, a design mode and a runtime mode. In design mode, you can create and store classes in your library. In runtime mode, various objects or instances are created as you run your application. You can group and control the runtime objects in your application by opening or instantiating them in a task. You can manipulate whole groups of instances by manipulating their task, rather than having to deal with each separate instance. You define a task in your library as a task class, or for web and mobile applications as a remote task.
Task classes can contain variables and methods, and you can define custom properties and methods for a task class as well. When you open a task you create an instance of that task class. The task instance is unique in Omnis in that it can contain other instances including remote form instances or report instances (plus window, toolbar, and menu instances for desktop apps). Task instances cannot contain other tasks. When you open an instance from within a task it belongs to or is owned by that task.
By opening and closing different tasks, or by switching from one task instance to another, you can control whole groups of objects. Omnis provides certain default actions which happen as the task context switches. You define exactly what happens in the task by creating methods in the task class. For example, in the task in a desktop app you can specify which windows are opened and which menus are installed using commands or the notation.
Each library contains groups of task classes called $tasks or $remotetasks (inside $root.$libs.LIBRARYNAME), and Omnis has a group containing all open task instances and remote task instances, called $root.$itasks or $root.$iremotetasks, listed in the order that they were opened.
Default and Startup Tasks
When you create a new library, it contains a task class called Startup_Task by default. For web or mobile apps using Remote forms, you need to create a Remote_Task to handle client connections and remote form instances in web and mobile apps: see Remote Tasks. When you start to create your library, and especially if you are prototyping your application quickly, you will not need to create any new tasks, since a lot of the behavior provided by tasks is handled automatically.
When Omnis opens, it creates a task instance for the IDE to run in. This task is called the default task, and is represented in the notation as $root.$defaulttask. This task instance contains all the IDE objects such as the Browser, Catalog, Property Manager, and so on.
When you open a library, an instance of the startup task is created automatically. From there on all instances opened in the library are owned by the startup task. You can delete the startup task, or you can create other tasks for your application components to run in.
It is not essential to add tasks to your library, your library will safely execute in the startup task, or the default task along with the IDE objects.
The startup task instance has the same name as your library. For a simple application, the startup task will probably be all you need, with all the other class instances belonging to it. The startup task remains open for as long as the library is open, but you can close it at any time using a command or the notation. You can change the name of the task to be opened on startup by setting the library preference $startuptaskname: for all new libraries this is set to Startup_Task by default.
If you have an application that spans multiple libraries, often only the library used to start the application will have a startup task. If a library is opened using the Open library command with the option Do not open startup task, the startup task is not instantiated. In design mode, you can stop a library’s startup task from running if you hold down the Alt/Option key as you open your library.
Handling Application Focus Events
You can control application focus events generated by the Operating System using the task methods $omnistofront and $omnistoback. These methods can be added to the Startup task in your library.
$omnistofront
called when Omnis is brought to the front by the Operating System as a result of a user action such as a mouse click or alt-tab key combination. On macOS, an extra boolean parameter is passed to $omnistofront. If the value of this parameter is kTrue, the user has clicked on the Omnis Icon in the Dock. If a user clicks on the Omnis Dock Icon, $omnistofront will be called twice. The first call will be generated as a result of an OS AppActivated event and the parameter value will be kFalse. The second call will be generated as a result of the Dock click and the parameter value will be kTrue.
$omnistoback
called when Omnis is sent to the back by the Operating System as a result of a user action such as a mouse click or alt-tab key combination. For $omnistoback you should only use Omnis code which produces a non-visual result. Attempting to open windows, and so on, while Omnis is losing the application focus may have undesirable affects and is not supported.
Main Window Resize Message (Windows only)
The task message $mainresized is called when the main Omnis application window has been resized on the Windows platform (it does not apply on macOS). $mainresized has two parameters, pWidth and pHeight, which are the dimensions of the available area of the main window (excluding any docking areas if present). When the main window is minimized the parameters are both zero. You could use the Width and Height dimensions to readjust the layout of end user windows based on the available area of the application window.
In addition, the sys functions sys(251) and sys(252) return the width and height of the available area of the main window, respectively.
Creating Task Classes
This section describes how you create a task class from the Browser.
To create a task class
Open your library and select it in the Browser
Click on New Class and then the Task option
Name the new task
Double-click on the task class to modify it
You modify a task class in the method editor. You can place in the $construct method any code that you want to run when the task is opened. For the Startup_Task, the $construct method is executed when you open your library. You can add any other custom properties and methods to the task, as well as any type of variable.
Opening Tasks
Apart from the startup task instance, which is opened automatically when you open your library, you can open a task using the Open task instance command or the $open() method. Any parameters you supply with the command are sent to the task’s $construct method.
Open task instance MyTask/TaskInstance2 (p1,p2,...)
Alternatively you can open a task instance using the $open() method.
Do MyTask.$open('TaskInstance2',p1,p2,...) Returns iTaskRef
Current and Active Tasks
Omnis keeps references to two different tasks, the active task and the current task, to keep track of the tasks that own the topmost instance or GUI object and the currently executing method. The active task is the task that owns the topmost open window, installed menu, or toolbar currently in use. The current task is the task that owns the currently executing method.
A task context switch occurs when Omnis changes the current or active tasks. As Omnis runs your library, the current and active tasks may point to different task instances depending on the user’s actions.
The Active Task
The active task is affected by the user, and is typically the task containing the topmost open window. When an instance belonging to another task is selected, Omnis performs a task context switch. As part of the context switch, messages are sent to both tasks. The active task gets sent a $deactivate() message, and the new active task is sent an $activate() message.
When the active task changes, you can use the $activate() and $deactivate() messages to perform other relevant actions such as hiding other windows, installing menus, and any other requirements your application has.
In order for Omnis to perform an automatic task context switch when the user selects an instance belonging to another task, the task’s $autoactivate property must be set to kTrue.
Omnis can install and remove menus and toolbars automatically during task context switches. Menu and toolbar instances each have a $local property that you can set. When set to true, the menu or toolbar instance is made local to the task that owns it. When a task context switch occurs, local menus for the previously active task will be removed from the menu bar, and any local menus instances owned by the new active task will be installed. Toolbars behave similarly. If the tasks use different docking areas, Omnis will not hide the docking areas, only the toolbars.
You can change the active task using the notation, rather than waiting for the user to initiate a task context switch. To do this, you can set the property $root.$activetask to a different task instance name to switch tasks.
The Current Task
The current task is under the control of Omnis itself, and is the task instance which contains the currently executing method. When a custom attribute or event is sent to an instance, the current task is switched to the task which owns the instance, and when control returns from that attribute or event, the previous task is restored.
When the current task changes, messages are sent to both tasks. The current task is sent a $suspend() message, and the new current task gets a $resume() message. If the new current task is being instantiated for the first time, it gets a $construct() message rather than the $resume().
In order to avoid endless recursion a task does not get suspend or resume messages during the execution of a suspend or resume method.
Since $suspend() and $resume() are likely to be called frequently, it is important that the code for them should be kept as short and efficient as possible and should not:
You can find out the name of the current task using the notation $ctask().$name, and the task that owns the instance by using InstanceName.$task().$name.
Closing Tasks
You can close a task instance using the Close task command or the $close() method. When you close a library all its task instances are closed, and when you quit Omnis the default task is closed and all instances belonging to the default task are closed.
When you close a task, all instances belonging to that task are closed or destructed providing they can be closed. When instances are closed, a message is sent to the instance asking it to confirm whether or not it can be closed. If the instance returns a false message, Omnis will not close that instance. For tasks, each instance belonging to the task is sent the message, and then the task itself is sent the message. If any of the instances belonging to the task cannot be closed, none of the instances nor the task instance are closed.
Task Variables
Task classes can contain both class and instance variables of any standard Omnis data type. Tasks can also contain task variables, which are accessible to any instance owned by the task. As with other variables, you create task variables in the variable pane of the method editor.
When two or more types of variable use the same variable name (this is not recommeded), a reference to that variable may be ambiguous. In this situation, Omnis uses the variable with the smallest scope automatically. All other variable scopes have precedence over task variables.
When a method in a code class is called from another class or instance using the Do code method command, the current task continues to point to the calling method. This allows methods in a code class to have access to the task variables from the calling method.
The Design Task
In order for task variables to be available to you for use in design mode, you must establish a connection between a class and the task whose variables you want to access. You do this by setting the design task ($designtaskname property) for the class. The design task determines which task variables are available to the class: if no design task has been set, the method editor does not let you declare or see any task variables.
Setting the design task for a class doesn’t guarantee that the task will be available in runtime when you open your class, nor will Omnis automatically create an instance of the task. The design task is simply a way to give you access to a set of task variables while you create the classes in your library.
You can also access task variables without setting a design task by referring to the variable as $ctask.variablename. This assumes that the variable will always belong to a task and can therefore default to the current task.
If you attempt to access a task variable in an instance, and that variable is not available in the task, a runtime error of ‘Unrecognized task variable’ will be generated, and the variable will have a NULL value.
If you rename a task variable, any references to it are not renamed. Also if one with that name ceases to exist, references to it which were entered as VariableName are shown in design mode as $ctask.VariableName. Similarly, if some code containing a task variable is pasted into a different class, any task variables used by that code are not copied into the destination class.
Private Instances
Normally an instance is visible to other tasks and you can reference it using the notation from anywhere in your library. However you can override this default behavior by making an instance private to the task that owns it. You can do this by setting the instance’s $isprivate property to kTrue.
When you make an instance private, you cannot destruct it, make references to it, or even see it unless you are within the task that owns it. A task can even be private to itself, so it can be closed only when it is the current task. If access to a private instance is required from outside of the task, an item reference can be set to the instance, and the item reference can be passed outside of the task. Once this has occurred, the item reference can be used to manipulate the instance.
The $root object has a series of object groups, one for each instance type, that are represented in the notation as $iwindows, $imenus, $itoolbars, $ireports, $itasks. Each of these object groups displays all public instances, as well as instances which are private to the current task. As the current task changes, the contents of these groups may change to reflect the private instances present in your library.
Private Libraries
Libraries can be private to a task, and both the library and its classes are visible only to that task.
The group of open libraries, $libs, contains a private library only when the task which owns that library is the active task. The Browser does not display classes from a private library. Standard entry points to the debugger such as shift-click on a menu line do not enter the debugger if the menu belongs to a private library.
As with private instances, if an item reference to any object within a private library is passed to an object outside the library, it is able to access the library using notation.
You can make a library private by setting its $isprivate property to true. This is normally done immediately after opening the library, but can be done at any time as long as the task which owns the library is the active task. Libraries also have the $alwaysprivate property, which, if set, means they are always and immediately private to their startup task.
Private libraries have an additional property, $nodebug, which keeps the debugger from being entered for any reason when code from that library is executing, including errors, breakpoints, and the stop key. Code from a private library with $nodebug set does not appear in the stack menu or the trace log.
When a task is closed, it closes all its private libraries unless they cannot be closed. This can occur if, for example, the library has instances belonging to other tasks. If a private library cannot be closed, it will become non-private.
Multiple Tasks
When designing an application, you might want to partition your library by creating modules containing all of the windows, reports and methods of like functionality. Each module can have its own menus and toolbars. An example containing such modules might be an accounting package, with General Ledger, Accounts Payable and Accounts Receivable modules.
In a totally modal application, where the user switches between modules, it is easy to ensure that the user sees the correct menus and tools for the current module. In a modeless, multi-window environment, controlling this can sometimes be difficult. Tasks automate the process of creating modular applications by providing all the management of menus and tools for you.
Consider the following example in which a single library is running three tasks: the Startup_Task and two user tasks Task1 and Task2. The startup task, which opens automatically when the library opens, contains an About window. The other two tasks each contain a window, a menu, and a toolbar. When the user selects a window from either Task1 or Task2, you may want Omnis to display the correct tools and menus for that window automatically.
When the library opens, the startup task opens and displays the About window and then opens the other tasks, each of which opens its window and installs its menu and toolbar. The startup task can close itself once the About window is closed if it’s no longer needed.
To open the two tasks, you should execute the following in the $construct method of the startup task
Open window instance AboutWindow
Open task instance MyTaskClass1/Task1
Open task instance MyTaskClass2/Task2
Close task instance LibraryName
Every task has a property $autoactivate, that allows the task to take control whenever the user tries to bring a window it owns to the front. If the property is set to false, the window won’t come to the front. To activate each task automatically, you need to execute the following in the $construct of each task
Do $ctask.$autoactivate.$assign(kTrue)
To ensure that your menus and toolbars show and hide appropriately as the tasks change, you need to set the $local property for each class. By making each menu and toolbar local to the task that owns it, Omnis hides and shows them automatically as the task context changes.
In the $construct for a task, you can install your menu and toolbar, and set their $local property. For example
Do $menus.MyMenuClass1.$open('Menu1') Returns iMenuRef
Do iMenuRef.$local.$assign(kTrue)
Do $toolbars.MyToolbarClass1.$open('Toolbar1') Returns iToolRef
Do iToolRef.$local.$assign(kTrue)
Do $windows.MyWindowClass1.$open('Window1') Returns iWinRef
You can do the same for the other task.
Do $menus.MyMenuClass2.$open('Menu1') Returns iMenuRef
Do iMenuRef.$local.$assign(kTrue)
Do $toolbars.MyToolbarClass2.$open('Toolbar1') Returns iToolRef
Do iToolRef.$local.$assign(kTrue)
Do $windows.MyWindowClass2.$open('Window1') Returns iWinRef
This functionality will change menus and toolbars as you switch from one window to the other.
Preferences on macOS
The macOS application menu has a Preferences item. You can arrange for Omnis to call a method in a task, when the user selects this menu item. To do this, define a method called $prefs in your task. When the user selects Preferences from the application menu, Omnis calls the $prefs method.
If more than one task defines $prefs, Omnis installs a hierarchical menu on the Preferences menu item. Each task has an item in the hierarchical menu. In this case, each task must also contain a method called $prefsmenutext. This method must return the text to display for the task’s item in the hierarchical menu, for example
Quit Method “My Library”
External Component Notation
The $components group under $root contains all the installed external components available in your XCOMP folder. You can view the contents of the $components group using the Notation Inspector.
Note that you manipulate an external component via its custom field properties, as shown below, not via the $root.$components...$compprops or $compmethods groups for the control. The groups under $root.$components is simply a convenient way of viewing the contents and functions of any external library or control.
The $components group has the standard group properties and methods, including $add() and $remove(), and you can list the components using the $makelist() method.
Do $root.$components.$makelist($ref.$name) Returns cCompList
You can drag a reference to any of the components from the Notation Inspector to your code, in the same way as other built-in objects. You can click on a component library in the Notation Inspector and view its properties in the Property Manager. Each component library has the following properties
$name
the name of the component which must be unique
$pathname
the name and path of the external library file: this will vary across different platforms
$functionname
the name of the external function
$controlhandler
Boolean that indicates whether the external is a control handler, for example, an ActiveX is a control handler
$constprefix
String used as a prefix for all constants within the external
$flags
indicates the external flags, for example, whether it is loaded
$usage
Current number of controls that are using this external
$version
the version information
You can view the contents of an external library in the Notation Inspector. Each component library has a group called $controls containing all the controls in the library. Some libraries may contain only one control, for example, the Slider Component Library contains the Slider Control only. A control contains its own events, functions (or methods), and properties in their own respective groups, as follows
$compevents
group of events for the control
$comprops
group of properties for the control
$compmethods
group of methods for the control
In the notation you treat an external component property or function as you would a standard built-in property or method, that is, you can use property and method names in the notation to manipulate and send messages to an external component field. Note that property and method names should include a dollar sign when you use them in the notation.
Do $cwind.$objs.ClockField.$facecolor.$assign(kBlue)
Do $cwind.$objs.QTfield.$Play()
In general, the properties of an external component are unique to the object and their names will not clash with standard Omnis field properties. However when an external component property has the same name as an Omnis property, you must access the external property using a double colon (::) before its name. For example, the Icon Field control has the property $backcolor which you must refer to using
Do $cinst.$objs.iconfield.$::backcolor.$assign(kRed)
At runtime you can add an external component to an open window using the $add() method. You need to specify the kComponent object type, external library name, external control name, and the position of the field. For example, the following method adds the Marquee Control to the current window instance, positions the new object, and sets some of its properties
Do $cinst.$objs.$add(kComponent,'Marquee Library','Marquee Control',0,0,15,100) Returns Objref
Do Objref.$edgefloat.$assign(kEFposnStatusBar)
Do Objref.$message.$assign('I hope you can read quickly!')
Do Objref.$steps.$assign(20)
Do Objref.$speed.$assign(20)
Do Objref.$::textcolor.$assign(kBlue)
Do Objref.$::backcolor.$assign(kRed)
Version Notation
All external components have the $version property. To get the version of an external component you must access it via the $root.$components group, not the external component field on a window or report. For example
Do $root.$components.Marquee Library.$version Returns lvXversion
If you have created any external components of your own to run under Omnis Studio version 1.x, you must recompile them for Omnis Studio 2.0.
Java Beans
Note the Java Bean ext comp is not longer installed in Studio 10 or above, but it can be obtained by contacting support.
The Java Bean external component has commands that let you control it in a Runtime Omnis. Note the Java Beans external is available under Windows only.
You request a command using the $cmd() method as follows:
$root.$components.JavaBean.$cmd(parameter list)
The parameters can be:
| "GetPaths", List |
Populates the specified single column list with the Java Bean search paths: no return value |
| "AddPath", NewPath |
Adds the specified path to the Java Bean search paths: returns true for success, or if the path is already present in the search paths |
| "DeletePath", DelPath |
Deletes the specified path from the Java Bean search paths: returns true for success |
| "EnumBeans" |
Enumerates Java Beans: returns the number of Beans found |
| "StartVM" |
Starts the Java virtual machine (to test if Java is installed): returns a string containing an error, or an empty string to indicate success |
| "SetupDialog". |
Opens the Java Bean component setup dialog |
| "RequestPath" |
Opens the “Prompt for Java Bean Path” dialog: returns a string containing the new path: empty if none selected |