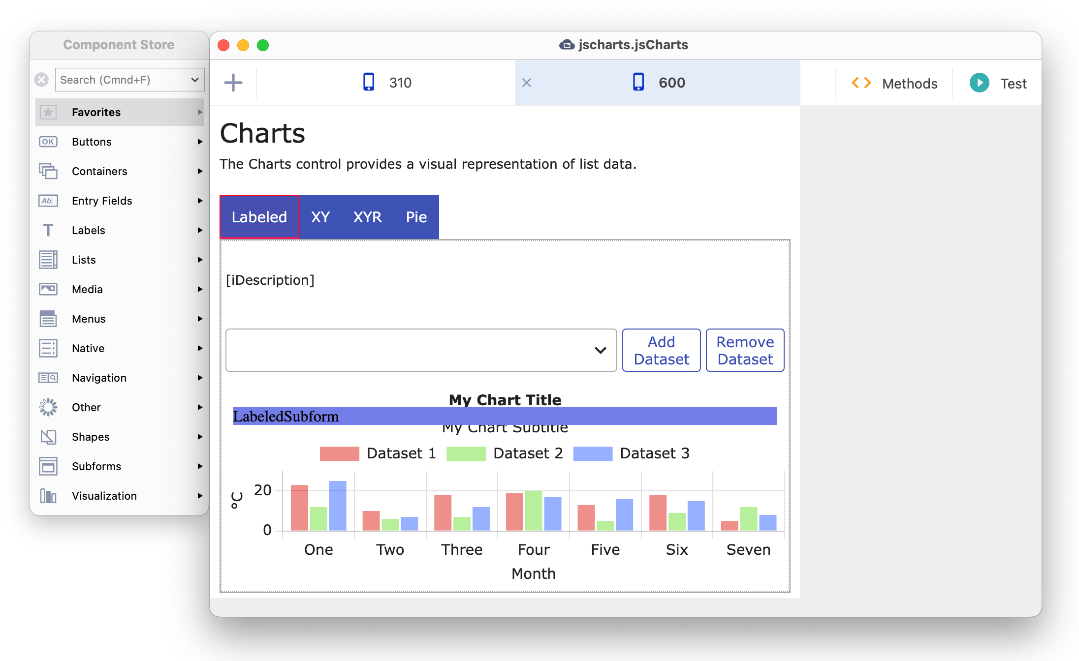
To create a web or mobile application in Omnis Studio, you need to create a Remote Form class using the JavaScript Components available in the Component Store in design mode. At any stage during the design process, you can test a Remote form by clicking on the Test button in the Design bar in the form, or by pressing Ctrl/Cmnd-T. Alternatively, you can Right-click on the background of a Remote form and select the Test Form option, to open the form in your default web browser, or you can select the Select Browser and Test Form option to select the browser in which to test the Remote form. The following screenshot shows the jsCharts Remote form in design mode in the JS Charts sample app:
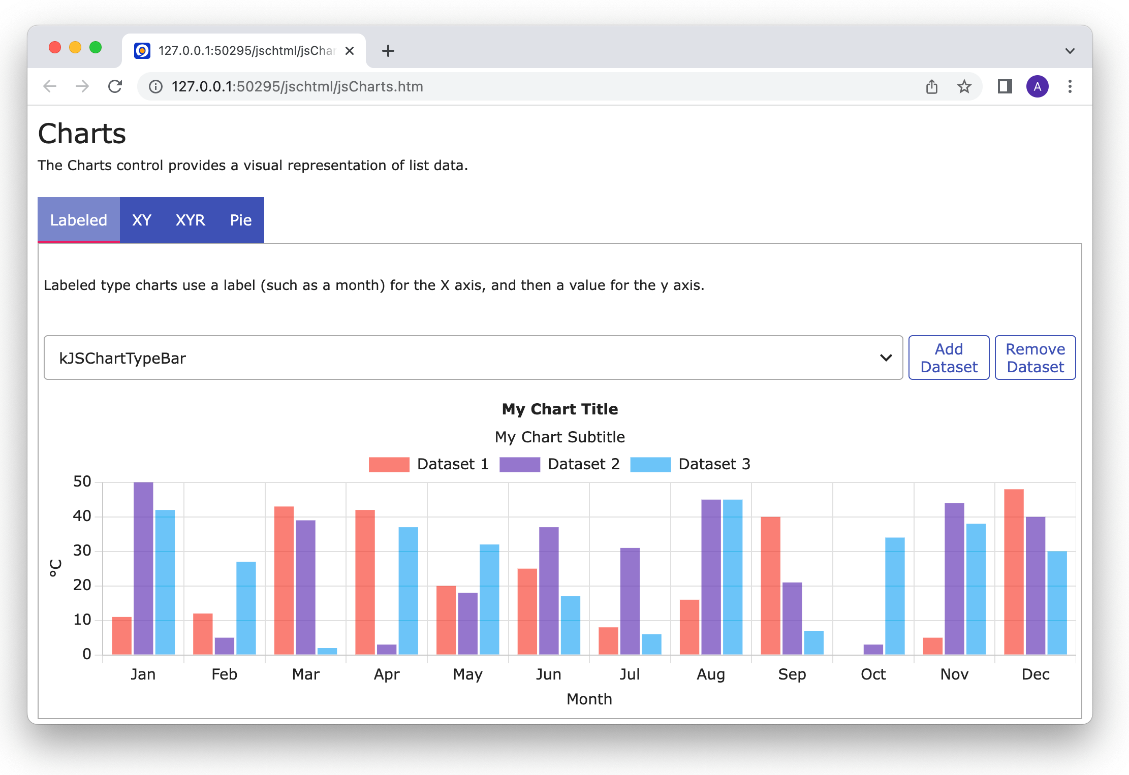
When you Test (open) a Remote form in design mode it will open in a web browser on your development computer. The remote form you created will be opened in a simple HTML template file in your web browser using the JavaScript Client and rendered using JavaScript and CSS created for you automatically. This is the JS Charts remote form opened in a web browser (you can view this app under the Samples option in the Studio Browser).
To test or open a remote form, your Omnis library also needs to have a Remote Task class which will handle the remote form instance(s) and any current connections to web or mobile clients. If your library does not contain a Remote task and you create a new Remote form (using a wizard, for example), Omnis will create a Remote_Task for you automatically; see Remote Tasks later in this chapter.
JavaScript Remote Forms and Remote Tasks are discussed in this chapter, while the individual JavaScript Components are described in the next chapter.
You can create a new Remote form class in the Studio Browser using the New Class>>Remote Form option, or the Class Wizard>>Remote Form option. The first option creates a blank remote form ready for you to drop in JavaScript components from the Component Store, while the second option launches the Remote Form Wizard, which helps you build a complete form, step-by-step (based on an existing Schema or Query class, and a SQL session).
If you create a new library in the Studio Browser using the Web and Mobile option, the new library will contain a Remote form (and a Remote task) ready for you to add your own JavaScript Components.
You can very quickly create a Remote form to access and browse your database in a web browser using the SQL JavaScript Form Wizard.
Before using the Remote form wizard, you need to create a schema class in your library, to match the data structure in your database, and you need open a session to your database. To create a Remote form using a wizard:
Create and open a session to your database in the SQL Browser
Create a Schema class based on your database table (drag a database table onto your library to create a schema class automatically)
Select your library under the Project Libraries option in the Studio Browser, and click on the Class Wizard option
Click on the Remote Form... option to launch the Remote Form wizard
Select the SQL JavaScript Form wizard (the default option), and step through the wizard, selecting your SQL session and schema columns to include in the form
The Remote form wizard provides the option to create a new server database connection, or use an existing connection, to enable you to logon to your database and view your data. The wizard also creates any schema classes required to match the data structure in your database. To create a Remote form using a wizard:
Select your library under the Project Libraries option in the Studio Browser, and click on the Class Wizard option
Click on the Remote Form... option to launch the Remote Form wizard
Select the SQL JavaScript Form wizard (the default option), name the new form and click on Create
Select an existing Remote Task or create a new one; some editions of Omnis Studio, including the Community edition, create a remote task for you automatically
Select the Form Type which matches the data you want to display in the form (single table or two tables in a parent/child relationship); for example, for a simple data entry form select 'One field per column based on schema or query class'
Next you can create a session (connection) to your database, or open one you already created in the SQL Browser. There is an option to 'Add Logon to Startup Task' which means Omnis will logon to your database when you open the library; if this option is disabled, Omnis will logon when this remote form is opened
Next you can select a database table to be used with the form, and Omnis will create a schema class automatically to match the server database table; alternatively, you can select an existing SQL class (schema or table) if you have previously created one in your library. You can select all or individual columns from the list of tables
These steps are described in detail in the Tutorial in the ‘Creating a Web Form using a wizard’ section, so you may like to work through that section if you want to try the Remote form wizard.
You can create a blank Remote form and add JavaScript components and code yourself.
Select your library under the Project Libraries option in the Studio Browser, and click on the New Class option
Click on the RemoteForm option
Name the New Remote Form and press Return
Like any other class in Omnis, the name of a new Remote form can be anything you like, but the name would normally take account of its function within your application. The class name does not have to conform to any convention other than any conventions you may like to use in your application to identify different class types: so, for example, your remote forms could be prefixed with “js” (short for JavaScript), such as “jsCustomerForm”.
You should note that the name of the Remote form class, plus the “.htm” extension, is used as the name of the HTML file which is created when you test your remote form in a web browser in design mode. Therefore, you should restrict any characters used in the name of your Remote form to only those normally allowed in a web context, or to be sure of removing all possible conflicts, you should only use alphanumeric characters and do not use spaces; you can use underscore to separate words if required. A remote form name cannot include the hash symbol (#) or other special symbols, since this may cause unexpected results in a web browser, or in the case of #, the remote form may not open in test mode at all. Omnis will warn you if you try to use any characters that are not allowed.
JavaScript Client
The JavaScript Client functionality is enabled by setting the $client property in a new remote form class. When you create a new remote form, either a blank one or using the Remote Form Wizard, Omnis will set the $client property to kClientJavaScript automatically, so the JavaScript Client is the default client for your web and mobile apps.
In previous versions, the kClientiOS and kClientPlugin values of $client were available, but these options have been removed from the Property Manager; in effect, the kClientJavaScript option is now the default or only possible value of $client.
Client Browser Support
The following Web Browsers support the Omnis JavaScript Client:
Chrome
Firefox
Edge
Safari
The JavaScript Client does not support Internet Explorer.
Please check the Install.txt file accompanying the latest release for the minimum versions of these browsers the JavaScript Client supports.
JavaScript Components
When you edit a remote form in design mode, the Component Store will be displayed, showing different JavaScript components in different groups. The following screenshot shows the Buttons group containing a number of related components, including the Button, Check box, and Switch controls.
See the JavaScript Components chapter for more information and example code for each JavaScript component.
When you create or modify a JavaScript Remote form class, the form design window is displayed in a Web Preview using the Chromium web browser built into Omnis (using the Chromium Embedded Framework or CEF), so you can see how your form will look at runtime in the end user’s web browser. Specifically, JavaScript controls (and JSON-defined controls) will look virtually the same in design mode as they will do at runtime in a web browser, including the visual effect of any CSS styles you have applied to the controls (using $cssclassname). In addition, your remote form and its controls will be displayed using the current JavaScript theme, which you can change by pressing Ctrl-J and selecting a different theme: see JS Themes.
To render the Web Preview, an HTML file is generated using the jsctempl.htm template file in the ‘html’ folder in the Omnis tree, or the file named in the $htmltemplate property in the design task, and placed in the ‘html/design’ folder; note the files in this folder are only used for rendering the Web Preview in design mode and are not required when you deploy your application.
Note to pre-Studio 10.2 users: Using old design mode
You should note that there are a few differences between the Web Preview mode for remote forms and the form design mode in previous versions, as follows:
There is no design grid available in the Web preview mode, so $showgrid is not present ($showgrid is not available if you switch to the old design mode).
Rulers are not supported in the Web preview mode, so the remote form context menu does not have an option to show Rulers; you can instead use Position Assistance to lineup and size the controls on your remote form.
Design DPI scaling does not apply in the Web preview mode.
The JS client uses box-sizing border-box, so the appearance of control borders may be different.
It is possible an exception will occur in the JS client running in the new Web preview mode: this does not have any effect on the validity of the remote form class. If this occurs, a message will be displayed for 5 seconds, and the error will also be logged to the trace log. In this case, you should close and re-open the remote form editor after an exception.
Remote Tasks
To test or run your remote form in a web browser, your library must contain a Remote Task and the $designtaskname property of your Remote form must be set to the name of a Remote task in the current library. When you create a new library or Remote form, Omnis will in most circumstances create a Remote task for you; the following points summarize how this is handled:
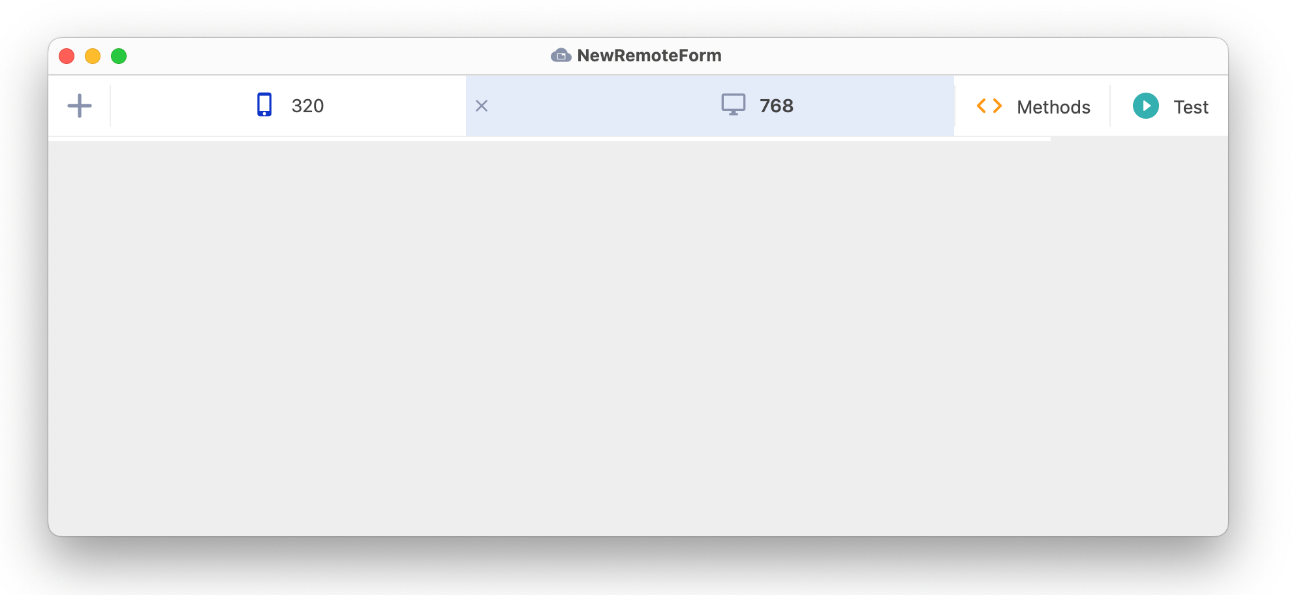
If you create a new library in the Studio Browser using the Web and Mobile option, the library will contain a NewRemoteForm and a Remote_Task and the $designtaskname property of the form will be set automatically.
If you create a new Remote form in an empty library (i.e. without an existing Remote task), and try to Test the form, a new Remote_Task will be created automatically and the $designtaskname property will be set to that task.
The Remote form wizard (SQL JavaScript Form) creates a new Remote_Task if a task class does not already exist in your library and sets the $designtaskname property of the form automatically.
If you try to open a remote form without a remote task in your library, or without $designtaskname being set to a remote task name, Omnis displays an error message and the form will not open.
If your library contains multiple remote tasks, and you create a new Remote Form from the Studio Browser (using the New Class option, not the wizard), the $designtaskname property will not be set, so you will have to assign the design task name manually before you can test the remote form.
Creating Remote Task Classes using Wizards
For the purposes of prototyping and testing your web or mobile application, you can use the Remote tasks created for you automatically. You will need to edit the Remote task when you are ready to deploy your application, or if you want finer control over the processes in your web application. However, if you want to create a Remote task, you can use one of the templates or wizards provided in the Studio Browser.
To create an empty remote task
A suitable alternative would be the Plain remote task, described below.
To create a remote task using a class wizard
Click on Class Wizard option in the Studio Browser and then the Remote Task option
Select the wizard you want, name the new class and click on Create
The following wizards/templates are available:
Plain Remote Task
creates an empty remote task containing an $event method with code for evBusy and evIdle events; this is suitable for running JavaScript Remote forms.
Monitor Remote Task
creates a task and remote form/window to monitor remote connections from within your application when deployed on the Omnis App Server.
HTML Report Task
creates a task to generate HTML reports on the fly
Submit_Task
creates a task and standard HTML file containing a submit form which interacts directly with Omnis; note the HTML file created using this wizard does not use the JavaScript Client.
$enablesenddata Property
Existing users should note that the remote task property $enablesenddata should be set to kFalse for all remote tasks controlling JavaScript remote forms since the $senddata() method is not implemented for JavaScript remote forms. Therefore, this property is not necessary in new web or mobile applications using the JS client and may not be shown in your version of Omnis Studio.
Plain Remote Task Wizard
The Plain Task wizard creates a basic template remote task that is suitable for linking to most simple remote forms. The Plain remote task also has an $event() method containing a template event handling method that detects evBusy and evIdle events in the task. You can add your own code to handle these events.
The Plain Remote Task has a $construct() method containing a parameter variable called pParams of type Row Variable. This row variable receives all the parameters of the JavaScript Client, such as the remote form name, the client width and height, and the user agent string: see below.
When you create a task using the Plain Task wizard you can specify the Inherit from Monitor task option. This option adds a set of “monitor” classes to your library which allows you to record client connections associated with the new plain task you are adding to your library. If you check the Monitor option, the wizard prompts you for details about the new monitor task. If your library does not contain a monitor task, you need to specify the Create New Monitor Task option. If, however, your library contains a monitor task, you can specify the Use Existing Monitor Task option to add the new plain task you are currently adding to your library to the existing monitor.
Monitor Remote Task Wizard
The Monitor wizard (or checking the ‘Inherit from Monitor task’ option in the Plain Task wizard) creates a number of “monitor” classes, including a new task and monitor Remote form and /or Window class, that allow you to record remote connections between web or mobile clients and your application hosted on the Omnis App Server.
The wizard prompts you to enter the name of the new Monitor remote task and remote form for displaying the connection results and activity: alternatively, the wizard can create a desktop window class, or both the remote form and window classes. In addition, an extra pane allows you to identify the remote task in your library that needs to have the Monitor set for its superclass (this had to be set manually in versions prior to Studio 10.x).
The Amend Startup Task option lets you add code to the Startup_Task in the current library to open the Monitor form/window at startup; this is checked by default.
The Monitor form/window has three panes. The Connections pane shows the connections grouped by remote form name. The History and Server Usage panes let you monitor the traffic flow on your Omnis App Server and provide some general information about server usage. You can print the server usage using the Print Report button.
Server Management Library
The Server Management Library contains the same Monitor classes (as created in the Monitor wizard) that you can use to monitor an instance of the Omnis App Server; the servermgmt.lbs library is located in the /webserver folder under the main Omnis folder.
On Windows, the Server Management Library can display a tray icon. To enable the icon, you need to set the "showTrayIcon" item in the "servermgmt" section of the config.json file to true.
The remote task of your library can inherit the behavior of the Monitor task in the Server Management Library using servermgmt.Monitor in the $superclass property of your own remote task, and using the command Do inherited in the $construct of your own remote task.
Remote Task Instances
When the JavaScript Client first connects to the Omnis App Server, Omnis creates an instance of the Remote Task Class associated with the Remote form class to which the client is connecting (and specified in the $designtaskname property of the remote form). Once the remote task class has been instantiated, next the Remote form instance is created. The $construct method of first the Remote task and then the Remote form are run, so these methods can include any code you want to run prior to opening the form (in the task construct method) or when the form is opened.
$order property
The $order property is an integer that uniquely identifies the remote task instance within the lifetime of the Omnis Server (since it was started). The value will not be re-used for a different remote task until the Omnis Server is restarted. Also, values are unlikely to be incremental.
Construct Row Variable
When a form is opened and the Remote task and Remote form instances are created, Omnis passes a parameter variable of type Row to the $construct() method of the Remote task and then the Remote form (in that order); this is called the Construct Row parameter variable. The row variable contains a column for each parameter of the JavaScript Client Object instantiated on the client: therefore, it will include columns for OmnisLibrary name and OmnisClass name (as defined in your HTML file), as well as extra columns containing additional information about the client object.
There is an example app called Construct row under the Samples option in the Studio Browser showing how you can return information from the construct row; the same app is available in the Omnis Components app on the Omnis website.
The construct row variable will contain the following columns and typical values:
| OmnisLibrary |
<OmnisLibrayName> minus the .lbs extension |
| headers |
a row with each column matching a name-value pair for each HTTP header received from the client, e.g. Host: developer.mozilla.org will include the header 'host' as the column name with the 'developer.mozilla.org' as the value. The header name is lowercased and all hyphens are removed, e.g. Accept-Language becomes acceptlanguage, and any spaces at the beginning are stripped out |
| cookies |
a row with each column matching a name-value pair for each cookie, for example cookie1=hello will result in a row with the column name 'cookie' and 'hello' as the value |
| OmnisClass |
<RemoteFormName> e.g. jsRemoteForm |
| appid |
<OmnisLibrayName>.<RemoteFormName> |
| param1, 2, .. 9 |
Up to 9 pre-defined custom parameters called param1, param2, etc, which receive the values in the parameters added to the JavaScript Client object in your HTML page; you can add custom parameters prefixed with “data-“ to send further values to the remote task or form $construct method, e.g. data-param1="123" data-param2="abc", etc. |
| OmnisPlatform |
JSU, the JavaScript Client |
| JSscreenWidth |
The screen width of the client, e.g. 2048 for desktop |
| JSscreenHeight |
The screen height of the client, e.g. 1152 for desktop |
| JSscreenSize |
The initial setting of $screensize (only applies to kLayoutTypeScreen based forms in Studio 8.0 or earlier, so not relevant for responsive remote forms) |
| JSDeviceInfo |
Device screen size (Width x Height) and density, e.g. 1920x1080 (devicePixelRatio:1) for desktop with standard monitor, 360x640 (devicePixelRatio:2) for mobile phone with HD display |
| clientPlatform |
The platform on which the client is running, one of the following strings: 'Windows', 'macOS', 'Linux', 'iOS', 'Android' or 'Unknown' |
| userAgent |
The navigator.userAgent of the client, which usually contains the browser type and version (e.g. Mozilla/5.0) |
| href |
the client's location.href, which is the URL the client browser has used to connect to the JS Client, including any URL params |
| appName |
The navigator.appName of the client, i.e. the browser application name, e.g. “Netscape” (or “Microsoft Internet Explorer” for older clients) |
| Flags |
Currently indicates if the client supports animation: 1 means the browser does support animation, zero means that it does not |
| JStimezoneOffset |
offset from UTC in minutes, e.g. “60” for clients on UTC+1, “120” for clients on UTC+2, etc. |
| ClientLocale |
the Locale language setting of the client, e.g. “en_GB” for clients in the UK, or “en_US” for America |
| theme |
The current JS theme as set in the $javascripttheme Omnis preference (e.g. ‘default’) |
| URLparams |
One or more parameters added to the URL for the web page containing your remote form; see below. For example, ?x=y&a=b appended to the URL are returned as a JSON object string {"x":"y","a":"b"} |
| window_ |
specified as data-window, a comma-separated list of members of the JavaScript 'window' object; see below |
| localpref_ |
specified as data-localstorage, a comma-separated list of preference names saved to localStorage; see below |
The appName and userAgent columns return properties of the client browser and therefore allow you to determine which browser and version the client is using, such as whether it is a desktop or mobile browser.
Using the Construct Row Variable in your Code
If you want to use the values in this parameter variable, you can create a parameter variable of type Row in the $construct() method of your remote task or remote form which will receive the parameter variable when the task/form is constructed. To examine the values in the variable, you can set a breakpoint in the $construct() method of your remote task or remote form, open the form (using Ctrl-T), and Omnis will switch to the debugger allowing you to right-click on the variable to examine its value.
The following example uses the screen size of the client device to set the size and position of various controls in the initial remote form for the app. The $construct() method of the remote form receives the pRow parameter row variable containing the screen size of the client device, and calls another method to setup the columns for a data grid control on the main remote form:
Calculate iScreensize as pRow.JSScreensize
Do method setupSizes
Etc.
Switch iScreensize
Case kSSZjs320x480Portrait
Do $cinst.$objs.pagePane.$objs.orderGrid.$::columnwidths.$assign("150,50,50,70")
Case kSSZjs320x480Landscape
Do $cinst.$objs.pagePane.$objs.orderGrid.$::columnwidths.$assign("70,40,40,70")
Case kSSZjs768x1024Portrait
Do $cinst.$objs.pagePane.$objs.orderGrid.$::columnwidths.$assign("300,75,75,175")
Case kSSZjs768x1024Landscape
Do $cinst.$objs.pagePane.$objs.orderGrid.$::columnwidths.$assign("250,75,75,175")
Default
Do $cinst.$objs.pagePane.$objs.orderGrid.$::columnwidths.$assign("100,50,60,75")
End Switch
Passing Additional Parameters via a URL
You can pass additional parameters to a remote task (or remote form) from the JavaScript Client by adding the parameters to the URL for the web page containing your remote form. This is in addition to the parameters that can be sent to the remote form or task in the construct row variable, and any that may be quoted in the HTML page containing your remote form using the data-param1, data-param2,.. tags.
The additional parameters can be appended to the URL pointing to the remote form in the following format:
http://127.0.0.1:5988/jschtml/rfSetCurField.htm?x=y&a=b
The JavaScript client adds the parameters as an optional column called URLparams in the row variable passed to the $construct() method of the remote form and remote task. The data in URLparams is encoded as a JSON object string, e.g. if the URL params are x=y&a=b, as above, the JSON object string has the value {"x":"y","a":"b"}. You can use the new OJSON static function to convert this to a row:
Do OJSON.$jsontolistorrow(pRow.URLparams) Returns lRow
where lRow is a row variable. For the JSON above, the value of lRow.x will be 'y' and lRow.a will be ‘b'. Note: the client also decodes any special encoded URI characters before generating the JSON, e.g. %3D will become =.
You can send data or content to the $construct method of a remote form by specifying some extra attributes in the Omnis JavaScript object, contained in a <div> called “omnisobject1”, as follows:
data-localstorage
A comma-separated list of preference names saved to localStorage (e.g. using the 'savepreference' $clientcommand), whose values should be sent to the $construct row in the form. They can be named "localpref_<prefName>"
data-window
A comma-separated list of members of the JavaScript 'window' object, whose values to send to the $construct row in the form. You can use dot notation to access nested children. The columns returned to Omnis will be named "window_<memberName_childName_...>". Column names have a max length of 255 characters
For example, the following parameters added to the omnisobject (shown in bold) will send the pixel ratio of the current device, plus the myPref1 and myOtherPref parameters from local storage to the $construct of the remote form:
<div id="omnisobject1" style="position:absolute;top:0;left:0"

data-webserverurl="" data-omnisserverandport="" data-omnislibrary=""

data-omnisclass="" data-dss="" data-param1="" data-param2=""

data-commstimeout="0" data-window="document.URL,devicePixelRatio"

data-localstorage="myPref1,myOtherPref"></div>
Class Cache Logging
You can log and control the caching of classes in the JavaScript Client. For most applications, you should not need to use the cache logging and control, since the default behavior of caching all class data to localStorage provides the best performance, and is adequate for most remote forms and data.
The options are only provided if you find your application reaches the limits of localStorage (e.g. with a very large application) and you need to examine and control the contents of the cache.
If you have reached the localStorage limit, and need to manually clear the cache, you can do so by running the following JavaScript code in your browser:
localStorage.clear();
To enable the cache logger, the omnisobject <div> can have two optional attributes:
"data-logcaching"
If present, data will be collected on the caching of class data, etc in localStorage.
This can be accessed by querying the JavaScript object jOmnis.omnisInsts[0].cacheLogger. It has methods getCacheLog() and printLocalStorage() to provide useful information in the browser console. If given the value "verbose", it will print caching messages to the console as they occur.
"data-onlycacheclasses"
If present, cache only the class data for the specified classes in localStorage.
A comma-separated list of Remote Form classes whose data should be cached.
In the format "<library name>.<form name>". E.g: "myLib.jsForm1,myLib.jsForm2"
#STYLES is handled separately, per-library. To enable caching of styles, add an entry "<library name>.#STYLES"
These parameters will need to be added to or enabled in the HTML page containing the initial remote form for your web or mobile application (they could also be added to enabled in the jsctempl.htm file, although the cache logging does not need to be enabled for most applications).
The remote task instance has a method, $changeform(), which enables you to replace the form currently in use on the client, with another form in the same library. $changeform() has a single argument, which is the new remote form name. When it executes, the current form instance destructs, and the client constructs an instance of the new form to display in the user’s browser. You can use task variables in the remote task instance to pass information between the destructed remote form instance, and the new remote form instance.
There are some restrictions to note:
$changeform() cannot be used in the $construct() or $destruct() method of a remote form instance or remote task instance. If used, Omnis generates a runtime error.
Multiple calls to $openform() (described later) or $changeform() during the processing of a single event will result in only the last call to $openform() or $changeform() having any effect.
One scenario for using $changeform() is where the end user is required to log onto your web application, whereby the initial “logon” form prompts the user for a name and password, and the application changes to another form when the user has successfully submitted a valid name and password.
You can open more than one form within a single client connection, that is, within a single remote task instance. At any one time, only one of these multiple instances is visible, and the forms must be from the same library.
There are two methods of a remote task instance which you can use to manage multiple forms: $openform() and $closeform(). Like $changeform(), both these methods take a single argument, the remote form name.
If the form passed to $openform() already has a remote form instance open in the context of the remote task instance, it becomes the visible form for the remote task. Otherwise, Omnis constructs a new instance of the remote form in the remote task, and makes the new remote form instance the visible form.
The $closeform() method closes (destructs) the remote form instance for the named form, without closing the task instance or any other forms that may be open within the task. It is possible to close the last remaining remote form instance, but this is not recommended, since the end user will be presented with a blank screen. If the referenced form is not visible, the client observes no effect; otherwise, the most recently visible open remote form instance becomes visible.
There are some further restrictions to note:
$closeform() and $openform() cannot be used in the $construct() or $destruct() method of a remote form instance or remote task instance. If used, Omnis generates a runtime error.
Multiple calls to $openform() or $changeform() during the processing of a single event will result in only the last call to $openform() or $changeform() having any effect.
Calling $showurl() or $showmessage() in the $destruct() method of a remote form has no effect.
All forms must be in the same library.
You can use task variables to handle communication between multiple remote form instances in a remote task instance.
To facilitate communication between different remote form instances, remote forms can also receive the event evFormToTop. In design mode, you can enable this event for a form, using the $events property of the form. The event generates a call to the $event() method of the remote form. evFormToTop occurs when an existing remote form is about to become visible on the client as a result of a call or calls to $openform() or $closeform().
Client Access Properties
Remote tasks have a number of properties for managing the connections between the Omnis App Server and the web or mobile clients connected to your application. These properties will be populated only when there are live remote task and remote form instances created by a client connection.
$connectbytessent
specifies the number of bytes which have been sent to the client during the connection. This property is set after $construct() has been executed.
$requests
specifies the number of events executed on the server. Excludes connect and disconnect messages. Updated prior to evBusy message.
$reqtotbytesreceived
the total number of bytes received from the client for all requests. To calculate an average per request, you can divide this value by $requests. Updated prior to evBusy message.
$reqtotbytessent
the total number of bytes sent to the client for all requests. To calculate an average per request, you can divide this value by $requests. Updated prior to evIdle message.
$reqmaxbytesreceived
The largest block in bytes received from the client for all requests. Updated prior to evBusy message.
$reqmaxbytessent
The largest block in bytes sent to the client for all requests. Updates prior to evIdle message.
$reqcurbytesreceived
The number of bytes received from the client for the current request. Updated prior to evBusy message for the current request.
$reqcurbytessent
The number of bytes sent to the client for the current request. Updated prior to evIdle message.
Timeouts
You can control how long someone is connected to the Omnis App Server and how long a single client connection can remain idle, using the following properties.
$maxtime
the maximum time in minutes that a client is allowed to stay connected; the default value is 0 which means the client can stay connected indefinitely.
$timeout
the maximum time in minutes that a client is allowed to stay idle; the default value is 0 which means the client is allowed to stay idle indefinitely.
Client Connections
Remote tasks have some properties that tell you about the current client connection.
$clientaddress
the TCP/IP address of the current client. Note that this may not be the exact TCP/IP address of the client machine, due to the possible presence of proxy servers and firewalls between the client machine and the web server.
$connectionid
the id of the current client connection; ids are allocated dynamically by the Omnis Server and numbers are not reused unless the server is restarted.
$connectiontime
the time and date the client connected to the Omnis Server, i.e. the time the current task instance was instantiated.
$lastresponse
the time and date the client last accessed the remote task instance on the Omnis Server.
Managing Timeouts in Remote Tasks
Remote Tasks can be ‘suspended’ to allow greater control over how client connections are managed. A task may (optionally) be suspended if the web page is sent into the browser’s persistent cache, or if the page becomes hidden (e.g. the user switches tabs).
When a task is suspended, it can automatically transition to a shorter timeout. An event is also fired on the task, so you might also want to take this opportunity, for example, to close your database or push connections.
A benefit of this is that it much improves the chance that Omnis will receive some kind of notification that mobile apps have gone away or have been killed by the user/OS, and will not leave the Remote Task open indefinitely.
Properties
Remote Tasks have the following properties:
$suspendconditions
A set of zero or more kSuspendCondition… values to indicate under which circumstances the client should tell the server to suspend the task.
$suspendedtimeout
The time (in minutes) the task will survive for while suspended. Zero means never suspend the task (the default) and -1 means suspend, but use the value of $timeout
The conditions under which the client may suspend are:
kSuspendConditionCache
The browser has stored the full page, including its state, in its back/forward cache. Support for this varies by browser (Chrome does not seem to support it), but it generally occurs when the user navigates away from the page using the browser’s back/forward navigation buttons.
Note: Fields with an $autocomplete property set to “off” may be cleared when the client is sent to the cache.
kSuspendConditionInactive
The page is no longer visible. E.g. the user has changed tab, minimized the browser or switched desktop.
If the Task times out while the client is suspended, you will receive a "You have been disconnected..." message on resuming. You can override this, as usual, by implementing a client-executed "$ondisconnected" method on your form, which returns true.
Important Note: The HTML templates contain support for this new mechanism (introduced in Studio 10.1), therefore you need to update any existing .htm files on your web servers to match, otherwise you will get errors or leak Remote Tasks.
Remote Tasks Events
Remote Tasks have the following events to handle task suspension:
- evSuspended and evResumed
which will be called when the client is suspended or resumed, respectively. Both events receive a pSuspendCondition parameter with a kSuspendCondition value to indicate whether the client was suspended to the browser’s cache or the page was hidden.
When the client is sent to/resumed from the cache or becomes hidden/visible again, an attempt will be made to call a client-executed form method named “$suspended” or “$resumed” on your main form.
This happens regardless of whether the Remote Task is actually suspended, so can be made use of in serverless-client apps, or if you just want to react to the page becoming visible again without using the suspend functionality.
These methods receive the following parameters:
pSuspendCondition
A kSuspendCondition… value indicating whether this event is occurring due to the page’s visibility changing, or sent to the cache.
pTaskSuspended
A boolean indicating whether the Remote Task was/will actually be suspended. (It may not, depending on the Remote Task’s $suspend… properties)
Secure Sockets
You can use secure sockets (HTTPS) if you have installed an SSL certificate on your web server. The JavaScript Client will use a secure connection to connect the client to the web server if you prefix the URL or IP_address in the data-webserverurl parameter with “https://”. In addition, remote tasks have the $issecure property that lets you turn secure mode on and off dynamically, by assigning to the property for the current task at runtime.
Remote Task Events
For remote tasks, the evBusy and evIdle events are sent to the $event() method during the lifetime of a connection: evBusy is sent when Omnis receives a request from a client, evIdle is sent when Omnis is about to return the result of a request, i.e. the task instance is about to become idle. The following example, shows the code for the $event() method in the Monitor task created using the Monitor task wizard:
On evBusy
If iMonitorOpen
Do iMonitorRef.$setstatus($cinst,kTrue) Returns lServerBusyFlag
If lServerBusyFlag
Quit event handler (Discard event)
End If
End If
On evIdle
If iMonitorOpen
Do iMonitorRef.$setstatus($cinst,kFalse)
End If
On evRejected
Do $cinst.$showmessage(pErrorText)
In addition, tasks report the evRejected event which is generated when Omnis rejects a connection by a client. Usually this occurs if there are too many users trying to connect to Omnis, or $maxusers of the remote task has been exceeded. The parameter pErrorText is "Too many users connecting to server" for the first case, and "Too many users connecting to task [taskname]" for the second.
Push Connections
Under normal operation, the Omnis Server cannot initiate communications with the client – all communications must originate as a request from the client. However, you can “push” data to the client using Push Connections by creating a web socket connection to the client. An example use-case could be that you could start off a long query using a SQL worker on the server, and then push the response to the client when the results are ready, updating any instance variables in the remote form.
There is an example app called HTTP Push under the Samples option in the Studio Browser showing how you can use push connections, and there is a Tech note describing how to use the example: ‘REST Web Services HTTP JavaScript Push Example’ TNWS0005.
Creating a push connection
Each JavaScript client remote task in Omnis can have a single “push connection”, established using the client command openpush.
The openpush client command can be executed in either a server or client executed method, but you are advised to use it in a server method to gain greater control over when the results are pushed. That way, you know exactly when you are using a push, or whether or not you want to push data. The syntax is:
$cinst.$clientcommand("openpush",row([iMaxPollDelayMillisecs=1000]))
- iMaxPollDelayMillisecs
the maximum poll delay in milliseconds. Default is 1000
$cinst.$clientcommand("openpush",row([iMaxPollDelayMillisecs=1000,iMaxTries=5,cRetryCodes='500-599']))
iMaxPollDelayMillisecs
the maximum poll delay in milliseconds. Default is 1000
iMaxTries
The max number of times a request will automatically be tried, if it returns a http status code matched by cRetryCodes. -1 Means unlimited. Default is 5.
cRetryCodes
HTTP status codes to treat as 'temporary errors'. These will be retried automatically, up to iMaxTries times before reporting an error. This is a string containing comma-separated codes and/or code ranges, e.g. "404,500-599" means any responses with http status code 404 or anywhere between 500 and 599 will automatically be retried. Default is 500-599.
The timeout period of each request is 60 seconds, so it can take multiple minutes for an error to be reported, if you have more than a few iMaxTries. Timeouts are a normal part of push connections – if the server hasn't pushed anything back, the requests will keep being sent and timing out until it does.
There is a matching client command, closepush, which you can use to close the push connection. The syntax is:
$cinst.$clientcommand("closepush",row())
Utilizing REST
The push connection uses Omnis RESTful support to carry its requests, therefore, if you are using a Web server to pass JavaScript client requests to the Omnis server, you need both the standard Web server plugin, and the RESTful Web server plugin to be installed with the Web server, i.e. you need to install both omnisapi.dll and omnisrestisapi.dll.
The client scripts automatically generate a URL for push by converting the parameters in the web page. For example, if your HTML page for the JavaScript client uses the URL:
http://localhost:8080/omnisservlet
then the client scripts will convert this to:
http://localhost:8080/omnisrestservlet
for the push connection. When generating push URL, Omnis only amends the plugin name part of the complete URL, so in the above case, omnisservlet becomes omnisrestservlet. You can see the URL used for push connections by using browser debugging tools.
If you are not using standard names in your HTML page, there is a parameter in the Omnis configuration file (config.json) that allows you to override the default push URL generated by the scripts: this can only be used when using openpush in a server method. To configure this set the member “overridePushURL” of the “server” entry to the desired URL.
To support push connections there is a method for remote form instances called $pushdata(), which has the following syntax:
- $pushdata(wRow[~&cErrorText])
Used with $clientcommand openpush. The method pushes the row wRow to the client which results in a call to the client-executed method $pushed in the remote form instance on the client, passing wRow as the parameter. wRow must be JSON compatible, so it can only contain simple types: character, boolean, integer, number, date, list and row.
Omnis maintains a queue of pushed data for the remote task, which is independent of calls to openpush. As soon as a push connection arrives from the client, Omnis sends all queued pushed data that the client has not yet received as the response. The client then processes the response, and issues a new push connection to the server, telling the server it has received the data. This allows the server to remove the received data items from its queue, and free their memory. Typically, at this point there will be no more queued data. The connection stays open, and as soon as the server code calls $pushdata, Omnis sends the data as the response to the client. This gives the impression of a permanent pipe from the server back to the client, with acknowledgement of pushed data received by the client, so pushed data should not go missing.
Typically, you would take data from the row returned by $pushdata and assign it to an instance variable, or subset of variables, to update the remote form.
There is a tech note TNWS0005 to show how you would use a RESTful web service with the openpush client command in the JavaScript Client.
The client-executed method $pushclosed can be implemented for remote forms which is called (on all forms) if a push connection closes. Return kTrue from the method to prevent the default behavior. It has two parameters:
pErrorCode
Non-zero values indicate it was closed due to an error.
0 means it was closed by calling the 'closepush' $clientcommand.
> 1 means pErrorCode is the http status code which caused the error. An error message will be displayed, unless you return kTrue to prevent the default behaviour.
-1 means a transport error, i.e. the request could not be delivered.
pWillRestart
If true, the default behavior will be to restart the push connection. Return kTrue to prevent this.
Push Data Task Methods
Remote Task classes also have the $pushdata() method. When called, this will send data to the client and fire the $pushed() method of the Remote Task's 'current form', which is effectively the last form to have sent an event to the server.
Poll delay
The 'openpush' client command has an optional column which can be passed in its parameter row. The 'maxPollDelay' column allows you to override the default maximum delay (1000ms) between the client receiving a '$pushdata()' from Omnis, and making a new connection to Omnis ready for the next '$pushdata()' command. Passing a value of 0 (or less) will not change the maximum delay.
If your application bounces back and forth between client & server in quick succession (you call a server method from $pushed, which in turn calls $pushdata), you may find that reducing this makes your application more responsive. There is a small overhead to reducing this too low, however, so it's recommended to leave the default value unless you have a need to change it.
Remote Objects
Remote Object classes (or Remote Objects) are Object classes that are instantiated and executed entirely on the client, in the JavaScript Client. Each Remote Object class instance has a JavaScript object “class” that directly corresponds to it on the client.
Remote Objects are useful if you have some code that you want to be executed purely on the client, and you want to use it in multiple remote forms, so a Remote Object would provide a good way to structure the code in your application, that is, it provides an alternative to having to inherit methods from a Remote Form superclass, so may be useful in a serverless-client based mobile app.
Remote Object classes (or Remote Objects) are Object classes that can be instantiated and executed on the client, in the JavaScript Client, or on the server. When executed on the client, each Remote Object class instance has a JavaScript object “class” that directly corresponds to it on the client.
Remote Objects are useful if you have some code that you want to be executed on the client, or on the server, and you want to use it in multiple remote forms, so a Remote Object would provide a good way to structure the code in your application, that is, it provides an alternative to having to inherit methods from a Remote Form superclass, so may be useful in a serverless-client based mobile app.
The following sections describe how you use Remote Objects on the client only, while the section Running remote object code on the server describes how you implement code that can be run on the client or the server.
Creating Remote Objects
The Studio Browser window allows you to create a new Remote Object, create a subclass of an existing remote object class, and edit a remote object. Editing a remote object opens the Method Editor, in the same way as when you edit a normal object class. Within the Method Editor itself, the main difference is that every method in a remote object class is always marked as client-executed.
The JSON library representation now includes support for remote objects. You can print methods in a remote object class.
Find and replace supports remote object classes, and has an additional entry in the class selection menu, to select remote object classes.
The inheritance tree includes a node for remote object classes.
Omnis Language
Library Notation
The notation for manipulating remote objects is similar to that for objects. There is a new group within each library, called $remoteobjects, containing all of the remote object classes in the library. Each remote object class has a subset of the properties and methods supported by object classes:
Variables
Remote object classes can have class and instance variables. These are restricted to the set of client execution data types: var, date, list, row, and (new for remote object support) object. In addition, each method in a remote object class can have local variables, which are likewise restricted to the set of client execution data types including object.
Creating Instances
You create an instance of a Remote Object by specifying the remote object class name as the subtype of a variable in a remote object (see the previous section) or for remote forms, either:
Note that this means that remote form instance variables of type object can now have a remote object class as their subtype, in addition to an object class or a non-visual external object. Remote form object variables with a remote object as their subtype are not synchronised between client and server – they exist only on the client.
Behavior
You can write the methods in a Remote Object class in the same way as you create the methods in an object class, except you are restricted to client-executable code. Inheritance works as you would expect using the normal Omnis mechanism, although you cannot override variables in a subclass – you must inherit superclass variables. Variables are referenced as you would expect, e.g. you can just use iName or you can use $cinst.iName.
However, note that you cannot use $new to create a new remote object instance. This is because the Omnis server needs to be able to quickly parse a remote form and its superclasses in order to determine the remote object classes it uses, in order to generate the code correctly.
Remote objects do not execute $destruct, because they are JavaScript objects (which are naturally garbage collected by the execution environment).
If you execute a remote form method marked as client-executed, by calling it from a server method, then because the method is actually executing on the server, Omnis will generate an error if you try to use a remote object.
When coding in the Method Editor, the Code Assistant will only provide assistance for remote object instance variables, and object instance variables, when you are coding for an environment that is applicable: so for example, you would get no assistance for a remote object instance variable when coding a server-executed method.
When passing remote objects around between methods, bear in mind that they are passed by reference, so they are never copied.
$cwind for Remote Objects
You can use the notation $cwind from code written in a Remote Object, to refer to the top-level remote form instance that contains the remote object, for example, you can write code like the following in a remote object method:
Calculate $cwind.$objs.[pName].$backcolor as pick($cinst.$isodd(),kMagenta,kCyan)
In addition, you can use the notation $cinst.$container in a remote object to refer to the remote form that immediately contains the remote object.
Code Generation
The Omnis server automatically generates the JavaScript code for Remote Objects, in a similar way to how it generates JavaScript code for client-executed methods in remote forms. The JavaScript for each remote form contains the JavaScript for all of the remote objects it uses, using a conditional test which means that if 2 remote forms use the same remote object, the code used for all instances of the remote object will be that loaded with the first remote form.
If you modify and save a remote object class, Omnis will regenerate the code when the remote form is re-loaded.
Running remote object code on the server
You can use Remote Objects to implement common code that is available to both server and client methods. In this case, you can place the code in a Remote Object and run it from either client or server executed methods.
To run code in a Remote Object on the server, you need to specify a Remote Object class as the subtype of an object variable, using $new and $newref in server methods, or as the superclass of an object variable. In the case where a remote form instance object variable has a remote object as its subtype, there will be two distinct (unrelated) copies of the remote object and its instance and class variables, one on the client, and one on the server. Note that the server copy is not instantiated until the instance object variable is used during server code execution.
In addition, when editing a client-executed method, the variable panel of the method editor allows you to specify the server type of variables that would have the type Var in client executed methods. In the JavaScript code for the remote object, these variables will have type Var, whereas in a server copy of the remote object, these variables will have the specified server type(s).
If the remote object is being used in server code, and it contains code that cannot execute on the server, then a runtime (debug) error is generated.
Like other types of Omnis class, Remote Form classes have many properties that control their appearance and behavior. You can set most properties of a remote form class in the Property Manager, but the properties for remote form instances must be assigned or controlled in the code in your app. Remote form instances also have methods: see the Remote Form Methods section.
Many of the properties, including many of the standard form properties, are reasonably self-explanatory, but some properties that are specific to remote forms require further explanation and are described in the following sections. The $serverlessclient property enables the Standalone Mobile Apps capability, and is described later in the Serverless Client section, while the $stringtabledata and $stringtabledesignform are discussed in the Localization chapter.
Responsive design is a technique used to design form layouts that cater to different devices or screen sizes, including phones, tablets, and desktops, from a single remote form class. The motivation for employing responsive design is to create a single form, with one set of code methods, that adapts its layout automatically when it is displayed on a range of different devices, or when the client browser is resized. For standard web pages, responsive design is implemented using CSS media queries and breakpoints, and Omnis takes a similar approach by allowing you to specify a number of layout breakpoints in a single JavaScript remote form, where each breakpoint corresponds to a different layout for the fields and other controls on your remote form.
All new remote forms created in the Studio Browser via the New Class option or the Remote Form wizards are set to the responsive layout type by default.
Remote forms in converted libraries (Studio 8.0 or earlier) will continue to use the $screensize property to specify the layout for different devices. There is a migration tool, available under the Tools>>Add-Ons menu, JS to Responsive option, that allows you to migrate existing $screensize based remote forms to the responsive type. (Note the old Sync Screen tool only applies to the old $screensize based remote forms, and should not be used for responsive forms.) See Remote Form Migration.
JavaScript remote forms have a property, $layouttype, that specifies how the layout of the form is designed: it can be set in design mode to one of the kLayoutType... constants, and is only assignable when the remote form is empty, when it does not contain any controls. You can return the value of $layouttype in a remote form instance, but you cannot change it at runtime in your code.
The possible values for $layouttype are:
kLayoutTypeResponsive
The remote form has a responsive layout with layout breakpoints, as specified in the form toolbar and stored in the $layoutbreakpoints property as a comma-separated list. A remote form can have a different layout for the fields and other controls for each breakpoint value. All new remote forms are set to this type.
kLayoutTypeScreen
This option corresponds to remote forms in Studio 8.0 or earlier libraries, and uses the old $screensize property containing a number of fixed screen sizes. An existing remote form in a library converted from Studio 8.0, or earlier, will be set to this layout type (you can use the migration tool under the Tools>>Add-ons menu to convert a $screensize based form to responsive: see Remote Form Migration).
kLayoutTypeSingle
The remote form has a single layout. This type could be used for applications intended to be deployed on desktop web browsers only: you can use the $edgefloat property for controls to resize or reposition them when the browser window is resized (this layout type does not allow breakpoints to be set).
A responsive remote form does not have the following properties, since they are not relevant to responsive design: $resizemode, $screensize, $width, $height, $horzscroll, or $vertscroll, however $edgefloat still applies to components in responsive forms.
If you change $layouttype to kLayoutTypeSingle, and the $resizemode property is set to kJSformResizeModeNone, then $resizemode will be set to kJSformResizeModeFull automatically to make it resizble.
You can create a new Responsive Remote form class in the Studio Browser using the New Class>>Remote Form option, and in this case, the $layouttype property is set to kLayoutTypeResponsive automatically. The remote form wizards, available under the Class Wizard option in the Studio Browser, also create remote forms with the responsive layout type. If you want to change the layout type, you must change it before you add any controls, since you cannot change the form layout type once it contains any controls.
A new responsive remote form contains two layout breakpoints by default: these are set to 320 and 768 which correspond to the relative widths for mobile devices and desktop computers (note the default breakpoint values for new remote forms are set in the $initiallayoutbreakpoints library preference).
Remote forms can have only one breakpoint, but in most cases, you would define two breakpoints to cater to mobile devices and desktops or tablets.
Changing and Adding Breakpoints
You can change the default breakpoints to suit the layouts you wish to support in your application. You may find, for example, that setting two breakpoints is enough to cater to mobiles and tablets or desktop screens, and then use the floating edge properties of objects ($edgefloat) to resize and reposition them for different device or screen sizes (the remote form wizards take this approach).
Each layout breakpoint must be a positive integer in the range 100 to 32000, with at least 32 pixels between any breakpoints; therefore, you cannot create a breakpoint with an existing value, or within 32 pixels of an existing breakpoint. The minimum width of the first breakpoint is 100.
The Breakpoints for a Remote form are shown in the Design bar. Clicking on a layout breakpoint makes it the current layout.
You can change, delete or add new layout breakpoints using the toolbar at the top of the remote form design screen, as follows:
To change the value of a layout breakpoint, you can drag the right edge of the current breakpoint in the toolbar, or you can double-click on the number in the form toolbar and enter a new value, or press Ctrl/Cmnd-E to edit the value.
To delete a breakpoint, click on the Delete (X) button when the breakpoint is selected, or press Ctrl/Cmnd-D when the breakpoint is selected (the delete button is not shown when there is only one breakpoint, since this is the minimum number of breakpoints for a responsive form).
To add a new layout breakpoint, click on the ‘+’ button in the top-left corner of the form toolbar, or press Ctrl/Cmnd-L when the remote form is selected, and enter a breakpoint value.
You can right-click on a breakpoint (which also makes it the current breakpoint) to open a context menu which provides options to edit the breakpoint value and delete the breakpoint.
When adding a new layout breakpoint, all breakpoint-specific properties are copied from the nearest breakpoint, including the size and position coordinates of the components in the existing breakpoint, plus the following: layout padding for the form, edge float, align, drag border, error text pos, and ‘visible in breakpoint’ properties.
Deleting Breakpoints
When you delete a breakpoint, the positioning and individual properties you have set for all of the fields and controls in the layout are lost, so use this option with caution. You can restore a deleted layout breakpoint immediately after deleting it using the Undo option. If undo is not available, you will lose the breakpoint and any custom settings for the all the fields and controls in that layout; in this case, you would have to recreate the layout again.
Layout Breakpoints
A responsive remote form must have one or more layout breakpoints. Layout breakpoints are widths measured in CSS pixels, so they represent logical sizes rather than physical sizes. The JavaScript client chooses the layout for one of the breakpoints defined in the form based on the logical width of the area in which the remote form is to be displayed in the browser on the device.
For a desktop browser, the width would be the width of the browser window (which can be resized), although note that responsiveness also applies to remote forms displayed in a subform control or subform set (in which case the width is the width of the subform control or container for the subform set).
For a mobile device, the width is most likely to be the width of the device screen itself, although again, a form on a mobile device can be loaded in a subform control or subform set which may be narrower than the device screen.
The client chooses the most appropriate layout for the device, from all the layouts available in the form. Specifically, the client uses the layout for the largest breakpoint that is less than or equal to the display area width, or if no such breakpoint exists (because all breakpoint widths are greater than the display area width), the layout for the smallest breakpoint.
Once the client has chosen a breakpoint, the client will apply floating and component properties to make use of the available extra width (if any), and if there is no extra width, the client will automatically turn on horizontal scrolling if necessary.
Layout Breakpoint Properties
Remote forms have a property called $layoutbreakpoints, which stores the layout breakpoints for a remote form. This is a comma-separated list of one or more breakpoint values, and these values are shown and edited in the toolbar in the remote form design screen: you cannot set layout breakpoints for a form in the Property Manager. You can return the value of $layouttype in a remote form instance, but you cannot set it at runtime.
When you create a new responsive remote form, the layout breakpoints in the form (and the value of $layoutbreakpoints) are initialized with the value of the library preference $initiallayoutbreakpoints. If you wish to create new remote forms with different layout breakpoints you can edit this preference: to do this, select the library in the Studio Browser and set the property under the Prefs tab in the Property Manager.
A responsive remote form has a property, $currentlayoutbreakpoint which is the value of the current layout breakpoint. In design mode, the current breakpoint is highlighted in the form toolbar: it is not shown in the Property Manager. At runtime, the value of $currentlayoutbreakpoint may change if the end user resizes their browser window, or changes the orientation of a mobile device.
Minimum Layout Height and Padding
Each layout breakpoint in a remote form has a property $layoutminheight, which is the minimum height of the responsive layout. The default setting of $layoutminheight is zero which means the minimum height of the form is set to the bottom-most coordinate of all controls plus an additional 2 pixels for padding (other non-zero values must be in the range 100 to 32000 inclusive).
Each layout breakpoint in a remote form has a property $layoutminheight, which is the minimum height of the responsive layout. The default setting of $layoutminheight is zero which means the minimum height of the form is set to the bottom-most coordinate of all controls plus an additional 2 pixels for padding (other non-zero values must be in the range 10 to 32000 inclusive).
The minimum height is indicated in design mode as the white area containing all the controls; the surrounding area in the form design screen is shaded gray. When the available client height at runtime is larger than this value, controls can float to use the additional vertical space, depending on their $edgefloat properties.
The $layoutpadding property allows you to set the amount of padding under the bottom-most control on the form. By default, the bottom edge of the form is set to 2 pixels under the bottom-most control.
The range for $layoutpadding is 0 to 512 which is added to the bottom-most coordinate of all controls, to generate the minimum layout height when $layoutminheight is zero. When available client height is larger than this, the controls on the form can float. A value is stored for each breakpoint.
When you create a new remote form class (or convert an existing remote form), $layoutpadding is set to 2 by default for each breakpoint. The default value of $layoutpadding is specified in the "responsiveLayoutPadding" item in the "defaults" section of the Omnis configuraration file (config.json), which is set to 2 by default.
When a remote form is accessed for the first time, e.g. in a converted library, the value of $layoutpadding is initialized to the default padding (unless the remote form is read-only, in which case the default value is used, but not written to the class).
Subforms within the inheritance hierarchy of a set of responsive remote forms do not have to have the same layout breakpoints. Therefore, a subform can have different layout breakpoints to its superclass.
What breakpoints should I use?
In general, you need to create a breakpoint for the smallest device within each category of device you wish to support (phone, tablet, or desktop). Therefore, the value of the first breakpoint would be the logical width of the smallest phone you wish to support (bearing in mind logical dimensions are not the same as the pixel dimensions, which depend on the density of the screen). For example, the logical dimensions of the iPhone 13/14 are 390 x 844 (Pro versions are larger), and the Samsung Galaxy S21 is 360 x 800, so you could set the first layout breakpoint to 350 to allow a safe margin and to accommodate form layouts for both phones; or you could retain the default 320 breakpoint to cater to older phones that have a smaller logical width.
Similarly, to set the layout breakpoint for tablets you should consider the minimum width for the range of tablets you wish to support. The default breakpoints defined in a new remote form (320 and 768) provide support for a wide range of mobile devices or tablets, both in vertical and horizontal orientations, but you may need to adjust the default breakpoints to suit your requirements, or as new phones are released.
Adding Controls
When you add a control to a responsive remote form it is added to the current layout and all other layout breakpoints: initially, a control will be in the same position in all layouts, but you can switch to another layout and change its position and other object properties for that layout, such as $edgefloat. If you delete a control from one layout it will be removed from all other layouts, and any individual object property settings will be lost.
Copying Layouts
You can copy the layout from another layout to the current layout using the Copy Layout from Breakpoint option in the remote form. To do this, select the layout breakpoint you want to update, right-click on the background of the form, select the Copy Layout from Breakpoint option, and choose the breakpoint value of the layout you want to copy from (values other than the current breakpoint are shown). This has the effect of synchronizing the layouts of the current and selected breakpoints, by applying the size and position properties of all components in the chosen layout, including their $edgefloat settings. (Note this has a similar function to the Sync Screen tool available for old $screensize based forms.)
The Copy Layout from Breakpoint menu option can also apply to selected objects only if an object or multiple objects are selected. The layout properties of the selected objects in different breakpoints are set to the same values, while the other non-selected objects are unaffected; in this case, the menu option text changes to show 'selected fields only'.
Assigning Properties
The 'Copy <property> To All Other Layout Breakpoints' option on the Property Manager context menu allows you to copy the property value of a control to other instances of the control on all other breakpoints.
In addition, the 'Copy Position To All Other Layout Breakpoints' option allows you to copy the position (meaning left, top, width, height and edgefloat) of a control to all other breakpoints.
Control Size and Layout Properties
The following layout properties are stored for each control for each layout breakpoint, that is, they can be set to different values for each layout: $left, $top, $width, $height, $align, $edgefloat, $dragborder, $errortextpos, and $visibleinbreakpoint, which allows you to hide a control for certain layouts. For example, you could use this property to show a vertical tabbar for one layout and a horizontal tabbar for another layout.
When setting the $align, $edgefloat, $dragborder, $errortextpos and $visibleinbreakpoint properties in the Property Manager, you can assign the selected value to the control on all layouts by checking the ‘Set for all layout breakpoints’ option in the property droplist.
Remote form classes have a number of methods to allow you to manipulate the layout breakpoints in the form (note these cannot be used in remote form instances, since you cannot change breakpoints at runtime):
$addlayoutbreakpoint(iBreakpoint[,&cErrorText])
Adds a new layout breakpoint to the responsive remote form at position iBreakpoint. Returns true for success, or false and cErrorText if an error occurs
$movelayoutbreakpoint(iOldBreakpoint,iNewBreakpoint[,&cErrorText])
Moves breakpoint iOldBreakpoint for the responsive remote form to iNewBreakpoint. Returns true for success, or false and cErrorText if an error occurs
$deletelayoutbreakpoint(iBreakpoint[,&cErrorText])
Deletes the layout breakpoint at position iBreakpoint from the responsive remote form. Returns true for success, or false and cErrorText if an error occurs
$layouttype cannot be overridden or changed in a subclass. $layoutbreakpoints cannot be inherited: each class has its own set of layout breakpoints. However, $layoutminheight can be overridden.
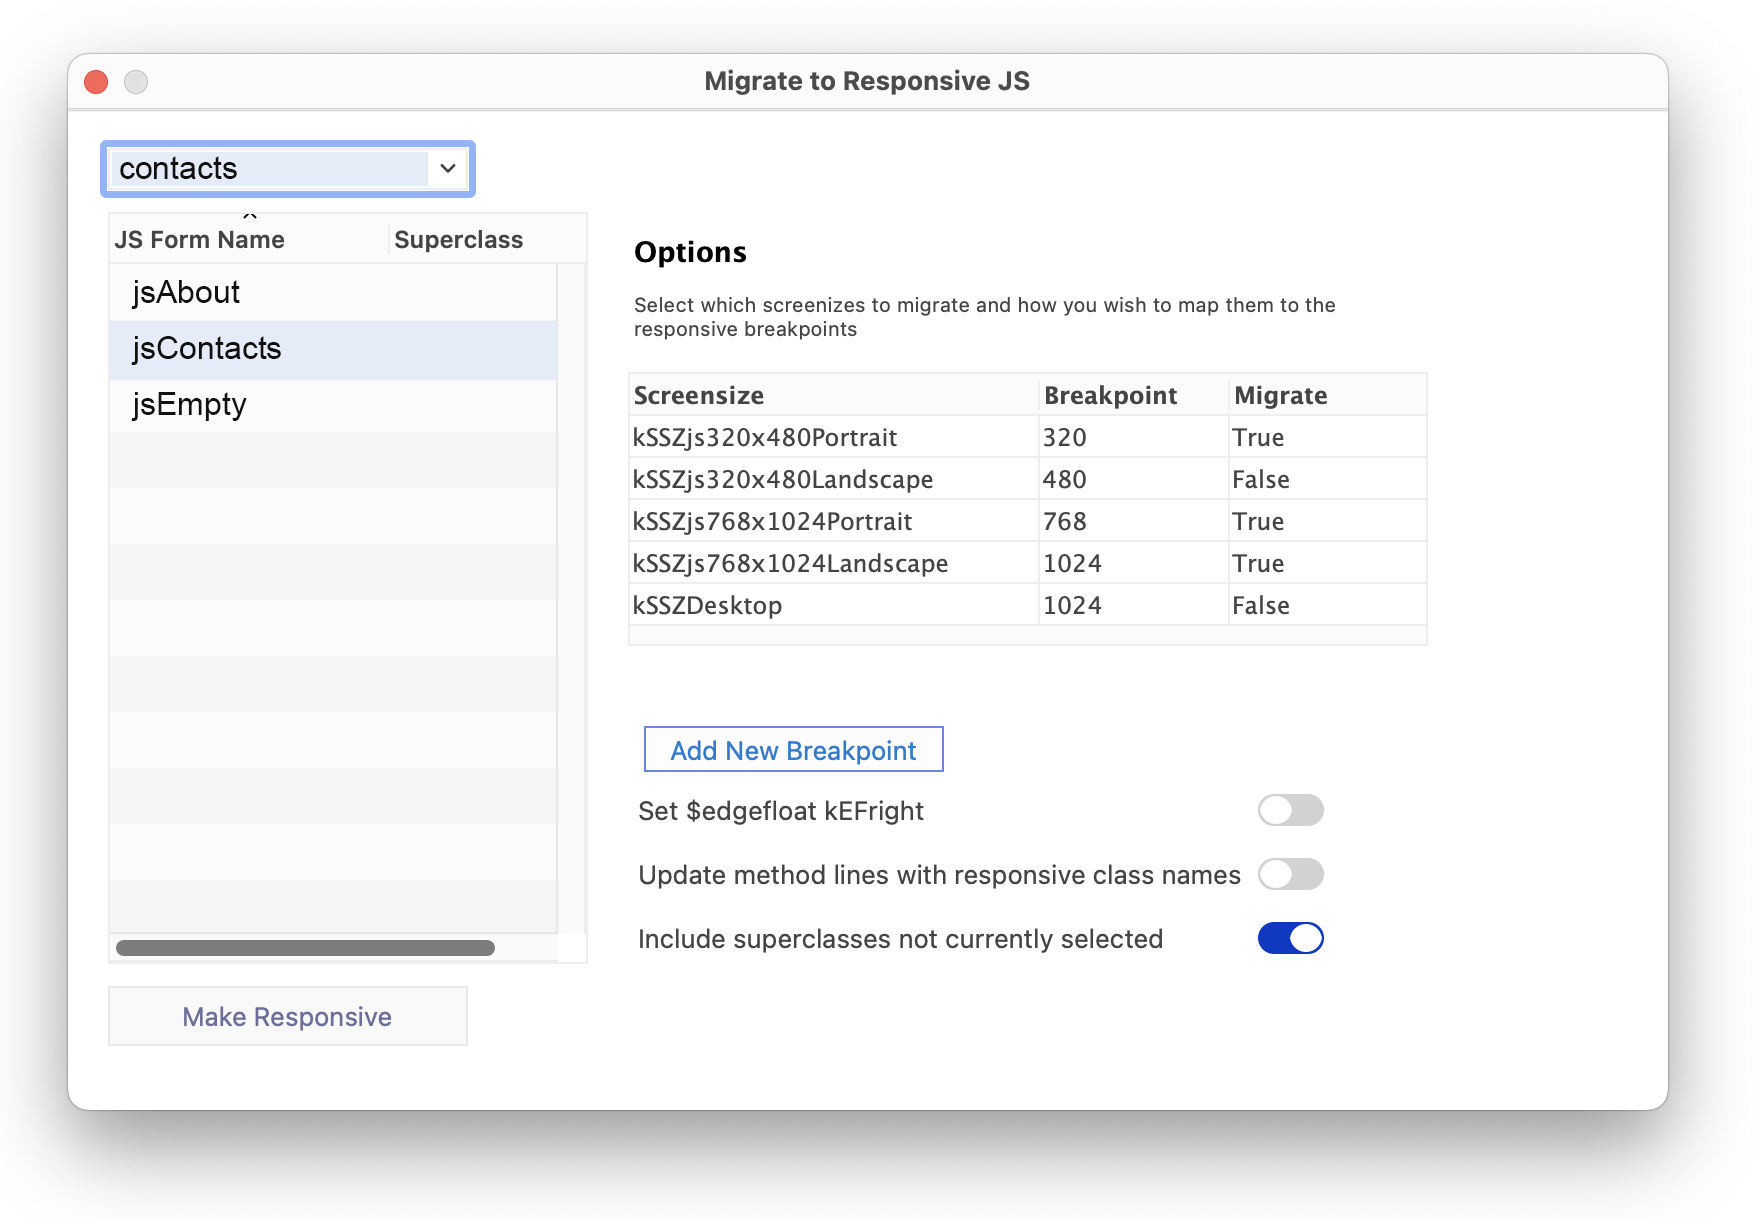
The Remote Form Migration tool, under the Tools>>Add-Ons menu JS to Responsive option, allows you to convert an existing JavaScript remote form in a library converted from Studio 8.0, or earlier, to the responsive form type. The migration tool creates new layout breakpoints corresponding to the old screen sizes available in remote forms in previous versions, and tries to adjust the positioning and layout of fields to fit those breakpoints. The migration tool creates a new responsive remote form with breakpoints and modified screen layouts, based on an existing remote form, and retains the old unmodified form in your library.
The migration tool will create breakpoints at 320, 768, and 1024 in the new remote form, and assign them to the form layouts corresponding to the old screen sizes (the kSSZ... constants) set under $screensize: to create a breakpoint it must be set to True in the Migrate column in the Migration tool window. The 480 breakpoint is available but is not enabled by default, since it is not needed in the new responsive form.
You can add a new breakpoint using the Add New Breakpoint button and assign that value to one of the old screen sizes; the new Breakpoint value is added to the dropdown menu in the Breakpoint column. For example, you may wish to create a breakpoint at 300 and assign it to the old phone screen size (320x480) to ensure that all content is displayed on all types of phones.
The Set $edgefloat kEFright option sets the $edgefloat property of certain controls to kEFright to ensure that when the form is resized in the browser the right edge of those controls is also resized or moved. In this case, only controls with no other controls to their right, which are generally on the right-hand side of your form, are updated. Specifically, the $edgefloat property of any buttons is set to kEFleftRight, rather than kEFright, to ensure they float without resizing when the browser window is resized.
The Update method lines… option will replace all references in your code to the old remote form name to the new name, so your code continues to work.
When you have set up the appropriate options you can click the Make Responsive button to create the new responsive form(s), which are placed in a new folder in your library. You can modify them, or test them straight away using Ctrl/Cmnd-T.
When you have run the migration process, the tool creates a change log which will contain any issues that may need your attention. This may include any places in your code that use the old $screensize constants (kSSZjs...), which no longer apply to responsive forms.
Screen Type Layout (kLayoutTypeScreen)
The following section refers to Remote forms when the $layouttype is set to kLayoutTypeScreen. This layout type enables the use of the old $screensize property and fixed screen sizes, available in Studio 8.0 or earlier, which you are advised not to use for new remote forms. Any remote forms in an existing library which is converted to Studio 8.0 or earlier will have this layout type. Note that in addition, only remote forms of type kLayoutTypeScreen trigger the evLayoutChanged event when their layout changes (from Studio 10.0).
The $screensize property provides a number of fixed screen sizes for displaying remote forms on desktop browsers, tablets and phones. As with responsive remote forms, each fixed screen size uses the same set of objects (and methods) and the remote form class stores the position of the fields for each screen size setting.
The following fixed screen sizes and orientations are available (for $screensize based forms only, not responsive type forms):
kSSZDesktop
for remote forms running in desktop browsers; in effect, the screen size is unspecified and the $height and $width of the remote form in design mode is used to size the form in the browser
kSSZjs320x480Portrait or kSSZjs320x480Landscape
For mobile devices with screens 320 x 480 px (at 96dpi) in Portrait/ Landscape orientation
kSSZjs768x1024Portrait or kSSZjs768x1024Landscape
For tablets with screens 768 x 1024 px (at 96dpi) in Portrait/ Landscape orientation
When opening (constructing) a remote form, the JavaScript Client uses the most appropriate fixed screen size and orientation stored with the form, for the screen size and orientation of the current device. If the user swaps from portrait to landscape, or back again, the JavaScript Client repositions the controls automatically.
When specifying the width and height for the mobile fixed screen sizes, you can set the $width and $height properties to match the exact coordinates in the current setting of $screensize, allowing for the mobile title bar which is 20 pixels high. If you have set $designshowmobiletitle to kFalse you may want to add 20 pixels to the height of the form.
Adding new fixed screen sizes
The screen sizes enabled in the $designedscreensizes library preference will be used to populate the $screensize property in the Property Manager. The omnisobject containing the JavaScript client in the HTML page has the ‘data-dss’ attribute, which contains the designed screen sizes for the library. If you use forms from more than one library in a single client instance, each library must have the same set of $designedscreensizes. If not, a runtime error will occur when trying to use a form from another library.
If you change the screen sizes supported in the $designedscreensizes library preference, all the HTML files for all remote forms in your library need to be rebuilt to reflect the new set of screen sizes: this is done automatically when you test a remote form since the HTML file is rebuilt every time you test a remote form. Note the jsctempl.htm template file contains the data-dss attribute and any screen sizes currently implemented for the JavaScript client.
If you are using Firefox during development, you can test different layouts for mobile and tablet screen sizes in a single browser window using the ‘Responsive Design View’ mode: note this is a feature of Firefox and is not available in other browsers. This may save you a lot of time during the initial stages of designing your mobile application, since this avoids having to test your app on multiple devices to test different sizes and layouts. However, we recommend that you should test your final app on any real device that you wish to support when you are ready to deploy your app.
To enable this functionality, you need to set the ‘gResponsiveDesign’ flag to true in the ‘ssz.js’ script file located in the html/scripts folder in your Omnis development tree. For this to take effect, you must restart Omnis after setting the responsive design flag. To enable this mode in Firefox, go to the Tools>Web Developer menu option and select ‘Responsive Design View’: you will need to show the Menu bar in Firefox to see this option. Then when you test your remote form in Firefox, you can select different screen sizes and orientations in the dropdown menu in the Firefox browser window, and your remote form will redraw using the appropriate screen size specified in $screensize for the remote form. When you have finished testing using this mode, you should set gResponsiveDesign in the ‘ssz.js’ script file back to false.
The Sync Screens tool applies to $screensize based forms only; it does not apply to responsive forms.
The Sync Screens Tool configures the components on the different fixed screen sizes stored in a single remote form. The Sync Screens tool is available under the Tools>>Add Ons menu in the main Omnis menu bar.
To use the Sync Screen tool you need to select a library from the Library dropdown and then select the JavaScript form in which you wish to synchronize objects. The ‘Source Screensize’ is used as the starting point upon which the other screen sizes/layouts are based (the desktop size/layout is chosen by default). You can choose which screen sizes/layouts will be synchronized, and under the ‘Options’ check boxes whether or not to scale objects by horizontal or vertical position and/or by width and height. If you don’t want a particular object to be resized or repositioned by the tool, you can lock it in the remote form in design mode (Right-click the object and select Lock) and enable the ‘Ignore Locked Components’ option (enabled by default). When you have adjusted the settings, click on the Sync button.
You should change the setting of $screensize in your remote form and check the layout of the objects for each screen size/layout. You should also test the form in a browser and on different devices to check that the form objects have been sized and positioned correctly.
Resize Mode (Screen & Single layout only)
Remote forms with the layout type kLayoutTypeScreen and kLayoutTypeSingle have the $resizemode property which allows a form displayed in a desktop web browser to be resized ($resizemode is not available for kLayoutTypeResponsive forms). The $dragborder and $edgefloat properties can then be used to allow JavaScript forms and components to be dynamically resizable at runtime in the end user’s browser.
The $resizemode property only applies when the remote form is being displayed in a standard browser window on a desktop computer or laptop, that is, the property does not apply when the form is displayed in a browser on a mobile device or when the form is being used as a subform since in this context the form size is fixed.
The $resizemode property determines whether or not a form resizes when the end user resizes the browser window. The value of $resizemode is one of the kJSformResizeMode... constants that specify how the form behaves when it initially opens and when the browser window is resized. The kJSformResizeMode... constants are as follows:
kJSformResizeModeNone
The form does not change size when the browser window is resized and the form is positioned at the left of the browser window. This corresponds to the behaviour in Omnis Studio 5.2.x
kJSformResizeModeCenter
The form does not change size when the browser window is resized but the form is centred horizontally in the browser window, only if its width is less than the browser window width
kJSformResizeModeAspect
The form resizes itself as the browser window is resized maintaining its aspect ratio to fit the browser window; it will not resize to a size smaller than the designed size in the remote form class
kJSformResizeModeFull
The form resizes itself to fit the browser window, regardless of aspect ratio; it will not resize to a size smaller than the designed size in the remote form class
You can assign $width and $height of the remote form at runtime, however this may conflict with $resizemode, so you should only assign these properties when $resizemode is kJSformResizeModeNone.
Component Transitions
Remote forms have a property, $animatelayouttransitions, which specifies whether or not the controls on the form will animate to their new position and size when the form layout or orientation changes on the client. If this property is set to kTrue, all the controls on the form will animate on the transistion, e.g. when changing from vertical to horizontal orientation, or when resizing your desktop browser window. You can stop the animation for individual controls by setting the $preventlayoutanimation property to true for the control. (The transition properties apply to responsive remote forms and the old $screensize based forms.)
The animation time is hard-coded to 500ms, but you can override this for individual controls using JavaScript as follows:
Calculate lControl as $cinst.$objs.myButton1
JavaScript: lControl.animateLayoutTime = 1000;
Or, to set a new animation time for ALL controls on the form, execute the following in the remote form's $init method:
JavaScript: ctrl.prototype.animateLayoutTime = 1000;
Initial Field and Tabbing Order
The $startfield property specifies which field in a remote form will get the focus when the form is opened; it takes the field number of the control as specified in the $order property of the control. The relative values of the $order property for all the controls in your remote form determines the tabbing order of the controls in the form. In general useability and accessibility practices it is usual to specify the left- or top-most control of the form as $order = 1 and follow consecutive order number values across to the right (if you have rows of controls) and downwards.
For inherited forms, the $inheritedorder property determines the tabbing order for the first inherited field: zero means maintain the designed order from the base class through to this class.
Responding to OK and Cancel Keys
You can specify which object in the remote form receive OK and Cancel events from the keyboard, e.g. when the end user presses the OK or Cancel button. For the JavaScript remote forms, $okkeyobject specifies the object in the form that receives evClick when the user presses Return or Enter. Similarly, $cancelkeyobject specifies the object that receives evClick when the user presses Escape. Both of these properties only apply if the field currently with the focus does not use the key that is pressed, in which case these properties will have no effect.
The $okkeyobject and $cancelkeyobject properties are activated when the focus is on the containing form, so $okkeyobject and $cancelkeyobject will now receive a click when the Enter or Esc keys are pressed, and the focus is on the whitespace within its container. Each parent form (when working with subforms) will be checked for an $okkeyobject or $cancelkeyobject until it reaches the top form. The exception to this is if the subform is contained within a subform set, and in this case, it will keep checking parent forms until it reaches its containing subform.
Remote forms have the $alpha property which sets the transparency of the form (an integer from 0 to 255, with 0 being completely transparent and 255 opaque). In addition, $backalpha lets you control whether or not subforms in the main form use the background color of the subform field or the form itself. The majority of the JavaScript components have the $alpha and $backalpha properties which control the transparency of the foreground and background colors of the component.
In combination with the animation methods, you can use the $alpha of a form or control to make elements in your form appear and disappear. The About windows in the sample apps (available in the Welcome screen when you start Omnis) are displayed by setting the $alpha property of the About subform and using the animation “ease in” effects. See the Animations section.
Gradients
To create a gradient for the background of a JavaScript remote form, you can select a gradient fill pattern for $backpattern and control the start and end colors for the gradient by setting $forecolor and $backcolor.
The following methods can be used against the $objs group for a remote form class, to add or remove objects. You could use these methods in your app to create a remote form with specific components (fields and buttons), for example, based on prompts from the end user and pre-defined schema classes (the wizards use these methods to build remote forms).
You can create a new object in a remote form class using the $add() method. The syntax for the method is:
- REMOTEFORM.$objs.$add(type[,cComponentLibrary,cComponentControl],iTop,iLeft,iHeight,iWidth)
inserts a new object and returns an item reference to it
Where type is a constant, either kComponent or kPagedPane. If type is kComponent, you must supply the otherwise optional parameters cComponentLibrary and cComponentControl to identify the remote form component (the external component library and control name). kComponent can be one of the standard component types such as kEntry, kPushbutton, kCheckbox, and so on.
The iTop, iLeft, iHeight and iWidth parameters specify the pixel coordinates and pixel dimensions of the object.
For example, to create a new button in a remote form class, you need to add the button to the $objs group of objects in the remote form, as follows:
Do RemoteFormName.$objs.$add(kPushbutton,iTop,iLeft,iHeight,iWidth)
The $remove(rItem) method can be used to delete an object from a remote form class; rItem is an item reference to the object to delete.
Adding objects from the Component Store
You can use the $addfromcompstore() method to add a JavaScript component or background object to a Remote form class from the Component Store. The method will add the field or object into the $objs group for remote form class, since remote forms do not have a $bobjs group. (Note: the method can also be used to add objects to Window ($objs and $bobjs) and Report classes ($objs)).
The advantage of using this method is that the new object is based on a template in the Component Store and thereby inherits all its properties and styling from the template, unlike when using the $add() class method which creates a new object directly from Omnis with only basic default properties.
- $addfromcompstore
REMOTEFORM.$objs.$addfromcompstore(cTemplateName [, iTop, iLeft, iHeight, iWidth])
Returns itemref to the new object, or kNull if no template matches
cTemplateName (required, character) is the name of the component template exactly as it appears in the Component Store, either the User Component Store usercomps.lbs or the built-in comps.lbs. The name match is case-insensitive but whitespace-significant.
The name can be qualified to disambiguate templates with the same name, for example:
- name, e.g. "Push Button"
class.name, e.g. "FieldComponents.Push Button"
lib:class.name, e.g. "User Component Library:Buttons.Tall Button"
The lib: qualifier matches the library's internal name (its $name), not its file name on disk.
The template lookup walks though usercomps.lbs first, then the built-in comps.lbs. For an unqualified name, a user template overrides a same-named built-in template.
iTop, iLeft, iHeight, and iWidth (optional) specify the position and size in pixels of the new component. Any positional parameter that is omitted keeps the template's own default value for that slot.
When you “open” or test a remote form in Omnis it is opened in a web browser. In development mode, this will be the default web browser on your development computer, but when your app is deployed, the remote form will open in the end user’s web browser, or the browser on a mobile device, or within a wrapper application for standalone mobile apps. When a remote form is opened a Remote Form Instance is created which will have a number of methods that you can use in your code to perform various actions.
Remote form instances have a number of properties, including:
$remotemenu
which is the current remote menu instance. This is only set when evOpenContextMenu is being processed: see the Remote Menus section
$sqlobject
is the JavaScript Client SQL Object which is only available in client-executed methods running in a wrapper application: see the SQL Object section
$layouttype
returns the current layout type of the remote form instance; note you cannot set it in your code
Remote form instances have the following methods, to enable animations, client messages, client commands, and the ability to open a web page from within the client:
$beginanimations() and $commitanimations()
$beginanimations(iDuration [, iCurve=kJSAnimationCurveEaseInOut]) After calling this, assignments to some properties are animated for iDuration milliseconds by $commitanimations(); the $commitanimations() method animates the relevant property changes that have occurred after the matching call to $beginanimations(); see the Animations section
$clientcommand()
$clientcommand(cCommand, wRow) Executes the command cCommand on the client device using the parameters in the row variable wRow or using the row() function; see the Client Commands section for possible client commands.
$maximize() and $minimize()
For subforms in a subform set only: maximizes or minimizes the remote form instance if it is a member of a subform set
$setcurfield()
$setcurfield(vNameOrIdentOrItemref [,bSelect=kFalse]) sets the current field on the client and places the focus in the field; for mobile devices the soft keypad may be initiated (depends on the OS); if bSelect=kTrue, and if supported by the control, all of its content will be selected; executing $setcurfield(‘’) will remove the focus from the current field; you can specify the field by name, ident, or item reference
$showmessage()
$showmessage(cMessage[,cTitle]) displays an OK message on the client machine using the specified cMessage and cTitle; multiple calls to $showmessage() during the processing of a single event will result in only the last call to $showmessage() having any effect and that message being shown; see Client Messages
$loadfinished()
a client-executed method that allows you to check when all visible subforms of a form have been loaded; it is called after all the subforms that belong to the parent remote form instance have finished loading and their $init methods have been called. So you could create a client method called $loadfinished to perform any actions you want after all visible subforms have loaded. Regarding subforms on a page pane, $loadfinished is called after the $init of any subforms on the page pane's visible page has run; the $init of any subforms on any hidden panes is not run until the pane becomes visible
$showurl()
$showurl(cURL[,cFrame,cWindowProperties,cWindowRef]) opens the URL in a new window or frame on the client machine; cURL specifies the URL of the HTML page; cFrame specifies the HTML frame name; if cFrame is empty, the page is displayed in a new window, otherwise it is displayed in the specified frame of the current window
$closeurl()
$close(cWindowRef) closes a browser window that was previously opened by the $showurl() method, takes a single parameter, a string identifier to the window, returned in the fourth parameter of the $showurl() method
- $pushhistorystate, $applynewhistory, and $rollbackhistory
can be used to interact with the web browser’s history stack, see Overriding the Browser History
See also Client Methods for remote form methods that can be executed on the client (including $init method).
The cWindowProperties parameter for the $showurl() method is ignored if cFrame is not empty. Otherwise, it has the same format as the JavaScript argument to ‘window.open’, for example, "toolbar=0,menubar=1" specifies that the browser window will have a menubar, but not a toolbar. The keywords are all boolean (0 or 1) except for the width, height, top and left, which are numbers in pixel units. Possible keywords are:
| toolbar |
specifies if the browser window has a toolbar |
| status |
specifies if the browser window has a status bar |
| menubar |
specifies if the browser window has a menu bar |
| scrollbars |
specifies if the browser window has scrollbars |
| resizable |
specifies if the browser window is resizable |
| location |
specifies whether the browser window has a location bar |
| directories |
specifies whether the browser window displays Web directories |
| width |
width of browser window |
| height |
height of browser window |
| top |
top coordinate of browser window |
| left |
left coordinate of browser window |
$redraw and $senddata Methods
The $redraw and $senddata Methods are only relevant to remote forms used with the now obsolete Web Client plug-in, so do not apply to JavaScript based remote forms. Redraws are handled automatically for JavaScript remote forms and controls, so the $redraw() method is not required and if it is called it does nothing. In addition, the $senddata() method was used in the old plug-in to control when data was returned to the client, but this is irrelevant for JavaScript Client which handles the transfer of data between the client and server automatically.
Client Messages
The $showmessage() method allows you to display a message on the client device. This method only applies to remote tasks that are associated with remote forms, that is, the method does not work for remote tasks that handle HTML forms or “ultra-thin” clients. Only one message can be shown in response to a single event. Executing $showmessage() more than once in response to the same event will result in a single Ok message with the text and title of the last call to $showmessage being shown. Alternatively, you can use the OK message command provided it is executed on the client; in this case the command uses a standard browser alert() or confirm() dialog.
You can add a new object to a remote form instance or a Paged Pane in the form at runtime using the $add() method. Note that you cannot create an entirely new object using this method, rather the $add() method in this context lets you copy an existing object in the form and add it to the form or pane. The following method can be used, where $cinst is the remote form instance:
$cinst.$objs.$add(cName,rSrcItem[,rParentPagedPane,iPageNumber,bAllPanes=kFalse])
adds new object cName to the JavaScript remote form instance by copying rSrcItem (existing object in same instance). The default action is that the new object is added to the form (when rParentPagedPane etc are omitted), otherwise you can specify the Paged Pane parameters to add the new object to a Paged Pane in the remote form.
This method can only be used in server methods, not a client-side method, that is, the information about methods etc is not present on the client. There is a logical limit of 16384 controls on a remote form, although performance will be impaired well before that limit.
The rSrcItem and rParentPagedPane parameters must both be item references to objects in the same remote form instance: their original properties and methods defined in the class when the form was instantiated will be the initial properties and methods of the new object.
If the object to be copied (rSrcItem) is a paged pane, then its children are not copied.
This method of copying objects cannot be used to copy complex grids. Furthermore, complex grids cannot be anywhere in the parent hierarchy.
Note that you cannot use the $remove() method to remove objects you have added using the $add() method: to remove or hide such an object, you can set $visible for the object to kFalse. In addition, you should note that $order is not assignable at runtime so you cannot add a new object and then change its field order.
The item group $root.$iremoteforms is a global group of all remote forms instantiated in Omnis at any one time. You can inspect the $iremoteforms group within the context of the current remote task (the current global group remains unchanged).
Therefore you can use $ctask.$iremoteforms in a remote task to return an item group containing both top-level remote form instances and subform instances. In addition, the $obj notation has been implemented for subform objects, so that if the current item is an item reference to a remote form instance contained by a subform object, item.$obj is the item reference to the remote form subform object. For example, if RF1 is a remote form containing a subform object named sfobj, with a classname of RFSUB, then after both forms have constructed:
$ctask.$iremoteforms
$ctask.$iremoteforms.RFSUB.$obj
Overriding the Browser History
You can interact with the web browser’s history stack using various form methods, for example, to add navigation events inside your remote form which are triggered when the user clicks the Back or Forward browser buttons.
There is a sample app called JS History under the Samples option in the Studio Browser which shows how you can use the browser history to track clicks in a Tab bar on a remote form.
The History stack
The History stack is a list of pages or states that a user navigates through within a browser session. History states can be added to the session history stack or replaced but cannot be removed. Rolling back history therefore involves moving the user back through the history stack, so forward navigation will still be possible after a rollback. Pushing a new state onto the stack does, however, invalidate any states that are ahead of the user’s current position in the stack. Note that session history persists between page reloads.
Interacting with the History
The browser history buttons can be overridden by adding a new state to the history stack using the $pushhistorystate() remote form method, which can be client- or server-executed. When the user uses the browser Back or Forward buttons to navigate through the history, the $applynewhistory callback method will be called.
$pushhistorystate(wRow, [bReplaceState=kFalse])
wRow is a row and should contain the information needed for you to restore your application to this state. This could be as simple as the current tab number of a tab control, as shown in the sample app. You can replace the current history state instead of adding it to the history stack by specifying bReplaceState as kTrue.
$applynewhistory()
receives the row wRow from $pushhistorystate as a parameter. Custom code should be added to this form method to determine the behavior to be applied on browser navigation. For example, the tab number could be assigned to the $currenttab property of a tab control, as in the sample app. Return kTrue to indicate you have handled the history change. This will prevent $applynewhistory being called on any other forms for this history navigation event.
Note that $applynewhistory will be called on all open forms until one returns kTrue, and that the order in which forms are called is not guaranteed.
In the sample app, when the end user clicks on a Tab bar the tab number is added to the browser history using $pushhistorystate(), so when the user clicks on the Back button in the browser, Omnis cycles back through the tabs in the correct order according to the browser history.
Rolling Back the History
The $rollbackhistory form method can be used to move the user back through the custom history states that have been added using $pushhistorystate(). $rollbackhistory can be client- or server-executed.
- $rollbackhistory([iCount=0, bPreventNotify=kFalse])
iCount is the number of custom states to go back. The default value is zero, which takes the user back to the beginning of custom history. If bPreventNotify is specified as kTrue, $applynewhistory will not be called at the end of the rollback.
In the sample app, a home button uses $rollbackhistory without a parameter to jump back to the beginning of the history stack, in effect going back to the initial tab.
Copying Data to the Clipboard
The $copytoclipboard() method allows you to copy some data to the end user’s clipboard and has the following parameters:
- $copytoclipboard(vDataToCopy[,cMIMEType='text/plain',bDataIsBinary=kFalse])
copies vDataToCopy to the user's clipboard, either character or binary depending on the value of bDataIsBinary; cMIMEType is the MIME type of the data which defaults to "text/plain"
If Chrome is being used, then the end user can change the permission level for the clipboard in the privacy and security settings. The default is "Ask", but the user could also change the permission level to "Allow" or "Block". However, whatever the permission level that the user has set, the $copytoclipboard method will work without interruption if it has been initiated by the user, for example by clicking a button – "Ask" or "Block" will only be active if the $copytoclipboard method has been called other than by user interaction. Permissions do not apply in Firefox or Safari.
For example, a character variable iText holds the text entered into an Edit Control. When a button is clicked, the text is copied to the user's clipboard as text. The code behind the button would be:
On evClick
    Do $cinst.$copytoclipboard(iText)
If the text held by iText is html, which needs to be rendered as rich text, the code behind the button would be:
On evClick
    Do $cinst.$copytoclipboard(iText,"text/html")
In the following example, a binary variable iImageData holds the binary data of an image. When a button is clicked the image data in iImageData is copied to the clipboard. The code behind the button would be:
On evClick
    Do $cinst.$copytoclipboard(iImageData,"image/png",kTrue)
Note that the user interaction must take place in a secure environment (for example, https) for $copytoclipboard to function. It is also recommended that $copytoclipboard be called from a client-executed method. This is required by some browsers to ensure reliable execution.
Reading Data from the Clipboard
The $readclipboard() remote form method allows you to read the last item of data on the end user’s clipboard, which in turn calls the $onclipboardread() remote form method, passing it three parameters:
pSuccess
A boolean value indicating whether the clipboard read has been successful
pPlainText
A character value. If pSuccess is true, pPlainText is the value of the ‘text/plain’ MIME type of the clipboard content. If there is no plain text data on the clipboard, pPlainText will be an empty string. If pSuccess is false, pPlainText is the associated error message
pExtraData
A row containing any other MIME types associated with the data (for example ‘text/html’, ‘image/png’). The column headings are the MIME types, with the values being the data value corresponding to the MIME type. Html text data is a Character type, while images are represented as Binary data
Both $readclipboard() and $onclipboardread() can be either client- or server-executed.
The following example code in $onclipboardread() would assign the value of some clipboard plain text to iText if the read is successful, or send an error message to the trace log if not:
If pSuccess=kTrue
    Calculate iText as pPlainText
Else
    Send to trace log [con("error: ",pPlainText)]
End If
As another example, if the clipboard item is an image, the binary string associated with the image can be assigned to iImageData in the following code:
Calculate iImageData as pExtraData.["image/png"]
Html text may be sanitized depending on the browser to prevent malicious content from being pasted into the document.
For security reasons, $readclipboard() will only work if called within a secure context and from a user interaction such as a button click. In Chrome, the browser’s clipboard permissions may need to be changed to 'Allow' or 'Ask'. In Safari and Firefox, when the method is called a Paste option is displayed, which will need to be clicked by the end user to proceed with the clipboard read.
JavaScript fields and controls trigger events which you can respond to in the $event() method for individual controls. JavaScript remote forms also trigger events, including when the screen size or orientation of the client device changes, or when a form or subform is brought to the top when multiple forms are open. Remote forms trigger the following events:
evAnimationsComplete
The animation has completed, with the parameter pEventCode; the Animations section
evFormToTop
The remote form is about to become visible on the client, with parameters pEventCode and pScreenSize which is a kSSZ... constant for the current screen size on the client; see the Multiple Forms section
evLayoutChanged
(applies to kLayoutTypeResponsive remote forms) generated when the responsive layout breakpoint changes, that is, when a mobile device is rotated, or when a browser window is resized: this event is also triggered when the form first opens. This has the event parameter pBreakpoint, which is the integer value of the initial or new layout breakpoint (e.g. 320 or 768, the default values).
(Note that in versions prior to Studio 8.1.6, the pBreakpoint parameter was reported as a string in a client executed method, but this is now reported as an integer value, which matches the behaviour of evLayoutChanged in server methods.)
evScreenOrientationChanged
(applies to kLayoutTypeResponsive, kLayoutTypeScreen, and kLayoutTypeSingle type forms, since Studio 10.0) The orientation of the screen has switched between portrait and landscape, with parameters pEventCode, pScreenSize (a kSSZ... constant for the current fixed screen size on the client, and pOrientation (kOrientPortrait or kOrientLandscape depending on the resulting orientation of the form).
evSubFormToTop
An existing remote form, contained in a subform that has $multipleclasses set to kTrue, is about to become visible on the client, with the parameter pEventCode; see the Multiple Forms section
evOpenContextMenu and evExecuteContextMenu
JavaScript remote forms report the context menu events: see the Context Menus section
Event Parameters
When an event is triggered, a number of event parameters are sent from the client to the event handling method. The first of these parameters is always the name of the event that occurred, and all subsequent parameters are specific to the event and describe the event in more detail. For example, a click on a list passes the click event in the first parameter (pEventCode=evClick) and the list line clicked in the second parameter (pLineNumber).
If you want to use any remote form events in your code, you have to enable the events in the $events property of the remote form. You have to do this in design mode by clicking on the background of the form, selecting the Properties option, and selecting the $events property in the Property Manager. You can enable an event by selecting it in the dropdown list for the $events property.
When the orientation of a remote form changes (e.g. when the end user rotates their mobile device, or in some cases resizes the browser window), Omnis sends an evScreenOrientationChanged event to the top remote form. This allows the remote form to adjust the coordinates of any dynamically added objects. In addition, evFormToTop also receives the pScreenSize event parameter, allowing other forms to make adjustments if necessary when they come to the top. In addition, remote forms of type kLayoutTypeScreen (non-responsive) trigger the evLayoutChanged event when their layout changes.
Event Methods
You can trap and respond to events generated in a remote form in the $event() method in the form. You have to add a method called $event to the Class methods for the form to create an event handler. Like other event methods you can use the On event command to trap specific remote form events. The following $event method responds to the evScreenOrientationChanged event and sets the iScreensize variable to the correct screen size.
On evScreenOrientationChanged
  Switch pScreenSize
    Case 3
      Calculate iScreensize as kSSZjs320x480Portrait
    Case 4
      Calculate iScreensize as kSSZjs320x480Landscape
    Case 9
      Calculate iScreensize as kSSZjs768x1024Portrait
    Case 10
      Calculate iScreensize as kSSZjs768x1024Landscape
    Default
      Calculate iScreensize as kSSZDesktop
  End Switch
  Do method setupSizes
Running Event Methods on the Client
Event handling methods can be set to run on the client and for most simple methods and calculations this is advisable; in most cases, when you add a $event method it is set to execute on the client automatically (and marked in pink, the default color). To set a method to run on the client you need to Right-click on the method in the method editor and select the ‘Execute on Client’ option. By default, an event is sent back to the Omnis App Server, the client is momentarily suspended while the event handling method is processed on the server, and when the method is finished control is passed back to the client. In some cases, this may not be a problem, or when server data is required, but in general it makes sense to execute your methods on the client and avoid any network delay if possible. Whether or not you execute a method on the client will depend what the method has to do and what information it requires: in general, any method that changes the user interface on the client can be executed on the client, while a method that needs to fetch data or write data to your server database needs to execute on the Omnis App Server.
You can test a JavaScript remote form in a number of different ways:
Click on the Test button in the Design bar of the Remote form
Right-click on the background of the Remote form and select the Test Form option
While the Remote form is the top design window, press Ctrl-/Cmnd-T, or press Shift+Ctrl/Cmnd+T to select the browser type and test the form (see below).
You can also Right-click on a Remote form listed in the Studio Browser and select the Test Form or Select Browser And Test Form option.
To test a Remote form your library must contain a Remote task and its name must be assigned to the $designtaskname property of the remote form for it to be tested or opened: see Remote Tasks for more information about remote tasks.)
The Test button or Test Form option will open the remote form in a web browser specified as the default browser on your development computer; the remote form will open in a new browser window or create a new tab if your browser is already open.
The Select Browser And Test Form option (Shift+Ctrl/Cmnd+T) on the Remote form design Context menu (or in the Studio Browser) opens a dialog containing a list of web browsers installed on your system, including an entry for the System Default, allowing you to select a browser in which to test your remote form. This can be useful if you want to test a remote form in several different browsers while designing the form and testing your app, for example, to check that some JavaScript code behaves the same in all browsers. Note that the option is only present in the Context menu when your system has more than one registered web browser, otherwise the option is hidden, and the default system browser will be used via the standard Test Form option.
Having tested a remote form in your web browser, you can switch back to Omnis and continue to change your remote form or its methods, and use Ctrl/Cmnd-T at any time to test your form. Each time you press Ctrl-T, Omnis will try to open a new browser window or tab. Alternatively, if your web browser is already displaying your remote form, and you have modified the form, you can switch to your web browser and Refresh/Reload the browser to see the latest changes to your form (but if you change JS theme you have to re-open the browser window/tab using Ctrl-T).
HTTP Server
Omnis has a built-in HTTP server to allow you to test remote forms locally in a web browser.
By default, the HTTP Server supports IPv4. You can set the “IPv” item in the ‘server’ group in the Omnis Configuration file (config.json) to set the IP version support. The values can be 4 for IPv4, 6 for IPv6, and 64 for a dual-stack IPv6 socket, that is, an IPv6 socket which has support for IPv4 on the same socket.
Default Web Browser
When you test your remote form using the Test button or Test Form option (Ctrl/Cmnd-T), it is opened in the default web browser on your development computer. If you want to test the form in another browser on your computer, you can use the Select Browser And Test Form... option (Shift+Ctrl/Cmnd+T) on the Remote form design Context menu; alternatively, you can copy the test URL and paste it into another browser (note the port number may change from session to session).
If you want to override the default action for the Test Form option, you can specify the name and path of an alternative browser in the $webbrowser Omnis preference (edit the Omnis preferences via Tools>>Options on Windows, or Omnis>>Preferences on macOS). If this preference is empty, then the default browser on your development computer will be used for testing remote forms.
Test Web Page
When you test your remote form using Test Form (Ctrl/Cmnd-T) an HTML page is created for you automatically containing the JavaScript Client and all the required parameters to allow you to open your Omnis app in a web browser. The test HTML file is located in the HTML folder under the main Omnis folder, and can be used or incorporated into the other web pages on your website when you are ready to deploy your application. The Web Preview displaying your form in the remote form editor also creates an HTML file in the ‘html/design’ folder, in order to render the page in design mode, but this is not required for deployment.
The name of the test HTML file will be the same as your remote form class name plus the .htm extension. The test HTML is based on a template file which is also located in the HTML folder: see below for more information about the template.
The URL for the test HTML page will be something like the following:
The test URL contains the IP address of your Localhost (127.0.0.1), the port number of your copy of Omnis Studio, a reference to the test JavaScript Client HTML folder, and the name of the HTML file. The port number during testing will be the port number specified in the $serverport Omnis preference, or if this is empty (the default) a port number is selected randomly from the available ports on your computer.
If you try to open or navigate to the test URL from your browser history it may not work: in this case such a URL may not have the correct port setting since the port number is assigned dynamically during testing if the $serverport property is empty and therefore may be different from one session to another. In addition, you cannot open or test your remote form by opening the test HTML in the template folder: again your browser will not have the correct URL to load the test HTML file.
Omnis Studio and your library must be open and running to test your remote form. So if you open the test HTML file from your file system, and Omnis and your library are not open, then your remote form will not be displayed and your web or mobile app will not run.
Template HTML File
The test HTML created when you use the Test Form or Ctrl-T option is based on a template file called ‘jsctempl.htm’, which is located in the HTML folder under the main Omnis folder. When you press Ctrl-T a copy of the template file is made and the individual parameters for your remote form are written to the test HTML file: this occurs every time you test your form to ensure the test HTML file is up to date and has the correct parameters. Therefore, if you make any changes to the HTML file in HTML folder your changes will be overwritten the next time you test your remote form: if you want to keep a version of this file, either rename it or copy the file to another location.
See Editing Your HTML Pages for more information about the contents of the test HTML page and what changes you may need to make for deployment.
Using an Alternative Template file
The remote task class property $htmltemplate allows you to specify a different HTML template to use to test a remote form, rather than using the default template ‘jsctempl.htm’. For example, you may want to create a template with your own set of parameters in the “omnisobject” <div>, but retain the default template.
The new $htmltemplate property specifies the name of a template file (which must exist in the html folder) to use when testing any remote forms that use this remote task as its design task. If $htmltemplate is empty (the default), Omnis uses the default template ‘jsctempl.htm’ located in the html folder, which matches the behavior in previous versions.
When you open a remote form in your development browser you will need to debug the methods and code in the form. You can do this by setting breakpoints in your code and you can send messages to the Omnis trace log or the JavaScript console (provided it is available) to allow you to debug your code.
Breakpoints
You can set breakpoints in your code, so when you test your remote form using the Test Form option or Ctrl-T and a breakpoint is encountered, control will pass from your web browser back to Omnis. In this case, when a breakpoint is encountered, the Omnis entry (button) in the Windows Task bar will flash (the default color is orange) and you will have to click on the button to return to the Omnis application window to continue debugging.
Trace Log
The tracelog() function allows you send debugging and other messages to the Omnis trace log from within client methods executed in the JavaScript Client: this will allow you to debug client methods. The tracelog(string) function writes the string to the Omnis trace log, or does nothing if debugging is disabled using the library property $nodebug. It returns true if the string was successfully written to the trace log.
Alternatively, in JavaScript client-executed methods you can use the Send to trace log command which sends the text to the JavaScript console.
Runtime & Server Logging
The Library preference $alwayslog ($clib.$prefs.$alwayslog, defaults is kFalse) allows you to log messages in the Runtime and Server versions of Omnis to help you debug your code. When kTrue, the Send to trace log command and tracelog() function always write non-diagnostic messages to the trace log (overriding the check for debuggable code).
Client Caching
There is an entry in the Omnis configuration file (config.json) that allows you to control whether HTML pages are cached or not by the built-in HTTP server in Omnis (which is used for testing forms in design mode). The "preventclientcaching" item under the ‘omnishttpserver’ entry in the config.json file is set to true by default and prevents web pages from caching. When set to true, this would mean that every time a page is accessed, the page and any linked scripts (JS files, CSS files) are loaded or refreshed and not cached: note this is for testing purposes only, and does not apply when you deploy your app. If you want pages to be cached you can set this item to false.
The "preventclientcaching" entry in config.json has the following format:
"omnishttpserver": {

        "preventclientcaching": true

    }
When hosting your files on a web server (as recommended for deployment), this setting does not apply - your web server will have its own settings to control client caching behavior of files it serves.
To test your remote form on a mobile device or any other client apart from your development computer, assuming those devices are within the same local network (LAN/WLAN) as your development computer, you can enter the test URL into the web browser on your device but replace the Localhost IP address (127.0.0.1) with the IP address of your development computer. For example, reusing the test URL above and replacing the IP address, the following URL could be used on a mobile device such as a phone or tablet computer:
http://194.131.70.184:51452/jschtml/jsMain.htm
You can use the ipconfig command to find the IP address of your development computer, via the Command prompt on a PC or the Terminal on a Mac.
You can test a mobile remote form in a wrapper application using the Test Form Mobile (Ctrl-M) option, assuming a wrapper application is setup and enabled: if a wrapper is not setup you can test your mobile forms in a web browser during development, as above. See the Deployment chapter for details about setting up a wrapper application.
Client Script Version Reporting
If the build version of the scripts in the JavaScript Client is different to the scripts on the server, then the mismatch is reported as an error.
If there is a major version difference between client and server, an error message is generated, and the client will not run in this situation. The error message text is determined by a new localizable string "omn_cli_script_majorversion_mismatch" in strings_base.js.
If there is a difference in the build revision, a warning is logged to the browser console describing the issue. For example, if you patch the scripts only (rather than installing a new version of Omnis Studio), then this difference will be logged in the console.
Remote Tasks
When I try to test my remote form using Ctrl-T, it does not open and the error “To use a remote form class, you must set the design task of the remote form class to a remote task” is displayed.
You need to create a remote task in your library and set the $designtaskname property of the remote form class to the name of the remote task you created. A remote form instance needs a remote task instance to run (for testing or deployment), so will not open without a remote task and the $designtaskname property being set.
When I open my blank remote form in design mode I don’t see any JavaScript components in the Component Store.
All new remote forms should be set to run on the JavaScript client, but if for some reason the $client property is not assigned, you need to set it to kClientJavaScript to use the new JavaScript components. (Note you cannot switch an existing Web Client based remote form to the JavaScript Client, but there is a migration tool available in the Studio Browser to help you move to the new client.)
Events
I have placed an event method behind my button (or any other event-driven object), but nothing happens when I click it while testing the form in a browser.
You must specify which events are to be triggered by the object or remote form in the $events property of the object or form. So for a button, the evClick event must be checked in the $events property of the button. Events for some objects are checked by default, but you may like to examine the state of each event in the $events property and make sure the events you need are enabled.
Client Methods
You can run certain methods on the client, such as event handling methods ($event), instead of running them on the Omnis App Server: these are referred to as Client-Executed Methods or simply Client Methods. When such client methods are called in your application, runtime execution does not pass back to the Omnis App Server, rather the method is executed entirely in the end-user’s browser within the JavaScript Client. Enabling certain methods to execute on the client can speed up your application, by cutting down on network traffic, while from a design point of view, using client methods allows you to add more interactivity into the UI of your web or mobile app, including using native JavaScript in your Omnis code.
Any methods in your JavaScript remote forms that are enabled to execute on the client are converted to JavaScript files. These JavaScript files are run in the browser when the method is called on the client. When a client browser opens a JavaScript remote form, the Omnis App Server generates a JavaScript file containing the client methods for the remote form (the generation of this file only occurs once unless the remote form class is modified, in which case it will regenerate the file). This file is added to the html/formscripts folder in the Omnis tree inside a subfolder named after the library. Each remote form containing client methods has a separate JavaScript script file.
When you deploy and run your web or mobile app on the Omnis App Server, these JavaScript script files are generated at the same location as in the development version, the first time the client calls the client-side method. For the deployed app, the JavaScript files are in minified form, and therefore are smaller and will run faster since all the comments are stripped out.
There is a sample app called Client Methods under the Samples option in the Studio Browser, and in the Omnis Components app on the Omnis website.
Enabling Client methods
To enable a method to execute on the client, you can Right-click on the method name in the Method Editor and select the ‘Execute on Client’ option. Whether or not an existing method can be enabled to execute on the client will depend on the Omnis commands, functions, and in some cases the type and scope of the variables used in the method. When you try to enable the method to execute on the client, Omnis checks whether all the commands and functions within the method can be executed on the client, and if not, it will not allow the method to be marked as ‘Execute on Client’. If the method can be executed on the client, the method name will be shown in pink (the default color) and the restrictions on client methods will then apply to this method.
If you create a new empty method in the method editor, it can be enabled to execute on the client without error (since it does not contain any commands, functions or variables at this stage), but the number of commands and functions available to use will be limited to those shown in the Method Editor. The type of Local and Parameter variables you can create will also be restricted: see Data Types below.
The Omnis Help (F1) indicates whether or not a command or function can be executed on the JavaScript client.
Binary functions
The Binary functions cannot be used in JavaScript client methods since JavaScript does not support binary data particularly well.
Text Blocks
You can use the text block commands (Begin text block, Text:, End text block, Get text block, JavaScript:) in client methods to build up a block of text, e.g. to generate styled text (see the Styled Text section).
Object Properties in Client Methods
While some properties can only be assigned in Server methods, you can read the current value of many more remote form properties and component properties in client-executed methods running in a form instance. So for example, you cannot change the size and position of an object in a client method (by setting $top, $left, $width, and $height), but you can return the current values for an object in a client method, e.g. $cobj.$width returns the width of the object.
An error will be generated if you try to read the value of a remote form/control instance property from a server-executed method: "Cannot get the value of a remote form instance property when executing code on the server".
Code Block Error Checking
JavaScript code generation for client methods detects missing block terminators, and if an error is found, Omnis adds an error to the Find and Replace log and opens the log. For example, an error is generated if there is a While loop with no End While, or an If with no End If. You can open the method containing the error by double-clicking the error message in the Find and Replace log.
Auto Client Executed
When you add a new method in the method editor, and the method editor recognizes the method name as a known method that should be client-executed, then the method editor marks it as client-executed, and also adds any parameters (if required). This applies to new methods with the following names: $candrop, $drag, $filereadcomplete, $filtergrid, $getscrolltip, $init, $pushed, $sfscanclose, $sfsorder, $sortgrid, $sqldone, $term. In addition, the $sqldone method receives some boilerplate or template code when you add it.
$init method
You can create a client-side method with the name $init in your remote form which the client calls after the form and the client scripts file have been loaded. This allows you to do any final initialisation of the remote form, especially when the remote form is running in serverless client mode. When you create or enable the $init method it will be marked as client executed automatically.
Leave Site Prompt
You can use the $init() client method to add a 'Leave Site' prompt to your application which forces the browser’s built in prompt to be shown when the end user attempts to close the remote form if there has been any sort of interaction. To add a ‘Leave Site’ prompt, add a Quit Method command returning any string to the $init method of your remote form, for example, Quit method 'Show leave site prompt'. The default ‘leave site’ text for the browser is displayed, so the text you add to Quit method is irrelevant.
Event Specific Client Methods
You can use the $eventclient() method to call a client-executed method for specific named events. The client will run the $eventclient method if it contains On default or an On <event> statement for the named <event> that has been triggered, otherwise it will run the $event method, which must be server-executed if $eventclient is specified.
When specifying $eventclient, as with $event, events are still only sent when they are present or enabled in the $events property for the control or form. Omnis calculates the subset of $events to be handled by $eventclient as those events specified in an On statement or On default statement in $eventclient, at any level in the inheritance hierarchy for the control or form. In this case, if you use On default, all events are processed by $eventclient.
Any events not present in the subset of $events to be handled by $eventclient are sent to $event for the control or form and run on the server, unless they are one of the small set of client-only events, e.g. $candrop and $drag.
The current event processing model, where all events go to $event, which is either client or server executed, works as in previous versions if there is no $eventclient method present for the control or form.
When using inheritance, you can also override $eventclient in a subclass.
Showing Built-in Methods
When the Show Built-in Methods option is enabled (the default), the method editor tree list shows all possible built-in class and control methods that can be overridden, including $event and $eventclient (in versions prior to Studio 11 most of these methods were available but not listed). Note that control methods that are built-in to JavaScript client objects cannot be overridden, meaning they are not displayed in the method tree list when showing built-in methods. In addition, built-in methods in the tree have a tooltip that is displayed when the Show Method Content Tips option in the View menu is enabled.
Debugging Client methods
Client methods cannot be debugged in the Omnis method editor since method execution occurs in the client browser. Instead, you must use the Script Debugger within the browser you are using to test the client executed parts of your application. Note that for this reason you cannot use any Omnis commands that interact with the debugger or trace log (Trace on, Open trace log, etc) in client methods, or any that would interrupt command execution (Breakpoint, Yes/No message). However, while developing your app, you can use the Send to trace log command in client executed methods to write a line to the JavaScript console.
Client methods cannot be debugged in the Omnis method editor since method execution occurs in the client browser. Instead, you must use the Script Debugger within the browser you are using to test the client executed parts of your application. Note that for this reason you cannot use many Omnis commands that interact with the debugger or trace log (Trace on, Open trace log, etc) in client methods. However, while developing your app, you can use the Send to trace log command in client executed methods to write a line to the JavaScript console.
The Breakpoint command can be used in client-executed methods to set a 'hard' breakpoint in the code, but note that this will only be hit if the web browser developer tools are open. It will then break into the browser's debugger, in the JavaScript code which was generated from your client-executed method. The browser dev tools can usually be opened using the F12 key.
Errors
Omnis maintains two global system variables #ERRCODE and #ERRTEXT that report error conditions and warnings to your methods. Fatal errors set #ERRCODE to a positive number greater than 100,000, whereas warnings set it to a positive number less than 100,000. You can return the values of #ERRCODE and #ERRTEXT in client executed methods in the JavaScript using the functions errcode() and errtext(), so it is possible to write methods to handle errors when they occur.
Calling Custom Methods
You can use the Do method command to call a custom method (your own method) in the current remote form instance. If you use this command in a client method you must include parenthesis after the method name for the method to be called. For example, to call a custom method called $mymethod from within in a client method in the current remote form instance, you must use Do method $cinst.$mymethod(), or you can use Do $cinst.$mymethod().
Data Types for Client methods
JavaScript itself only supports a small number of built-in data types, and these do not correspond directly with Omnis data types. Since instance variables are used by both the JavaScript Client and the Omnis App Server, these can still be given any Omnis data type.
However, Local variables and Parameter variables in client methods can only be Date Time, List, Row or Var type. The Var type is a generic variable used for data of any type. The client does not enforce the type of data stored in a variable, unless you assign a value to an instance variable or list column, in which case the client will convert the assigned value to the correct Omnis type for the instance variable or list column, or failing that, if the data cannot be converted, the client throws an exception, reported by an OK message.
Further restrictions
Field reference parameters are not supported, since JavaScript methods use call by value.
Date Time local variables and parameters do not have a subtype in client methods.
Date Time, List and Row variables are represented by a JavaScript object on the client, whereas the other data types are the native JavaScript types (number, string and Boolean).
When you change a method from client to server execution, or back again, the data type of Local variables and Parameters changes to the most logical supported value for client or server execution (restoring the original type when changing from client to server execution if the type on the client is Var).
Variable References in Client Methods
There are some subtle differences to the way variables are passed around in client methods in Omnis Studio, as opposed to methods that are executed on the server. This is due to the fact that client-executed methods are running JavaScript code, and so are bound by the rules of that language.
- In JavaScript, variables and method parameters are always passed by value. This means that a copy of the value of the variable is passed around.
This is easily understood for primitive data types, such as string, number, and boolean, but objects are slightly more nuanced, that is, anything that’s not a primitive, including Omnis Lists, Rows, Dates and Remote Objects.
Object-type variables
- The value of an object variable is essentially a pointer to that object.
This means that it is cheap and efficient to pass objects around, but there are two important consequences:
If you change some property of a passed object, it will change the property on the original object too.
If you re-assign the whole variable of the passed object, you are replacing the pointer, so will not effect the original object.
In Omnis, this only comes into play when you are using local variables or parameters in a client-executed method.
Example 1
Calculate lRow1 as iRow
Calculate lRow2 as lRow1
Calculate lRow1.C1 as "TEST"
Calculate lColValue as lRow2.C1
Example 2
Calculate lRow1 as iRow
Calculate lRow2 as lRow1
,
Calculate lRow1 as row("TEST")
Calculate lColValue as lRow2.C1
Execution and Method Calls
Method execution in the JavaScript client means that that no user-visible updates to the user interface occur until control returns from the executing JavaScript to the browser (or other container). This means that client methods should be as short as possible. This also means that if a client-side method calls a server method, this call cannot occur in a synchronous manner, since the user interface would appear frozen while the server code was executing (since no user-visible updates to the user interface occur while a synchronous AJAX call is running). This means that the mechanism for calling a server method from a client method is implemented differently for the JavaScript client.
When code in a client-side method calls a server method (either using $cinst.$methodname notation, or by using the Do method command), the call to the server is executed asynchronously. While the server method is executing, the UI is made inaccessible using a loading overlay – the exception to this is that $alwaysenabledobject and edit controls calling a server-executed evKeypress are left accessible. After making the server method call, the client-side method continues to completion (note that the server method call returns true or false to indicate if it has started). The client-side method can only call one server method like this – if it makes a second call, the client throws an exception.
When code in a client-side method calls a server method (either using $cinst.$methodname notation, or by using the Do method command), the call to the server is executed asynchronously. While the server method is executing, the UI is made inaccessible using a loading overlay – the exception to this is that $alwaysenabledobject and edit controls calling a server-executed evKeypress are left accessible. After making the server method call, the client-side method continues to completion (note that the server method call returns true or false to indicate if it has started).
If you try to call multiple server methods from a client method, Omnis only allows one method to run at a time, but the others will be queued. They will run in the order in which you call them. If your subsequent server method calls depend on previous server method calls, you should take the “daisy-chain” approach of calling the next method from the previous method's ..._return callback method, described below.
Return Values Using a Promise
When calling a server-executed method from the client, a Promise is returned, unless there is a matching ..._return method, in which case it will call back to the return method when complete (see below for using _return methods).
The return value from the server method will be passed through as a parameter in the Promise's "then" function. This allows you to chain your asynchronous logic in the same method, maintaining context and continue to use variables defined in the outer method. For example:
Do $cinst.$myServerMethod() Returns lPromise
JavaScript: lPromise.then( (returnVal) => {
JavaScript: lRetVal = returnVal; // Assign the parameter to a local variable that Omnis code knows about
Do $cinst.$showmessage(lRetVal,"Server Method Complete")
JavaScript: });
Return Values Using a Promise
When calling a server-executed method from the client, a Promise is returned, unless there is a matching ..._return method, in which case it will call back to the return method when complete (see below for using _return methods).
The return value from the server method is an object, which has an 'errorText' member, and a 'form' member. The 'form' member is a reference to the form instance which has loaded. If the 'errorText' member is populated, this indicates an error loading the form. For example:
Do $cinst.$clientcommand("subformdialogshow",row(...) Returns lPromise

JavaScript: lPromise.then( (result) => {
JavaScript: lForm = result.form;
Do lForm.$myMethod()
JavaScript: });
Return Methods
If the client code needs to handle the return value from the server method, then you can implement a client-side method in the remote form with the name <method name>_return. For example, to receive the return value from a server method called $test, implement a client-side method $test_return; the server method ($<method name>) must be called from a client-side method. The <method name>_return method must have a single parameter, which is the return value from the server method. A typical action of the _return method might be to update a progress control, and then issue another call to the server. This allows a time-consuming operation to execute while showing its progress.
The Insert Client Return Method After option in the Modify>>Method menu (and on the Method list context menu) allows you to add a “<method name>_return” method for a server method; the method is named <method name>_return automatically and placed after the server method.
From Studio 10.2 onwards, you can create such return methods for controls (fields). If a client-executed method calls a server-executed method on a control, when execution returns to the client, Omnis will look for the <method name>_return method on the control, and if not found it will look for the return method at the form level, as in previous versions.
Object and Library names
You can use $cinst.$class or $cinst.$lib in client-executed methods to get the name of the current class or library, where $cinst is a JavaScript remote form instance executing the method.
Client Methods Example
There is an example app demonstrating JS Client Methods in the Samples section in the Studio Browser, and the same app is available in the Omnis Components app on the Omnis website. The app includes a simple entry form with client-side field validation, and some animated help tips.
You can examine the client methods and code in the sample library – some of the code is described here.
Field Validation
A web or mobile form may include several mandatory fields. You can use a client-side method behind the Submit button (called Add in the example app) to check that the fields contain some data – this is the code for the email field:
On evClick
If pos('@',iEmail)=0
Do $cinst.$objs.EmailLabel.$textcolor.$assign(kRed)
Calculate lCurField as 'Email'
Else
Do $cinst.$objs.EmailLabel.$textcolor.$assign(kBlack)
End If
Do $cinst.$setcurfield(lCurField)
The code checks whether or not the Email field contains an ‘@’ and if not the field label is colored red and the cursor is placed in the Email field – if the Email field contains data the method moves onto the next field. All the other fields on the form are checked for any content and handled in a similar way: the password field is checked for a minimum number of characters, as follows:
If len(iPassword)<6
  Do $cinst.$objs.PasswordLabel.$textcolor.$assign(kRed)
  Calculate lCurField as 'Password'
Else
  Do $cinst.$objs.PasswordLabel.$textcolor.$assign(kBlack)
End If
Do $cinst.$setcurfield(lCurField)
Animated Help tips
In the JS Client Method example app, the form has some help buttons that the end user can click on to receive tips about how to fill out the form. These help tips are implemented using a hidden text box and the animation methods – when you click on a button, the text box is made visible and is moved into position next to the appropriate field, and when the button is clicked again the text box is hidden. The code to achieve this is in a client-side method behind the Help tip button marked with a ‘?’ icon: the button is in fact a Picture control with its $iconid set to 1794, and the code is placed behind the $event() method. The Tip box is a paged pane containing a Rounded rectangle and a Text field – when the form is opened its $alpha is set to 0 and it is positioned off the screen. The help tip next to the Password field has the following event method:
On evClick
If iLastTip='password'
Do $cinst.$beginanimations(500,kJSAnimationCurveLinear)
Do $cinst.$objs.Tip.$alpha.$assign(0)
Do $cinst.$commitanimations()
Calculate iLastTip as ''
Else
Calculate iTip as "A password must to at least 6 characters long."
Do $cinst.$beginanimations(500,kJSAnimationCurveLinear)
Do $cinst.$objs.Tip.$top.$assign(270)
Do $cinst.$objs.Tip.$alpha.$assign(255)
Do $cinst.$commitanimations()
Calculate iLastTip as 'password'
End If
There is a similar Help tip button and method for the Email field. If the Password Tip box is already visible in the form and you click the Email Help button, the Tip text is changed and the Tip box itself is moved next to the Email field.
Client Objects and Inheritance
The JavaScript client uses JavaScript objects to represent each remote form and each control on the remote form. The client methods of a remote form and its controls are defined as methods of the remote form and control objects.
Once a remote form and its client methods script file have been loaded, the JavaScript remote form object has a member called ivars which is a JavaScript object that maps instance variable names to instance variable field numbers. If you override an instance variable, then the ivars object will have more than one entry for the variable – overridden superclass variables will have a numeric suffix to distinguish them.
The Do inherited command is evaluated at the point at which the script file is generated by the server. This means you can only use Do inherited from within the actual method you have overridden. This differs from the other clients, in that they allow you do call Do inherited from a private method called from an inherited public method, and then the call to Do inherited calls the overridden public method.
New Page Browser Prompt
In most desktop browsers (excluding Opera) a web page can prompt the user before navigating to another page. Using the $init client-side method for a remote form you can specify the message to be added to the user prompt.
If the $init method returns a character string, the browser will prompt before navigating to another page, but only if the browser supports this feature. The returned character string may not be in the browser prompt, depending on the browser, for example, Firefox does not currently display it.
If $init does not end with a Quit method command, or returns another type, then functionality is unchanged from the current behavior.
Once one $init method has returned a string, any return values from any other $init calls for other remote form instances are ignored, so there is no way to turn off the prompt once it has been enabled.
Client Commands
The $clientcommand() remote form method allows you to execute various pre-defined commands on the client device, including ones that open various types of message boxes, and ones that can access functions on a mobile device. The suitability of certain client commands will depend on the current client device (e.g. some of the commands may not be available for certain mobile devices), and due to the differences between web browsers on desktop computers and phones, so these client commands should be thoroughly tested, as appropriate, for all platforms or devices you wish to support.
These client commands should be executed in the context of the current remote form instance using $cinst, and require various parameters that depend on the command sent to the client. The client commands must be executed on the client; they have the general syntax:
Do $cinst.$clientcommand(cCommand,wRow)
where $cinst is the current remote form instance, cCommand is the name of the client command to be executed on the client, and wRow is a row variable containing one or more parameters to be passed to the client; or you can use the row() function directly to send the required parameters.
The following is a summary of all the client commands (in alphabetical order), and they are described after the table (in functional groups):
| assignpdf |
Assigns the specified PDF to the specified HTML control |
| clearerrors |
Clears all errors set with $errortext for all objects on the form |
| clearlocale |
Clears the locale on the client |
| closefile |
Closes a file or files supplied by the drag value of kDragFiles to evDrop |
| closepush |
Closes an open push connection to the Omnis Server |
| enablepushnotifications |
Enables or disables push notifications on the client inside a JavaScript mobile wrapper; see the wrapper docs on the download page |
| javamessage |
Shows a message box on the client |
| loadpreference |
Loads a named preference value from the client preferences into an instance variable |
| lockui |
Locks the client user interface |
| noyesmessage |
Opens a no-yes message box |
| okcancelmessage |
Opens an ok-cancel message box |
| openpush |
Establishes a push connection to the Omnis Server for the remote task |
| playsound |
Plays a sound on the client (unlikely to work on mobile devices) |
| readfile |
Reads and then closes the file identified by file ident (supplied to evDrop) |
| savepreference |
Saves a value (as a character string) as a named preference on the client |
| setcustomformat |
Sets the default custom date format used when $dateformatcustom is empty |
| setlocale |
Sets the locale on the client |
| settheme |
Sets the theme for the JS client, i.e. all remote forms in the library or application |
| showloadingoverlay |
Shows or hides a loading overlay over a control or the entire form |
| showpdf |
Opens the specified PDF in a new browser window or tab |
| showtoast |
Activates a “toast message” which displays a message to the user in a small popup which disappears after a timeout, either 5000ms or specified amount |
| soundbell |
Sounds the bell (unlikely to work on mobile devices) |
| speakmessage |
Speaks a message, useful for visually impaired users |
| subformdialogclose |
Closes the topmost subform dialog |
| subformdialogshow |
Opens a single subform as a modal dialog |
| subformpaletteclose |
Closes a subform palette |
| subformpaletteshow |
Opens a subform palette |
| subformset_action |
Where action is one of the following: add, formadd, formremove, formtofront, or remove, e.g. subformset_add adds a set of subforms to the form. See Subform Client Commands |
| yesnomessage |
Opens a yes-no message box |
Message Dialogs
There are a range of message dialogs available including dialogs for Yes/No messages (Yes is default button), No/Yes messages (No is the default button), and Ok/Cancel messages (OK is the default, with an optional Cancel button).
There is an example app called Dialogs under the Samples option in the Studio Browser that shows how to use the client commands to open message dialogs, plus the same library is available in the Omnis Components app on the Omnis website. In addition, the speakmessage client command can speak a message.
The message box client commands allow you to enter the message text in the first column of the row variable. You can create a line break in the message text using //.
The message box client commands allow you to enter the message text in the first column of the row variable. You can create a line break in the message text using kCr or kLf, e.g. con("Line 1",kCr,"Line 2"), or using //.
Multiple calls to any of the message commands during the processing of a single event will result in only the last call having any effect and that message being shown, so all previous messages will be ignored or overwritten.
Yes/No Messages
The “yesnomessage” command opens a Yes/No message box in which Yes is the default button.
Do $cinst.$clientcommand("yesnomessage",row(cMessageText, cTitleText, cPublicFormMethodNameCalledOnYes, cPublicFormMethodNameCalledOnNo [,cPublicFormMethodNameCalledOnCancel]))
If cPublicFormMethodNameCalledOnCancel is omitted no Cancel button is shown.
For example, in the Webshop sample app a Yes/No message is generated using the $clientcommand method when a user clicks on a product size/type that is not available:
Do $cinst.$clientcommand("yesnomessage",row(con('Would you like to order >',iProductList.product_size_1,'< instead?'),'Not available','$orderYes'))
No/Yes Messages
The “noyesmessage” command opens a No/Yes message box in which No is the default button.
Do $cinst.$clientcommand("noyesmessage",row(cMessageText, cTitleText, cPublicFormMethodNameCalledOnYes, cPublicFormMethodNameCalledOnNo [,cPublicFormMethodNameCalledOnCancel]))
If cPublicFormMethodNameCalledOnCancel is omitted no Cancel button is shown.
Ok/Cancel Messages
The “okcancelmessage” command opens an OK/Cancel message box in which OK is the default button, with an optional Cancel button.
Do $cinst.$clientcommand("okcancelmessage",row(cMessageText, cTitleText, cPublicFormMethodNameCalledOnOk, [,cPublicFormMethodNameCalledOnCancel]))
If cPublicFormMethodNameCalledOnCancel is omitted no Cancel button is shown.
The styling for dialog headers is defined in the classes: .omnis-wf-title.typeheader and .omnis-wf-title.typebody in the core.css file, which can be modified by overriding them in user.css.
speakmessage
The "speakmessage" client command tells assistive technology to announce a message, which can, for example, be used to convey information to visually impaired users.
Do $cinst.$clientcommand("speakmessage",row(cMessage, bInterruptCurrentSpeech))
JavaScript Message Boxes
The “javamessage” command shows a JavaScript message box on the client. The message box can be various styles (error, warning, success, prompt, message, or query) and can have up to three buttons and accompanying text.
Do $cinst.$clientcommand("javamessage",row('error'|'warning'|'success'|'prompt'|'message'|'query', cMessageText, cTitleText, bOpenAtMouse, cButt1text:servermethodname, cButt2text:servermethodname, cButt3text:servermethodname))
For example:
Do $cinst.$clientcommand('javamessage',row('query','Update file?','Warning',kFalse,'No:','Yes:$call_next_method_a','cancel'))
Dialog Icons
The message dialog displayed using the ‘javamessage’ command contains a standard icon from the material design set. Types 'error', 'warning', 'success', 'prompt' and 'query' all contain an icon specific to that type, while 'message' does not use an icon. The images for the icons are defined in the core.css file under the .typeicon classes and can be overridden in user.css.
Using a Promise
The javamessage, yesnomessage, and noyesmessage client commands (as well as the $showmessage method) return a JavaScript promise when the methods are executed on the client; a promise contains a value that can be used in JavaScript code in your remote form, for example, to initiate a specific action.
The promise's resolve function is passed a parameter whose value depends on the message type being shown, as follows:
| javamessage client command |
The button number which was clicked (1-3) |
| yesnomessage client command |
true if 'Yes' was clicked, else false |
| noyesmessage client command |
true if 'Yes' was clicked, else false |
| $showmessage method |
true |
For all these dialog functions which return a promise, the calls will only return a promise when executed on the client. A promise will be 'resolved' when its dialog is closed. You can add code to run at this point using JavaScript, for example:
Do $cinst.$clientcommand("yesnomessage",row("Are you sure?","Really?!")) Returns lPromise
JavaScript: lPromise.then((lResult) => {
Do $cinst.$showmessage(con('You clicked ',lResult))
JavaScript: });
Playing Sounds
The system bell
The “soundbell” command plays the default system sound on the client.
Do $cinst.$clientcommand("soundbell",row())
In this case, row() is passed empty.
Play a sound file
The “playsound” command plays a sound on the client.
Do $cinst.$clientcommand("playsound",row(cNameOfSoundFile1[,cNameOfSoundFile2,...]))
The sound file(s) should be located in the html sounds folder.
Browser support
In some cases, these sounds will not work in Safari on macOS or iOS since it generally only allows sounds that are in direct response to a user action. Therefore, sounds triggered in a server method are unlikely to work, whereas if they are triggered in a client-executed method they are more likely to work. In general, sounds tend to work in Chrome on macOS or iOS, regardless of how they are triggered.
In all cases, using the client commands to play sounds should be thoroughly tested, for all platforms and browsers you wish to support.
The “setcustomformat” command allows you to set the date format used on the client when $dateformatcustom is empty (defaults to D m y).
Do $cinst.$clientcommand("setcustomformat",row(cDateFormat))
See the Date and Time Formatting section for more details about setting the data format on the client.
Client Preferences
The following commands allow you to save and load end-user data on the client, such as user preferences. You could use these commands to store and load usernames and/or passwords to allow the end user to log onto your application. As with other client commands, these commands must be executed on the client.
There is an example app called JS Preferences under the Samples option in the Studio Browser showing how you can use these client commands to save and load user preferences in a remote form; the same app is available in the Omnis Components app on the Omnis website.
Saving preferences
The “savepreference” command saves a value (as a character string) as a named preference on the client.
Do $cinst.$clientcommand("savepreference",row(cPreferenceName, cPreferenceValue [,StorageType]))
Loading preferences
The “loadpreference” command loads a named preference value from the client preferences into an instance variable.
Do $cinst.$clientcommand("loadpreference",row(cPreferenceName, cInstanceVariableName [,StorageType]))
Where cInstanceVariableName is a quoted string containing the name of the variable.
The following method can be used for a ‘Save’ button which saves the values in three fields on a form:
On evClick
Do lPrefRow.$define(lPrefName,lPrefValue)
Do lPrefRow.$assigncols('omnis_pref1',iPref1)
Do $cinst.$clientcommand("savepreference",lPrefRow) Returns #F
Do lPrefRow.$assigncols('omnis_pref2',iPref2)
Do $cinst.$clientcommand("savepreference",lPrefRow) Returns #F
Do lPrefRow.$assigncols('omnis_pref3',iPref3)
Do $cinst.$clientcommand("savepreference",lPrefRow) Returns #F
Storage Type
The row variable passed to the “savepreference” and “loadpreference” client commands can have a third parameter, the “storage type”, which allows temporary, session, or local storage options. This allows you to store text values in the client browser, either temporarily or persistently in the browser using JavaScript sessionStorage or localStorage. Storage type is of type character and can have the following values:
"temp"
temporary storage stored within an instance of this connection, will be cleared on page close or reload
"session"
JavaScript sessionStorage cleared when page session ends, survives page reloads and restores
"local" (the default if no value supplied)
JavaScript localStorage has no expiration time and survives page closures. When used with the wrappers the values will be shared between online and offline mode
For example:
Do lPrefRow.$define(lPrefName,lPrefValue,lStorageType)
Do lPrefRow.$assigncols('omnis_pref1',iPref1,"session")
Do $cinst.$clientcommand("savepreference",lPrefRow)
Do lPrefRow.$assigncols('omnis_pref1','iPref1',"session")
Do $cinst.$clientcommand("loadpreference",lPrefRow)
Locking the User Interface
The “lockui” command lets you lock the user interface manually, for example, when a series of events are taking place, and unlock the UI when the events have completed.
Do $cinst.$clientcommand("lockui",row(bLock))
Set bLock to kTrue to lock the UI, or kFalse or empty to unlock.
This command is useful with the progress control and $sendcarryon – in this case, you can lock the UI when you start the progress bar, and unlock it when you have finished using the following code:
Do $cinst.$clientcommand("lockui",row(kTrue))
Do $cinst.$clientcommand("lockui",row(kFalse))
Do $cinst.$clientcommand("lockui",row())
Custom Loading Indicator
The “showloadingoverlay” client command allows you to add a loading indicator (animated image and text) over an individual control, or the entire page in the JavaScript Client. As well as providing feedback to the user, that a long running operation may be in progress, it will also prevent user input. It is useful if you are doing any asynchronous operations, such as populating a list using a SQL worker object.
There is an example app called Loading Overlay under the Samples option in the Studio Browser showing how you can use the loading overlay client command; in addition, the same app is available in the Omnis Components app on the Omnis website.
The showloadingoverlay client command is executed using the $clientcommand method, as follows:
Do $cinst.$clientcommand("showloadingoverlay",row(bShow, cControlNameOrEmpty, cMessageText [, cCSSClass]))
The parameters are:
bShow: A Boolean value kTrue to show the overlay, or kFalse to hide it.
cControlNameOrEmpty: The $name of a control on the form to which the overlay should be attached/removed from. Pass an empty string to target the entire page.
cMessageText: (Optional) A string of text to display in the overlay.
cCSSClass: (Optional) A CSS class to apply to the overlay. Allows you to customise the appearance of the overlay using CSS (See below).
By default, the overlay will darken whatever is behind it, and display a spinner and text string. If you wish to customize the appearance, you can do so with CSS. Create a CSS class in your user.css file, and pass this class name as the cssClass parameter.
The loading overlay comprises a toplevel div, which will be given your CSS class name. This contains a div with the CSS class name of “container”, which contains a div with the “indicator” class and a ‘p’ element with the “message” class. You will need to use CSS to style all of these. Look at the 'jsLoadingOverlay' JS form in the sample library which contains 'getUserCss' and 'getUserCss2' methods which build up examples of the necessary CSS and may be useful to form the basis of your CSS.
There are a number of client commands, all prefixed ‘subformset_’, that allow you to create and manage subforms in a subform set: see the Subform Client Commands section for more information.
Subform palettes can be opened or closed using subformpaletteshow and subformpaletteclose, or a subform palette can be closed by clicking outside the subform: see Subform Palettes.
PDF Printing
The showpdf and assignpdf client commands allow you to print and display PDF files in the client browser: see the PDF Printing in the JavaScript Client section for more information.
Push Connections
Remote tasks can have a single “push connection”, established using the client command openpush, to allow you to send data to the client: see the Push Connections section for more information.
Dragging and Dropping files
The readfile and closefile client commands enable files to be read from evDrop event while dragging files from the end user's system. See Dragging and Dropping files for more details.
Push Notifications
The enablepushnotifications client command enables and disables push notifications for mobile apps: this is described in a separate doc available with the JavaScript Wrapper download.
Toast Messages
The showtoast client command activates a “toast message” which displays a message to the user in a small popup which disappears after a timeout, either 5000ms or specified amount: see the Toast Messages section for more information.
Locale Commands
The setlocale and clearlocale client commands can be used to manage the locale on the client: see the Localizing Remote Forms section for more information.
Theme Command
The settheme client command can be used to set the JS Theme in the JS Client: see the Changning the Theme section for more information.
The Remote Menu class allows you to add various types of menus to remote forms and individual controls. A remote menu can be opened as a Popup Menu control, added to a Tab Control or Split Button, or opened as a Context menu for the remote form itself or individual controls (Popup menus, Tab menus, and Split buttons).
There is an example app showing how to use a Remote menu under the Samples option in the Studio Browser, and the same app is available in the Omnis Components app on the Omnis website.
When you design a Remote menu, you need to create a title, specified in the $title property, and add individual menu lines: the text for a menu line is added to the $text property for the menu line.
To create a Remote Menu
Click on the New Class>>RemoteMenu option in the Studio Browser
Click into the menu header and enter the text for the menu title
Press Return to create a new menu line, or Right-click on the menu header and select Add Line
After creating a new menu line, assuming it is selected, you can type the text for the menu line; alternatively, you can click into the $text property in the Property Manager and enter the text for the menu line
To create another menu line, you can press Return or Right-click on a menu line and select Add Line; you can use the same context menu for delete a line
To add a dividing line, add a new line and do not add any text; you can drag menu lines or dividing lines to reorder the options in the menu.
A remote menu does not contain methods, rather each line has a separate ID which is specified in the $commandid for the menu line. When a menu line is selected at runtime, you can use the line ID to detect which line was selected and branch your code accordingly. For example, when a remote menu is used as a popup menu and the menu is clicked, the evClick event is triggered and the value of $commandid for the selected menu line is reported in pLinenumber.
You can add icons to Remote menu lines and can be chosen when you create the remote menu class, along with the text for the menu line (they must be 16x16 if using PNG icon images). The icon in each menu line is specified by $iconid. Checked menu lines use the checked state of the icon if the icon is multi-state.
Note that $objs.$add for a remote menu instance does not have a parameter to add an icon id. You can only set this after adding the menu line, by assigning $iconid for the new line (since the new menu line needs to reference the icon on the server, which cannot be done while executing $add).
Icon Colors
The $iconcolor and $defaulticoncolor properties control the color of icons when using themed SVG icons. The $iconcolor property for a remote menu line sets the icon color when using a themed SVG icon. The $defaulticoncolor property for a remote menu class sets the icon color when using a themed SVG icon and the $iconcolor property of the item is kColorDefault. If $defaulticoncolor is also kColorDefault, then the themed icon uses the text color.
Text Alignment
You can change the text alignment in Remote menus. The pContextMenu event parameter in evOpenContextMenu events has an $align property. This can be used to specify the text alignment of a menu. For example:
Do pContextMenu.$align.$assign(kCenterJst)
Possible values are kLeftJst (default), kRightJst and kCenterJst.
A context menu is a menu that can be opened by the end user by right-clicking on the background of a form, or within the border of a form control. You can implement context menus for remote forms or individual form controls by setting the $contextmenu property of the form or control to the name of a Remote menu class. Each line in a remote menu has the $commandid property, so when the user selects a line in the menu this ID can be used to trigger a specific action in your code. When a line in a remote menu is selected, an evExecuteContextMenu event is reported to the form or field with event parameters containing the Command ID of the selected line, and for fields, a reference to the field which was clicked on.
Remote forms and controls have the $disabledefaultcontextmenu property to disable default menus from opening when the end user right-clicks the form or object: the default menu for the edit control could be the clipboard menu. If true, the default context menu for the object will not be generated in response to a context click ($clib.$disabledefaultcontextmenu and $cobj.$disabledefaultcontextmenu must both be false for the default menu to be generated).
Remote forms or controls report the following events in response to a context click.
evOpenContextMenu
Sent to a field or a remote form when a context menu is about to open; the event contains the parameters:
pContextMenu is a reference to the remote menu instance that is about to pop up as a context menu;
pControlMenu is kTrue if the menu is a control menu, or kFalse if it is a context menu, see below;
pClickedField is a reference to the field which was clicked.
For data grids only, the pPosition parameter for the evOpenContextMenu event contains a co-ordinate string, such as "4,2", where the first number is the row and the second is the column: the column part will always be populated with the column you right-clicked under, but the row part will only be non-zero if you right-click on a row
evExecuteContextMenu
Sent to a field or remote form when a context menu item is selected; the event contains the parameters:
pCommandID is the command ID of the selected remote menu item;
pControlMenu is kTrue if the menu is a control menu, or kFalse if it is a context menu, see below;
pClickedField is a reference to the field which was clicked
The remote menu instance itself only exists during the evOpenContextMenu event, therefore it is possible to modify the menu before it is displayed on the client, or you can discard the event to prevent the menu from being displayed.
Remote form instances have the property $remotemenu which is the name of the remote menu instance (set only when evOpenContextMenu for the field or form is being processed): for hierarchical menus, this is the item reference to the remote menu instance of the attached remote menu.
After evOpenContextMenu completes, and the user selects a remote menu item, the client sends an evExecuteContextMenu event to the form or form control that received the evOpenContextMenu, passing the event parameter pCommandID containing the value of $commandid of the selected menu line.
All controls with a menu, such as Tab, Popup menu, or Split button, generate the evOpenContextMenu and evExecuteContextMenu events when using their own control menus. The pControlMenu parameter can be used to distinguish between Control menus and Context menus; it is kTrue if the menu is a Control menu, or kFalse if it is a context menu.
You can open a special kind of subform or group of subforms that behave like separate “floating” windows inside the main remote form in the JavaScript Client. The subforms in a Subform Set (SFS) are different to standard subforms (which are embedded in a Subform control, and described in the JavaScript Components chapter), in that they have a title bar and resizable borders, and the end user can move or resize them within the “main” or parent remote form instance running on the client. Such dynamic subforms within a subform set allow you to create highly flexible user interfaces in your apps, by allowing a high degree of interactivity for the end user.
The subforms in a subform set are created at runtime in the JavaScript Client within a remote form instance, or they can be opened within the context of a single page in a paged pane in a remote form, which are referred to as Subform panels. Each separate subform in the Subform Set is an instance of a standard Remote form class that you have previously created in your library, which is referenced and added to the Subform set on the client.
In addition to opening one or more subforms in Subform set, you can open a subform as a Subform Palette; see Subform Palettes.
There is an example app under the Samples option in the Studio Browser showing how you can setup and use a subform set, and the same app is available in the Omnis Components app on the Omnis website.
Subform set windows respect their container’s dimensions when opened, that is, if subforms that are larger than the available space are opened (or are too far to the right or bottom to fit the whole subform area), then they will be resized and repositioned automatically. Specifically, the left and/or top values will be reduced, If these reach 0, and there is still not enough space for the subform, the width and/or height values will also be reduced.
Stacking Order List
The subforms in a Subform Set have a “stacking order” (or Z-order) relative to one another, so the top-most form in the set will appear in front of any forms lower in the stacking order if they intersect. Clicking on a form lower in the stacking order brings it to the front. The tab order of the remote form excludes controls on the subforms in a Subform Set behind the top form in the set. There is a maximum of 256 remote form instances (including subform instances) in a remote task instance. When you have more than one Subform Set open (this is allowed but not recommended) there is no relative stacking order between the sets.
There is a set of client commands to open and manage the subforms in a Subform Set which you can execute using the $clientcommand() method. These client commands should be executed in the context of the current remote form instance using $cinst. The $clientcommand() method requires two parameters: the cCommand to be executed and a wRow variable containing the parameters for the command, with the syntax:
Do $cinst.$clientcommand(cCommand,wRow)
where $cinst is the current remote form instance.
The following client commands are available for creating and managing subform sets or the subforms in a subform set, including subform dialogs.
The subformset_add command creates a Subform Set within the current remote form instance.
Do $cinst.$clientcommand("subformset_add",row(setname, parent, flag, ordervar,
formlist))
Note the parent parameter is available if you want to create the subform set inside a paged pane, rather than the remote form instance. The columns for the row variable parameter are as follows:
setname: a string which is the name of the subform set, which must be unique within the current remote task.
parent: the container for the set, either:
pagedpanename:page (e.g. pp:5), so that the subforms belong to the specified page of the paged pane)
or empty, meaning that the subforms in the set belong to the remote form instance invoking $clientcommand.
flags: the sum of the following constants (e.g. kSFSflagMinButton+kSFSflagMaxButton), which effect the behavior of the subforms in the set:
kSFSflagCloseButton: The subforms in the set have a close button
kSFSflagMinButton: The subforms in the set have a minimize button
kSFSflagMaxButton: The subforms in the set have a maximize button; note the subform can only be maximized (resized) if kSFSflagResize is enabled
kSFSflagResize: The subforms in the set have a resize border so that they can be resized using the mouse or when the Maximize button is pressed
kSFSflagOpenMin, kSFSflagOpenMax, kSFSflagMinAsTitle, kSFSflagAutoLayout: are used to open a subform set within a "panel" or container, such as a paged pane control: see Subform Panels later in this section
kSFSflagPreventDrag: the user will not be able to drag the subforms in the SFS
kSFSflagScrollable: allows subform sets to scroll; only effects non-responsive subform sets since responsive subform sets are scrollable by default
- kSFSflagAllowOutsideOfBounds: allows subforms to be positioned outside of their container boundaries, both by notation and the end user dragging them
- kSFSflagEscToClose: the subforms in the set can be closed by pressing the Escape key
ordervar: the name of an instance list variable in the remote form invoking the $clientcommand. The client keeps this list variable up to date with the stacking order and position information for the subforms in the set: see below.
formlist: a list which defines the subforms to be added initially to the subform set (this list can be empty), i.e. a list of remote form classes that you have previously created in your library. The order of the forms in this list represents the stacking order from top to bottom, so that once the set has been added, the top-most subform will be for line 1, and the bottom-most subform will be for the last line. The columns in the list are as follows:
Column 1: uniqueID: An integer which must uniquely identify this subform in the set.
Column 2: classname: The name of the Omnis remote form class for the subform.
Column 3: params: Literal parameters to be passed to the $construct and $init of the subform, e.g. “‘Test’,200”
Column 4: title: The title of the subform - text displayed in the title bar of the subform.
Column 5: left: The left coordinate of the subform (for Desktop browsers, or portrait if a mobile device). The constant kSFScenter centers the form horizontally in its parent.
Column 6: top: The top coordinate of the subform (for Desktop browsers, or portrait if a mobile device). The constant kSFScenter centers the form vertically in its parent.
Column 7: width: The width of the subform. If the forms in the set are resizable, then the form cannot be made narrower than the minimum of this width and the width designed for the remote form class.
Column 8: height: The height of the subform. If the forms in the set are resizable, then the form cannot be made taller than the minimum of this height and the height designed for the remote form class.
If the subforms are to be displayed on a mobile device, Columns 9-12 are landscape left, top, width and height respectively. If these are omitted, the landscape values default to the portrait values.
The width and height parameters can be given as a string in the form "min-max" (e.g. "300-900") to specify a range, rather than a number. In this case, the command will use the largest value within this range which keeps the subform within the bounds of the browser window.
When formLeft or formTop parameters are set to kSFScenter, the subform will be displayed in the center of the current viewport or the current form, whichever is the smaller of the two: note that horizontal and vertical centring work independently of each other.
When using the "subformset_add" and "subformset_formadd" client commands you can pass dimensions for the subforms for each breakpoint in a responsive remote form in the formlist parameter (instead of the single set of left, top, width, height parameters). The same method applies to both client commands, but the example below shows directly adding a form with "subformset_formadd":
Do lDimList.$define(lBreakpoint,lLeft,lTop,lWidth,lHeight)
Do lDimList.$add(310,10,10,200,200)
Do lDimList.$add(600,kSFScenter,kSFScenter,300,300)
Do lDimList.$add(1000,kSFScenter,kSFScenter,600,600)
Do $cinst.$clientcommand( "subformset_formadd",row(cSetName,vUniqueID,cParams,cTitle,lDimList,iModal))
The dimensions list replaces the 4 separate parameters, and so condenses the command to a minimum of 5 parameters (6 if passing a value for iModal): this only works for responsive forms, whereas single and screen type forms must use the original set of parameters to avoid confusion.
The client will use the value passed in lBreakpoint to assign the values to the correct breakpoint for the containing form. If the breakpoints do not match, then the values will be used from the next breakpoint down. For example, if you had the list of dimensions as defined above, but your form used the following breakpoints:
310 - would use the values from 310 as they match
590 - this is smaller than the next value of 600, so would again use the values from 310
900 - this is smaller than the next value of 1000, so would use the values from 600
1200 - this is greater than the values from 1000, so uses those values.
Having created a subform set using subformset_add, you can use the subformset_formadd client command to add a form to the subform set.
Do $cinst.$clientcommand("subformset_formadd",row(setname, uniqueID, classname, params,
title, left, top, width, height, mod))
The row parameters are as follows:
setname: a string which is the name of the set to which the subform is to be added.
uniqueID: an integer which must uniquely identify this subform in the set.
classname: the name of the Omnis remote form class for the subform.
params: A comma-separated list containing literal parameters to be passed to the $construct and $init methods of the subform instance, e.g. "'Test',123". Note strings have to be quoted, and can contain spaces and commas. Note you can return the current parameter separator using the sys(93) function, which you could use to embed into your list of parameters. $init is run in serverless client subforms.
The 'subformSetParamsAreLocalized' item in the 'jsClient' group in the Omnis configuration file (config.json) allows you to use the server's localized function and decimal separators in the parameter list sent to Subform set forms. If 'subformSetParamsAreLocalized' is true, parameters passed to Subform Set forms use the Omnis server's localized parameter separator character to separate the parameters. For example, setting $language to Italian will set the parameter separator to ";" (colon), and decimal point character as "," (comma). If 'subformSetParamsAreLocalized' is false, commas are used as the separator, regardless of the localized parameter setting.
title: the title of the subform - text displayed in the title bar of the subform.
left: the left coordinate of the subform (for Desktop browsers, or portrait if a mobile device). The constant kSFScenter centers the form horizontally in its parent.
top: the top coordinate of the subform (for Desktop browsers, or portrait if a mobile device). The constant kSFScenter centers the form vertically in its parent.
width: the width of the subform. If the forms in the set are resizable, then the form cannot be made narrower than the minimum of this width and the width designed for the remote form class.
height: the height of the subform. If the forms in the set are resizable, then the form cannot be made taller than the minimum of this height and the height designed for the remote form class.
Note the 4 separate parameters (left, top, width, height) can be replaced by a list containing the dimensions for each breakpoint: see above regarding the formlist for subformset_add.
The width and height parameters can be given as a string in the form "min-max" (e.g. "300-900") to specify a range, rather than a number. In this case, the command will use the largest value within this range which keeps the subform within the bounds of the browser window.
modal: zero if the subform is non-modal, or 1 if the subform is fully modal, and prevents the use of any other form or subform in the remote task’s user interface (the form is grayed out and clicks outside the subform are ignored).
If the subforms are to be displayed on a mobile device, the next four columns are landscape left, top, width and height respectively. If these are omitted, the landscape values default to the portrait values.
The parameters above, starting with uniqueID, are identical to those in the formlist (for the subformset_add command), except the modal indicator is present between the two sets of coordinates.
The subformset_remove command removes a set of subforms. All subforms in the set will be destructed and removed from their parent.
Do $cinst.$clientcommand("subformset_remove",row(setname))
Where setname is the set to be removed.
The subformset_formremove command removes a subform from an existing set and destructs it (removing it from its parent).
Do $cinst.$clientcommand("subformset_formremove",row(setname, uniqueID, focus))
The row parameter are as follows:
setname: a string which is the name of the set from which the subform is to be removed.
uniqueID: an integer which identifies the subform in the set to be removed.
focus: optional (default value is kFalse). If the focus parameter is kTrue, sets focus to the new top form in the set unless it is minimized.
The subformset_formtofront command brings a subform in a set to the top of the stacking order, and gives it the focus. You must use this command to display a subform that has previously been minimized.
Do $cinst.$clientcommand("subformset_formtofront",row(setname, uniqueID))
Where setname is the name of the set containing the subform.
uniqueID is an integer which identifies the subform in the set to be brought to the front.
The subformdialogshow command opens a single subform as a modal dialog.
Do $cinst.$clientcommand("subformdialogshow ", row(classname, params, title, width, height,
closeButton, resizable, max, openMax))
The parameters are as follows:
| classname |
String, the name of the remoteform |
| params |
String, a comma-separated list of parameters to pass to the form's $construct & $init |
| title |
String, the title of the modal dialog |
| width |
Integer, the width of the dialog |
| height |
Integer, the height of the dialog |
| closeButton |
Boolean (Optional), defaults to true, show close button |
| resizable |
Boolean (Optional), defaults to false, if true allows resizing |
| maxButton |
Boolean (Optional), defaults to false, if true shows maximize button (resizable must be set to true) |
| openMax |
Boolean (Optional), defaults to false, if true opens dialog in a maximized state (resizable must be set to true) |
The width and height parameters can be given as a string in the form "min-max" (e.g. "300-900") to specify a range, rather than a number. In this case, the command will use the largest value within this range which keeps the subform within the bounds of the browser window.
This command generates a new subform set and adds one modal subform to it. The name of this set is internal only, and cannot be added to or removed from. Another modal subform dialog can be opened above the previous one by running subsequent calls, preventing access to the first one until the second is closed (using the subformdialogclose command).
The subformdialogclose command closes the topmost subform dialog. This command only works for subforms opened using the subformdialogshow command, and has no parameters as such modal dialogs must be closed in reverse order of them opening.
Using the Stacking Order Variable (ordervar)
When you use the subformset_add client command a list called ordervar is created containing a list of the subforms in the subform set. The ordervar variable allows you to manage the subforms in the set. It has the same definition as the formlist, and like the formlist it contains the subforms in the order of the top to the bottom of the stacking order. Note that if coordinates have been centered using kSFScenter, the ordervar contains their actual values rather than the value kSFScenter.
Whenever the stacking order changes, or a form is moved or resized, the client updates the values in ordervar. This results in:
Automatic updates to controls which are data-bound to the ordervar.
A call to a client method in the container form for the SFS. If you add a client-executed method called $sfsorder, with a single parameter, which is the set name, you can add processing that occurs each time the set is updated. For example, you could use a tab control to display a tab for each member in the set, where the current tab represents the top-most subform.
You can use the ordervar list in conjunction with the subformset_formtofront $clientcommand to manage the subforms in the set, e.g. bring a form to the front by selecting a line in a popup menu (this is the only way to restore a minimized subform). For example:
Do $cinst.$clientcommand("subformset_formtofront",row('SubformSet',iOpenForms.[pLineNumber].C1))
If a subform has been minimized, you would you have to use such a method to display the subform again since minimized subforms are not visible in the parent remote form.
Load Finished Method
Remote forms have the $loadfinished client-executed method which is called after all the visible subforms that belong to the parent remote form instance have finished loading and their $init methods have been called. So you could create a client method called $loadfinished to perform any actions you want after all visible subforms have loaded.
Regarding subforms on a page pane, $loadfinished is called after the $init of any subforms on the page pane's visible page has run; the $init of any subforms on any hidden panes is not run until the pane becomes visible.
Trapping the Close event
You can add a method to a subform in a subform set to trap the close event before the $destruct for the subform is run. The method should be named $sfscanclose and should be set to be client-executed (which should be enabled automatically). The method can contain whatever processing you want to run. If the return value (a Boolean) from this method is kFalse the subform cannot close. Otherwise, if the return value from this method is kTrue, the subform can close. If $sfscanclose is not present, the subform closes by default.
Dialog and Palette style subforms can call into $sfscanclose() when attempting to close via the close button (X) in a dialog subform, or clicking the background outside the palette for a palette style subform. As with other subforms, it would be possible to test a conditional statement in $sfscanclose() and if it returns kFalse the close event will be cancelled.
The kSFSflagPosnScroll flag allows you to control how a subform is positioned relative to its container if the container has been scrolled. When the kSFSflagPosnScroll is set the subform in a subform set (SFS) will open relative to the current scroll position of its container. For example, on a long form which is currently scrolled to the bottom of the page, with a subform opening at left position 100 and top position 100, it will open 100 pixels in from the top of what can currently be seen in the viewport. Similar behavior would apply if it belonged to a paged pane that has been scrolled.
When the flag is not set, it will be positioned absolutely to the defined position: therefore, in a long form that has been scrolled to the bottom of the page, the subform will be placed at the top of the page if its top position is set to 0.
However, when opening a modal subform in a subform set, if its position is set to kSFSCenter, it will always be positioned relative to the current scroll position of the form, as modal subforms always belong to the form, not a paged pane (since a modal subform requires interaction and closing before any other action can be taken on the form). If kSFSCenter and kSFSflagPosnScroll are both not used, then a subform will be placed at its specified position, even if that is out of the current view of the user (which is the behavior in previous versions).
The styles and colors used in subforms will be those set in the subform classes; the colors for the subform set are taken from the theme used in the main JS form.
You can use $cinst.$title to change the title text for a member of a subform set.
You can obtain a reference to any subform instance within a subform set using the $sfsmember root notation. For example:
$root.$sfsmember(cSetname,iUniqueID)
returns an item reference to the remote form instance for the subform set member with the specified unique ID in the named subform set in the current remote task. This notation can be used in server and client methods.
You can open a set of subforms as a group of collapsible panels within a container, such as a paged pane control. The subform panels are arranged vertically and the end user can expand and collapse each subform by clicking or tapping on the subform title bar or the minimize icon. Subform panels cannot be nested.
There is an example app called JS Subform Set Panels under the Samples option in the Studio Browser showing how you can setup and use subform panels, and the same app is available in the Omnis Components app on the Omnis website.
Configuring the panels
You can create a set of subform panels using the “subformset_add” client command along with the “kSFSflag...” constants, which can be found in the Catalog (F9) in the ‘Subform sets’ group. The subformset_add command creates a set of subforms within the current remote form instance or a parent, such as a paged pane.
Do $cinst.$clientcommand("subformset_add",row(setname, parent, flag, ordervar, formlist))
The flags can be summed to specify the complete behavior of the panels in the set: see the example method below to see how to use subformset_add and the flags.
kSFSflagOpenMin
The subform panels in the set are opened in the minimized state. Normally, all subforms in the set are opened in the un-minimized state. This flag overrides this default behavior.
kSFSflagOpenMax
The subform in the set is opened in the maximised state. Sizes/positions should still be set as the subform will return to these values if it is restored.
kSFSflagMinAsTitle
When a panel (subform) in the set is minimized, just the title bar is shown. This flag overrides the default behavior which is to reduce the subform to nothing when it is minimized.
You can use the kSFSflagMinButton flag to add a minimize button to each subform to allow the end user to expand and contract the panel (in addition to clicking on the title).
kSFSflagAutoLayout
Automatically lay out the panels (subform set members) vertically within their parent, ignoring the specified left and top. Turns on kSFSflagMinAsTitle and turns off kSFSflagResize and kSFSflagMaxButton. When using kSFSflagAutoLayout, the user can drag and drop the title bar of the panels in the set, to re-order them. If you open a modal subform in a set with kSFSflagAutoLayout set, the modal form opens at the top of the parent form, and does not become part of the vertically laid out forms.
kSFSflagParentWidth
Only applies when kSFSflagAutoLayout is specified. Ignores the width parameter for each set member, and sets the width of each subform to the width of parent. This flag also sets edgefloat for each subform to kEFright. Using kSFSflagParentWidth allows you, for example, to create a paged pane page populated with panels implemented as subforms, where the panels resize when the paged pane resizes.
kSFSflagSingleOpen
Only applies when kSFSflagAutoLayout and kSFSflagMinButton are both specified. When specified ensures that at least one window is always open.
The minimize button icon is removed and the whole title bar becomes the minimize button. Only applies when kSFSflagAutoLayout is specified.
End users can expand or collapse (open or close) subform panels using a single click (in previous versions, a double-click was required). This is enabled by making the title bar on the subform behave like the minimize button, and therefore the title accepts single clicks. The kSFSflagMinButtonIsTitle flag for the ‘subformset_add’ action needs to be set to allow this behavior, and only applies when kSFSflagAutoLayout is specified.
When in auto layout mode, and not using single open or open minimized modes, you can indicate that a form is to be opened minimized modes by prefixing its class name with the ~ (tilde) character. This means that when you open a number of subforms in a subform set, you can specify which subforms will open minimized (collapsed).
The following example of a set of subform panels contained in a paged pane (available in the Samples section in the Studio Browser), with both the auto layout and parent width flags set.
The following method constructs the subform set and assigns it to a paged pane in the remote form. In this case, the subform only contains an edit control which receives some text to be displayed in the subform (“This is panel #”). The list of subforms is built including the text and background color which is assigned to a paged pane using a row variable and the subformset_add client command.
Do lFormList.$define(lFormID,lClassName,lFormParams,lFormTitle,lFormLeft,lFormTop,lFormWidth,lFormHeight)
Do lFormList.$add(1,'jsSubformSetPanelsSubForm',con(1,chr(44),rgb(221,221,255),chr(44),chr(34),"This is panel 1",chr(34)),'Panel 1',,,,160)
Do lFormList.$add(2,'jsSubformSetPanelsSubForm',con(2,chr(44),rgb(204,204,255),chr(44),chr(34),"This is panel 2",chr(34)),'Panel 2',,,,160)
Do lFormList.$add(3,'jsSubformSetPanelsSubForm',con(3,chr(44),rgb(187,187,255),chr(44),chr(34),"This is panel 3",chr(34)),'Panel 3',,,,160)
Do lFormList.$add(4,'jsSubformSetPanelsSubForm',con(4,chr(44),rgb(170,170,255),chr(44),chr(34),"This is panel 4",chr(34)),'Panel 4',,,,160)
Do lSetRow.$define(lSetName,lParent,lFlags,lOrderVar,lFormList)
Do lSetRow.$assigncols("SubformPanelsSet",'PagedPane:1',kSFSflagSingleOpen+kSFSflagMinButton+kSFSflagAutoLayout
+kSFSflagParentWidth,'iOpenForms',lFormList)
Do $cinst.$clientcommand("subformset_add",lSetRow)
In this case the flags kSFSflagSingleOpen, kSFSflagMinButton, kSFSflagAutoLayout, and kSFSflagParentWidth have been summed to create the complete properties for the set of panels.
An example containing a set of Subform Panels is available in the JavaScript Components Gallery on the Omnis website.
Modal Subforms and Paged Panes
If you associate a subformset with a paged pane and you add a new MODAL form to the set, the new subform window will be associated with the remote form as a whole, rather than the paged pane.
The following code creates a subform set containing two subforms.
Do iFormList.$define(iID,iClassName,iParams,iTitle,iLeft,iTop,iWidth,iHeight)
Do iFormList.$add(1,"jsSub1",,"subform1",10,10,200,200)
Do iFormList.$add(2,"jsSub2",,"subform2",220,10,400,200)
Do lRow.$define(lSetName,lParent,lFlags,lOrderVar,iFormList)
Do lRow.$assigncols("SubformSet",,kSFSflagCloseButton+kSFSflagMaxButton + kSFSflagMinButton+kSFSflagResize,,iFormList)
Do $cinst.$clientcommand("subformset_add",lRow)
The code creates the subforms in the main remote form within the browser:
The Memo sample app available in the Applets section of the Studio Browser uses subform sets.
A Subform Palette is a subform that can be opened next to a specified control – a small arrow is added to the subform window pointing to the control. Such a subform could allow the end user to set an option, or to provide some information such as a help tip. Subform palettes can be opened or closed using the client commands subformpaletteshow and subformpaletteclose, or a subform palette can be closed by clicking outside the subform.
There is an example application called JS Subform Dialogs under the Samples option in the Studio Browser showing how to use the subform palette client commands.
The subformpaletteshow command shows a remote form as a subform palette:
Do $cinst.$clientcommand("subformpaletteshow",row(cClass, cParams, cControl, iWidth, iHeight
\[,iPositionFlags\] \[,bShowOverlay\] \[,cTitle\] \[,bPreventClose\]))
The row parameters are as follows:
| cClass |
Character, the class name of the remote form to use in the palette. |
| cParams |
Character, comma-separated list of parameters to pass to the remote form's' $construct & $init. |
| cControl |
Character, the name of the control the palette points to. |
| cControl |
Character, the name of the control the palette points to, or control-name:selector to point to a sub-element of the control, see below. |
| iWidth |
Integer, the width of the subform palette. |
| iHeight |
Integer, the height of the subform palette. |
| iPositionFlags |
Integer (Optional), a combination of up to 2 kSFSPalette... constants to specify the position of the palette; see description of flags below. |
| bShowOverlay |
Boolean (Optional), if kTrue, shows the form overlay (transparent gray) while the palette is open (defaults to kFalse). |
| cTitle |
Character (Optional), the title of the subform (this is not displayed anywhere, but is used to populate the aria-label property of the palette for screen readers). |
| bPreventClose |
Boolean (Optional), if kTrue, the user cannot close the palette by clicking outside it (defaults to kFalse); in this case, you must use subformpaletteclose to close the palette. |
If the control name given in the cControl parameter is not found (or you omit the name), the palette dialog will be centered in the browser window, and the arrow is not displayed since there is no control for it to point at.
If you pass the bShowOverlay parameter as kTrue and if it points at a control (or a sub-element of the control), a cutout will be made in the overlay around that element, to highlight it.
The iWidth and iHeight parameter can be specified as a range so the that the subform palette will adjust its width and height according to the available space in the browser. The dimensions of the palette are calculated according to the space between the edge of the target and the browser window, and depending on the kSFSPalettePos... value.
For example, setting width to "200-900" and kSFSPalettePosFlagRight means the subform palette will have a minimum width of 200px, but if there is more than 200px space to the right of the target control, it will use that space, up to a maximum of 900px. Giving the palette a height range will apply that relative to the whole browser window, as the height does not need to be limited if the palette is positioned beside the target. The inverse will apply if you set the palette position to be above or below the target.
The iPositionFlags parameter (positioning flags) should contain up to 1 Position flag (top, right, bottom, or left) and 1 Align flag (start, center, or end) to set the position of the subform palette relative to the control specified in cControl. The default is kSFSPalettePosFlagRight+kSFSPaletteAlignFlagCenter to position the palette window to the right and in the center of the control.
| kSFSPalettePosFlagTop |
Position the palette above the related control |
| kSFSPalettePosFlagRight |
Position the palette to the right of the related control |
| kSFSPalettePosFlagBottom |
Position the palette below the related control |
| kSFSPalettePosFlagLeft |
Position the palette to the left of the related control |
| kSFSPaletteAlignFlagStart |
Aligns the palette at the start of the specified position (top/right/bottom/left) |
| kSFSPaletteAlignFlagCenter |
Aligns the palette in the center of the specified position (top/right/bottom/left) |
| kSFSPaletteAlignFlagEnd |
Aligns the palette at the end of the specified position (top/right/bottom/left) |
| kSFSPaletteHideArrow |
Additional flag to hide the arrow normally shown on the palette window |
You can hide the arrow on the palette window by adding kSFSPaletteHideArrow to the iPositionFlags row parameter, in addition to the positioning flags.
If the palette were to overlap the opposite side of the control, e.g. because of the lack of space, Omnis will try to place the subform on a different edge automatically. If Omnis cannot place the subform in an acceptable position, it will fallback to using the initial state. There is also an arrow which will point to the center of the given control. However, it is restricted by the size of the subform palette, and so will be placed towards the edge of the palette closest to the center of the control, as appropriate.
In the example app, the following code is in the $event method for the button which opens a subform palette next to the button (iPaletteMessage is populated with a text message from the form, while iPalettePosValue and iPaletteAlignValue are taken from droplists in the form):
Do $cinst.$clientcommand("subformpaletteshow", row("jsSFDPalette", con(kDq, iPaletteMessage, kDq), "ShowPalette", 220, 120, iPalettePosValue+iPaletteAlignValue, kFalse, "MyTitle"))
For controls that contain sub-elements, such as lists or grids, the subform palette window can be positioned relative to a particular item or line within the control rather than to the control itself. This is achieved by adding a selector to the control name in cControl, separated by a colon (:), to determine the target sub-element or line.
For example, for a Data Grid control, the subform palette could point at a row in the grid with the selector comprising a rowSelector only, this being either a row number or a search term such as “Price=299.99". The corresponding cControl string would be something like: “DataGrid:3” to target row 3 of the grid, or “DataGrid:Price=299.99" to target the row whose Price value is “299.99”.
Additionally, the subform palette could point at a specific grid cell, with the selector being a data column number or name (the columnSelector), followed by a dot then the rowSelector. The corresponding cControl string would be something like: “DataGrid:Product.3” to target the product cell in row 3 of the grid, or “DataGrid:Product.Price=299.99" to target the product cell of the row whose Price value is “299.99”.
The selector syntax for each of the controls that have sub-elements is as follows:
Complex Grid
[targetSelector.]<rowSelector> where targetSelector is the name of a control within the complex grid, and rowSelector is a number or search term
Data Grid
[<column number or name>.]<rowSelector> where rowSelector is a number or search term
List
<rowSelector> which is a number or search term indicating the target line in the list
Native List
<rowSelector> which can be of the form:
"5" to target row 5 of a flat list, or "g2:5" to target row 5 of group 2 in a grouped list.
"myCol=Something" to target the first row where the 'myCol' column has a value of "Something".
For grouped lists, use "g2:myCol=Something"
Segmented Bar
The selector is the number of the target segment
Tab Bar
The selector is the number of the target tab
Tile Grid
[targetSelector.]<rowSelector> where targetSelector is the string "button". If the targetSelector is absent the tile will be pointed at. If it is present, the button of the tile will be pointed at. The rowSelector is a number or search term
Toolbar
The selector is the number of the target toolbar item
Tree List
A Tree List allows for a subform palette to target an individual node provided it has already been opened, otherwise the node element will not yet exist to point at. For a flat tree the selector is the ident, or for a dynamic tree the selector is the node ident
You can use "<controlName>:0" (zero) in the cControl parameter to point to the control as a whole, rather than an element within the control.
The subformpaletteclose client command closes the top-most subform palette. No row parameter is required. Note the end user can close a subform palette by clicking outside the subform (which can be prevented using bPreventClose).
Customizing Keyboard Shortcuts
You can intercept keyboard presses in a remote form or on individual controls and modify them with your own event handling methods using the $keyboardshortcut client-executed method, which allows you to add custom behavior to a keyboard event where one or more of the modifier keys are pressed. The $keyboardshortcut method can be called on a remote form instance by overriding the default form method or can be added to a JavaScript control.
The $keyboardshortcut method has the following parameters:
pSystemKey
If the pressed key is a system key, the value is the keyboard constant value representing the pressed key, such as kBack. If the pressed key is not a system key the value is 0.
pCharacterKey
If the key is a character key the value is the uppercase version of the character pressed. If the pressed key is not a character the value is an empty string.
pModifiers
Is the sum of the following keyboard modifier constants, representing the state of these modifiers at the point the system or character key was pressed: kJSModShift, kJSModCtrl, kJSModAltOrOption, kJSModCmd.
These values produce a "bitmask" where each value in the sum sets a different binary bit in the number. You can use the binary bitand() function to see whether the kJSMod... values' bits are set. For example, the following code would determine if the control key is pressed, where lControlKey is a Boolean variable:
Calculate lControlKey as bitand(pModifiers,kJSModCtrl)<>0
- pFocusedControl
Is a reference to the current active control, or null if no control is focused. It cannot be assigned to an instance variable, but its properties, such as pFocusedControl.$name, can be assigned to an instance or local variable
The $keyboardshortcut method should return kTrue to specify that you have handled the keyboard shortcut, and do not want the default behavior to occur. For example, the following code will result in the default keyboard shortcut behavior for ctrl + “S” being overridden and $somemethod() being called instead:
If pCharacterKey="S"&lControlKey=kTrue
    Do $cinst.$somemethod()
    Quit method kTrue
End If
An attempt is first made to call $keyboardshortcut on the current active control (or top form if no control is active), and successively up the stack of container controls and forms until a control / form is encountered whose $keyboardshortcut method (if it exists) returns kTrue.
Web Browser or Operating System shortcuts using the same key combinations may take precedence. So you are advised to test your methods thoroughly to ensure your custom shortcuts are not already used by the OS or web browser.
Running JavaScript in the Client
The JavaScript: command (including the colon) allows you to execute any native JavaScript in the client browser directly from your Omnis code; this can include calls to other JavaScript embedded into or linked to the HTML page containing your JavaScript remote form. Omnis does not perform any validation of the code you insert into the JavaScript: command in the method editor (you can check for errors in the JavaScript console of the browser). You cannot include any square bracket notation in the code parameter of the JavaScript: command, since the code needs to be evaluated by the server when generating the script file. A simple example would be to open an alert in the browser with the standard alert() function, as follows:
JavaScript: alert("Hello World")
Since this command executes native JavaScript code on the client it must be executed in a client-side method. The JavaScript: command will only appear in the Command list in a method that is enabled to execute on the client. Omnis will not allow the JavaScript: command to be present in a server method (an error occurs). If you try to execute JavaScript: on the server, by calling a client-side method from a server method, a debugger error will occur.
You can include JavaScript in the HTML page containing your remote form (inline or linked), and call code in these scripts from your remote form code using the JavaScript: command. To extend the alert() example above, you could embed a JavaScript function in your HTML page, like this:
<html>

  <head>

    <script type="text/javascript">

    function show_alert()

    {

      alert("Hello World");

    }

    </script>

  </head>

  <body>

    <!-- body including the omnisobject containing your form -->

  </body>

</html>
And call this function from your Omnis code using the JavaScript: command as follows:
JavaScript: show_alert()
Another example could include using the JavaScript: command to “push” events to Google Analytics to track certain actions or events in your application. To do this you would need to add the standard Web Analytics code provided by Google into your HTML page (containing your remote form) and call the gaq.push() function with the correct parameters from within your Omnis code.
Example Using the JavaScript: Command
A possible use for the JavaScript: command is for an event handler. You could use the $init method to install an event handler, such as:
JavaScript: document.getElementById("jsTEMP1_1076_client").onselect=function(event) { __form.callMethodEx("selected",0,event); };
JavaScript: window.addEventListener("keydown",function(event){ __form.callMethodEx("keydown",0,event) }, true)
Note that in both of these examples you can use __form.callMethodEx to call an instance method of the remote form. The second parameter (zero in these examples) are flags which control how callMethodEx behaves – these must always be passed as zero.
You could use the $init method to assign additional style information to controls on the form. For example:
Do $cinst.$objs.$sendall($cinst.$addboxshadow($ref))
$addboxshadow is a form method with parameter pObj. The following JavaScript: command adds a box shadow if the browser supports it.
JavaScript: pObj.elem.style.boxShadow="0px 0px 5px 5px #888888";
Addressing control elements
A common requirement when using custom JavaScript in the JS Client is to get hold of an HTML element within a control on the page.
This is best achieved by first using Omnis notation in your client method to store a reference to the control in a local variable. This variable will then contain the client representation of the Control instance.
You can then use the Control's elem property to get its outer 'Frame' element. Or (more often) use its getClientElem() method to get its inner 'Client' element.
Calculate lCtrl as $cinst.$objs.myButton
JavaScript: var ctrl = lCtrl.getClientElem()
JavaScript: ctrl.style.backgroundColor = "#FF5555";
Most controls are relatively complex and will have further elements within the 'Client' element. You could, for example, use the native querySelector() method on your Client element to find a specific descendant element.
Styled Text
You can insert various text styles in some of the JavaScript components wherever text is displayed. For example, you can insert colors, font styles, and images into the text within the list control, the droplist control, the data grid control, and the hyperlink control.
Text styles can be inserted using the style() function, in both server and client methods. The style() function inserts a style-character represented by an Omnis constant into a calculation or a text block. The styles that can be used include some of the general constants (listed under 'Text Escapes' in the Omnis Catalog) and a few others prefixed kEscJs... supported in the JavaScript Client. The following style constants can be used:
| kEscColor |
In a client-side method, the color parameter can be a numeric literal, a constant such as kRed, or HTML color string enclosed in double quotes. |
| kEscStyle |
In a client-side method, the style parameter must be a numeric literal or constant. |
| kEscBmp |
In a client-side method, the icon id parameter must be either a numeric literal, or the sum of a numeric literal and an icon size constant e.g. 1710+k48x48 |
| kEscJsNewline |
No additional parameters are required. Inserts a
line break tag. See * |
| kEscJsClose |
No additional parameters are required. Closes the current open style information (inserted by kEscColor or kEscStyle) in the styled text and reverts to the original color and text style. Note - kEscColor and kEscStyle insert a <span> tag to style the text. kEscJsClose closes the <span> tag. |
| kEscJsHtml |
Inserts raw HTML (the second parameter to style()). |
* You can use the br() function as a short-hand to insert a new line. The br() function and kEscJsNewline can only be used with styled text for the JavaScript Client.
The parameters for style() can use any HTML color string, such as "#FF0000". For client methods that execute on the client, the color parameter must be a literal string and therefore enclosed in double quotes. For example, style(kEscColor,"#FF0000"), or style(kEscColor,"rgba(0,0,255,0.5)"). Omnis does not validate the HTML color syntax, so you should check the syntax is correct to avoid runtime errors.
The following example code produces a list line which looks like this from the styled text data in iChar:
Calculate iFloatRight as style(kEscJsHtml,"<span style='float:right;'>")
Calculate iFloatLeft as style(kEscJsHtml,"<span style='float:left'>")
Calculate iSmallFont as style(kEscJsHtml,"<span style='font-size:8pt'>")
Calculate iCloseSpan as style(kEscJsHtml,"</span>")
Calculate iIcon as style(kEscBmp,1710+k32x32)
Calculate iOpenP as style(kEscJsHtml,"<p style='height:36px;margin:0px'>")
Calculate iCloseP as style(kEscJsHtml,"</p>")
Begin text block
  Text:  [iOpenP][iFloatLeft]Left text[iCloseSpan]
  [iFloatRight]Right[iIcon][iCloseSpan][br()]
  [iSmallFont][style(kEscStyle,kItalic)]
  [style(kEscColor,kRed)]Line 2[iCloseSpan][iCloseP]
End text block
Get text block iChar
Animations
JavaScript remote forms have the methods $beginanimations() and $commitanimations() which allow you to control animations for some controls. The animated properties are: left, top, width, height, alpha, backcolor, backalpha, textcolor, fontsize, bordercolor, linestyle, buttoncolor (the latter is for pushbutton only).
There is a sample app called Animations under the Samples option in the Studio Browser showing how you can animate component changes such as size, position, and transparency; the same app is available in the Omnis Components app on the Omnis website.
The syntax for the $beginanimations() method is:
- $beginanimations(iDuration[,iCurve=kJSAnimationCurveEaseInOut])
after calling this, assignments to some control properties are animated for iDuration (milliseconds) by executing $commitanimations()
iCurve values are:
kJSAnimationCurveEaseInOut (the default), kJSAnimationCurveEaseIn, kJSAnimationCurveEaseOut, kJSAnimationCurveEase and kJSAnimationCurveLinear
If you set the same property for an object more than once, the first property change is animated, and then the last property change is animated when the first completes. Property changes between the first and last are ignored. The evAnimationsComplete event (for remote forms) is generated after the last property change(s) have completed. This allows you to reverse the effect of an animation (which is the equivalent to the autoreverse/repeat options available on iOS).
The About form in the example app is loaded into a subform using animations, which initially has the $alpha value of zero (fully transparent) and is increased to 255 during the animation, as follows:
On evClick
Switch iScreensize
End Switch
Do $cinst.$objs.aboutSubForm.$classname.$assign("jsAbout")
Do $cinst.$objs.aboutSubForm.$visible.$assign(kTrue)
Do $cinst.$beginanimations(500,kJSAnimationCurveEaseIn)
Do $cinst.$objs.aboutSubForm.$alpha.$assign(255)
Do $cinst.$commitanimations()
Time Zones and Dates
The JavaScript Client exchanges dates and times between the server and client using UTC time, regardless of where your server is located (note that UTC is essentially the same as GMT but UTC is used globally as the standard time for web servers). You should therefore store all dates and times in UTC and use the time zone offset of the client to either determine or set the local time of the client. The $construct row variable parameter for the remote task/form has a column JStimezoneOffset, which is the timezone offset in minutes for the client relative to UTC time. For example, if the client’s local time zone is UTC+2 (or GMT+2), JStimezoneOffset will be 120. See the Construct Row Variable section for more information about the $construct row variable for tasks/forms.
Time Zone Functions
There are a number of Omnis functions that allow you to convert local dates and times to UTC since the client and server need to both use UTC time: they are listed in the ‘Date and Time’ group in the Omnis Catalog (F9/Cmnd-9).
loctoutc() and utctoloc()
Converts the specified datetime (or time) from the local timezone to UTC (Coordinated Universal Time), or vice versa, and returns the result
tzcurrent(), tzdaylight(), tzstandard()
Returns the character string identifying: the current time zone, the daylight saving time zone, or the standard time zone, respectively, of the current date and time of Omnis (plus tzoffset() returns the system time zone offset from UTC time in minutes)
You should note that on 32-bit Windows the TZ codes returned by the timezone (tz) functions are the long time zone names and not the short abbreviated time zone names. If you want to use the short time zone names, you can add a mapping to studio.stb, from the full name to the abbreviation you wish to use.
Local Time
The $localtime task property allows you to switch to Local time rather than UTC. If true, the JavaScript Client and the Omnis App Server exchange date-time values in local time rather than UTC time. $localtime must be set in design mode: it cannot be assigned at runtime.
Date Parsing
The Date Parser in Omnis tries to convert a string representation of a date or date/time value to an Omnis Date/time format. Date string parsing falls back to Short date/time formats.
The Short date/time format depends on the browser locale, so for GB English it is D/M/y, and for US English it is M/D/y, for example. Therefore, an end user could enter "3/5" into any Date or Date/time field, and it might be converted to "3 May 2024" or “March 5 2024”, for example.
Date and Time Conversion in SQLite
When converting Date and Time data in a SQLite database to dates in a remote form (i.e. in the JavaScript client), the subtype of any Date/Time data is taken into consideration. In this case, 'Short Date...' data subtypes will return a date only (no time component), and 'Time' data subtypes will return a time only (no date component).
PDF Printing
The PDF Device is a printing device (external component) to allow you to print a report from Omnis to a PDF file and display it in the JavaScript Client in the end-user’s web or mobile browser. There are two client commands (used with $clientcommand) to allow you to handle PDF reports (if the end user’s device supports PDF).
There is an example app called JS PDF Device under the Samples option in the Studio Browser, and the same app is available in the Omnis Components app on the Omnis website.
Supporting Files
The PDF Device component is available for Windows and macOS and is located in the ‘xcomp’ folder and is loaded automatically.
The PDF Device component is available for Windows and macOS and is loaded automatically. It is located in the ‘xcomp’ folder on Windows and the ‘PlugIns’ folder on macOS.
Node.js
Omnis uses Node.js to print reports which is installed ready to use in Omnis Studio. Note that Node.js is used for PDF printing in Omnis (as well as several other functions) subject to the MIT license from PDFKit: https://github.com/foliojs/pdfkit/blob/master/LICENSE
Note: In versions prior to Studio 11, Python (reportlab) was used for PDF printing, but this is no longer used and the python.zip file has been removed from the Omnis development tree. If you are converting to Studio 11, you do not need to adjust your application code or interface to use Node.js.
Fonts
The PDF device will only work with Reports that use TrueType fonts, and using other fonts may cause an error during PDF generation. Specifically only fonts contained in “.ttf”, “.ttc” or “.dfont” files can be used. Therefore you must choose TrueType fonts for your report if you intend to print using the new PDF device.
PDF Print Name
The PDF print file name is specified in $prefs.$reportfile, or if this preference is empty Omnis will prompt the user to select the path of the output PDF file; note that this mechanism can be overridden programmatically by using the $settemp method (see below).
PDF Folder
By default, PDF report files are placed in the “omnispdf” folder. However, you can override this by setting the "omnispdfFolder" item in the "pdf" section in config.json to an alternative folder. The item defaults to empty, which means Omnis will use the current “omnispdf” folder. The folder specified in "omnispdfFolder" must already exist, otherwise Omnis reverts to the default omnispdf folder.
Printing PDF Using Code
To send a report to PDF programmatically, you can use the following code:
Calculate $cdevice as kDevOmnisPDF
Set report name MyReportClass
Print report
Calculate $cdevice as kDevOmnisPDF
Set reference lReportInst to $clib.$reports.NewReport.$open('*')
Do lReportInst.$printrecord()
Do lReportInst.$endprint()
In both of these cases the report will be sent to a report file specified in the $prefs.$reportfile preference. Note that there is a separate value of $prefs.$reportfile for each Omnis App Server stack (thread) and the main Omnis thread. If $prefs.$reportfile is empty, and the code is running in the main Omnis thread, Omnis will prompt the user for the destination PDF file; otherwise, if $prefs.$reportfile is empty and the code is running in another thread, Omnis will generate a runtime error.
PDF Device Functions
The PDF device has a number of functions to allow you to set up reports sent to temporary PDF files, to set up document properties, and to add security features such as passwords and encryption. See also PDF Version and Encryption and PDF/A support.
$settemp()
The $settemp function allows you to specify that the next report will print to a temporary PDF file in the omnispdf/temp folder. The function returns the name of the file that will be created in omnispdf/temp (or an empty string if bTemp is kFalse). You can specify a timeout in minutes whereupon the temporary PDF file will be deleted.
Do Omnis PDF Device.$settemp(bTemp,iTimeout) Returns cID
| bTemp |
A Boolean: kFalse means a temporary file will not be used. kTrue means the next report sent to PDF by the current task instance will be written to a temporary file in the folder “omnispdf/temp” in the data part of the Omnis Studio tree. Note that after the next report has been sent to PDF, the stored value of bTemp will revert to kFalse. |
| iTimeout |
An integer: Only used when bTemp is kTrue. If omitted defaults to 10. The time in minutes for which the next PDF file generated by the current task will remain on disk. When the time expires, the Omnis PDF device automatically deletes the file. Note that Omnis automatically deletes any files left behind in omnispdf/temp when it starts up. |
Each task instance (including remote tasks) stores its own information set up using $settemp. This allows $settemp to be used in one thread on the Omnis Server without effecting other threads/clients.
$setdocinfo()
The $setdocinfo function lets you specify the author, title and subject properties for the PDF documents generated by the current task. The author, title and subject parameters are all strings, and the function returns kTrue for success. Here is the full syntax:
Do Omnis PDF Device.$setdocinfo(cAuthor[,cTitle='',cSubject='',cKeywords='',cLanguage='en-GB']) Returns bOK
Do Omnis PDF Device.$setdocinfo(cAuthor[,cTitle='',cSubject='',cKeywords='',cLanguage='en-GB',cProducer='Omnis Studio PDF Device',cCreator='Omnis Studio']) Returns bOK
You can add keywords to the PDF file’s metadata by adding extra parameters to $setdocinfo, specified as a string of comma-separated keywords, for example:
Do Omnis PDF Device.$setdocinfo(cAuthor,cTitle,cSubject,'keyword1, keyword2, keyword3') Returns bOK
You can add the Producer and Creator information to the output PDF file by including the cProducer and cCreator parameters. cProducer is the software that generated the PDF, the default is Omnis Studio PDF Device, and cCreator is the software that created the content of the PDF, the default is Omnis Studio.
$encrypt()
The $encrypt function sets encryption (security) properties for the PDF documents generated by the current task, and the function returns kTrue for success. The full syntax is:
Do Omnis PDF Device.$encrypt(cUserPassword[,cOwnerPassword='',bCanPrint=kTrue,bCanModify=kFalse,bCanCopy=kTrue,bCanAnnotate=kFalse]) Returns bOK
The parameters are as follows:
| cUserPassword |
A character string: The user password for the document. If this is set to empty then none of the other arguments apply and the document will not be encrypted; otherwise the document will be encrypted and the user password and other properties specified by this function will be applied to it. |
| cOwnerPassword |
A character string: The owner password for the document. The default is no password is assigned. |
| bCanPrint |
A Boolean: Specifies if the user can print the PDF document. The default is kTrue. |
| bCanModify |
A Boolean: Specifies if the user can modify the PDF document. The default is kFalse. |
| bCanCopy |
A Boolean: Specifies if the user can copy from the PDF document. The default is kTrue. |
| bCanAnnotate |
A Boolean: Specifies if the user can annotate the PDF document. The default is kFalse. |
Security in Third-party PDF readers
The optional security parameters will be applied to the PDF file if you include them in the $encrypt() function, but you should note that the third-party PDF viewer the end user is using may not support these settings or may just choose to ignore them. The password specified in cUserPassword should be interpreted by all PDF readers.
$embedfile()
The $embedfile() function allows you to embed a file in a PDF file, such as an XML file which could be an electronic invoice. If cName is omitted, the name of the file in cFilePath is used.
Do Omnis PDF Device.$embedfile(cFilePath[, cName])
$embeddata()
The $embeddata() function allows you to embed the data in cData with the given name cName in a PDF file; for example, the data could be in XML format representing an electronic invoice.
Do Omnis PDF Device.$embeddata(cData, cName)
$embedfile()
The $embedfile() function allows you to embed a file in a PDF file, such as an XML file which could be an electronic invoice. If cName is omitted, the name of the file in cFilePath is used. You can specify the MIME type of the file in cMIMEType, but if omitted this defaults to application/octet-stream.
Do Omnis PDF Device.$embedfile(cFilePath[, cName, cMIMEType='application/octet-stream'])
$embeddata()
The $embeddata() function allows you to embed the data in cData with the given name cName in a PDF file; for example, the data could be in XML format representing an electronic invoice. You can specify the MIME type of the data in cMIMEType, but if omitted this defaults to application/octet-stream.
Do Omnis PDF Device.$embeddata(cData, cName[, cMIMEType='application/octet-stream'])
Completing PDF Printing
When a PDF report completes, the device sends a message to the task (or remote task) that printed the report. The message is $pdfcomplete, and it takes two arguments:
1. The pathname of the output report file.
2. A Boolean which is true for success, false if an error occurred generating the PDF.
Icons and Vertical Text
You can include icons in text in a report printed to PDF using the style() function and the kEscBmp escape constant. For example, you can use con(style(kEscBmp,1400),’some text’) in a report entry field calculation to display an icon on a report.
In addition, you can print vertical text in a PDF report using the kEscAngle text escape and the kAngle90 or kAngle270 constants to rotate the text, for example, con(style(kEscAngle,kAngle270),iTextLine1).
See Styled Text for more information about using the style() function and text escapes.
PDF Printing in the JavaScript Client
PDFs generated by the PDF device can be used with the JavaScript Client. The showpdf and assignpdf client commands can be used with $clientcommand to display PDF files on the client. You should avoid generating large PDF documents to use with the JavaScript Client since the generated PDFs are streamed from the Omnis App Server (i.e. via a Web Server). An alternative would be to output the PDF document into the Web Server’s file system and link to it using a URL to the PDF on the Web Server and the getpdf command to send it to the client: see Linking to PDFs.
There is an example app called JS PDF Device under the Samples option in the Studio Browser showing how you can print reports to PDF in the JS Client.
showpdf
The showpdf client command opens the specified PDF in a new browser window or tab. There is no control over whether the PDF is opened in a new window or tab: typically, this depends on the end-user browser settings, including their setting for popups.
Do $cinst.$clientcommand("showpdf",row(pdf-id, tim, pdf-filename))
The row parameters are as follows:
pdf-id
A character string. Either a full pathname of a PDF file on the Omnis server (pdf folder must be specified in getpdfFolders config.json item; see below), or an id returned by $settemp
timeout
An integer being the time in seconds that the client is prepared to wait for PDF generation to finish. Defaults to 60. If PDF generation does not complete in time, or an error occurs, Omnis returns a PDF document containing a suitable error message.
pdf-filename
the file name of the PDF file
The following method generates a PDF and displays it on the client:
Calculate $cdevice as kDevOmnisPDF
Do Omnis PDF Device.$settemp(kTrue,1) Returns lID
Set report name New Report
Do Omnis PDF Device.$encrypt('bob','owner',1,0,0,0)
Do Omnis PDF Device.$setdocinfo('Bob','Title','Subject')
Print report
Do $cinst.$clientcommand("showpdf",row(lID,20))
assignpdf
The assignpdf client command opens the specified PDF in a PDF viewer control in the current remote form instance. The PDF must be assigned to an HTML control in the remote form which tries to open the PDF file using the PDF viewer installed in the end user’s browser.
Do $cinst.$clientcommand("assignpdf",row(html-object-nam, pdf-parameters, pdf-id,
tim, pdf-filename))
The row parameters are as follows:
html-object-name
The name of an HTML Object control in the current remote form instance. The HTML content of this object will be replaced with that necessary to display the PDF document in a PDF viewer control.
pdf-parameters
PDF viewer parameters. These apply when the PDF is viewed in a browser that uses the standard Adobe PDF viewer control. They control the look and behavior of the PDF viewer. See the Adobe website for details about the PDF Open Parameters.
pdf-id
A character string. Either a full pathname of a PDF file on the Omnis server (pdf folder must be specified in getpdfFolders config.json item; see below), or an id returned by $settemp
timeout
An integer being the time in seconds that the client is prepared to wait for PDF generation to finish. Defaults to 60. If PDF generation does not complete in time, or an error occurs, Omnis returns a PDF document containing a suitable error message.
pdf-filename
the file name of the PDF file
The following method creates a report and assigns it to an HTML control in the remote form.
Calculate $cdevice as kDevOmnisPDF
Do Omnis PDF Device.$settemp(kTrue,1) Returns lID
Set report name New Report
Do Omnis PDF Device.$encrypt('bob','owner',1,0,0,0)
Do Omnis PDF Device.$setdocinfo('Bob Smith','Title','Subject')
Print report
Do $cinst.$clientcommand("assignpdf",row("htm","toolbar=1&zoom=20",lID,10))
If you set the $html property of the HTML Object control to “<div %e></div>” the PDF viewer will have the same border, position and dimensions as the designed control on the remote form. Note that this command will not work on Android with the default web browser, since it does not support the application/pdf plug-in. If the application/pdf plug-in is not available on Android, it executes showpdf instead.
PDF Path Names
The character length of the path name when creating a PDF is unlimited (in versions prior to Studio 11, the limit was 255 characters). Under Windows, for very long path names, you may need to enable long paths by setting the registry key Computer\HKEY_LOCAL_MACHINE\SYSTEM\CurrentControlSet\Control\FileSystem\LongPathsEnable to 1 and restart.
PDF Version and Encryption
You can set the PDF version and encryption used in the PDF file using the Omnis PDF Device.$setpdfversion function, which can be one of the kDevOmnisPDFVersion... constants identifying the PDF version and encryption to be used when encrypting the PDF file.
The following constants are available:
| kDevOmnisPDFVersion13 |
Version 1.3, 40-bit RC4 encryption |
| kDevOmnisPDFVersion14 |
Version 1.4, 128-bit RC4 encryption |
| kDevOmnisPDFVersion15 |
Version 1.5, 128-bit RC4 encryption |
| kDevOmnisPDFVersion16 |
Version 1.6, 128-bit AES encryption |
| kDevOmnisPDFVersion17 |
Version 1.7, 128-bit AES encryption |
| kDevOmnisPDFVersion17ext3 |
Version 1.7 ExtensionLevel 3, 256-bit AES encryption |
The default is kDevOmnisPDFVersion13 which specifies 40-bit RC4 encryption.
The default is kDevOmnisPDFVersion17 which specifies 128-bit AES encryption.
When setting the PDF/A subset using the $setpdfsubset function, PDF/A-1 requires a PDF version of 1.4 (kDevOmnisPDFVersion14), while PDF version 1.7 will work with PDF subset 2 and 3 and UA since they are all based on PDF 1.7.
PDF/A support
You can set the PDF/A subset type for a PDF file, which is used to create archival versions of documents. The standard version PDF/A-1 is supported, as well as PDF/A-2 a/b and PDF/A-3 a/b.
You can use the Omnis PDF Device.$setpdfsubset function to set the PDF/A subset type using one of the following constants:
| kDevOmnisSubsetPDFA1a |
PDF/A-1a - Part 1 Level A (accessible) conformance |
| kDevOmnisSubsetPDFA1b |
PDF/A-1b - Part 1 Level B (basic) conformance |
| kDevOmnisSubsetPDFA2a |
PDF/A-2a - Part 2 Level A (accessible) conformance |
| kDevOmnisSubsetPDFA2b |
PDF/A-2b - Part 2 Level B (basic) conformance |
| kDevOmnisSubsetPDFA3a |
PDF/A-3a - Part 3 Level A (accessible) conformance |
| kDevOmnisSubsetPDFA3b |
PDF/A-3b - Part 3 Level B (basic) conformance |
| kDevOmnisSubsetNone |
Unsets the PDF subset |
If you wish to unset the PDF subset, you can use the kDevOmnisSubsetNone constant with the $setpdfsubset() function.
Linking to PDFs
You can use the getpdf parameter when executing a URL such as the following to reference a PDF:
http://127.0.0.1:5912/jsclient?__OmnisCmd=getpdf,C:\myreport.pdf
To enhance security, the getpdf parameter only gets files with a “.pdf” extension, and it only works with parameters that are associated with an open remote task instance which is stamped with a creation time value.
Setting PDF Folders
To enhance security, you can limit the folders from which PDF files can be retrieved using showpdf, assignpdf, or getpdf by specifying the folders in the config.json configuration file, and thereby excluding all other folders. To do this you need to add the getpdfFolders item to the “server” member in config.json and list the folders. For example:
 "getpdfFolders": [

    "c:\\dev\\unicoderun",

    "c:\\dev\\temp"

  ]
The item can be an array of folder paths, and any subfolders of a configured folder is also allowed. Each entry is a valid folder path, without a trailing file separator.
Print PDF Example
The following methods will allow the end user to print a report to a PDF file: these methods use the built-in PDF Device methods and the client commands.
On evClick
Do $cinst.$createReport() Returns lID
Do $cinst.$clientcommand("showpdf",row(lID,60))
On evClick
Do $cinst.$createReport() Returns lID
Do $cinst.$clientcommand( "assignpdf",row("oHTML","toolbar=1&zoom=20",lID,20))
Calculate $cdevice as kDevOmnisPDF
If iSaveCopy
Do Omnis PDF Device.$settemp(kFalse) Returns lID
Calculate lSaveLocation as left(sys(10),rpos(sys(9),sys(10)))
Calculate lSaveLocation as
con(lSaveLocation,"savedReports",sys(9),iFileName)
Calculate $prefs.$reportfile as lSaveLocation
Else
Do Omnis PDF Device.$settemp(kTrue,1) Returns lID
End If
Set report name repNice
If iEncrypt
Do Omnis PDF Device.$encrypt(
iUserPass,iOwnerPass,iCanPrint,iCanModify,
iCanCopy,iCanAnnotate) Returns #F
End If
Do Omnis PDF Device.$setdocinfo(iAuthor,iTitle,iSubject) Returns #F
Print report
If iSaveCopy
Quit method lSaveLocation
Else
Quit method lID
End If
Electronic Invoices
Many European countries have adopted legislation encouraging businesses to adopt electronic invoicing (e-invoices), and for some countries it is a mandatory requirement for some public organizations. In certain countries, including Germany and France, the Factur-X and ZUGFeRD standards have been adopted to enable electronic invoices to be printed and shared with government authorities, to increase efficiency and save costs.
You can use the following functions in the Omnis PDF Device to print electronic invoices in Omnis Studio, either embedding the invoice from a file or data loaded into memory:
$embedinvoicedata(cData, iFormat [, cDocumentType='INVOICE', iProfile=kDevOmnisPDFInvoiceProfileEN16931])
embeds the invoice data
$embedinvoicefile(cFilePath, iFormat [, cDocumentType='INVOICE', iProfile=kDevOmnisPDFInvoiceProfileEN16931])
embeds the invoice file
Using these methods, you can embed either a file on disk, or the file contents that has been loaded into memory into a PDF and mark it as an invoice according to the Factur-X or ZUGFeRD standards.
The parameters are as follows:
cData: for $embedinvoicedata this is the data to embed. For $embedinvoicefile, cFilePath is the file path to the invoice data to embed. Usually, the data embedded is in XML format.
iFormat: a constant that controls the format of the PDF invoice, either: kDevOmnisPDFInvoiceFormatFacturX (a French format) or kDevOmnisPDFInvoiceFormatZUGFeRD (a German format)
The following parameters set the required metadata:
cDocumentType: the document type, which defaults to ‘INVOICE’, but can be overridden using ‘ORDER’ or ‘CREDIT NOTE’ depending on your invoicing requirements.
iProfile: a constant that controls the profile of the embedded invoice data, one of the following:
| kDevOmnisPDFInvoiceProfileMinimum |
‘minimum’ standard; the minimum fields needed for a valid invoice |
| kDevOmnisPDFInvoiceProfileBasic |
‘basic’ standard; the basic fields needed for most business invoices |
| kDevOmnisPDFInvoiceProfileBasicWL |
‘basic wl’ as above, but ‘with lines’ for itemized invoices |
| kDevOmnisPDFInvoiceProfileEN16931 |
‘EN 16931’ (the default) is the primary European standard specifying the required fields for an invoice |
| kDevOmnisPDFInvoiceProfileExtended |
‘extended’ standard; the core standard with additional fields for specific industries including construction, logistics, healthcare |
| kDevOmnisPDFInvoiceProfileXRechnung |
‘XRechnung’ (X Invoice); a German standard, used when iFormat is kDevOmnisPDFInvoiceFormatZUGFeRD |
Note these profiles all fall within the EN 16931 European standard, but are restrictions (subsets), or extensions of that core standard.
The Omnis PDF Device does not check your invoice data for standard correctness – it merely embeds the data into the PDF document and sets the correct metadata. It is your responsibility to understand what standard you need to target according to your requirements and to ensure the electronic invoice data is compliant with that standard.
Furthermore, when creating electronic PDF invoices, you must ensure your PDF document is also compliant. Both Factur-X and ZUGFeRD require the invoice data and its metadata to be embedded into a PDF/A-3 document. To ensure you meet that requirement, use of the Omnis PDF Device $setpdfversion and $setpdfsubset methods to set the PDF version to 1.7 (kDevOmnisPDFVersion17, the default version) which is required for PDF/A-3 (kDevOmnisSubsetPDFA3b).
Toast Messages
Toast messages are small notification type messages that that can be “popped up” in a remote form to alert the end user about something: the concept is derived from “toast messages” on Android. (Note this section refers to toast messages for remote forms and not desktop toast messages.)
Toast messages are activated using the “showtoast” client command ($cinst.$clientcommand) which displays a message to the user in a small popup window which disappears after a timeout, either 5000ms or specified amount.
Do $cinst.$clientcommand("showtoast",row(cText, \[iTimeoutMillisecs=5000, iPosX=#NULL, iPosY=#NULL, cContainerName='', bFixed=kTrue, iOriginX=kLeftJst, iOriginY=kJstVertTop, bSpeak=kTrue, bInterruptCurrentSpeech=kFalse]))
The row parameters are as follows:
| cText |
The message text. The container’s size will scale with the amount of text. You can use ‘\n’ to insert a new line. |
| iTimeoutMillisecs |
(Optional) The length of time (ms) the message will be shown for (5000 ms by default). |
| iPosX |
(Optional) The horizontal position of the toast message in pixels. Centered if not specified. If containerName is specified, this position is relative to the control. |
| iPosY |
(Optional) The vertical position of the toast message in pixels. Positioned near the bottom of the form if not specified. If containerName is specified, this position is relative to the control. |
| cContainerName |
(Optional) The name of the control to position the toast message relative to. Options are limited to paged pane and subform controls. |
| bFixed |
(Optional) This determines whether or not the toast message will stay in position when the container scrolls (true by default). |
| iOriginX |
(Optional) The toast message’s origin that iPosX references. Possible values are: kLeftJst (default), kRightJst and kCenterJst. |
| iOriginY |
(Optional) The toast message’s origin that iPosY references. Possible values are: kJstVertTop (default), kJstVertMiddle and kJstVertBottom. |
| bSpeak |
(Optional) If true, screen readers will announce the message. This is an accessibility feature to convey information to visually impaired users. |
| bInterruptCurrentSpeech |
(Optional) If kTrue, this instructs screen readers to interrupt current speech, otherwise if kFalse the message will not interrupt. |
The originX and originY parameters are used to set the point on the toast message that iPosX and iPosY reference. For example, if iOriginX is kRightJst and iOriginY is kJstVertBottom, the bottom right corner of the toast message will be at the position specified by iPosX and iPosY.
For example, the following code is from the Floating Action Button example app (under the Samples option in the Studio Browser) that reports the button option clicked in a toast message at the buttom of the form.
Do $cinst.$clientcommand("showtoast",row(con("Action ",pActionId," clicked"),1000))
The following example, displays a toast message for 5 seconds at the top right of the form.
Do $cinst.$clientcommand("showtoast",row("Hello world",5000,9999,1,'',kTrue,kLeftJst,kJstVertTop,kFalse))