Chapter 10—Report Programming
You can create many different types of report using a template or wizard, each with very different layouts and data handling capabilities. With reports you can print out all or a subset of your data and collect up data from different sources and print it on a single report. Each type of report in your application is defined as a Report class. This chapter describes Report classes and Report sections and their properties. Reports can contain data fields, pictures, text, and graphics. You can also place graphs on your reports, or base a report on the data contained in an Omnis list.
For web and mobile apps, you can print a report class to a PDF and display it in the end user’s web or mobile browser using the ‘showpdf’ and ‘assignpdf’ client commands, or you can allow the end user to download the report file to their device. You can use the PDF Device to print a report to a PDF file: see PDF Printing. This chapter describes how you can create a report class, which you will need to be able to print a report in web and mobile apps, but some sections only apply to creating and printing reports on desktop apps.
For desktop apps, you can print reports to a number of destinations, including a Page preview that is displayed on the end user’s screen, the current Printer, a File, a Port, or the Clipboard; this and all aspects of printing reports in desktop apps are covered in this chapter.
Report Fields and Sections
You use report fields (report entry fields) and sections to build all types of report. You can use standard data fields that can contain data from your server or Omnis database. You can use picture fields to display picture data. You place sections, or horizontal dividers, across your report class that structure and position the data in the printed output. You can create subtotals, totals, header and footer sections for most types of reports. By setting the appropriate properties in a report class you can print labels as well. Furthermore, you can add methods to a report class and the fields and section markers on the report.
Report Object Limit
You cannot place an unlimited number of objects on a Report class. The object limit is 8191 for a Report class, although in practice the limit is likely to be less due to platform limitations (the limit was 3000 in versions prior to Studio 11).
You are advised to split large reports (containing a large number of report fields) into a number of sub-reports, and print them to either the Printer or PDF using the Begin and End print job commands.
Report Field Types
The following fields or components are available in the Component Store for report classes:
Report Entry Fields
Entry fields display the data from your database. The $dataname for an entry field specifies the instance variable or database column name to be displayed or printed in the report.
The $tooltip property allows you to add a tooltip to a report entry field, to be displayed in a Page Preview or PDF report.
Hyperlinks
The $linkaddress property can be a URL link address used by the Preview and PDF report destinations to provide a hyperlink; this provides similar functionality to the $address property of HTML Link objects.
The omnisPreviewURLPrefix item in the ‘defaults’ section of config.json allows you to set the report preview URL prefix for the $linkaddress property for report class Entry fields. The item defaults to ‘omnis:‘ if empty.
Enterable Report Fields
You can allow the end user to enter and save text in a field in a PDF report by setting its $enterable property to kTrue. When the end user opens the PDF report, the field is active and enterable and once text has been entered the PDF can be saved. Note this only applies to PDFs that have been generated using the Omnis PDF Device.
Note that if the enterable report field is empty when it is printed, and the $nolineifempty property is set to kTrue, then the whole line including the enterable field will not be included in the report. In this case, it is advisable to set $nolineifempty for enterable report fields to kFalse (which is the default).
Wrapping Lists and Data Grids
The Wrapping List and Data Grid report fields support the use of styled text, provided their $::styledtext property is enabled. You can insert styling characters or “text escapes” into text objects and other fields in Omnis reports using the style() function.
HTML Link Objects
Hyperlinks are supported in PDF and Page Preview report destinations. To add a hyperlink to a report, you can use one of the HTML Link objects, found under the Media group in the Component Store, including:
HTML Icon (Link)
adds a link behind an icon, specified in the $::iconid property
HTML Picture (Link)
adds a link behind a picture; the image can be from a variable specified in $dataname or from a calculation specified in $text.
HTML Data Text (Link)
adds a link behind some data bound text; the text can be from a variable specified in $dataname or from a calculation specified in $text.
HTML Text (Link)
adds a link behind some static text specified in the $::text property.
To add the hyperlink to the HTML Link Objects you need to set the $address property to the target of the link, which can be a URL or mailto, for example:
https://omnis.net

mailto:bob.smith@omnis.net
The $tooltip property can contain a tooltip used for the link specified in the $address property. It can contain expressions including square bracket notation.
For Page Preview reports only (ignored for PDF reports), you can create a special custom HTML link using the syntax:
omnis:p1,p2,p3,p4
where the data after omnis: is a comma separated list of parameter values, which can be integer or character, and must not contain " (double quotes).
In the latter case, when the user clicks the omnis: link, Omnis looks for a method called $previewurlclicked. Firstly, if the report has been sent to a window field, Omnis looks for the method in the window instance containing the screen report field, otherwise if the first test fails, Omnis looks for the method in the task that printed the report. If Omnis finds the method, it calls $previewurlclicked passing it the following parameters:
An item reference to the report instance.
The ident of the report object.
A row created by adding a column for each comma delimited item in the data after omnis: in the link.
You can create a method called $previewurlclicked in either the window or task, as above, and react to the parameters passed.
Aspect Ratio for Icons and Images
For the image related report objects, such as HTML Icon (Link) and JPEG controls, you may need to set the $keepaspectratio property to kTrue for the icon or image to draw with the correct aspect ratio. If this property is kFalse (the default), the icon or image may not draw correctly. In addition, some of the report image controls have the $noscale property; if set to True, the control will not scale the image.
JPEG Report Control
The JPEG control allows you to place a JPEG image on a report. The image can be from a variable specified in $dataname or from a calculation specified in $text. Alternatively, you can specify the path to the JPEG image in $path.
Picture Report Control
The Picture control allows you to place an image on a report. The image can be from a variable specified in $dataname or from a calculation specified in $text.
Rtf Viewer Control
The Rtf Viewer control allows you to embed an RTF document into a report. The RTF file can be from a variable specified in $dataname or from a calculation specified in $text. Alternatively, you can specify the full pathname to the RTF file in the $filename property.
Report Labels
You can use the Label or Text report objects in your report classes to label report fields and so on. In addition, you can use the String Label object which allows you provide multi-language labels on your reports: for information about the use of String Labels and String tables, see the Localization chapter.
Report Shapes
You can add various graphical shapes to your reports using the objects in the Shapes group in the Component Store including 3d Rectangle, Line, Oval, Rectangle, and Rounded Rectangle. You can control the appearance of these shapes under the Appearance tab in the Property Manager, includng the border, line styles, and colors, as appropriate.
Report Wizard
The SQL Report Wizard lets you create a report class that contains fields that map directly to a SQL class in your library, which lets you print data on your SQL server database. Before you can use a report wizard you must create the Schema or Query classes necessary for SQL, or you can create a new one in the wizard.
For SQL reports you need to select the Session to be associated with the new report. The SQL Report Wizard creates a report based on a schema or query class; each separate field on the new report maps to a schema column, which in turn maps to your server database.
To create a new report using a wizard
Select your library in the Studio Browser
Click on the Class Wizard option, then click on the Report option
Select the SQL Report Wizard and click on the Create button
When you finish in the Report Wizard the new report class is opened ready for you to modify or print. To modify your report, you need to edit its properties. You can also add new report objects from the Component Store, and you can add methods to the report class or the objects on the report.
There is an Omnis Report Wizard which creates a report based on an Omnis file class, but this should only be used in legacy apps that use Omnis datafiles, and not for new applications. This wizard is only available when the Datafiles option is enabled in the IDE Options in the Studio Browser.
The toolbar at the top of the report editor lets you set the page size, preview the report on screen, and show or hide connections between the different sections of the report as shown down the left-hand side of the report editor. In addition, you set the sort levels in your report from this toolbar. Position your mouse over each tool to see what it does.
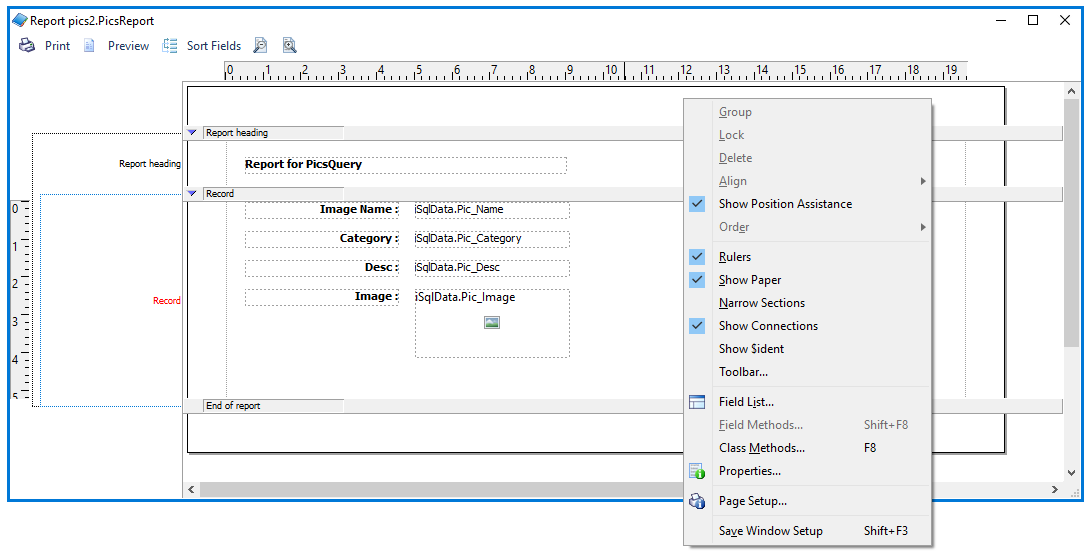
Some of the options in the report editor toolbar are available using the report context menu by Right-clicking on the report background.
The Narrow Sections option displays the section markers as narrow lines which shows you how the report will look when you print it. The Show $ident option displays the ident numbers for the fields and section markers in the report. The Field List option displays a list of fields and section markers in the report class. You can expand the tree in the Field list to show the fields within each report section.
The Class Methods option lets you add methods to the report class, and the Properties option shows the properties for the class. The Page Setup option or toolbar button opens the Page Setup dialog in which you can select the printer, and set the page size and orientation. This dialog will vary greatly across the different operating systems.
Zoom In/Out
The report class editor toolbar has Zoom In and Zoom Out buttons which control the DPI value used to convert report coordinates to and from pixels, and the DPI value used to create fonts used in the editor. "Zoom in" increases the DPI value, “Zoom out” decreases it. Note this is for design mode only, and you can zoom through a limited set of DPIs:
72 – objects displayed at standard resolution for macOS
96 – objects displayed at standard resolution for Windows (with default system scaling of 100%)
144 – objects displayed at 2x resolution for macOS
192 – objects displayed at 2x resolution for Windows
In addition, if Windows is using a different scaling value, the editor inserts the system DPI into this list at the appropriate point.
These values correspond to the design coordinate system used in Omnis, so on HD displays 96 DPI maps to 192 physical pixels.
You can use Ctrl+ and Ctrl- (Cmnd+/Cmnd- on macOs) to zoom in and zoom out respectively. The current zoom level is saved with the window setup by the save window setup context menu item.
Note that the section bars and the text in the left panel do not increase in height when you zoom. Note also, that zoom does not affect the size of lines drawn in fields on the report - only the text, and in some cases images will scale.
The Modify Report field has a new runtime property, $dpi, that can be assigned to one of the values above.
External Components
If you create external components for reports then you will need to make some changes to draw text at the correct DPI. Typically, if the component just displays its name or dataname using the standard interface, you won’t need to do anything, as the text DPI will be handled by the Omnis core. Where components that can be placed on reports draw custom text, there are some changes to make in the component:
There is a new callback ECOgetFontDpi(HWND) that returns the current DPI to use to create fonts - this will return zero unless the component is on a report design window, in which case it will return one of the above values.
There is a new class GDIfontCreator, that you construct with the HDC for drawing, and the return value from ECOgetFontDpi. This has a method createFont that you then use to create the font rather than calling GDIcreateFont. When you have finished with the font, call GDIdeleteObject as usual. You cannot cache the HFONT generated by createFont in your component.
If you require font or text metrics, use the HDC versions of GDIfontHeight, GDIfontPart, GDItextWidth etc, with a font created using GDIfontCreator.
In addition, for more advance use there are classes GDIhdcFontCacheHelper which removes all fonts cached by the Omnis font cache for a particular HDC at the end of the block and GDIoverrideHDCDPI which means that all fonts created for a specific HDC are created at a specified DPI while GDIoverrideHDCDPI is in scope. You need to use GDIoverrideHDCDPI if you are drawing styled text, as styled text drawing may create new fonts. In addition, when drawing styled text, you need to set mFontHdc in the GDIdrawTextStruct, in order for fonts to be created at the correct DPI.
You can also call GDIcreateDcFont with a DPI parameter to manage fonts yourself.
Report Sections
Sections are horizontal markers or dividers across the report class that structure and position the data when your report is printed. To create a complex report with headers, footers, subtotals, and totals, such as an invoice or catalog listing, you have to place the appropriate sections in your report class in the right order. When you enable the various sections in your report using the Property Manager, their position and order is handled for you automatically.
There are two sections that you must have in a report:
the Record section indicates the start of the display of records or rows of data, and
the End of report section indicates the end of the report.
These sections appear automatically in every new report class. The following section types are available:
| Report heading |
defines the area at the start of the report, which prints only once; you can use this to create a report title page |
| Page header |
defines an area at the top of each page below the top margin, printed at the top of each new page |
| Subtotal heading |
prints before each subtotals section; it would normally contain column headings for your subtotal sections |
| Subtotal heading 1 to 9 |
each subtotal heading prints before its corresponding subtotal level |
| Record |
defines the section containing the fields that print your data; the record section expands to accommodate your data which may extend over several pages when printed |
| Positioning |
divides a section into two or more subsections; you can control exactly where on the page a positioning section is printed |
| Subtotals level 1 to 9 |
defines the fields that will print subtotals; you can have up to 9 levels of subtotaling |
| Totals |
prints at the end of the report and defines the fields that you want to total |
| Page footer |
defines the area at the bottom of each page; printed at the bottom of each new page of your report |
| End of report |
defines the end of the report; must be present on every report |
To enable a particular report section, you have to set the appropriate property to true under the Sections tab in the Property Manager. When you enable a particular report section, it is shown on your report in the correct position. You can click on individual sections to change their properties in the Property Manager.
Page Headers and Footers
To create a page header for your report, you must set the pageheader property of the report to true under the Sections tab in the Property Manager. The Page header section will appear on your report above the Record section, or any subtotal headings if you have any.
Similarly, to create a page footer for your report, you must set the pagefooter property to true under the Sections tab in the Property Manager. The Page footer section will appear on your report below the Record section, or any Subtotals and Totals sections if you have any.
Any fields or graphics you place in the header section, that is between the Page header section and the next section marker will print at the top of each page. Likewise, any fields or graphics you place in the footer section, that is, below the Page footer section marker, will print at the bottom of each page. Note that the connection between the different sections is shown in the left margin of the report editor: the current section is shown in red.
When printing to a non-paged device such as File or HTML, by default the footer section is not printed. The Report header and first Page header sections are printed at the beginning of the report. However it is possible to force the footer section to be printed by calling $printsection( kFooter ) for the report instance. The default positioning for a footer for a non-paged device is to follow on from where the last section stopped printing.
To change the height of any section, including the record, header and footer sections, you can click on the section marker (the gray bar) and drag it into position. All the sections below the one you move will adjust automatically.
To show you more how the report will look when you print it, you can view the sections as narrow lines. To view sections as narrow lines, click on the Narrow sections button in the report editor toolbar, or Right-click on the report background and select the Narrow Sections option.
Printing Sections as Record Sections
The $printsection method has a new parameter to force the report section to print as a record section. The method $printsection(iSection[,bPosnIsRecord=kFalse]) prints a section: note bPosnIsRecord applies to positioning sections only. If bPosnIsRecord is kFalse (the default), this method prints a section based on the position of the previous section; otherwise, when this parameter is true the method prints the section as a record.
Borders and shading
You can set the border and fill properties for each section in a report. The report class and section objects have the following new properties: $effect, $forecolor, $backcolor, $bordercolor, $backpattern, $linestyle. In addition, sections have $topmargin, $leftmargin, $bottommargin and $rightmargin properties to allow the sections border and fill to be inset from the sections boundary.
Positioning sections cannot have their own border and fill properties. The border and fill of the main section extends through all its position sections. The border and fill properties of each section are visible in design mode.
Watermarks
You can add a watermark effect (using a background image) to your reports by assigning a picture to the $backpicture property of the report. The alignment can be one of the following within the report margin: TopLeft, TopCenter, TopRight, CenterLeft, Center, CenterRight, BottomLeft, BottomCenter, BottomRight, Stretch (stretch the image to fit the report margin), or Tiles (tile the image within the report margins).
The horizontal and vertical DPI (dots per inch) specify the resolution at which the image is to be printed.
When using notation, $backpicture refers to the binary representation of the image and the formatting properties. To change the image or formatting properties you can use $backpicture.$picture or $backpicture.$align. The full set of notation is as follows:
| $backpicture.$picture |
the actual image (24bit color shared). |
| $backpicture.$picturealign |
alignment of the image within the report margins. This can be one of the kPALxxx constants. |
| $backpicture.$horzdpi |
the horizontal dpi (defaults to 150), disabled for kAlignMargins and kAlignPrintable |
| $backpicture.$vertdpi |
the vertical dpi (defaults to 150) , disabled for kAlignMargins and kAlignPrintable. |
| $backpicture.$horzoffset |
additional horizontal offset in cms or inches from the alignment. Disabled for alignments of kAlignMargins and kAlignPrintable |
| $backpicture.$vertoffset |
additional vertical offset in cms or inches from the alignment. Disabled for alignments of kAlignMargins and kAlignPrintable |
Icon IDs for background pictures
You can use the $backiconid property to assign an image to the background of a report using an image or icon ID, rather than using $backpicture. The property must refer to an icon ID in an icon set, or an alpha page in #ICONS in your library or an icon data file. If you specify a value for $backiconid it takes precedence over $backpicture.
Section Positioning
When you print a report, each section follows the previous section by default, and is positioned down the page according to the height of the previous section set in the report class. However, for some types of section, you can control where a section prints and whether or not a new page is forced using the pagemode and startmode properties of the section. You can use a special type of section marker called a position section to print part of your report literally anywhere on the page. To do all these things you have to modify the properties of the appropriate section marker.
To view the properties of a section, open your report class in design mode and click on the appropriate section to view its properties in the Property Manager.
Page Mode
You can control whether or not Record, Subtotals, Totals, and Subtotal heading sections start a new page when they are encountered by setting their pagemode property. You can select one of the following options for this property.
Nopage
does not force a new page; uses the pagination in the report class (the default)
Newpage
always starts a new page before this section
Testspace
starts a new page before starting this section if there is not the specified amount of space available on the current page
If you select the Testspace option, the pagespacing property is enabled in the Property Manager in which you can enter the amount of space required for the section. If this amount of space is not available on the page, a new page is started. The figure you enter in pagespacing is shown on the section marker.
Omnis works with units that are 1/72 of an inch; therefore, it may round exact numbers in centimeters or inches to the next real unit. For example, 1cm becomes 0.99cm.
Start Mode
All sections except for Page footer and End of report let you specify the startmode, which tells Omnis where to start the section. You can choose one of the following options.
Follow previous section
starts the section on the line following the end of the previous section (the default)
Fromtop of previous section
starts the section n inches/cms from the top of the previous section
Fromend of previous section
starts the section n inches/cms from the end of the previous section
Fromtopmarg
starts the section n inches/cms from the top margin of the report
Frombottommarg
starts the section n inches/cms from the bottom margin of the report
When you choose one of the start modes the startspacing property is enabled in the Property Manager, which lets you enter a measurement for the startmode. The startmode and spacing is shown on the section marker.
Omnis ignores previous section settings if the previous section was a Page header section or a Positioning section within a Page header section. The spacing comes before the page start test that examines the amount of space left on a page. Omnis ignores top and bottom margin settings for reports that are not paged.
Note that when you set up a report to print labels, you can use the Fromtop or Frombottom options to set the spacing between your labels.
You can enter a negative value for the start spacing of a positioning section, for example Start –1.000cms from end of previous section. This allows you to align fields with the bottom of an extending field.
Record Spacing
The default spacing between records or rows of data on your printed report is determined by the height of the Record section in your report class. However you can override this spacing by setting the userecspacing property for the Record section. This property forces the report to use the vertical spacing set in the recordspacing property of the report class.
Position Sections
A Position section is a special type of report section that you can print literally anywhere in the report. For example, using a positioning section, you could print a footnote or a logo at the bottom of a letter, regardless of the content or amount of data in the main report letter.
A positioning section placed over the second line of a two-line extending field with the Follow previous section property prevents the second line from printing as a blank. You can also follow extending fields by a positioning section with Follow previous section to prevent them from writing over any fields below. A positioning section within a subtotal section lets you trigger a print position change by changing a sort field value.
Section Print Height
Report sections have the property $printheight which lets you specify the printing height of a section more accurately than using positioning sections. The printing height of a section is displayed in the section bar. Setting the sections print height does not affect the positioning of sections in the report class or on the design window. If a section area is larger than its print height, the area below the print height is filled with gray. Any report objects that fall entirely in the gray sections ($top of object is greater than $printheight of section) are evaluated but not printed.
You can create label reports using a combination of the $printheight property and the positioning mode kFitOnPage. If a section is too high to print on the current page, it will be printed the next page. Some objects are normally moved to fit on a page at the time they are added to the report, e.g. a single line of text. This behavior is disabled for objects in sections that have kFitOnPage selected.
Standard Lines between sections can expect an overall vertical placement inaccuracy of +-1/72nd of an inch. Hair lines can expect an overall placement inaccuracy equal to that of the DPI of the printer, but not better than +-1/600th of an inch.
Section Calculations
Sections have the $printif property which can trigger the section to print based on a calculation. If a section has a calculation, it is skipped if the calculation evaluates to zero, otherwise the section is printed as normal. If a section has been given a calculation, the text “Print if calculation” will appear in the section bar.
If a main section is skipped, all positioning sections belonging to the main section are also skipped, regardless of their $printif property. Calling $printsection from a method will ignore the $printif calculation and always print the section.
Custom Sections
A custom section is effectively a positioning section with $printif calculation of ‘0’. This means the section will not print unless, $printsection() is called with a reference to the section. You can add a custom section (positioning bar) from the Component Store.
Custom sections can be placed inside any of the main sections, but can be printed before or after any of the other report sections, but not during. Changing the $printif calculation to anything other than ‘0’, will change the section into a normal positioning section, and vice versa.
Hiding Sections in design mode
You can collapse or expand the sections in a report to simplify the visual appearance of the report in design mode. The collapse/expand icon in the report editor lets you collapse a section, leaving the section divider visible. The current collapse/expand state of a section will be saved in the report class.
When a ‘main section’ is collapsed, any positioning sections in that section are also hidden. Positioning sections can also be collapsed or expanded individually. Collapsing of sections is disabled when narrow sections are viewed.
Sorting and Subtotaling
To implement sorting and subtotaling for your report, you need to specify the fields on your report to be sorted, and create subtotals sections containing those fields. Sort fields define how Omnis subtotals the records or rows of data when printing a report. With no sort fields, Omnis displays records in the order they are listed on your server, or if the data is from an Omnis data file, in the order the data was inserted. When you add sort fields to your report, the report will print subtotals when the values change in the sort fields.
To specify sort fields for your report, click on the Sort Fields button in the report editor toolbar; the Sort fields window opens. In the Sort fields window, you can specify up to nine sort fields by entering each field or variable name in the left-hand column. Note that you can use the Catalog to enter your field or variable names. These sort fields form a nested sequence of sorts on the records that trigger printing of up to nine nested subtotal sections.
The sort fields for a report class are stored in the $sorts group for the class. You can modify the contents of this group at runtime using the notation, to change the sort fields for the report, but if you want the changes to take effect this must be done in the $construct() method of the report before the report instance is created. If you have more than one instance of a report class, each instance will have the sort fields specified in the class, but you can modify the $sorts group for a particular instance if you wish to change its sort fields.
To subtotal a field, place a copy of the field in the Subtotal section and select the appropriate $totalmode for the field. This is independent of the sort fields, which trigger the printing of the Subtotal sections.
When you enter a field or variable name in the list of sort fields the sorting options are enabled for that field. You can enable any of these options by clicking on the option.
Each sort field has the following options:
Descending sort
sorts the field in descending (Z to A and 9 to 0) instead of the default ascending order
Upper case conversion
converts field values to upper case before sorting, so the use of mixed case in your database does not affect subtotaling or sorting
Subtotals when field changes
tells Omnis to print subtotals using the corresponding subtotal section (1 to 9) when the value of the field changes; for example, if sort field 4 changes, subtotal level 4 will print
New page when field changes
starts a new page as well as printing a subtotal when the value of the field changes
When you enable the Subtotals or New page options for a sort field, you can specify the number of characters that must change before a subtotal is triggered or new page is printed.
Subtotal Sections
You can specify a Subtotal heading section in your report. It prints before the first Record section and successive Record sections following each Subtotals section. The subtotal heading can print column names and anything else you want to apply to each subtotaled Record section.
The Subtotals section prints whenever the Record section breaks on the corresponding sort field, with the subtotal printing before the record with the changed value. Since there are up to nine sort fields, you can have up to nine Subtotal heading and Subtotal levels numbered 1 through 9 corresponding to the sort fields specified in the report. The higher numbered sort fields are nested within the lower ones and hence change more often. That is, sort field 5 changes within sort field 4 which changes within sort field 3, and so on. Correspondingly, the Subtotal heading and Subtotals sections with higher numbers print more often as the sort fields change.
When you have multiple subtotals which print consecutively, the corresponding heading sections print one after another, starting with the one for the last subtotal. Subtotals and totals can be aggregations of several kinds, including sums, averages, counts, minimums, or maximums, depending on the field’s $totalmode property. Omnis maintains the total for each subtotal printing, then resets the subtotal to zero for the next section.
Numeric Hash Variables in Subtotals
In general, you are advised to not use numeric hash variables in reports, since you may experience rounding issues when such variables are used in report subtotals. You can control whether or not numeric hash variable values are rounded using the preserveHashVarDecimalPlacesOnSubtotals configuration item.
If the preserveHashVarDecimalPlacesOnSubtotals configuration item (in config.json) is true (the default), Omnis preserves numeric hash variable decimal places when a report processes subtotal sections. If false, numeric hash variables may be rounded, potentially altering the content of the main list if the report is being printed from a list and the list contains numeric hash variable columns.
Totals Section
The Totals section in a report prints at the end of the report. As for subtotals, you place the fields to aggregate in this section, and Omnis accumulates the aggregate values across the entire report.
You can set the $totalmode property for a report field in the totals section, which can be kTmNone, kTmTotal, kTmAverage, kTmCount, kTmMinimum, or kTmMaximum.
Calculated Fields
In addition to totaled fields in subtotal or total sections, you can place calculated fields in report sections which take their value from the result of some calculation. In this case the $dataname property of the field is left blank, the $calculated property is enabled and the calculation is placed in the $text property. For example, this could be the concatenation of a Firstname and Surname variable to display a person’s full name. Note that such calculated fields cannot be totaled in subtotal or total sections.
PDF Accessibility
Support for PDF/UA in PDF reports is enabled by allowing you to set the order of objects in a report class in design mode and tag non-text objects such as images. The report object ordering and tags can then be read by an accessibility PDF reader.
The Omnis report engine builds up a page of objects during the record printing process adjusting object positions using sections, $print and the natural order of records during printing. When the print job is complete, Omnis sends the final objects, page by page, to an output device ordered left to right, and from top to bottom. When printing to PDF, page by page, the objects are sent to the PDF device to be turned into a PDF file using PDF Kit. Until now, the order of objects in the final Omnis print job would determine the order of objects in a PDF file (left to right, top to bottom).
For many reports, this order of objects whilst visually acceptable may not be acceptable if read by an accessibility PDF reader. For example, you may have text that is grouped and makes sense to be read together as a block. With the addition of support for PDF/UA, you can now change the reading order of the objects in a report class and the output PDF if required.
PDF/UA Support
PDF/UA (PDF Universal Accessibility), formally known as ISO 14289-1, specifies that objects in a PDF file should be capable of being read in a specific order, and that visual objects that are non-text based (such as images) should be tagged so they can be read by a PDF reader.
To enable PDF/UA support and have objects tagged and read correctly, an Omnis report printed using the Omnis PDF output device may require developer modifications to control the order output and apply text tags to some objects.
The Omnis PDF device has a subset setting kDevOmnisSubsetPDFUA for the Omnis PDF Device.$setpdfsubset(iPdfSubset) function that when set, tags all objects correctly and sorts objects using the reading order specified in the report class before committing the objects to the PDF file.
PDF/UA support requires a minimum PDF version of 1.7. You can use the Omnis PDF Device.$setpdfversion(iPdfVersion) function to set the PDF version. The following code can be used to set the PDF subset and version:
Do Omnis PDF Device.$setpdfsubset(kDevOmnisSubsetPDFUA)
Do Omnis PDF Device.$setpdfversion(kDevOmnisPDFVersion17)
Object Reading Order
To specify the reading order of objects in a PDF report, Omnis design mode allows you to assign a 'reading order’ to an object or set of objects. This reading order is used by the PDF device to sort and order fields in the final PDF file, that is, a PDF reader will read the fields in the specified order.
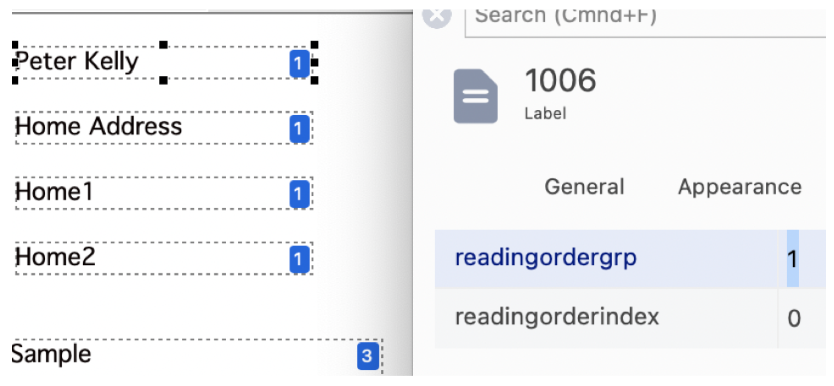
To set the reading order, report objects have three properties available under the Accessibility tab in the Property Manager.
$readingordergrp
a number representing a field's main grouping, default is 0, meaning it has no group
$readingorderindex
a number representing a field’s order within its reading group, default is 0
$alt
some non-text based objects (images) support this. The text tag assigned to the object in the final PDF file
All objects are first sorted by group, and then by index within the group. If a group of objects runs top to bottom, the index within the group does not need to be set, as this is the default order Omnis will use.
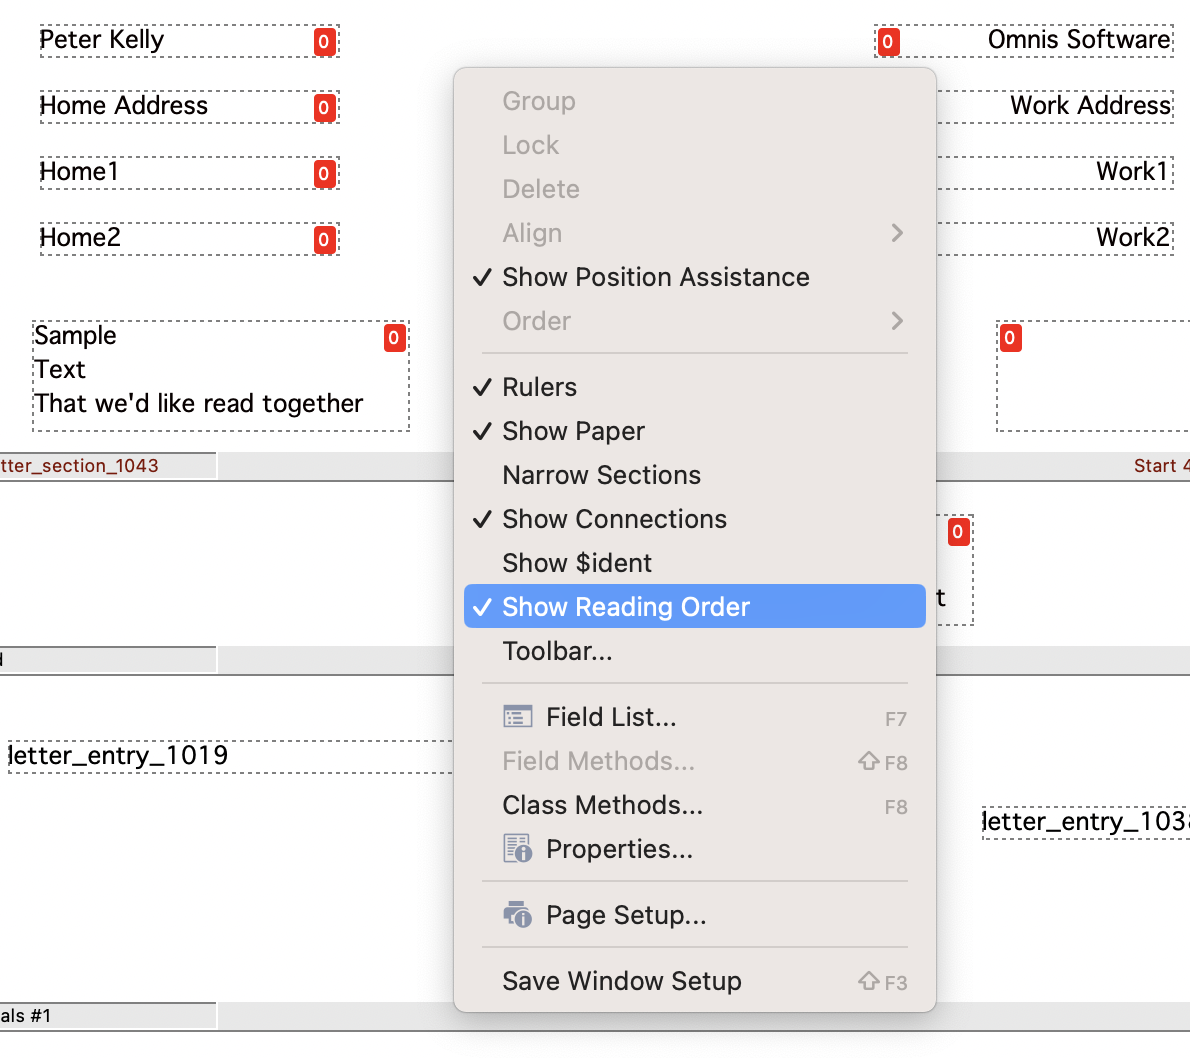
To help with setting groups and group indexes in report design mode you can show the group and index (like viewing an object's name or $ident). The Show Reading Order option in the report design context menu allows you to see the reading order of objects in the report. By default, there is no reading order, so the order in the report design window is shown in a red box and the value is zero.
To set an object's reading order, select an object or group of objects in design mode and use the Property Manager to set $readingordergrp and $readingorderindex. Once the order is set, the reading group is shown in a blue box, and if an index in the group is set, this is also shown, e.g. 1:1 is the first object in group 1. The following image shows a report after some fields have been given a group reading order.
If you intend to change the reading order of some objects, then all objects in the report will require the reading order to be set as the default order is 0 and this may conflict with objects with an order. If you only need to change a few objects, do so then assign all other objects a number larger than the order of the objects you want to control.
The $printontop property for report objects will be ignored when the object reading order is specified in your report class.
Previewing Object Order
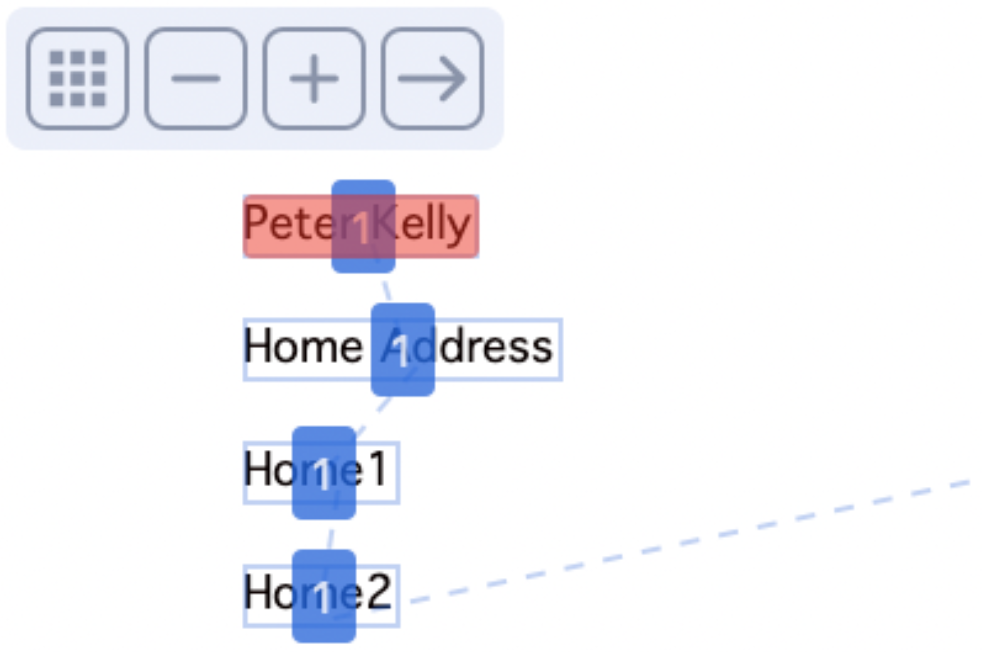
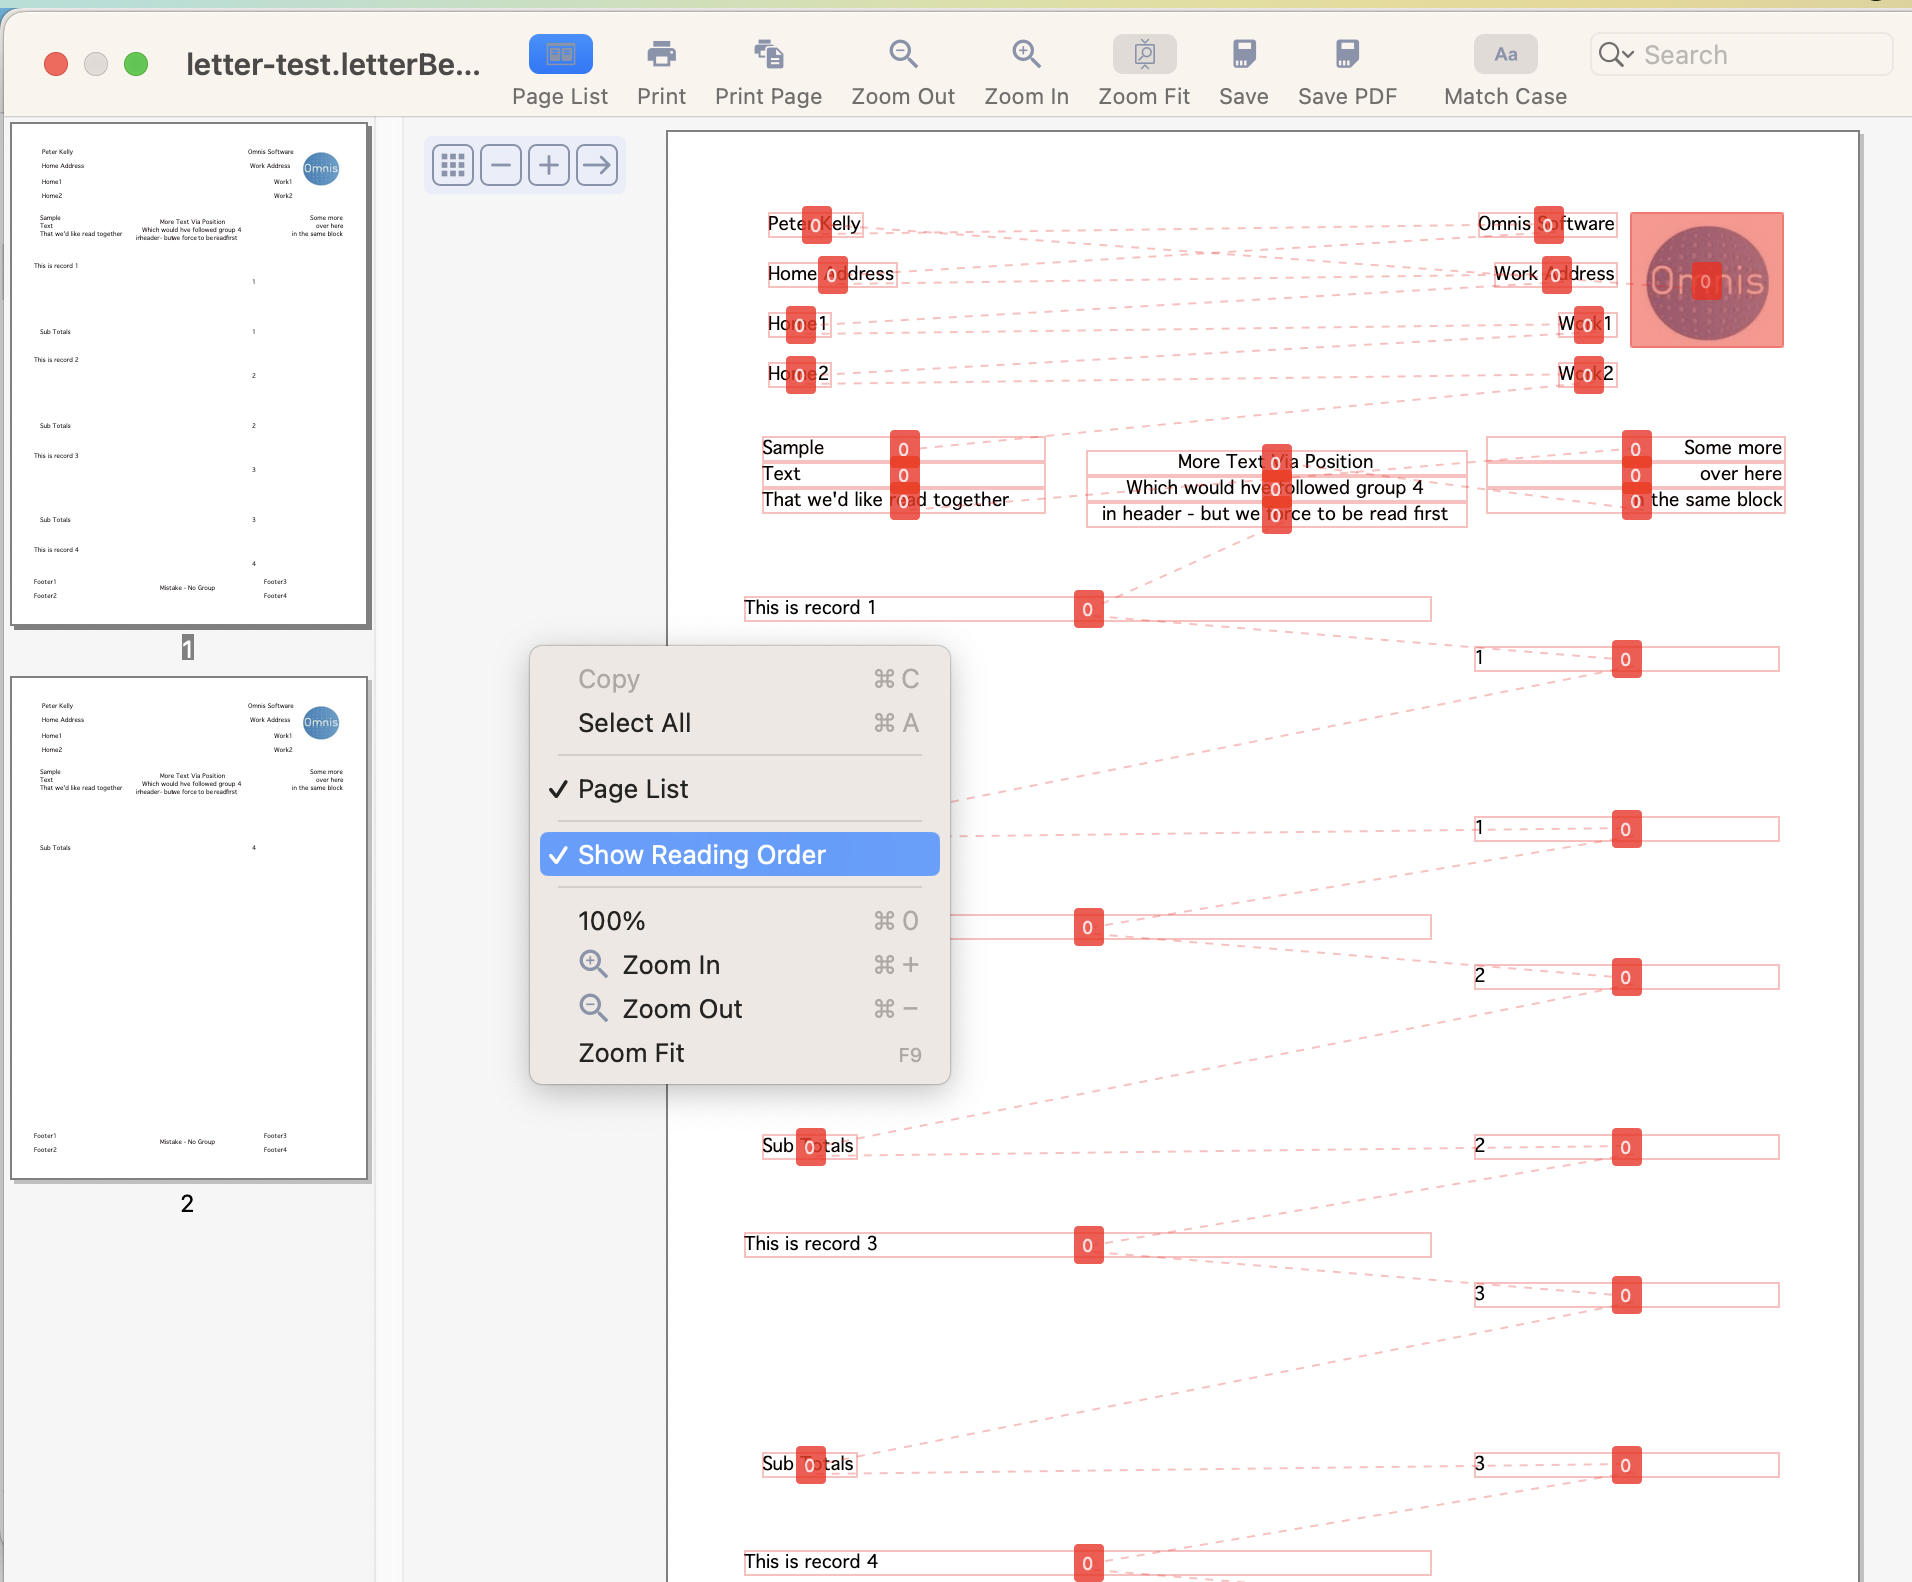
Viewing the design mode reading order is useful, but due to $print and position sections which can move objects during the print stage, only a final output gives a true representation of the final PDF. To allow you to see the object reading order in the report output, the Show Reading Order option is also available in the context menu in the Print Preview window. Omnis will show all the assigned reading order stops, and the links between them. There is a small toolbar in the top left corner of the Preview window allowing you to step through the report object order, as it would be read by a PDF reader.
Alternatively, you can use the Plus (+) or Minus (-) keys to step through the objects in the Preview report. As you navigate through the order, each object is highlighted showing its reading order stop, but you can press Backspace or the left-most toolbar button to show all the reading order stops and links.
The following image shows a report with no object order set, and in this case, Omnis will navigate left to right, top to bottom. The reading order is shown in red, and the link lines show the order of objects a PDF reader will take.
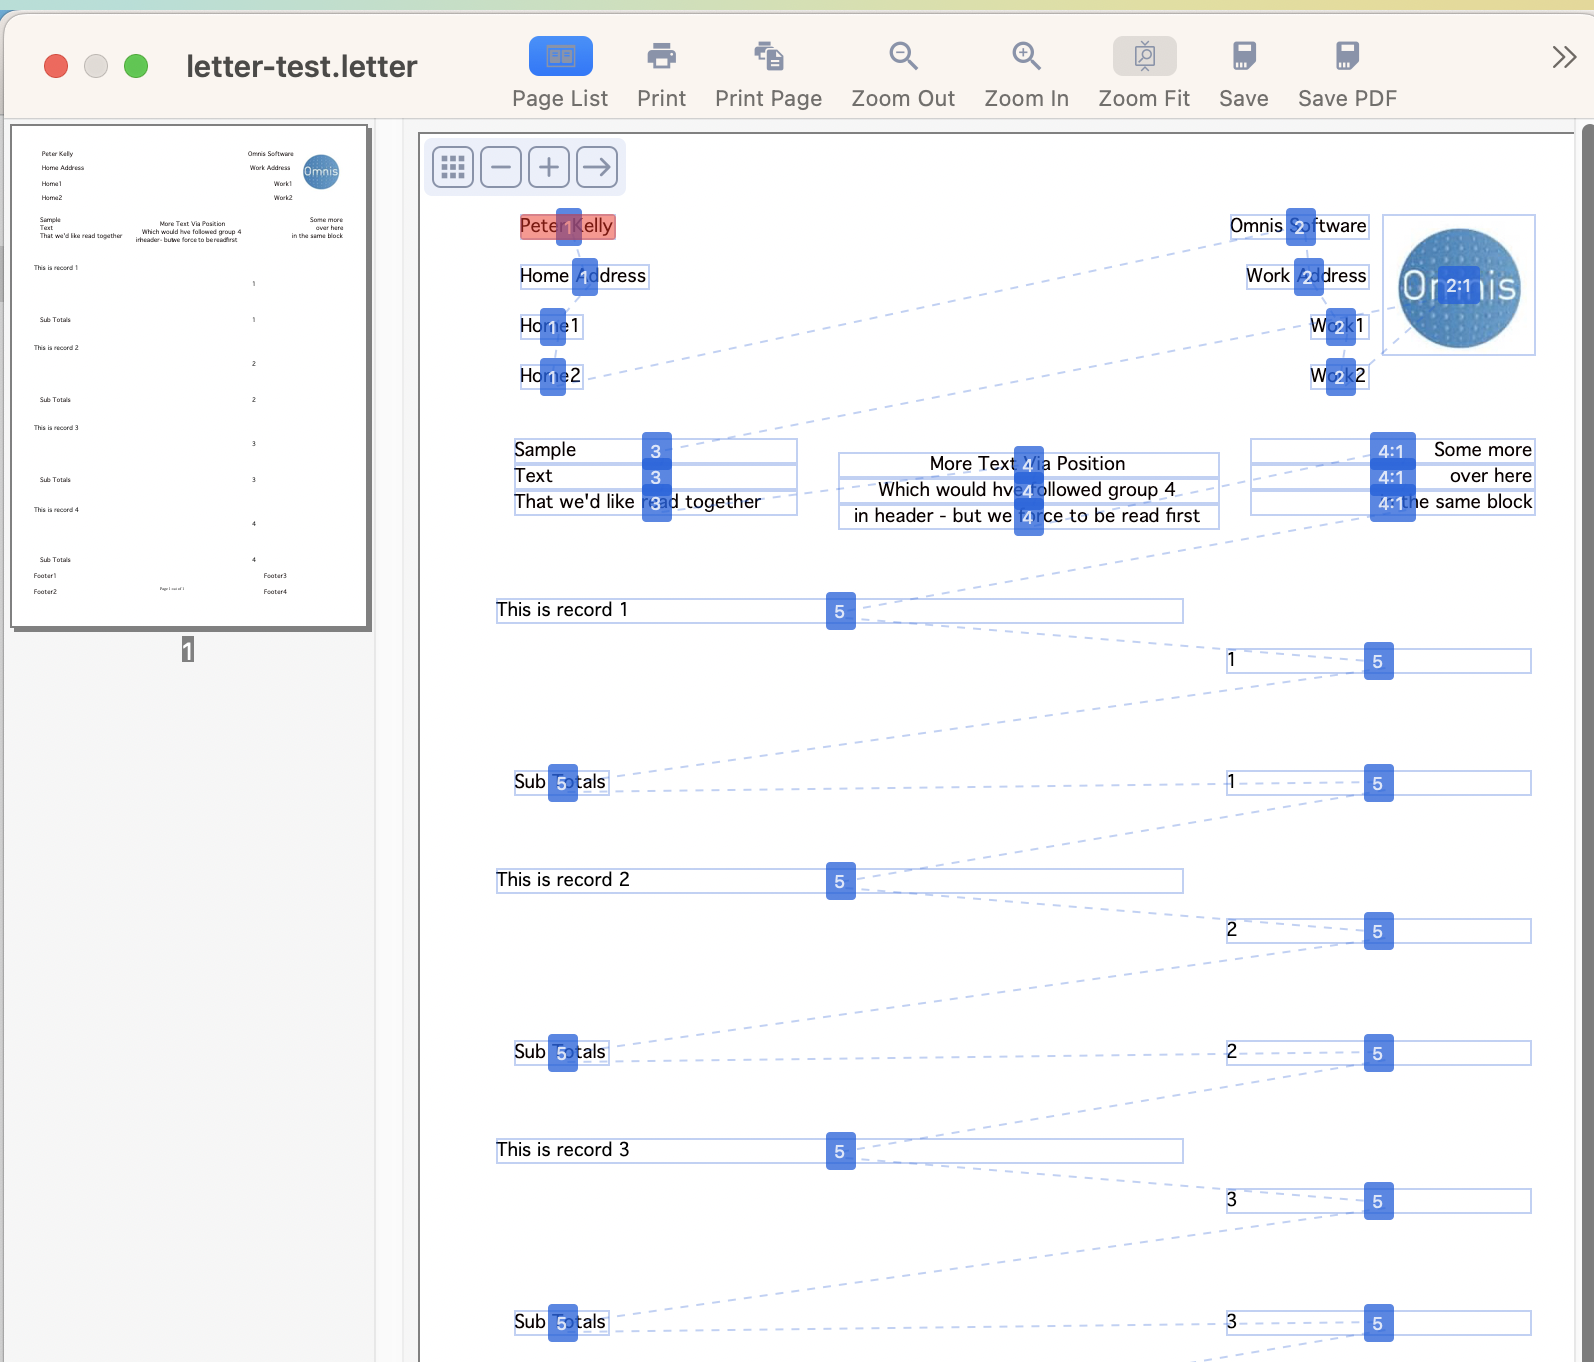
The next image shows a report where the order has been applied. You can see and follow the navigation through the report, and as you press the Plus key the highlight moves through the report objects showing the reading order. The order shows the current object and a link from the previous object and to the next object.
Using this navigation helps you visualize the object reading order and allows you to change the ordering back in the report class to create a final PDF file containing the object ordering you require for the best accessibility.
Printing Reports
In design mode, Omnis provides a wide range of choices for printing or previewing your reports, including sending your report to a Page Preview, the Printer, to a Text or HTML file. For web and mobile apps, you can generate a PDF file from a report and display it in the end users web browser or allow them to download the file. For desktop applications, end users can set the report destination using the File>>Print Destination menu option. In your finished library, you can provide a menu, popup menu, or toolbar button to print your report to the required destination. There are a number of commands that let you set the print destination, including Send to Page Preview, Send to file, and Send to clipboard.
While you are creating your report class you may need to print it to preview or test it. You can use one of the buttons on the report editor toolbar to print the current report class. From these tools you can print to a Page Preview window or the current Printer.
Report Destination Dialog
Note that the Print Destination dialog is only relevant for desktop apps. For web & mobile apps, using the JavaScript Client, the file can be generated on the server and viewed in the browser on the end user’s mobile device: see PDF Printing.
You can select the output destination or device for your reports from the Print Destination dialog, available from the File>>Print Destination option on the main Omnis menu bar, which is also available to the end user in the Omnis Runtime version. This dialog may also contain any custom devices, such as the HTML device.
The Print Destination dialog includes the following report destinations.
Preview or Page Preview (the default; see below)
reports are sent to a report Preview window which is displayed in the Omnis application window; this is convenient for the end user to view the report, prior to or instead of sending the report to the Printer.
Printer
the report is sent to the current printer
Disk
the report is sent to the file specified in the Parameters pane of the Print Destination dialog; the file is stored in a cross-platform proprietary binary format
Clipboard
reports are sent to the clipboard in text format
Port
the report is sent to the port specified in the Parameters pane
File
the report is sent to a text file specified in the Parameters pane
RTF
the report is sent to an RTF file specified in the Parameters pane
HTML
the report is sent to an HTML file (UTF-8 encoded)
PDF
the report is sent to a PDF file and can be opened on the end user’s desktop using the Adobe Reader or default PDF viewer.
Memory and DDE/Publisher
are also available but by default are not visible in the Print Destination dialog (you can set their $visible device preference to make them visible; see below)
The Page Preview destination is the default report destination; in versions prior to Studio 10.2 the Screen report destination was the default, but this has been deprecated and maps to Preview in converted apps.
To set the report destination
Select File>>Print Destination from the main Omnis menubar
Select a report destination and click OK, or double-click on a destination
Page Preview Destination
The Page Preview (or Preview) option displays a full page on the screen and is the default report destination (from Studio 10.2 onwards). Text is “Greeked” if the screen size is too small, i.e. dots representing the characters so that the whole page fits the available screen area.
Hyperlinks are supported in Page Previews: see HTML Link objects under PDF for details.
You can have more than one report Preview open at a time. Omnis displays a preview as soon as it has prepared the first page of data, that is, normally it does not wait for the report to finish. Therefore, as you scroll or Page down a long report it may take a few seconds to print each page.
The Page preview window can be opened maximized by specifying /MAX in the Send to page preview command parameters or in $windowprefs.
Preview reports have a toolbar at the top of the window to allow end users to print the report to the current Printer or Save the report to a file. The Omnis root preferences $reporttoolbarscreen and $reporttoolbarpagepreview (in the $root.$prefs devices group) allow you to select which buttons are shown on the Preview toolbar for end user reports.
Zoom Factor
You can specify the initial zoom level for the Page Preview report destination when executing the Send to page preview command, or setting the $windowprefs preference. The ‘/zoom=n’ parameter can be included directly after the ‘Title’ parameter, as follows:
Send to page preview syntax is now
Send to page preview ([Do not wait for user][,Hide until complete]) title[/zoom=n][/left/top/width/height/cen/max/stk]
$prefs.$windowprefs setting is
Title[/ZOOM=n][/left/top/width/height/CEN/MAX/STK]) sets the position and initial zoom factor for preview windows
The string /zoom=n is optional, where n is an integer zoom factor, while a zero value means zoom fit. If omitted the Preview window is zoomed to fit the screen.
A value for n of -1 to -7 means use the standard zoom factor indexed using -n (1 to 7); this corresponds to the 7 standard zoom factors for the window, in ascending order.
A positive value means use the standard zoom factor closest to, but not exceeding, n. So you can pass in 175 for example to have an initial zoom factor of 175%.
Copying from Preview reports
You can copy graphics from a report preview window by selecting an area with the mouse and using the Edit>>Copy menu item. You can copy text in the same way, and you can select and copy more of the report than is displayed on screen.
You can use the tab key to tab through the page list, page and search field in the Preview screen. Therefore, to copy content from a preview screen, you can tab to the page if necessary, press Cmd+A to Select all and then Cmd+C to copy content.
When the page has the focus, you can use the Escape key to clear the selection.
The Omnis root preference $disablereportcopy (in the $root.$prefs devices group) allows you to disable the copy via selection feature of screen reports and page previews for end user reports.
Save PDF on Print Preview
The Page Preview window has a Save PDF button. You can control whether this button is present for user reports, using the root device preference $reporttoolbarpagepreview: the constant kRBsavePDF controls whether or not the button is present.
Printer Report Destination
The Printer option sends the report to the current printer. Under Windows, selecting the printer as destination opens a list of installed printers, and changing to a new printer does not affect the default printer setup as defined in Windows Printer Settings.
Under Windows, another application can change the default printer. You can use the Omnis preference $printernotify to manage how Omnis responds to the default printer changing. The preference can be set to a constant as follows: kPrtNoteMsg, (the default) a notification message is displayed in Omnis allowing the end user to change printer or not; kPrtNoteAuto, no notification message is displayed, and the printer changes automatically; kPrtNoteNoMsg, no notification message is displayed, and the printer does not change. You can change $printernotify in the Omnis Preferences or Options under the Tools>>Options menu or toolbar option.
Note that you can change the page setup with the File>>Page Setup menu item.
Disk Report Destination
The Disk file report device sends the report output to a file on disk in a cross-platform binary format. If you double-click on the Disk icon in the Report Destination dialog Omnis prompts you for a disk file name.
You can print to the Disk device on one platform, reload the file in Omnis and print it on another platform. Alternatively, you can print the output from the Disk device using the File>>Print Report From Disk menu option, or using the Print report from disk command.
Clipboard Report Destination
The Clipboard option sends the current report to the clipboard as an unpaged, text-only report suitable for pasting as text into other applications.
Port Destination
The Port option sends the current report to a Unix or Windows serial or parallel port, or a Mac Modem or Printer port specified in the Parameters pane. This device also uses the settings in the Page sizes pane: see the File device.
Only one program can have a particular port open; if a port is open in Omnis and it is also, for example, the port used by the Spooler, then the Spooler will not be able to function.
Under macOS, there is an option on the Parameters pane to Convert for Imagewriter. When selected, the characters beyond ASCII 127 convert to a combination of a character, backspace, and accent character so that the report can print accented characters and umlauts.
Modern Mac computers do not have serial ports, but you can plug a serial adaptor into a USB port. Once the drivers for your serial adapter are installed correctly, Omnis Studio will automatically recognize any new serial ports when you plug the adapter into your machine. Any new serial ports that are discovered will be displayed in the parameters panel for you to select.
NOTE: Serial adapters and other USB devices which do not support the Comms Toolbox standard will not be recognized by Omnis Studio.
You can save the settings for the Port device to a profile using the Port profile editor: see later in this chapter for a description of the Port Profile editor. You can also setup the port using the Set port parameters command.
File Report Destination
The File print destination sends the current report to a file. If you double-click on the File icon in the Report Destination dialog Omnis prompts you for a file name. Omnis does not close the file at the end of the report so you can append multiple reports into a single file. This option enables the Page sizes pane in the Report Destination dialog.
In the Page sizes pane you can specify the number of lines per page to use in reports printed to a file or a port. Omnis stores the setting in the Omnis configuration file.
If you check the Generate paged reports check box, you can also check the Send form feed check box, which tells Omnis to terminate pages with a form feed, or fill in the Line per page field with a number of lines to which to pad out each page. Checking the Restrict page width option lets you enter the number of Characters per line.
RTF Report Destination
The RTF print device sends the current report to an RTF file. If you double-click on the RTF icon in the Report Destination dialog Omnis prompts you for a file name. You can also set the file name under the Parameters pane in the Report Destination dialog, as well as control the how images are embedded or linked. The default behavior is to embed images in the RTF file, but you can link the images in which case any images are stored as separate files and linked to the RTF file; you can also ignore the images altogether.
The following code allows you to set the name of the RTF file:
Do $devices.RTF.$setparam(kDevRtfFileName,'/Users/test/Desktop/test.rtf')
HTML Report Destination
The HTML report device is a custom device that prints a report to an HTML file on disk. When installed and loaded it appears in the print destination dialog and behaves like any other standard printing device. You can send any Omnis report to the HTML device and access and change the device using the notation. If you double-click on the HTML icon in the Report Destination dialog Omnis prompts you for a file name. The HTML output uses UTF-8: if you use a template file, that must also be UTF-8 encoded.
The HTML printing device uses HTML tables and standard HTML tags to position and structure the output of the Omnis report. The default background color of the HTML file is white. The color of the text in the original report class is retained in the HTML output file. Where possible, the device converts any image or picture data into JPEG images, which are written to disk and linked to the output HTML file.
PDF Report Destination
The PDF report destination sends the report output to a PDF file which can be viewed on the end user’s desktop using the default PDF viewer (or in a browser if you are running a web or mobile application using the JavaScript Client: see PDF Printing).
The “Print to PDF” option in the Print Destination dialog is available to end users from the main File menu in desktop applications. If the end user selects PDF as the report destination, then when they print a report, it will either be sent to a report file specified in $prefs.$reportfile, or if this preference is empty Omnis will prompt the user to select the path of the output PDF file. Note that this mechanism can be overridden programmatically by using the $settemp method.
The alternative of using the Printer report destination with $macosdesttype set to PDF uses bitmaps to render background objects, and their appearance in a scaled PDF will vary depending on the scaling factor and the algorithm used by the PDF viewer to scale the bitmap.
For PDF (and Page Preview) reports you can embed an HTML link (URL or mail) behind some Text, an Icon, or a Picture using the HTML Link Objects.
Printing Background Images to PDF
Background images on reports need to be shared pictures (PNGs) to print on the Linux headless server. To solve this, go to the library prefs and set $sharedpictures to kSharedPicModeTrueColor. Then open each affected report class in the report class editor; Omnis will ask if pictures are to be converted to shared, so respond with Yes. The reports will now print to PDF in the Linux headless server, and additionally the file size of the report classes will be much smaller.
Omnis will report an error if the Linux headless server cannot print to PDF.
PDF Font Mapping
When using custom fonts for PDF printing there may be a mis-match between the name of a font and its Window registry entry, which results in the font not being found and the report not being rendered correctly. To rectify this, you can add mappings to the "pdf" entry in config.json (that apply to the Windows platform only), to map a font name to its entry in the registry. For example, you can map the font name "Proxima Nova Rg" to its registry entry "Proxima Nova Regular", using the following item in the config.json file.
"pdf": {

  "plainSuffixes": "Regular,Standard,Normal,Normale",

  "Proxima Nova Rg": "Proxima Nova Regular",

  "Proxima Nova Rg Bold": "Proxima Nova Bold"

},
Memory Report Device
The Memory device lets you send a report to a binary variable or field, which you can hold in memory or save in a database. At a later date you can reload the contents of the binary variable or field and print the report to the printer or any other destination.
You can access the Memory device using the notation only via the $root.$devices notation group. By default this device is not shown in the Print Destination dialog, but you can show it using the following method (although in practice you would not use this destination for end users):
Do $root.$devices.Memory.$visible.$assign(kTrue)
You can print the output from the Memory device using the Print report from memory command.
DDE/Publisher Device (Obsolete)
This feature is no longer supported, since it relates to very old Windows and Mac operating systems, but is still available for backwards compatibility. The DDE/Publisher device lets you send a report via DDE under Windows, or to an “Edition” under macOS.
You can access the DDE/Publisher device using the notation only via the $root.$devices notation group. By default this device is not shown in the Print Destination dialog, but you can show it using the following method (although in practice you would not use this destination for end users):
Do $root.$devices.//DDE/Publisher//.$visible.$assign(kTrue)
Screen Report Destination (Obsolete)
The Screen print destination was available in versions prior to Studio 10.2 but it is now obsolete; it maps to the Preview report destination by default. The option "useScreenDestination" in the "defaults" section of config.json does allow you to send a report to the screen if required.
Printing Errors
The print manager reports the following error codes and text. You can setup error handlers to manage these errors.
| 1001650 |
Non-fatal print manager error |
| 1001670 |
Fatal print manager error |
| 1001680 |
Print manager system error; the code is shown in the error text |
| 1001681 |
Other Omnis error reported by print manager |
Tabs in Reports
The "replaceTabsInRTFwithSpacesWhenAddingToReport" item in the "docview" group in config.json sets the default tab width when printing text containing tabs in reports, so they are displayed properly, e.g. in the Page preview. The config item can be a value from zero to 32 inclusive, the default is 2. Zero means leave the text unchanged. 1-32 means replace each tab character found in the text with 1-32 spaces, when adding the text to a print job.
You can use the $settabwidth method to override the default tab width set in config.json.
Using style() in Reports
In versions prior to Studio 10.x, if the style() function was used in a report instance belonging to a remote task incompatible results were generated (but this has been fixed).
The style() function usually generates different results when used in a remote task instance, and the resulting style is suitable for use with the JavaScript client. The fix allows normal, non-JS client results, to be generated by style() when running in a report instance inside a remote task.
However, even with this fix, you should note that the call to print the report from the remote form, which passes the results of style() from some remote form code, will not work: you need to pass the icon id as the parameter, and call style() from within the report instance to make this work with this fix.
Report and Field Methods
You can create a report class, add fields and objects to the report from the Component Store, but to print sophisticated reports you will need to add some programming behind the fields and sections in your report. To do this, you need to write code that uses the Omnis print commands or methods. You can add class methods to the report itself to control printing, and you can add field methods to each field or section marker on your report to control things like the interval breaks and subtotals.
You can add up to 501 methods to each field or section on your report, and a further 501 methods to your report class. You enter the methods for a report class and its fields using the method editor.
A report class will contain a $construct() and $destruct() method by default. You can add code to these methods to control the opening and closing of the report instance. For example, if your report uses a list you can build the list in the $construct() method in the report. You can use the $open() method or the Prepare for print command to open a report instance, you can finish a report using $endprint() or the End print command, and you can close a report instance using the $close() method. You can send a list of parameters to the $construct() method when you open the report instance using the $open() method. You can send data to a report instance record by record using the Print record command, or print an entire report using the Print report command. Alternatively, you can send print messages to a report instance using the notation. For example, you can send a $printrecord() message to print a record to the report instance, or send an $endprint() message to finish the report; there is no equivalent method for the Print report command. You can override the default handling for these messages by writing your own custom methods with the same name. You enter these custom methods in the class methods for the report class.
To add a method to a report class
Open your report class
Right-click on the report background to open the report context menu
Select the Class Methods option
Right-click in the method list in the method editor and add your method
To add a method to a report field or section
Open your report class
Right-click on the field or section to open its context menu
Select the Field methods option
Right-click in the method list in the method editor and add your method
Report Data Grid Column Parameters
Column calculation properties (in $::calculation) for the Report Data Grid component are tokenized so that they work with the current function parameter separator.
For compatibility with versions prior to Studio 11, the component still works with the $::calculation and $columnheader properties stored as character strings, provided that the function parameter separators match those currently in use. When you re-enter one of these properties (select the property in the Property Manager and press Return) the property changes so that it is stored as a tokenized calculation, which will then work with any function parameter separator.
An alternative way to convert a library is to export to JSON and re-import, and in this case Omnis tokenizes the calculations on import. For import, Omnis will accept the report list calculations as either character strings or calculations; import always results in tokenized calculations being stored. Accepting both forms means that import is compatible with JSON exported in previous versions.
Print Devices and the Current Device
The following properties under $root handle the group of currently installed print devices or destinations, and the current printing device.
- $devices
group of currently installed printing devices, including Printer, Preview, Screen, Disk, Memory, Clipboard, Port, File, DDE/Publisher, and any custom devices you may have installed. You can set a reference to a device by using
Set reference MyRef to $devices.Screen
- $cdevice
the current printing device or report destination. You can change $cdevice by assigning a device from the $devices group, for example, to specify the screen as the current device use one of:
Calculate $cdevice as kDevPreview
Calculate $cdevice as $devices.Screen
Calculate $cdevice as $devices.$findident(kDevPreview)
Print Devices
The $root.$devices group contains the currently installed printing devices plus any custom devices you may have installed. A device has the following properties; $canassign for these properties is true unless specified.
$name
the name of the device; $canassign is false
$title
the string used to identify the device in the Print destination dialog
$iconid
the id of the icon for the device as displayed in the Print destination dialog, zero by default which means the device uses the default icon
$ident
a unique numeric identifier for the device in the $devices group; $canassign is false
$visible
if true, the device is shown in the Print destination dialog
$isopen
returns true if the device is open and in use; $canassign is false
$istextbased
returns true if the device is text-based, otherwise, the device is image-based, such as Printer, Screen, or Preview; $canassign is false
$cangeneratepages
this is a read only property. If it returns true, the device can generate pages and all normal page headers and footers will be printed. If it returns false, only the report header and first page header are printed. No footer section is printed.
$cankeepopen
returns true if the device can be kept open for long periods of time, such as the File device; otherwise, the device should be opened prior to printing and closed immediately after printing has finished, for example you must do this for the Printer; $canassign is false
You can use the following methods for a device; $cando() returns true if a device supports the method.
$open()
opens the device ready for printing or transmitting text or data. Some devices such as the Screen or Preview can only be opened from a print job when printing a report
$close()
closes the device, if the device is open
The following example prints two reports in the same print job, and uses the $open() and $close() methods to initialize the Printer.
Set reference theDevice to $devices.Printer
If theDevice.$isopen
If theDevice.$canclose()
Do theDevice.$close()
Else
Quit method kFalse
End if
End If
Do theDevice.$open() Returns ok
If ok
Set report name reportOne
Print report
Set report name reportTwo
Print report
Do theDevice.$close() Returns ok
End If
$canclose()
returns true if the device can be closed. If you opened the device using $open(), this method returns true; if you opened the device via a print job and the job is still in progress, it returns false
$sendtext( cText, bNewLine, bFormFeed )
sends the text in cText to the current device; all normal character conversion takes place. If bNewLine is true, the device advances to a new line or sends an end of line character; if bFormFeed is true, a new page is started, or a form feed character is sent. Data is sent in parameter order: first text, then the new line, then the form feed.
The following example sends some text to the File device.
Set reference theDevice to $devices.File
If theDevice.$sendtext.$cando()
  Do $prefs.$printfile.$assign('HD:MyFile')
  Do theDevice.$open() Returns ok
  If ok
    Do theDevice.$sendtext('Some text',kTrue) Returns ok
    Do theDevice.$sendtext('More text',kTrue) Returns ok
    Do theDevice.$close() Returns ok
  End If
End If
- $senddata( cData[,cData1]… )
sends the specified data in a binary format to the device; no character conversion takes place unless the data is of type kCharacter. If more than one parameter is specified the data is sent in individual packets
When using the $senddata() method you must consider type conversion. The method expects binary data, and therefore any data which is not in a binary format is converted to binary. For example, if you pass an integer variable, the data is converted to a 4 byte binary. In some cases, due to cross platform incompatibilities, if you want to be certain of the order in which the data is sent, and of the values which are sent, you should use variables of type Short integer (0 to 255), for example
Calculate myShortInt1 as 13
Calculate myShortInt2 as 10
Do myDevice.$senddata( myShortInt1, myShortInt2 )
You can send raw data to the Port or File device. The following example prints a report to a binary variable and sends the binary data to the Port device.
Do $cdevice.$assign($devices.Memory)
Do $prefs.$reportdataname.$assign('myBinaryField')
Set report name myReport
Print report
Set reference theDevice to $devices.Port
If theDevice.$senddata.$cando()
Do theDevice.$open() Returns ok
If ok
Do theDevice.$sendata(myBinaryField) Returns ok
Do theDevice.$close() Returns ok
End If
End If
- $flush()
flushes the device. For the File device $flush() will ensure all data is written to disk; you can safely call $flush() for devices which do not support this method; $cando() returns true for all devices that support $senddata() or $sendtext()
Global Printing Preferences
There are a number of Omnis preferences under $root.$prefs that handle the print devices and their parameters. You can set these using the Property Manager or using the notation.
$reportfile
the full path and file name for the Disk device
$printfile
the full path and file name for the File device
$editionfile
the full path and file name for the DDE/Publisher device
$pages
the page or page numbers to be sent to the device; all devices support this property. You can specify pages as a comma-separated list or range of pages separated by a hyphen, or any combination. Prefixing a range with an “e” will print even pages within the range, or with an “o” will print odd pages within the range. For example
1,3,7,10-15,25-20,e30-40,o30-40
$reportdataname
the name of the binary field for the Memory device
$reportfield
the name of the window field for a Preview or Screen report; if you specify this property the report is redirected to the window field
$windowprefs
the optional title and screen coordinates for a Screen or Preview window; the syntax is the same as the Open window command, such as My Title/50/50/400/300/STK/CEN; the title is also used as the document name when printing to the Printer
$waitforuser
if true, method execution is halted until the user closes the Screen or Preview window
$hideuntilcomplete
if true, a Screen or Preview window remains hidden until the report is finished
The following example specifies the Preview as the current device and sets up the preferences for the report window.
Do $cdevice.$assign(kDevPreview)
Do $prefs.$windowprefs.$assign('MyTitle/20/20/420/520/CEN')
Do $prefs.$waitforuser.$assign(kFalse)
Do $prefs.$hideuntilcomplete.$assign(kTrue)
$charsperinch
the number of characters per inch when printing to a text-based device
$linesperinch
the number of lines per inch when printing to a text-based device
$generatepages
if true, reports generate paged output when printing to text-based devices, that is, page headers and footers are generated as normal; otherwise if false, only one report header and page header is printed at the beginning of the report
$linesperpage
the number of lines per page when $generatepages is true
$restrictpagewidth
if true, the width of a page is restricted when printing to text-based devices
$charsperline
the number of characters per line when $restrictpagewidth is true
$sendformfeed
if true, form feeds are sent to text-based devices after each page
$appendfile
if true, data is appended to the current print file specified in $printfile, otherwise if false, the file is overwritten when printing to the File device; note if the device is already open prior to printing a report, the file is appended to regardless
$istext
if true, forces a non-text device to behave like a text-based device using the same preferences as text-based devices
$portname
the name of the port when printing to the Port device (Not supported on macOS)
$portspeed
the port speed setting when printing to the Port device (Not supported on macOS)
$porthandshake
the handshake when printing to the Port device; this can be kPortNoHandshake, kPortXonXoff, or kPortHardware (Not supported on macOS)
$portparity
the parity checking when printing to the Port device; this can be kPortNoParity, kPortOddParity, or kPortEvenParity (Not supported on macOS)
$portdatabits
the number of databits when printing to the Port device; this can be kPort7DataBits, or kPort8DataBits (Not supported on macOS)
$portstopbits
the number of stop bits to be used when printing to the Port device. This can be kPort1StopBit or kPort2StopBits (Not Supported on macOS)
The following example sets up the preferences for the Port device.
Do $prefs.$portspeed.$assign(9600)
Do $prefs.$porthandshake.$assign(kPortNoParity)
Do $prefs.$portdatabits.$assign(kPort8DataBits)
Do $prefs.$portstopbits.$assign(kPort1StopBit)
Do $prefs.$porthandshake.$assign(kPortXonXoff)
Do $prefs.$charsperinch.$assign(10)
Do $prefs.$linesperinch.$assign(6)
There is also a group of Page setup properties under $root.$prefs giving access to the global page settings. These are
$orientation
the page orientation; this can be kOrientDefault, kOrientPortrait, or kOrientLandscape
$paper
the paper type or size, a constant; one of 50 or so paper sizes or types including US Letter, European A sizes (from A6 upwards), envelope sizes, custom sizes, and so on
$paperlength
the length of the paper in cms or inches depending on the $usecms preference
$paperwidth
the width of the paper in cms or inches depending on the $usecms preference
$scale
the scaling factor in percent
$copies
the number of copies
The Omnis root method $getprinterlist() allows you to get a list of printers available to the current user. For example, the following method will return a list of printers:
Do mylist.$define(printer)
Do $root.$getprinterlist(mylist)
The current line of the list indicates the current printer.
The Omnis preference $disablereportworkingmessage allows you to disable working messages for reports, which you might want to do when printing to a Print Review window.
- $disablereportworkingmessage
If true, the 'Sending report to...' working message is not shown when printing a report.
This property only applies to reports being printed on the main thread (as reports in JavaScript client threads do not show a working message). Note that you cannot cancel the report if you set this property to true. You may also need to use $modes.$fixedcursor and $modes.$ccursor if you want to display a cursor other than the busy cursor while printing the report.
Report Instances
Report instances have the following methods.
$printrecord()
prints the Record section; same as the Print record command
$printtotals(section)
triggers a subtotal or totals section; section is the highest level subtotal to be printed, a constant, such as kSubtotal5 or kTotals
$printsection(iSection[,bPosnIsRecord=kFalse])
This is sent when a section is printed; iSection is one of the constants (kRecord, kTotals, etc.) or a reference to a section field on the report instance. The default handler prints the section positioned according to $sectionstart, $sectionend and the positioning mode for the section. For a Subtotal or Total section the current field values for fields whose $totalmode is not set to kTmNone are temporarily reset to those which were current when $printsection for a detail section was previously called.
bPosnIsRecord applies to positioning sections only; if bPosnIsRecord is kFalse (the default), this method prints a section based on the position of the previous section; otherwise, when true the section is printed as a record
$accumulate(section)
accumulates the subtotals and totals section, and is sent during the printing of a record section
$checkbreak()
checks if a subtotal break is required, returns a constant: kSubtotal1 to kSubtotal9 or kNone if subtotal break is not required
$skipsection()
skips the current section; if you call this during $print() for a field, no further fields will be printed for that section
$startpage(pagenumber)
starts a new page; adds the page header section to the page, and for the first page also adds the report header section
$endpage(pagenumber)
ends a page and adds the footer section to the page; without parameter ends all pages which have been started
$ejectpage(pagenumber)
ejects a page; without parameter ejects all pages which have been ended and not ejected; this method ejects pages which have an active section intercepting their boundary when the section has finished printing
$endprint()
finishes the report; prints the final subtotals and totals sections and ejects all the remaining pages
$openjobsetup()
opens the job setup dialog. You can call this method immediately after $open() for a report; if it returns kFalse as the result, the user has selected Cancel, and you should close the report instance. You cannot call $openjobsetup() during $construct() since a print job is not created until $construct() finishes.
$cdevice
reference to the printing device for the instance; if you wish to change the device, you must do so before returning from $construct() of the report instance, and before you start printing the first record. For example, execute the following at the start of $construct() to specify the page Preview device for the current instance
Do $cinst.$cdevice.$assign($devices.Preview)
The device preferences are listed under the global printing preferences. Report instances have their own printing preferences which are local to the instance. They take their initial values from the global printing preferences. You can only assign values to these properties in $construct(), and before you start printing the first record.
The $firstpage property always returns 1, and $canassign() is false. The $lastpage property returns the last page. You cannot set $lastpage in the report instance to reduce the number of pages generated, that is, once pages have been generated they cannot be removed from a print job.
Note that the $pageheight property of a report instance returns the height of the printable area excluding the margins, headers, and footer areas of the report.
The following method generates subtotal breaks every fifth record. The $reccount property is incremented and the subtotals accumulated manually.
Do $reports.Report2.$open('*') Returns Myreport
For lineno from 1 to Mylist.$linecount step 1
  Do Mylist.[lineno].$loadcols()
  Calculate Myreport.$reccount as Myreport.$reccount+1
  Do Myreport.$printsection(kRecord)
  Do Myreport.$accumulate()
  If mod(lineno,5)=0
    Do Myreport.$printtotals(kSubtotal1)
  End If
End For
Do myreport.$endprint()
Page Setup Report instance properties
You can change the page setup information of a report instance without effecting the global settings. The properties which can be set are;
$pagesetupdata
this can only be calculated prior to printing the first record; the best time is during $construct. When a print job has started, $canassign returns kFalse.
$orientation, $paper, $paperlength, $paperwidth, $scale, and $copies
any of these properties can be changed at any time during a print job, and will effect the next page to be generated. When $startpage for a page has been called, changing these properties will take effect from the next page onwards. A good time to make changes for the next page is during a $endpage for the current page, but it can be done from anywhere prior to the $startpage call for a page to be effected
$loadpagesetup
When true, the page setup information stored with the report is automatically loaded and used when the report is printed. This will not affect the global page setup information. The page setup information is applied to the page setup information of the report instance prior to calling the $construct method or opening the job setup dialog. It is also possible to load the page setup data from the $construct method of the report instance by assigning $loadpagesetup ( $cinst.$loadpagesetup.$assign(kTrue) ). Assigning kFalse has no effect., For new reports, this property will be set to kTrue by default. For existing reports, this property will be false.
Once a print job is complete and $endprint has been called, $canassign returns kFalse for all these properties.
Printing a report from a list
The following method prints a report from a list and uses a For loop to print the report record by record.
Do $reports.Report1.$open('*') Returns Myreport
For lineno from 1 to Mylist.$linecount step 1
  Do Mylist.[lineno].$loadcols()
  Do Myreport.$printrecord()
End For
Do Myreport.$endprint()
Note that you should not use hash variables to define the columns in list if it is going to be used as the basis of a report.
Screen Report Fields
You can send the output of a report to a window field, a Screen Report Field, which is similar to a Preview report but contained in the window field. The current page count is reported in the $pagecount property (read only), while $currentpage is the currently displayed page and is assignable at runtime. When more than one page is visible, the value indicates the page that is most visible.
Zoom
You can use the $zoom() method to scale the report from 25% to 200%. The method $zoom(iZoom) zooms the screen report field, where iZoom can be positive (indicating a percentage between 25 and 200% inclusive), or 0 meaning zoom to fit, or negative (-1 to -7) where -iZoom indexes the 7 standard zoom factors from smallest to largest.
Search
The method $searchreport(cText[,bIgnoreCase=kTrue,bNext=kTrue]) searches the report for cText. Further calls with the same cText and bIgnoreCase search for the next (bNext kTrue) or previous (bNext kFalse) match. Empty cText clears the search.
There is an event which works in conjunction with $searchreport (needed because the search occurs in a background thread). The event enables you to manage next and previous buttons, and status text. The next and previous buttons are assumed to start in disabled state. The event evReportSearchStatus is sent to the report field when the report search status changes: this has one event parameter pReportSearchStatus which is a row with 4 columns, as follows:
| next |
If true, search next can be enabled as there is another search result later in the report |
| prev |
If true, search previous can be enabled as there is another search result earlier in the report |
| count |
The count of search results |
| index |
The 1-based index of the current search result |
Report Field and Section Methods
Report fields and sections contain a $print() method that controls that particular field or section when it is printed. Every time a field or section is encountered during printing its $print() method is called, so for fields in the report Record section $print() is called for every row of data. You must end your own custom $print() methods with a Do default command to carry out the default processing for that line after your code has executed.
For example, the following $print() method for a report field prints the field in bold if its value is greater than 1000.
If parm_value>1000
  Do $crecipient.$fontstyle.$assign(kBold)
Else
  Do $crecipient.$fontstyle.$assign(kPlain)
End If

Do default
Report Object Positioning
When a report field prints, its position and data are passed to its $print() method; when a report section prints its position only is passed. You can set up parameter variables of type Field reference in the $print() method for a report section or field to receive its position and data. You can manipulate the position variable using the report object positioning notation. If you change the position of a section all objects in that section are affected together with all subsequent sections in the report. Making changes to the position of an object does not affect other objects.
A report position variable has the following properties.
$inst
the report instance to which the position belongs
$posmode
the mode of the report position, which is one of the following constants; assigning $posmode does not change the physical position of the object, but it does change its coordinates to the new coordinate system.
| kPosGlobal |
the position is global to the print job, relative to the top-left of the local area of the first page |
| kPosPaper |
the position is relative to the top-left of the paper edge of the page specified by $posvertpage and $poshorzpage |
| kPosPrintable |
the position is relative to the top-left of the printable area of the page specified by $posvertpage and $poshorzpage |
| kPosLocal |
the position is relative to the top-left of the local area (excluding the header and footer sections, and the margins) of the page specified by $posvertpage and $poshorzpage |
| kPosHeader |
the position is relative to the top-left of the header area (union of report and page header sections) of the page specified by $posvertpage and $poshorzpage |
| kPosFooter |
the position is relative to the top-left of the footer area of the page specified by $posvertpage and $poshorzpage |
| kPosSection |
the position is relative to the top-left of the section specified by $possectident |
In addition, you can set $posmode to one of the following values to return the coordinates of an area on the page specified by $posvertpage and $poshorzpage.
| kBndsGlobal |
returns kPosGlobal coordinates. The top, left, width, and height are calculated to global coordinates of the local area of the page |
| kBndsPaper |
returns kPosPaper coordinates. The top and left are zero, and the height and width are calculated to the height and width of the paper of the page |
| kBndsPrintable |
returns kPosPrintable coordinates. The top and left are zero, and the height and width are calculated to the height and width of the printable area of the page |
| kBndsLocal |
returns kPosLocal coordinates. The top and left are zero, and the height and width are calculated to the height and width of the local area of the page |
| kBndsHeader |
returns kPosHeader coordinates. The top and left are zero, and the height and width are calculated to the height and width of the header area of the page |
| kBndsFooter |
returns kPosFooter coordinates. The top and left are zero, and the height and width are calculated to the height and width of the footer area of the page |
$possectident
the $ident of the section when $posmode is kPosSection
$posvertpage
the vertical page number when $posmode is not kPosGlobal or kPosSection
$poshorzpage
the horizontal page number when $posmode is not kPosGlobal or kPosSection. This will usually be set to 1. Horizontal page numbers apply when horizontal pages are enabled
$top
the top of the position in cms or inches local to its $posmode
$left
the left of the position in cms or inches local to its $posmode
$height
the height of the position in cms or inches
$width
the width of the position in cms or inches
Measurements are in either cms or inches depending on the setting of the usecms Omnis preference which you can change in the Property Manager using the Tools>>Options/Preferences menu option.
Page layout
To understand the positioning notation it helps to look at the layout of the report on paper or screen. The area available for printing is limited to the printable area on the paper as determined by the printer or device. Within this space Omnis reports print to the header, footer, and local or global areas, that is, the space remaining after subtracting the header, footer, and margins specified in the class. Note that Omnis subtracts the margins specified in the class from the paper edge, rather than the boundary of the printable area.
The position of a report object, either a section or report field, is relative to the local area on the current page, or the global area for the entire report.
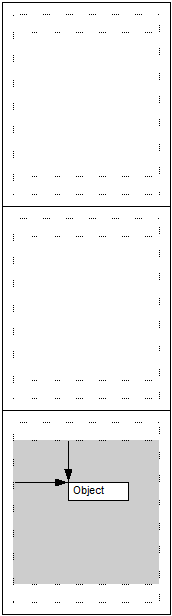 |
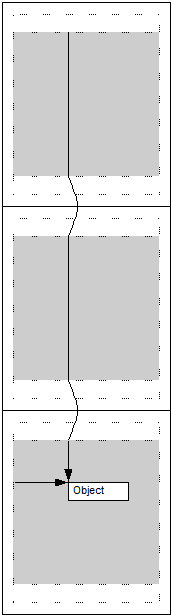 |
| Local coordinates are relative to the local area on the current page |
Global coordinates are relative to the global area for the entire report |
The following example method produces a report with multiple columns by configuring itself according to the current paper size and orientation. The report class contains various instance variables including iCurColumn, iMaxColumns, iLeftAdjust to handle columns and a global left adjustment. The data is taken from a list, but your data can be from any source. The Record section contains one field that gets its data from the list. Note the code for this method does the positioning and the Do default command prints the section.
Calculate pos as pThePos
Calculate pos.$posmode as kPosLocal
Calculate pos.$posmode as kBndsGlobal
If (pThePos.$top+pThePos.$height)>(pos.$top+pos.$height)
If (iCurColumn<iMaxColumns)
Calculate iCurColumn as iCurColumn+1
Else
Do pos.$offset(0,pos.$height)
Calculate iCurColumn as 1
End If
Calculate pThePos.$top as pos.$top
Calculate pThePos.$left as (iCurColumn-1)*$cinst.$labelwidth+iLeftAdjust
Else If not(pThePos.$left)
Calculate pThePos.$left as iLeftAdjust
End If
Do default
You can use the $offset(x,y) method to move the object horizontally by x units (unless $horzpages is enabled) and vertically by y units. The units are defined by $prefs.$UseCMS and maybe either positive or negative.
When a report is based on a report superclass several items are inherited including report header and footer sections (e.g. page header, subtototals, footer, etc), the objects within these sections, as well as the sort fields in the report superclass. The objects within the record section of the report superclass are not inherited. You can, therefore, create a report template containing your company identity and base all other reports on the template to ensure a uniform design and layout is maintained across all your reports.
Inherited sections cannot be manipulated in any way. You cannot resize an inherited section by moving the section object immediately below the inherited section, or change the properties of the section or its objects. When a section is inherited, the height of the section is determined from the superclass, and all other sections below are moved up or down accordingly.
For inherited sections, the text of the section bar and the text of the section connection lines are shown in blue. The background is shown in gray to indicate that this section cannot be manipulated.
Inheriting Sections
Modifying a Superclass
When modifying the section of a superclass, e.g. adding, removing or changing objects within a section, these changes will be reflected in any report class which inherits the section.
Removing an entire section from a superclass will also affect all subclasses. However, adding a new section to a superclass will not affect any of its subclasses. To inherit the new section, subclasses need to be modified to inherit this new section.
Any changes made to sort fields will be reflected in all subclasses.
Inheriting/Overload a section
To inherit or overload a section, right click on the section in the Property Manager. A context menu opens allowing you to inherit or overload the property. You cannot manipulate inherited sections, or inherited section objects, or to add more objects to an inherited section.
Subtotal Sections and Sort Fields
A subclass inheriting a subtotal section will also inherit the sort field from the super class, unless the subclass has already specified a sort field for the subtotal section in question. Sort fields can be overloaded or inherited via the context menu of the sort field. The properties of an inherited sort field cannot be changed. If you want to change the properties of an inherited sort field you must first overload the sort field.
When overloading a sort field, the properties of the sort field originally inherited are maintained. If a sort field is inherited which has not been specified by its super class, the name will be displayed as #???.
Positioning Sections
If an inherited section contains positioning sections, these are also inherited. It is not possible to add additional positioning sections to an inherited section. It is not possible to inherit position sections without inheriting their “main section”.
Notation
You can inherit or overload sections using notation. To do this you assign $isinherited of the section notation. For example:
Do $clib.$reports.myreport.$pageheader.$isinherited.$assign(kTrue)
To inherit sort fields using notation:
Do $clib.$reports.myreport.$sorts.1.$isinherited.$assign(kTrue)
The objects of inherited sections are not part of the subclass and as such will not appear in the list of objects of the report class, but will appear in the list of objects of a report instance.
The following section properties can be inherited: $reportheader, $pageheader, $subtotalhead, $subtotalhead1 to …9, $subtotal9 to …1, $pagefooter, $totals.
Report Fonts
If you are developing an application for a cross platform environment (for desktop apps), you may want to set up the system font tables to allow the fonts used in your application to map correctly across the different platforms. There is a system font table in a library for report classes and window classes for each platform supported in Omnis.
The fonts in the report font table will appear in the $font property for report objects. So even if you are developing an application for a single platform, you may still want to edit the report font table(s) to add fonts to those already available for report objects.
| #WIRFONTS |
Report font table for Windows OS |
| #MARFONTS |
Report font table for Mac (9 & earlier) |
| #UXRFONTS |
Report font table for Unix |
| #MXRFONTS |
Report font table for OSX/macOS (10 onwards) |
To view the report fonts system table
Use the Browser Options dialog (press F7/Cmnd-7 while the Studio Browser is on top) to make sure the system tables are visible
Double-click on the System Tables folder
Double-click on #WIRFONTS or the report font table for your platform
The #WIRFONTS system table contains a list of fonts that are available in Omnis by default. Each row in the font list displays the corresponding font for each platform supported in Omnis. To change the font mapping, replace the name of a font either by typing its name or selecting it from the list of fonts. To add a font, click in the next available line in the font list and add the name of the font. Add a font name for each platform.
The font table editor loads or creates a font table for each platform (corresponding to each column in the editor) and allows you to edit them all simultaneously. Therefore, when you edit the report font table for the first time, and click OK to finish editing it, a new system table is added to your library for each platform supported in Omnis, other than your current platform.
Windows Fonts
Under Windows, all fonts used in reports must be installed and registered. Reports can use fonts that are installed for the current user located in:
C:\Users\USER\AppData\Local\Microsoft\Windows\Fonts
and registered here in HKEY_CURRENT_USER\SOFTWARE\Microsoft\Windows NT\CurrentVersion\Fonts. Such fonts can be installed by right-clicking on the .ttf font file and selecting the Install font option.
Omnis will also look for fonts installed for all users and registered in HKEY_LOCAL_MACHINE (HKEY_LOCAL_MACHINE\SOFTWARE\Microsoft\Windows NT\CurrentVersion\Fonts), but this requires administrator privileges to install and write to the registry, so this may not be appropriate for some end users, in which case they can install a font for the current user.
Monaco font (macOS)
Apple has replaced Monaco font with Menlo, therefore you should use Menlo in your reports to be compatible with current and future versions of macOS.
Unknown macOS Fonts
You can map unknown macOS fonts in reports, such as the New York legacy Mac font, to alternative fonts. You can add the "unknownMacOSFonts" item to the "pdf" section of config.json to specify the font mapping. For example:
"pdf": {

  "unknownMacOSFonts": {

    "New York": "Times New Roman",

    "default": "Lucida Grande"

  }

},
The members of the unknownMacOSFonts object are the names of the unknown fonts to be mapped, and the name of the replacement font. A “default” member can be included to map all other fonts not listed in unknownMacOSFonts to the specified font.
Port Profiles
A port profile is a named collection of information sufficient to completely describe the operating system configuration of a port. Under Windows, the port profile information corresponds to the information required to set the fields in a DCB for a serial port (under Win16 the DCB is different to Win32). There is no port profile for a parallel port, since it requires no operating system configuration information.
Under macOS, the port profile information corresponds to the information required to make the SerReset and SerHShake API calls. (Note: Port profiles are not currently supported on macOS.)
The information required to completely configure a port therefore comprises:
1. The port profile (not required for parallel ports)
2. Characters per inch.
3. Lines per inch.
Port Profile Management
Each port profile is stored in a file. The Ports folder in the Omnis tree contains the port profiles. The port profile file contains:
An indicator of the platform to which the profile corresponds - Win16, Win32 or macOS. This allows for runtime checking.
The name of the profile, to be used in the report destination dialog, and as an argument to the Set port parameters command. Note that profile names are not case sensitive.
The profile data.
Note that this means that each profile file only contains the data for a single platform.
You can create and edit profiles using the Port Profile Editor on the Add-ons submenu in the Tools menu (it is not available on some older operating systems). The profile editor must run on the platform for which the profiles are to be created.
Port Profiles at Runtime
Report Destination Dialog
When the report destination is set to Port, the parameters tab of the dialog displays the port configuration information. There is a dropdown list on this tab, which contains a list of profile names, and one additional entry, ‘Use options below’. When this is selected, you can specify the port parameters in the dialog. When a profile is selected, Omnis configures the port using the information in the profile. Note that the dropdown list and configuration fields on this tab are disabled if you select a parallel port.
Set port parameters command
You can use a port profile name in place of the port parameter list:
Set port parameters {Profile name}
When this command executes, it first checks the entire parameter string against the list of profiles. If it matches an entry in the list, the command uses the profile to configure the port; otherwise, the command treats the parameter string as a parameter list.
Notation
The relevant $port… notation such as $portparity is unassignable when a port profile is selected. The $portprofile property is the port profile for the current port on the macOS, or just the single port profile under Windows.
Printer Escapes
When sending to printer, escape characters are not interpreted correctly, because the printer driver attempts to draw them as data. You must send reports containing printer escapes to port to ensure escape sequences are interpreted correctly.
The Omnis root preference $exportencoding ($root.$prefs) determines how the data is converted before Omnis sends it to the port. Set this to kUniTypeAnsiLatin1 for printer escapes to be interpreted correctly.
The escapes generated by the style() function cannot be mixed (in a report field's data) with escapes specific to a printer.
Labels
To print labels in Omnis you need to create a report class and set up its properties for label printing. You can create the report class using the standard SQL or Omnis report wizards, or you can create an entirely New Report and add the fields yourself. This section uses the Omnis Report wizard as the basis for a Customer address label, but the process is the same for any label report.
To create the basis of your label report
Create a new report class using the Omnis Report wizard and include the fields you want in your label
Open the report class to modify it
Delete the header section and any labels the report wizard places on the report class, but leave the data fields; your report class should look something like the following
To change this report class into a label report you need to change some of its properties, set the properties of the Record section to position your labels on the printed page, and as a further enhancement you can set the properties of some of the fields on the report to exclude empty lines. Note that all measurements use the current units set in the usecms Omnis preference.
To set the label properties of a report class
Click on the background of your report class to view its properties
Set the islabel property to kTrue
Set the labelcount property to the number of labels across the page; for example, for standard 3 x 8 laser labels you set labelcount to 3
Specify the width of a single label in the labelwidth property; if there are spaces between your labels, include the space in the label width, that is, the labelwidth is the distance between one record and next across the sheet of labels
If you want to print more than one label for each row or record of data set the repeatfactor property, otherwise leave it set to 1 for a single copy of each label
To specify the distance between each row of labels down the page, you change the properties of the Record section in your report class.
Click on the Record section to view its properties
Set the startmode property to kFromTop, and in the startspacing property enter the distance between the top of one row of labels and the next going down the label sheet
When you print your labels some of the fields may be empty and a blank line is printed. However you can stop a field from printing and move up all subsequent lines by setting the nolineifempty property for the field. For example, if your label includes two lines for the address you can set the nolineifempty property to kTrue for the second address field. In this case if the second address line is empty for a particular record, the line is not printed and subsequent fields move up one line. If any address field on your label is likely to be empty you ought to set its nolineifmpty property.
Rather than putting two separate fields on your label report for the Firstname and Lastname data, you can use a single calculated field and the con() function.
To create a calculated field
Create a field on your report and view its properties
Leave the $dataname property empty, and set the $calculated property to kTrue
Enter the calculation in the text property, something like the following
con(CU_FNAME,’ ‘,CU_LNAME) ## note space char is in quotes
The con() function concatenates the current values in the CU_FNAME and CU_LNAME fields and separates them with a single space character.
Using all the features described in this section, your label report should look something like the following when printed to the screen.
HTML Report Device
The Omnis Studio Print Manager API has been made public, allowing you to create your own custom printing devices as external components and place them in the XCOMP folder.
The Omnis Studio Print Manager API has been made public, allowing you to create your own custom printing devices as external components and place them in the external component folder (PlugIns on macOS and XCOMP on other platforms).
You can show your own custom printing devices in the Print Destination dialog, and use the printing preferences and notation to control your own devices. The HTML printing device is an external component and shows what you can do with custom devices. You can use the HTML report device in the same way as the standard report destinations; there is no difference between internal and external output devices.
When the HTML external component is loaded in Omnis, it registers an external output device with the Omnis Studio Print Manager and shows the HTML icon in the Report Destination dialog. To print to the HTML output device, you can set it up via the Report Destination dialog, or access it via the notation using the print device methods.
You can specify the HTML device using the notation as follows.
Calculate $cdevice as kDevHtml
Calculate $cdevice as $devices.Html
You can also set an item reference to the HTML device:
Set reference myDevice to $devices.Html
The constant kDevHtml is supplied by the HTML component at registration together with some other constants.
Setting the HTML Device Parameters
The HTML output device has several parameters which affect the overall appearance of the HTML document generated by the device. You can change some of these parameters in the Report Destination dialog and the notation, while some can be manipulated by the notation only. The HTML output uses UTF-8: if you use a template file, that must also be UTF-8 encoded.
The HTML device parameters are represented by constants which you can use in the notation. Some of them correspond to parameters in the Report Destination dialog.
| kDevHtmlFileName |
the pathname of the destination HTML file |
| kDevHtmlFont1 |
largest point size which maps to HTML font size 1 |
| kDevHtmlFont2 |
largest point size which maps to HTML font size 2 |
| kDevHtmlFont3 |
largest point size which maps to HTML font size 3 |
| kDevHtmlFont4 |
largest point size which maps to HTML font size 4 |
| kDevHtmlFont5 |
largest point size which maps to HTML font size 5 |
| kDevHtmlFont6 |
largest point size which maps to HTML font size 6 |
| kDevHtmlFont7 |
largest point size which maps to HTML font size 7 |
| kDevHtmlImageBorder |
whether JPEG images have a single pixel border |
| kDevHtmlUseRects |
whether background rectangles are to be used to determine the background color of the HTML table cell which intersects the background rectangle |
| kDevHtmlBackcolor |
background color of the HTML document |
| kDevHtmlTextcolor |
default text color; any black text received from the print manager will be changed to this color |
| kDevHtmlLinkcolor |
color for HTML text or pictures which are HTML links |
| kDevHtmlVLinkColor |
color for links which have been visited |
| kDevHtmlALinkColor |
color for links which are currently active |
| kDevHtmlTemplate |
full path and file name of a template HTML file which must be UTF-8 encoded; it must already contain the basic framework for an HTML file, that is
<html><head>
<meta http-equiv="content-type" content="text/html; charset=UTF-8"></head>
<BODY bgcolor= …etc…>
</BODY>
</HTML> |
| kDevHtmlTemplateChars |
the place holder contained within the template file which marks the point at which the report output will be inserted into the template, that is, “$$$$” the template file must contain this text, that is
<html><head>
<meta http-equiv="content-type" content="text/html; charset=UTF-8"></head>
<BODY bgcolor= …etc…>
<p>$$$$</p>
</BODY>
</HTML> |
| kDevHtmlScaleFont… |
an additional single font scale factor; the following constants are available
kDevHtmScaleFontNone: no scaling
kDevHtmScaleFontVSmall: reduce HTML size by 2
kDevHtmScaleFontSmall: reduce HTML size by 1
kDevHtmScaleFontLarge: increase HTML size by 1
kDevHtmScaleFontVLarge: increase HTML size by 2 |
You can get and set the value of the device parameters using the following methods.
$getparam(param constant)
returns the value of the specified parameter
$setparam(param constant, value [,param constant, value, …] )
sets the value(s) of the specified parameter(s)
For example
Do $devices.Html.$setparam(KDevHtmlFont1,6,KDevHtmlFont2,8)

Do $devices.Html.$getparam(kDevHtmlFileName) Returns MyPath
The following example, sets up a template file (which must be UTF-8 encoded):
Calculate lPath as 'C:\<path>\Template.htm'
Do $devices.HTML.$setparam(kDevHtmlTemplate,lPath)
Do $devices.HTML.$setparam(kDevHtmlTemplateChars,'$$$$')
The value of all device parameters is stored in the Omnis configuration file.
Sending Text or Data
It is possible to send text or data to some internal and external devices. The HTML device supports both. You can use the methods $sendtext() and $senddata() to send text and data, respectively.
When sending text, the HTML output device surrounds the given text with the correct HTML syntax, that is, it places begin paragraph and end paragraph statements around the text. You can send text with more than one call to $sendtext(), but still have the text appear in one paragraph. To do this, specify kFalse for the line feed parameter of the $sendtext() method. The device buffers the text separately, before adding a single paragraph to the document when you call $sendtext() with the line feed parameter set to kTrue.
When sending data, the device writes the data directly to the current position in the HTML file without any modification.
You can send text or data between reports, but not during printing, that is, while a report is being printed calls to $sendtext() and $senddata() are ignored.
The following method uses $senddata() to send data to an HTML file.
Set reference myDevice to $devices.Html
Calculate $cdevice as myDevice
Do myDevice.$setparam(kDevHtmlFileName,"C:\Omnis\REPORT.HTM")
Do myDevice.$open() Returns ok
If ok
  Do myDevice.$senddata(myData1)
  Set report name Report1
  Print report
  Do myDevice.$senddata(myData2)
  Set report name Report2
  Print report
  Do myDevice.$senddata(myData3)
  Do myDevice.$close()
End If
HTML Report Objects
HTML report objects are special objects that you can use to insert objects, such as other HTML documents, pictures, DLLs, or web site addresses, into your HTML reports. The HTML report objects are part of the HTML printing device and appear in the Media group in the Component Store when editing a report class.
The HTML report objects have an $address property which you can set to the address or location of an HTML document, picture, DLL, or web site, for example, “results/result1.htm” or “http://www.omnis.net/”. The text can contain square bracket calculations, such as “www.[lvWebName]”.
If the HTML objects are printed to any other device other than the HTML device, they behave like their equivalent Omnis field types, a standard picture or text field.
The omnisPreviewURLPrefix item in the ‘defaults’ section of config.json allows you to set the report preview URL prefix for the $address property for HTML Link objects. The item defaults to ‘omnis:‘ if empty.