Omnis Technical Note TNMC0002Updated August 2011
Building an iOS Application
By Jason Gissing
For Omnis Studio 5.1 and later.
Due to its publication date, this technote contains information which may no longer be accurate or applicable on one or more of the platforms it refers to. Please refer to the index page which may contain updated information.
Omnis Studio 5.1 introduced the ability to create Omnis apps for Apple's iOS running on the iPhone, iPad and iPod touch. In order to create a simulator app or an app for distribution, you need to sign up to the Apple iOS Developer Program to obtain the necessary files from Apple and to build your Omnis iOS app. To distribute your iOS app, within your organization or at a client site, you need to use one of the approved Distribution methods which usually allow you to deploy your iOS app to a specified number of devices.
This tech note summarizes how you sign up to the iOS Developer Program and outlines the steps you need to follow to create your Omnis iOS app for distribution, including information about the iOS certificates/provisioning profiles. Further details about the iOS Developer Program are available from Apple at: developer.apple.com. Click here for further details about the Omnis iOS client and Studio 5.1.
Signing up
Apple gives you 3 options when signing up for their iOS Developer Program:
| Free - This will allow you to download the iOS SDK, and test your applications on the simulator, but you can not distribute your app to a real device. | |
| Standard ($99 per year) - This allows you to submit your app to the AppStore, and also allows you to create and distribute Ad-Hoc apps to run on up to 100 specified devices, which you install to your device locally, through iTunes. | |
| Enterprise ($299 per year) - This option is for larger corporations only. Your company must have a Dun & Bradstreet Number (DUNS). This does not allow the distribution of Apps through the AppStore, but allows the creation of device-specific Ad-Hoc distributions, and also the ability to distribute in-house. |
You are also given the choice of signing up as a Company, or as an Individual. Signing up as a Company gives you the ability to add team members, whereas signing up as an Individual does not.
Certificates
| Log in to your account on the iOS Provisioning Portal, at: developer.apple.com/ios/manage/overview. | |
| Open the Certificates section, and then the Distribution tab: |
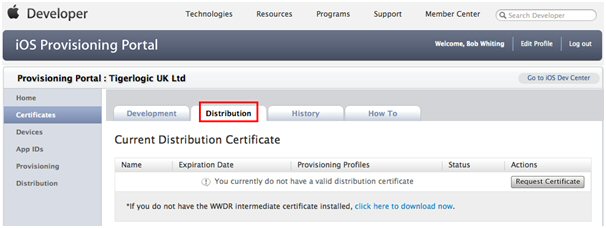
| Click the link to download the WWDR Intermediate certificate . Once it has downloaded, import it into your keychain (double-clicking in the Finder should do this). | |
| Push the Request Certificate button, and follow the instructions on the next screen to request a certificate. | |
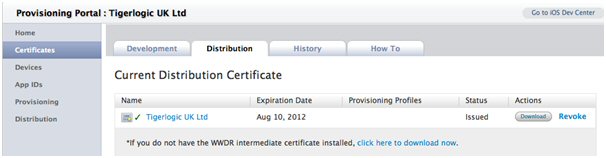
| Once your certificate has been issued (this usually only takes a few seconds), return to the screen above and download it. Add this to your keychain by double-clicking in the finder. |
If you need to move your development to another machine, you will need to take this certificate and key with you. If you open the Keychain Access app from your Utilities , this provides the means to export your certificate and key, which can then be imported to the new machine's keychain. |
Devices
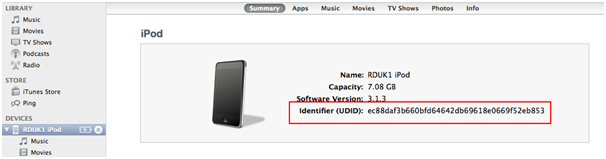
| Open the Devices section in the sidebar of the Provisioning Portal and add the devices you want to be able use your app. | |
| Devices are registered using their UDID - you can find a device's UDID by plugging it into iTunes. In your device's Summary tab in iTunes, click on its Serial Number - this will change to show the UDID: |
You can always add new devices at a later time, but after doing so you will need to add them to your provisioning profile, and re-build your app using the new provisioning profile. |
App Ids
| Open the App Ids section from the portal's sidebar, and push the New App ID button. | |
| Enter a name for your Identifier into the Description field. | |
| Enter '*'(without the quotes) into the Bundle Identifier (App ID Suffix) field. |
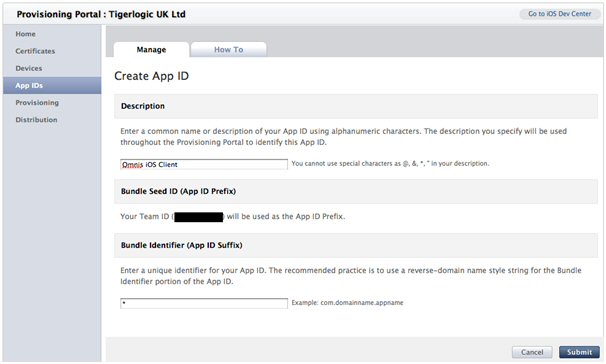
| Press the Submit button. |
Provisioning:
| Open the Provisioning section from the portal's sidebar,
open the Distribution tab, and select New Profile. |
|
| Select Ad Hoc as the distribution method. | |
| Enter a name for your profile. | |
| Select your App ID from the droplist. | |
| Select all the devices you wish to be able to install your app. |
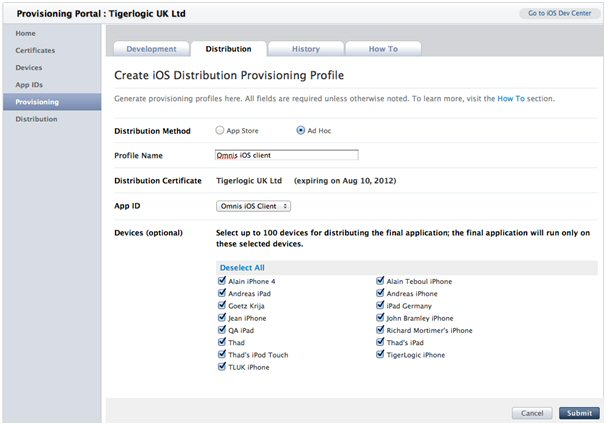
| Press the submit button when you are finished. | |
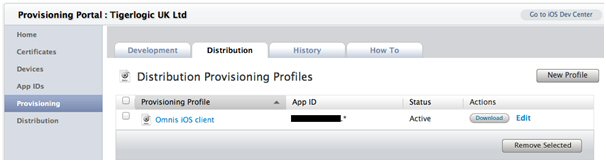
| Once the profile has been issued (usually only a few of seconds), download the profile from the Provisioning > Distribution area (to which you added the profile). You can now log out of the Provisioning Portal. |
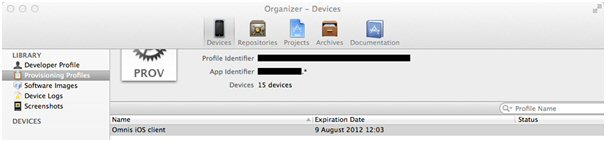
| Open xCode, and open the Organizer from the Window menu. Select Devices from the top of the Organizer window, and Provisioning Profiles from the sidebar. Drag your provisioning profile from the Finder into here to install it into xCode. |
Building:
| Download the latest appropriate iOS client project from the Omnis website: www.omnis.net/download/iosclient.jsp | |
| Open the clientios project in xCode - everything should now be in place for you to be able to build the project 'out of the box' (As long as you are using xCode 4.x, and v2.0a or later of the client project). | |
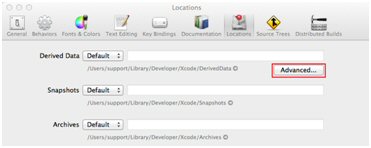
| Open Preferences from the main XCode menu, and open the
Locations tab. Click the Advanced button under Derived Data, and in the window that appears, set the Build Location to “Location Specified by Targets”. Otherwise, xCode will build the apps out to a folder in the depths of the Operating System. |
| Then close the preferences. | |
| Select your target from the droplist at the top of xCode, and build (Cmd-B). |
![]()
| Take the app you created from the build/Distribution-<target> folder of your clientbuild tree and distribute it to your users. To install your app they need to drag the app onto their device using iTunes. | |
For details on customising your app and refining it for distribution, please refer to tech note TNMC001. |
|
Troubleshooting:
| The project should automatically detect your provisioning profile, but if for any reason it doesn't you will get code signing errors when building device builds. If you encounter such an issue, try the following: | |
| Open the build settings for the problem target (see image below), and check that Code Signing Identity is set to your Distribution profile. |
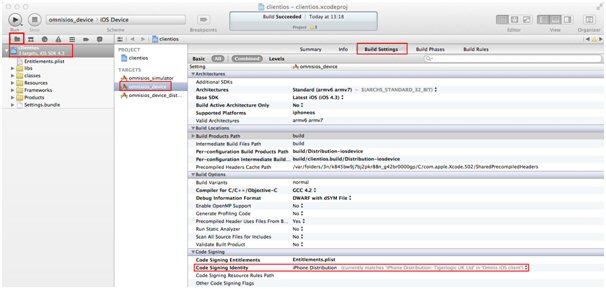
| After changing this you may need to Clean (Cmd-Shift-K) before rebuilding. | |
| If you get an error whilst installing the app onto a real device, it is likely that for some reason the device is not included in the provisioning profile which was used to sign the app. | |
If you update the provisioning profile, it is advisable to delete the old one in the Organizer before importing the new one. |
|
| An unusual issue which has been known to occur is in the Apple WWDR certificate becoming invalid. This results in a code signing error when you try to build a device app: “CSSMERR_TP_NOT_TRUSTED” | |
| If you encounter this, a solution is to open your Keychain Access app on your Mac, and locate the “Apple Worldwide Developer Relations Certificate Authority” certificate in both the login and System keychains. For normal code-signing operation, the certificate should display a green tick as shown below: |
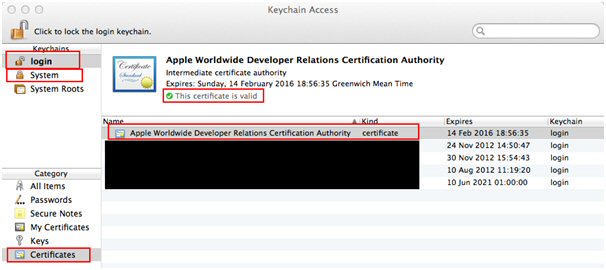
| If it does not, delete this certificate (from both login and system
areas), then re-download it from your Apple Developer Portal. Once
it has been downloaded, you should be able to import it back into
your keychain by simple double-clicking it in the Finder. At this point the certificate should be valid (green tick), and is only required in the login keychain. If you now Clean and build your project, the issue should be resolved. |
 Facebook
 Github
 Instagram
 Linkedin
 Twitter
 Youtube
 Please logon or create a free account to download this file.
