Omnis Technical Note TNJS0002Apr 2012
Building & Customizing the iOS JavaScript Wrapper app
NOTE: this Tech note is for Omnis Studio 5.2 only.
For Omnis Studio 6/8/10.x mobile apps, see the 'JavaScript Wrappers' docs
by Jason Gissing
In addition to using the new JavaScript Client in the browser on any computer, tablet or mobile device, you can create standalone apps for iOS and Android based devices that have your JavaScript remote form embedded. To do this, there are two custom apps or "wrappers" for the JavaScript Client, one for iOS, the other for Android. The custom apps create a thin layer around a simple Web Viewer which can load your JavaScript remote form.
This document describes the steps required in order to create your own customized iOS wrapper app for the JavaScript client. It should provide you with all of the information you need to create your own, branded iOS app ready for the iTunes AppStore.
Prerequisites
Note: If you are using Studio 5.2, the included iOS
wrapper app project is not compatible with this tech note.
Please download an updated project here: OmnisJS.zip
If you are using a later version of Studio, please use the newer iOS wrapper
app project in your installation's ./client/jsclient/wrappers/iOS
folder (Note that this may be in the writable area of your installation).
If you have not already got an iOS distribution provisioning profile and associated certificates installed on your machine, please refer to tech note TNMC0002 and follow through until the Building section. This will ensure you have all of the necessary certificates etc set up ready to build and sign the app.
If you are going to be distributing to the App Store, make sure you create an App Store provisioning profile as well as an Ad Hoc one (you should use the Ad-Hoc profile for initial testing of your app on your defined devices, before submitting to the App Store)
- Make sure you have xCode installed on your Mac. The project was originally configured to work with xCode 4.2. Future releases of the project will aim to be compatible with the latest version of xCode at their release.
- Take a copy of the Wrapper App project from your Studio installation.
By default this will be located in your Users folder such as:
/Users/<username>/Library/Application Support/Omnis Studio 5.x/client/jsclient/wrappers/iOS/OmnisJS_iOS.zip
Extract this somewhere and open the contained project in xCode. - Begin by building the default project, to ensure initially that the environment is set up properly. To do this, press Cmd-B. If the build encounters any errors, you should address these before proceeding further.
Renaming the Project
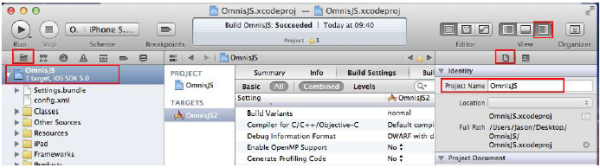
You will need to change the project name, to better reflect your app. To do this, you need to:
- Select the project in the Project Navigator (Folder icon in the top-left of the xCode Window).
- In the Utilities sidebar, ensure that the File Inspector tab is selected.
- The first entry in the right hand sidebar should be Project Name. Change this to your new project name. When prompted to rename project content items, select Rename.
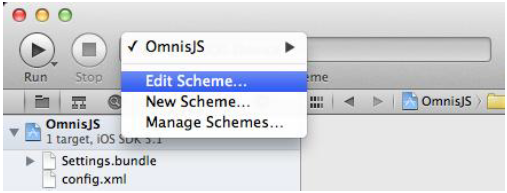
- Open the schema droplist at the top of the xCode window (click its left-hand side), and select Edit Scheme.
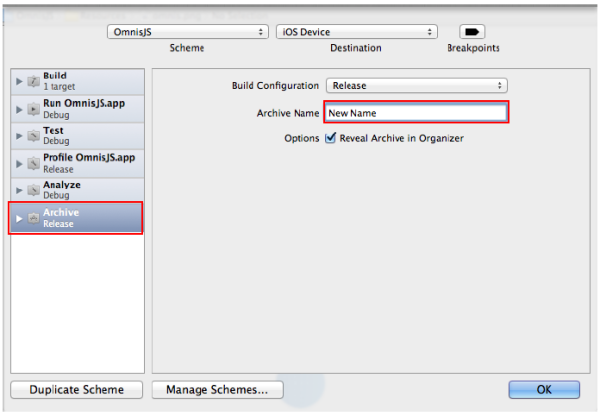
- In the window that opens, select Archive from the sidebar, and enter a name into the Archive Name field. This allows you to change the name used when archiving the build before distributing.
Changing the identifier
The first, and most important, part of customizing your app is to change its identifier. This will distinguish your app from all of the other apps installed on the device.
- Select the Project Navigator, then select the OmnisJS project in the sidebar.
- In the main window which opens, select the OmnisJS Target, and open its Summary tab, then locate the Identifier at the top of this page.
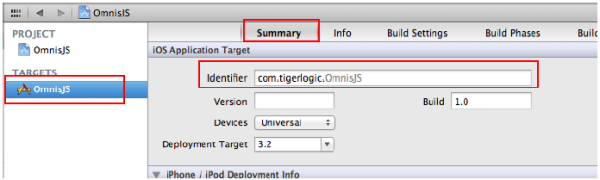
- Change this identifier to your own. Convention is to use a reverse
domain name format.
Note that this identifier must conform to the pattern specified by the AppID you created when creating your provisioning profile.
You may notice that the last part of this identifier is grayed out – this is being automatically populated from the Product Name, which will be considered below. So for now, change only the initial portion of this identifier.
Changing the App Name
In order to change the name of your app, you must now open the OmnisJS target's Build Settings tab.
- In the list of build settings, you need to find the Product Name property. You may like to use the Search field to help locate this.

- Enter the new name for your app here.
- This will now update the final part of the identifier.
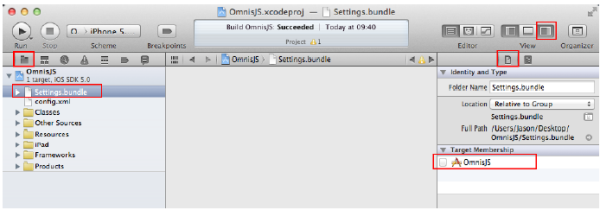
Removing the Configurable Settings
When you deploy your app, you probably won't want to enable the user
to alter the connection settings.
In order to remove the Settings entry for the app:
- Select the Project Navigator, and click on the Settings.bundle in the tree list.
- Provided you have the Utilities sidebar showing on the right of the xCode window, and the File Inspector tab selected, you should be able to see the Target Membership section. Uncheck the checkbox next to the project name (OmnisJS by default).
Hard-Coding the Connection Settings
Now that the user is no longer able to edit the connection settings, you must provide them pre-set inside the application.
- In the Project Navigator, select the config.xml file from the root.
- Edit this file, changing the connection string to point to the HTML
file on your server containing your Omnis remote form.
Tip: Make sure this html page and your remote form are set up properly for your application, by entering the URL to it into Safari on your iOS device. If the form runs correctly there, it should run correctly in your app.
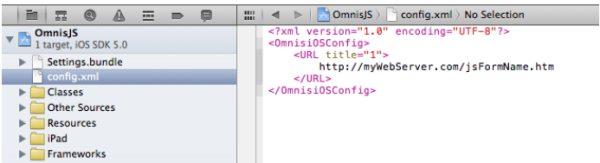
- If you want your app to be shown in full-screen, without the iOS toolbar, change the title attribute of the URL element from 1 to 0.
Changing the Icons
The app should be built with many different icon sizes, to accommodate the different iOS devices. For an understanding of these icons, please refer to Apple's documentation on the subject.
You should add your icons to the Resources folder of the project, making sure to remove the default Omnis icons first. In order to add a new icon, just drag it from the Finder into the Resources folder in the Project Navigator.
You should also conform to the naming conventions below, in order to
support older versions of iOS.
At the time of writing, the required icon sizes are:
| App Icons: | ||
| 57 x 57 | Icon.png | iPhone |
| 72 x 72 | Icon-72.png | iPad |
| 114 x 114 | Icon@2x.png | iPhone Retina Display |
| 144 x 144 | Icon-72@2x.png | iPad Retina Display |
| Search Results Icons: (optional, but you should include these) | ||
| 29 x 29 | Icon-Small.png | iPhone |
| 50 x 50 | Icon-Small-50.png | iPad |
| 58 x 58 | Icon-Small@2x.png | iPhone Retina Display |
| 100 x 100 | Icon-Small-50@2x.png | iPad Retina Display |
| Launch Images: | ||
| 320 x 480 | Default.png | iPhone |
| 640 x 960 | Default@2x.png | iPhone Retina Display |
| 768 x 1004 | Default-Portrait.png | iPad Portrait |
| 1024 x 748 | Default-Landscape.png | iPad Landscape |
| 1536 x 2008 | Default-Portrait@2x.png | iPad Retina Portrait |
| 2048 x 1496 | Default-Landscape@2x.png | iPad retina Landscape |
| App Store Icons: | ||
| 512 x 512 | iTunesArtwork (no extension) | iPhone App Store/iTunes icon |
| 1024 x 1024 | iTunesArtwork@2x.png | iPad App Store/iTunes icon |
Building an Archive
Now you are ready to build an archive. This is the step prior to distributing your app.
- From the schema droplist at the top of the xCode window, select the iOS Device target.
- Perform a clean (Cmd-Shift-K).
- Open the Product menu from the xCode menubar and select Archive.
- This should build an archive of your app, while opening the Organizer to display it. If not, you can open the Organizer window yourself by pressing Cmd-Shift-2.
Distributing Your App
Ad-Hoc Distribution
If you are distributing your app using an Ad Hoc provisioning profile
(for individually identified devices), you need to:
- Open the Organizer window and locate the Archive that you want to distribute.
- Select the archive, and push the Distribute button. This will open a wizard, which you should follow through, selecting "Save for Ad-Hoc Deployment".
- When asked for your Code Signing Identity, make sure you select your Distribution Ad-hoc provisioning profile.
- This will save the app as an .ipa file, which you can distribute to your clients. If you wish to distribute your app wirelessly to your clients, you may like to refer to tech note TNMC003.
App Store Distribution
When you submit an app to the App Store, it is assessed by Apple
to ensure it is suitable. As such, it is not guaranteed that your app
will be accepted. It is important that you read Apple's
guidelines on submitting to the App Store and any terms and conditions
before submitting your app.
- Log in to iTunes Connect in your browser https://itunesconnect.apple.com
- Select Manage your applications, and then Add a new app.
- Complete the form with the relevant information for your app, and follow through to get the app status to the point of "Waiting for upload".
- Now back to xCode, and in the Organizer window, select your Archive, and press the Verify button.
- This will open a wizard to allow you to verify that your app meets the minimum required criteria. Follow this through and ensure that this completes successfully.
- Return to the Organizer window and this time press the Distribute button. This will open a wizard which will allow you to submit your app for review.
- The review process may take upwards of a week, so be prepared to wait to hear the outcome of Apple's review.
Details on creating an Android app can be found in tech note TNJS0001.

 Facebook
 Github
 Instagram
 Linkedin
 Twitter
 Youtube
 Please logon or create a free account to download this file.
