Omnis Software Ltd
September 2019
Instructions for setting-up the Omnis App Framework on Android devices.
The Omnis Interface uses the AndroidX support library. At time of publication, this is a relatively new replacement to the previous Support Library used by Android apps, so you may need to migrate existing code to AndroidX.
If you are creating a new project, there is currently a checkbox shown in the New Project wizard - "Use androidx.* artifacts" - make sure to enable this.
Download and unzip the omnisInterface library.
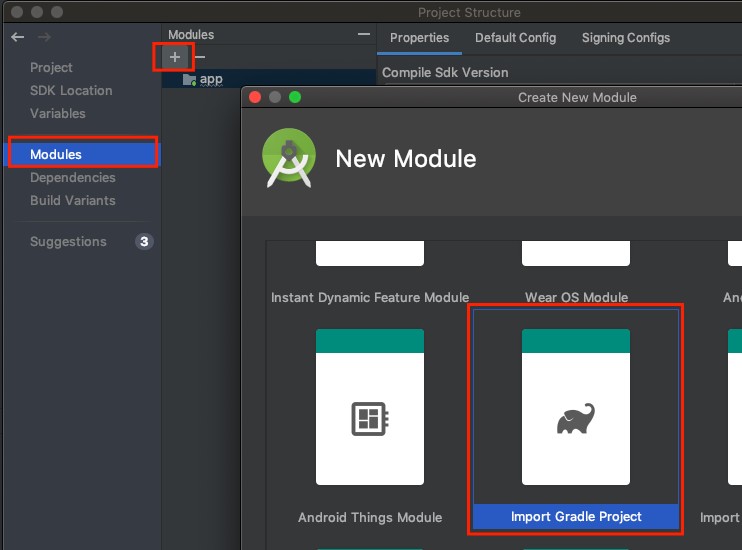
From your Android Studio project, right-click your app module, and select Open Module settings from the context menu.
Add a new module, and select Import Gradle Project from the wizard which opens, then select the expanded omnisInterface folder.
Because the omnisInterface library is installed locally, rather than fetched from a repository by Gradle, you will need to include its dependencies when you build.
// Dependencies required by OmnisInterface (as we're not pulling it in from a repository):

implementation omnisInterfaceImplementationDependencies.values()

implementation omnisInterfaceAPIDependencies.values()
And add the following to the top of that file:
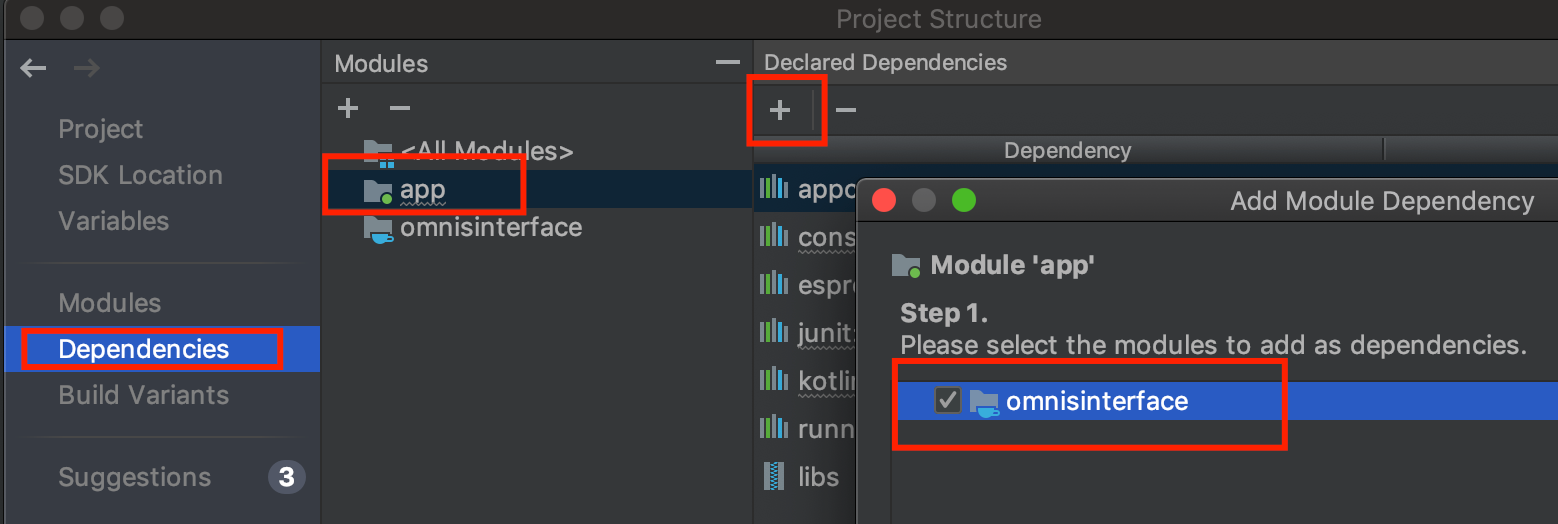
apply from: "../omnisInterface/omnisinterface_dependencies.gradle"Add the omnisInterface module as a module dependency of your app (again accessed via the module settings window):

Construct an OmnisInterface instance, passing your OMWebContainer to the constructor.
Example
private lateinit var mOmnisInterface: OmnisInterface

override fun onStart() {

  super.onStart()

  if (!this::mOmnisInterface.isInitialized) {

    val webContainer = findViewById<OMWebContainer>(R.id.omweb_container)

    mOmnisInterface = OmnisInterface(webContainer, this)

  }

}
Instructions for setting-up the Omnis App Framework on iOS devices.
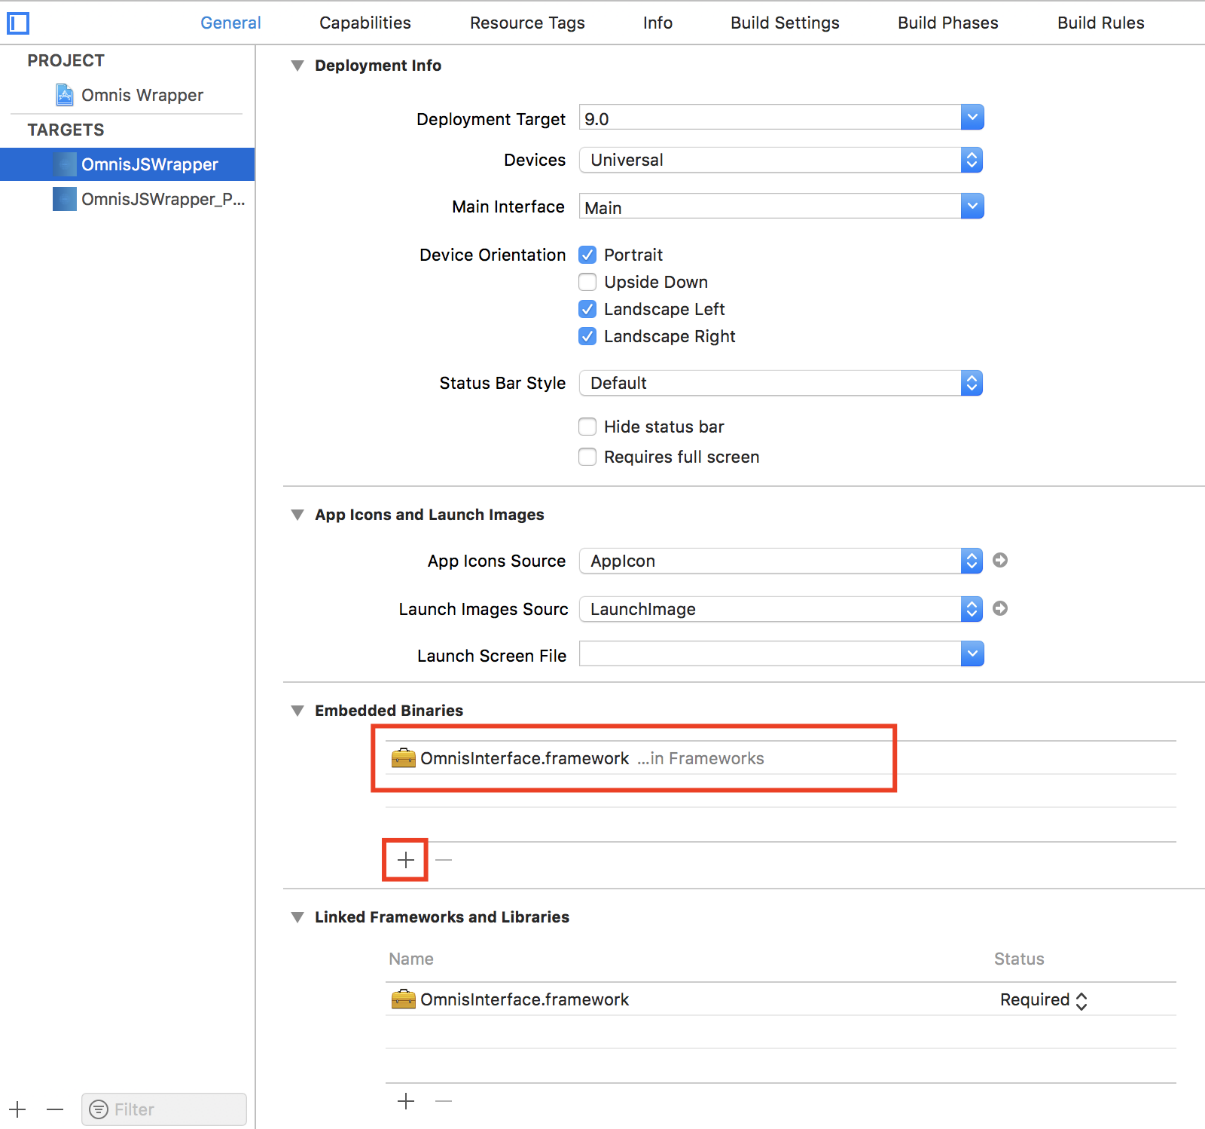
Add the framework to your project’s Embedded Binaries:
Create a UIView, and set its Class to OMWebContainer - this view will become the container which hosts the webview to run your Remote Forms etc.
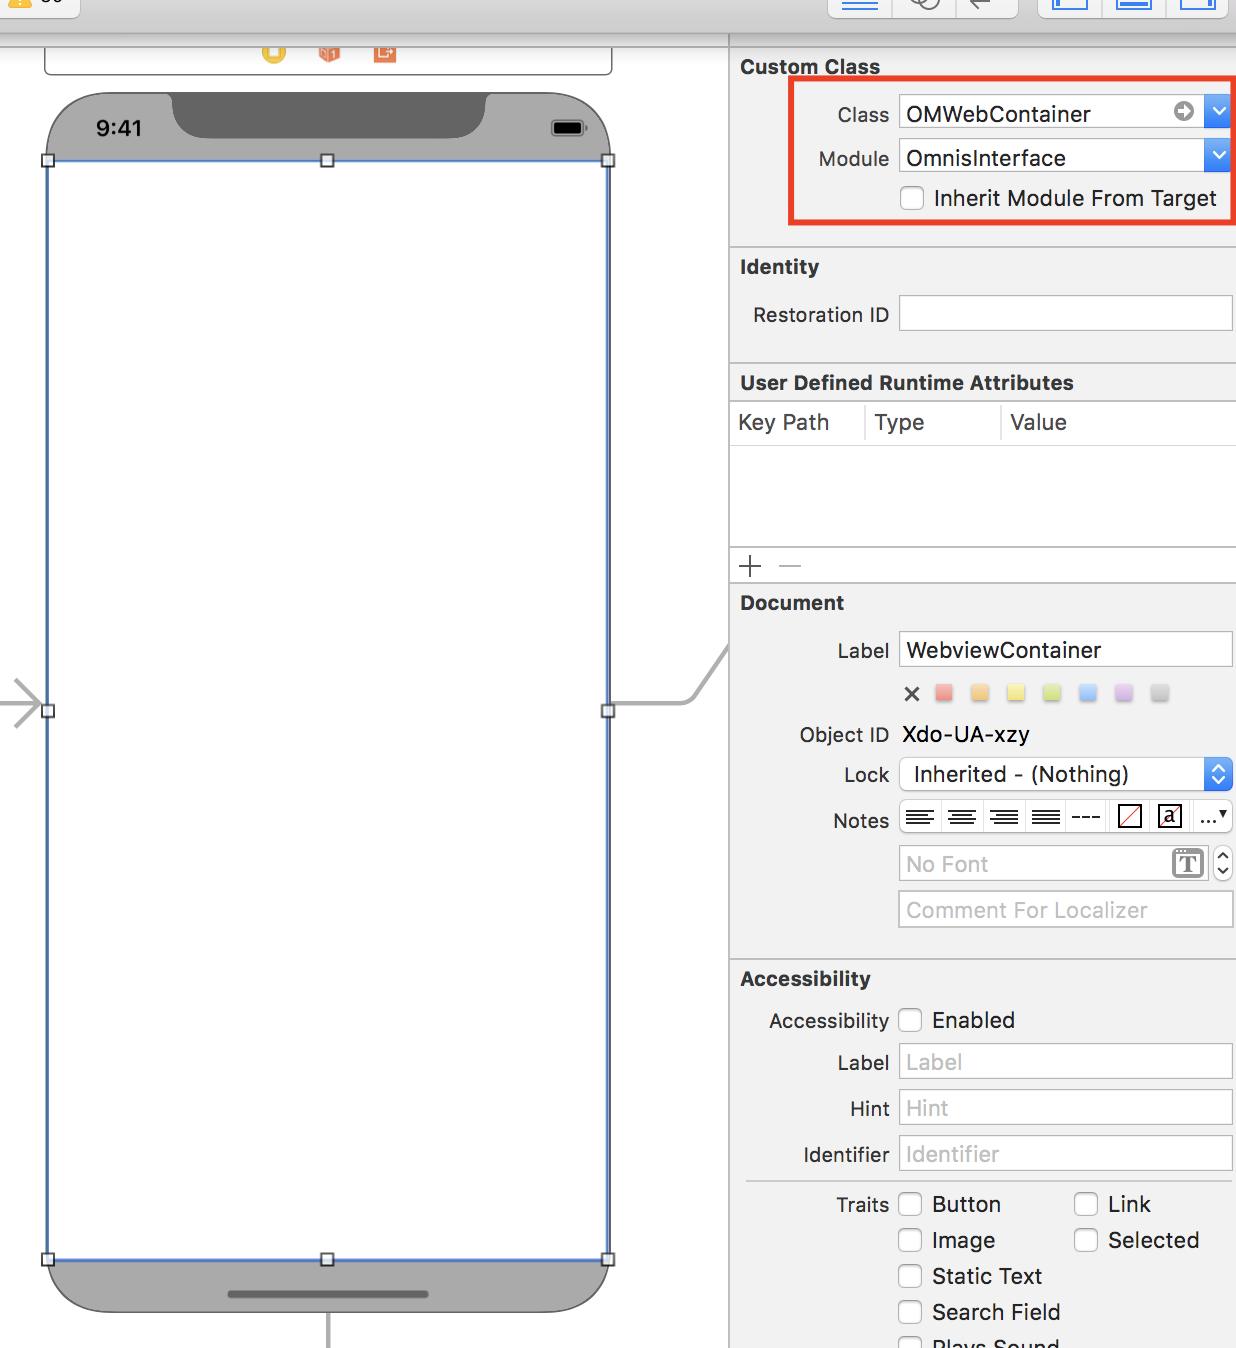
Construct an OmnisInterface instance, passing your OMWebContainer to the constructor.
Example
class ViewController: UIViewController {

  var omnisInterface: OmnisInterface!

@IBOutlet weak var webviewContainer: OMWebContainer!

  ...

  override func viewDidLoad() {

    super.viewDidLoad()

    omnisInterface = OmnisInterface(webviewContainer: webviewContainer, viewController: self)

  }

  ...

}The OmnisInterface Framework is provided as a Fat Universal binary, which contains slices for both device & simulator architectures.
To keep the size of you built app down, and to allow your app to be submitted to the App Store, you should strip unused architectures (i.e. Simulator architectures from device builds).
You can do this by:
In your Project's settings for each target:
Under Build Phases, add a Run Script section after the Embed Frameworks section, with the following content:
# Uncomment below to log output:
#exec > /tmp/${PROJECT_NAME}_striparchs.log 2>&1
APP_PATH="${TARGET_BUILD_DIR}/${WRAPPER_NAME}"
# This script loops through the frameworks embedded in the application and
# removes unused architectures.
# Thanks to: http://ikennd.ac/blog/2015/02/stripping-unwanted-architectures-from-dynamic-libraries-in-xcode/
find "$APP_PATH" -nam '*.framework' -type d | while read -r FRAMEWORK
do
  FRAMEWORK_EXECUTABLE_NAME=$(defaults read "$FRAMEWORK/Info.plist" CFBundleExecutable)
  FRAMEWORK_EXECUTABLE_PATH="$FRAMEWORK/$FRAMEWORK_EXECUTABLE_NAME"
  echo "Executable is $FRAMEWORK_EXECUTABLE_PATH"
  EXTRACTED_ARCHS=()
  for ARCH in $ARCHS
  do
    echo "Extracting $ARCH from $FRAMEWORK_EXECUTABLE_NAME"lipo -extract "$ARCH" "$FRAMEWORK_EXECUTABLE_PATH" -o "$FRAMEWORK_EXECUTABLE_PATH-$ARCH"
    EXTRACTED_ARCHS+=("$FRAMEWORK_EXECUTABLE_PATH-$ARCH")
  done
  echo "Merging extracted architectures: ${ARCHS}"
  lipo -o "$FRAMEWORK_EXECUTABLE_PATH-merged" -create "${EXTRACTED_ARCHS[@]}"
  rm "${EXTRACTED_ARCHS[@]}"
  echo "Replacing original executable with thinned version"
  rm "$FRAMEWORK_EXECUTABLE_PATH"
  mv "$FRAMEWORK_EXECUTABLE_PATH-merged" "$FRAMEWORK_EXECUTABLE_PATH"
doneOnce you have set up your OmnisInterface, you can call methods on it (or the objects it exposes as properties - such as scafHandler) to interact with the JS Client.
To load a form, simply call OmnisInterface's loadURL method, giving it the full URL to your Remote Form's .htm file.
Android Example
val theUrl = URL("https://mysite.com/myForm.htm")

mOmnisInterface.loadURL(theUrl)
iOS Example
let theUrl = URL(string: "https://mysite.com/myForm.htm")

self.omnisInterface.loadURL(url: theUrl!)In order to be notified when a form begins/ends loading etc, you need to assign a class which implements theOMWebNavigationDelegate protocol to your OmnisInterface's webNavigationDelegate property.
The delegate methods will then be called at the appropriate times.
You must initialise your OmnisInterface's scafHandler by calling initScafController, in order to enable support for offline forms.
This sets the ScafHandler up with details of your Omnis server, and offline form details etc.
Once this has been done, and SCAFs have been updated/extracted*, you can load the configured offline form by calling:
self.omnisInterface.scafHandler.loadOfflineForm()* Note that this is an asynchronous process, so you need some way of determining when the offline form is ready:
You need to assign some class, which implements the OMScafHandlerDelegate to the scafHandler's delegate property.
The delegate's onOfflineModeConfigured method will then be called when your offline form is ready (either after startup, once everything is prepared, or after you call updateScafs).
To implement custom messaging between the JS Client and your native app:
For iOS: Assign a class which implements the OMCommsDelegate protocol to the omnisInterface's commsDelegate property.
For Android: Assign a class which implements the OMCommsDelegate interface to the omnisInterface's commsDelegate property.
Call a form's sendWrapperMessage() method from JavaScript running in the JS client.
Pass this function the following parameters:
an ID to identify your message
any data (should be a JSON object)
optionally the name of a form method to call with the results.
Example
JavaScript: __form.sendWrapperMessage("myMessage", {firstName: "Alan", lastName: "Alphabet"}, "$messageReturn"); Your CommsDelegate’s messageFromJSClient method will be called, with the JSON payload you passed in, received as the data parameter.
The data parameter should contain the following members:
ID: The ID you sent for your message.
Data: A JSON dictionary containing the data you sent.
retID: (Optional) JavaScript function code text, to be executed to pass the results back to the JS client.
Return true if default handling should occur, else return false if you’ve handled the message.
Call omnisInterface's callJS method to execute whatever JS you wish.
Or, in order to call a callback function passed to the wrapper from sendWrapperMessage above, you can use your OmnisInterface's callJSFunctionText method, passing it the value given in messageFromJSClient's retID member as the functionText argument.
iOS Example
extension MainViewController: OMCommsDelegate

{

  func messageFromJSClient(data: [String : AnyObject]?) -> Bool! {

  if let id = data?["ID"] as? String

  {

   switch id

      {

        case "myMessage":

        let firstName = data?["Data"]?["firstName"] as? String ?? ""

        let lastName = data?["Data"]?["lastName"] as? String ?? ""

        // TODO: Something with the data

        // Call back to an Omnis method, if one was provided:

        if let returnFunc = data?["retID"] as? String

        {

          omnisInterface.callJSFunctionText(returnFunc, params: [

            "'\(id)'", // Will be first param passed to method

            "'\(firstName)'", // Will be 2nd param passed to method

            "'\(lastName)'" // Will be 3rd param passed to method

            ], completionHandler: nil)

        }

        break;

        default:

          return false; // Let default handling occur for messages we're not explicitly handling.

      }

    }

    print("No ID provided!")

    return false // Let default handling occur

  }

}
Android Example
override fun messageFromJSClient(data: JSONObject, omnisInterface: OmnisInterface): Boolean {

    val id = data["ID"]

    when (id) {


      "myMessage" -> {

        val dataObj = data["Data"] as JSONObject

        val firstName = dataObj["firstName"] as? String ?: ""

        val lastName = dataObj["firstName"] as? String ?: ""


        // TODO: Something with the data

        // Call back to an Omnis method, if one was provided:

        val returnFunc = data["retID"] as? String

        if (returnFunc != null)

        {

         omnisInterface.callJSFunctionText(returnFunc, arrayOf(

            "\'${id}\'",

            "\'${firstName}\'",

            "\'${lastName}\'"

          ))

        }


        return true // We handled the message - prevent default handling

      }


    }


    return false // Let default handling occur

  }
If you followed the examples above, after sending the message to the wrapper, the form's $messageReturn method will be called, with the following parameters:
p1: "myMessage" (The message ID)
p2: "Alan"
p3: "Alphabet"
In order for the photo functionality to work with your app, you must create a File Provider, which allows sharing of files within your app's internal storage area (So the Camera app can save files there).
1) Create a resource file to define the File Provider:
Create an xml resource with content to provision a folder within the "files-path" area as shareable.
Example - fileprovider.xml
<?xml version="1.0" encoding="utf-8"?>

<paths>

  <files-path name="photos" path="photos" />

</paths>
By default, it should have a path named "photos".
2) Include the File Provider in your Manifest
Edit your AndroidManifest.xml file, and add the File Provider to the Application section:
Example
<provider

  android:name="android.support.v4.content.FileProvider"

  android:authorities="net.omnis.fileprovider"

  android:exported="false"

  android:grantUriPermissions="true">

  <meta-data

    android:name="android.support.FILE_PROVIDER_PATHS"

    android:resource="@xml/fileprovider" />

</provider>
Set the android:authorities attribute to your own domain identifier.
3) Override File Provider defaults if necessary
The OMImages class has the following public static members, which should be overridden with your own values if they differ from the defaults:
FILE_PROVIDER_AUTHORITY: Should match your android:authorities above (default = "net.omnis.fileprovider").
FILE_PROVIDER_PATH: Should be the path specified for your files-path entry in fileprovider.xml (default= "photos").
Barcode functionality on Android makes use of Google's ML Kit framework, and as such requires a Firebase project.
You need to create a project in Firebase, then download the Google-Services.json file for your project, and add to the root of your App module in your Android Studio project.